|
|
|
|
| home railway pages signal box diagrams Woodhead route (Wath - Dunford) Woodhead route (Rotherwood - Penistone) Woodhead route (Woodhead - Manchester) Woodhead route (electrical diagrams) about the diagrams |
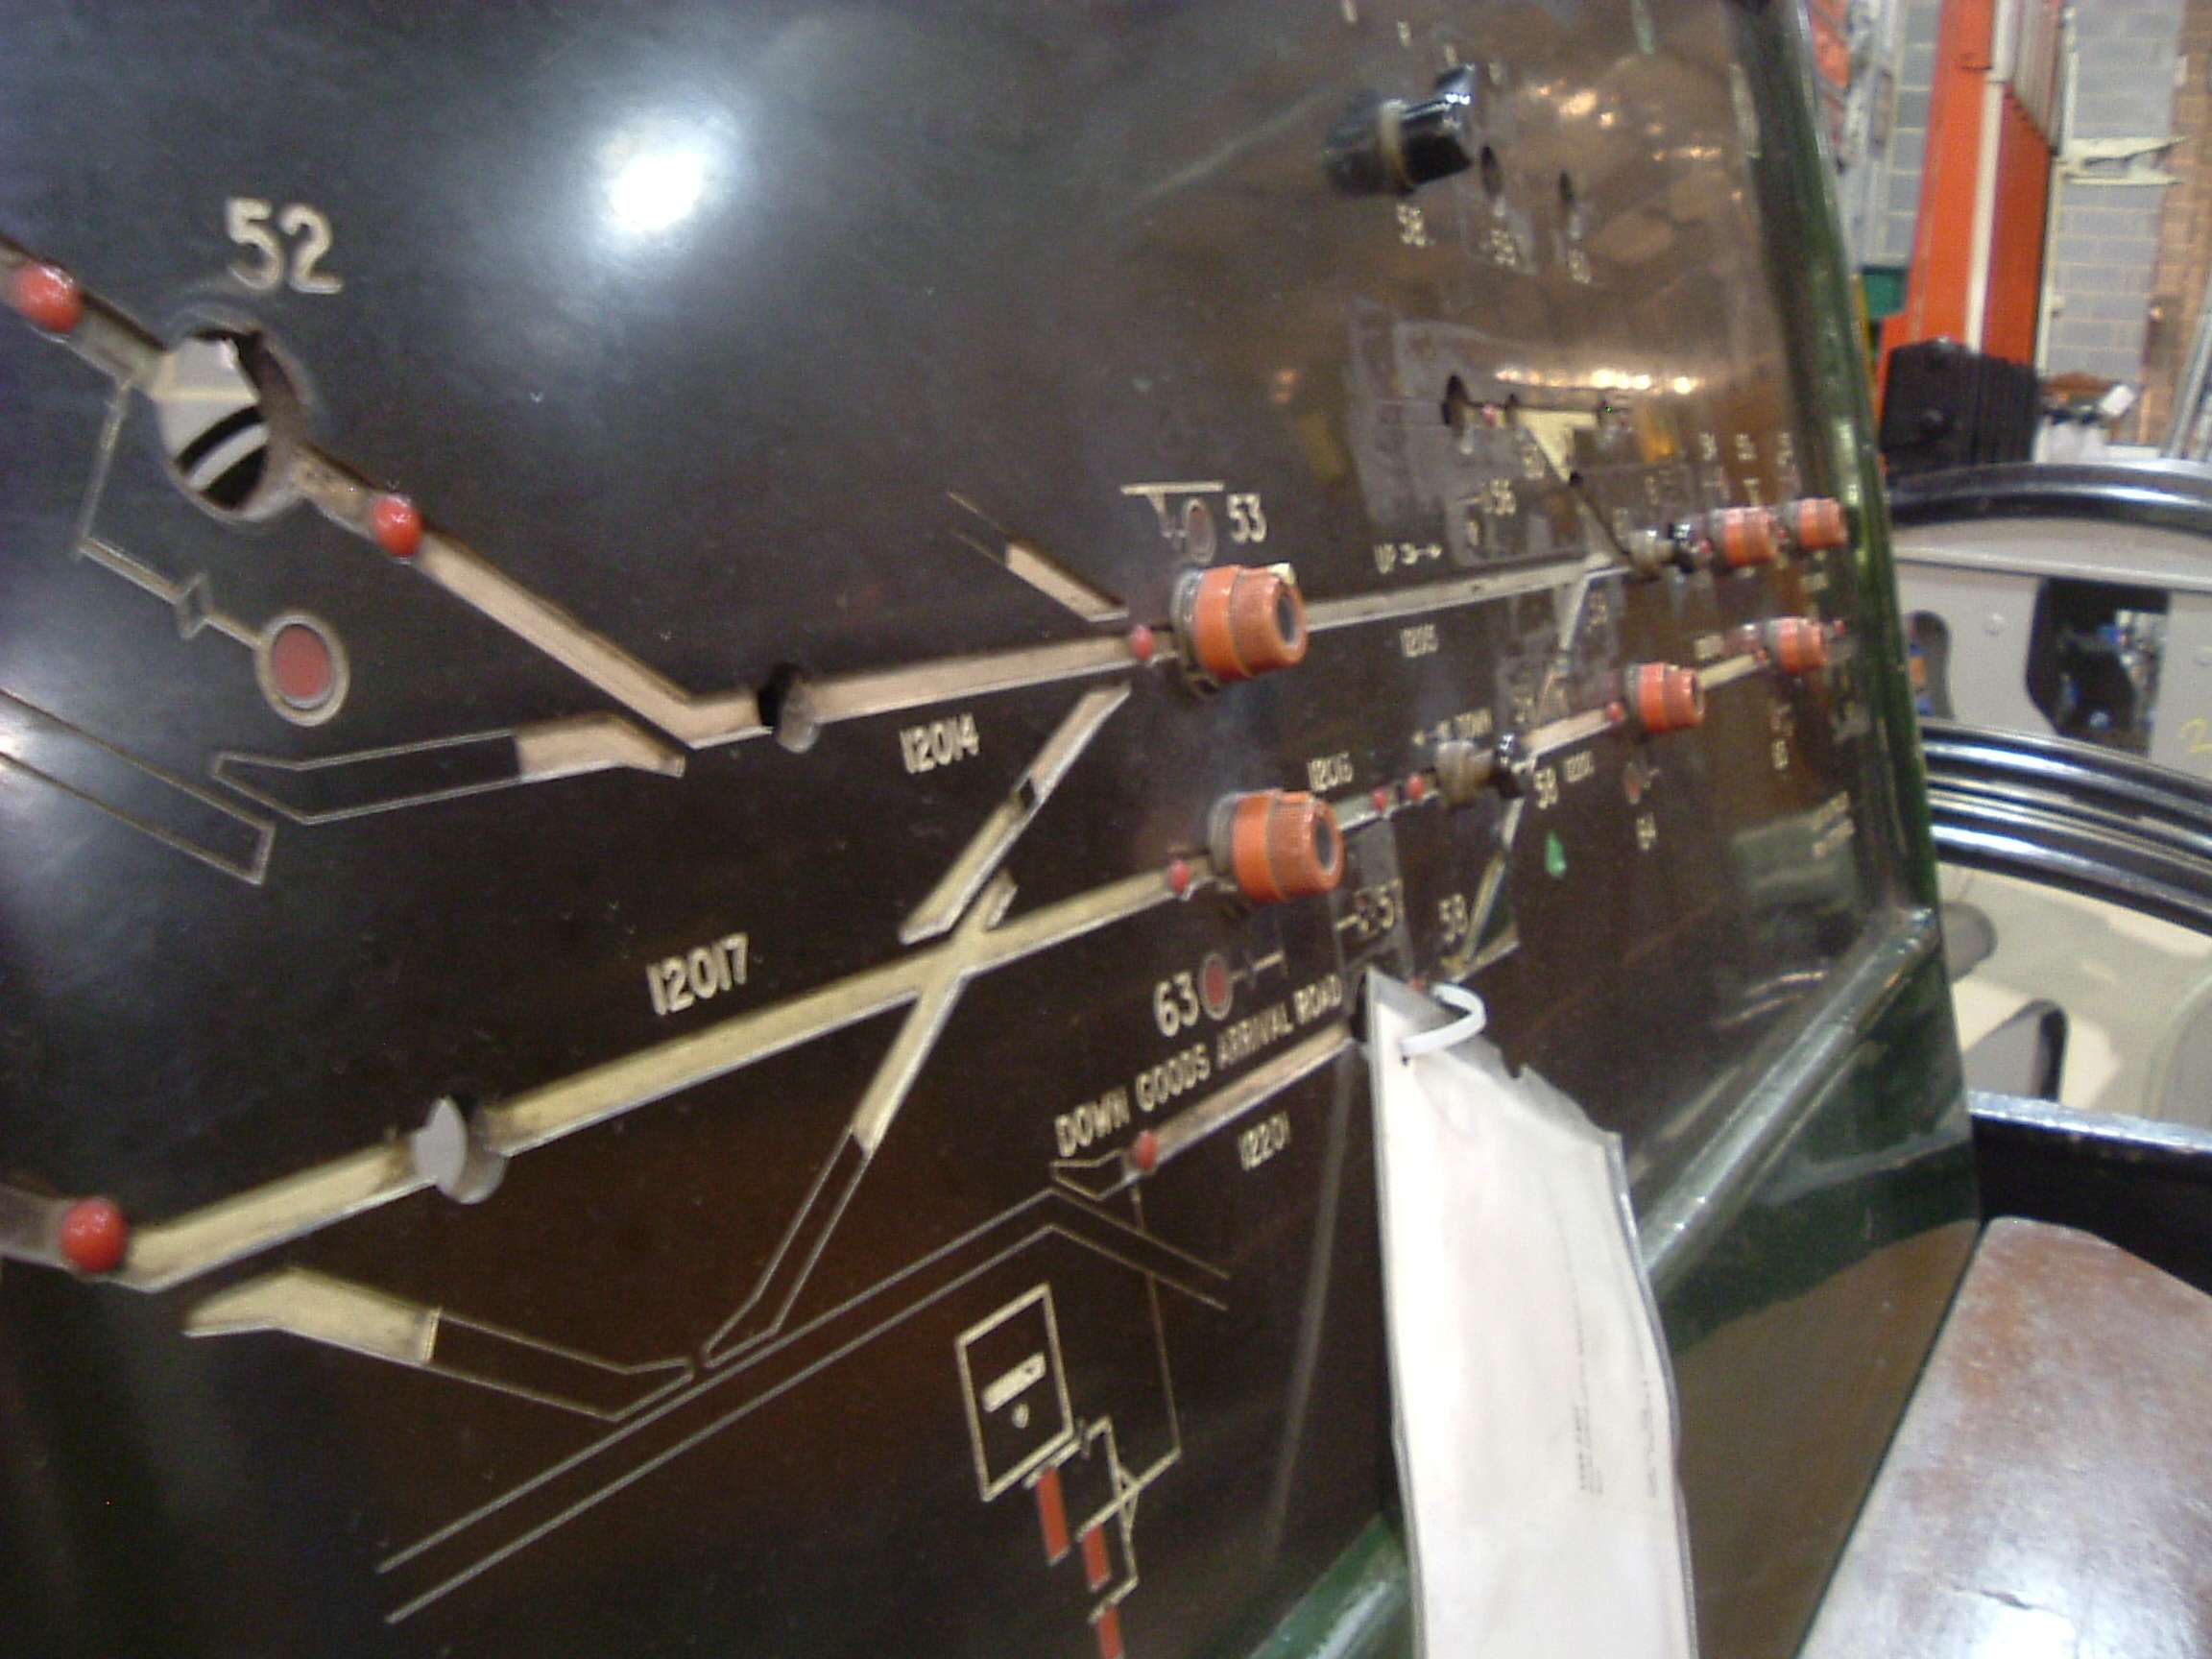
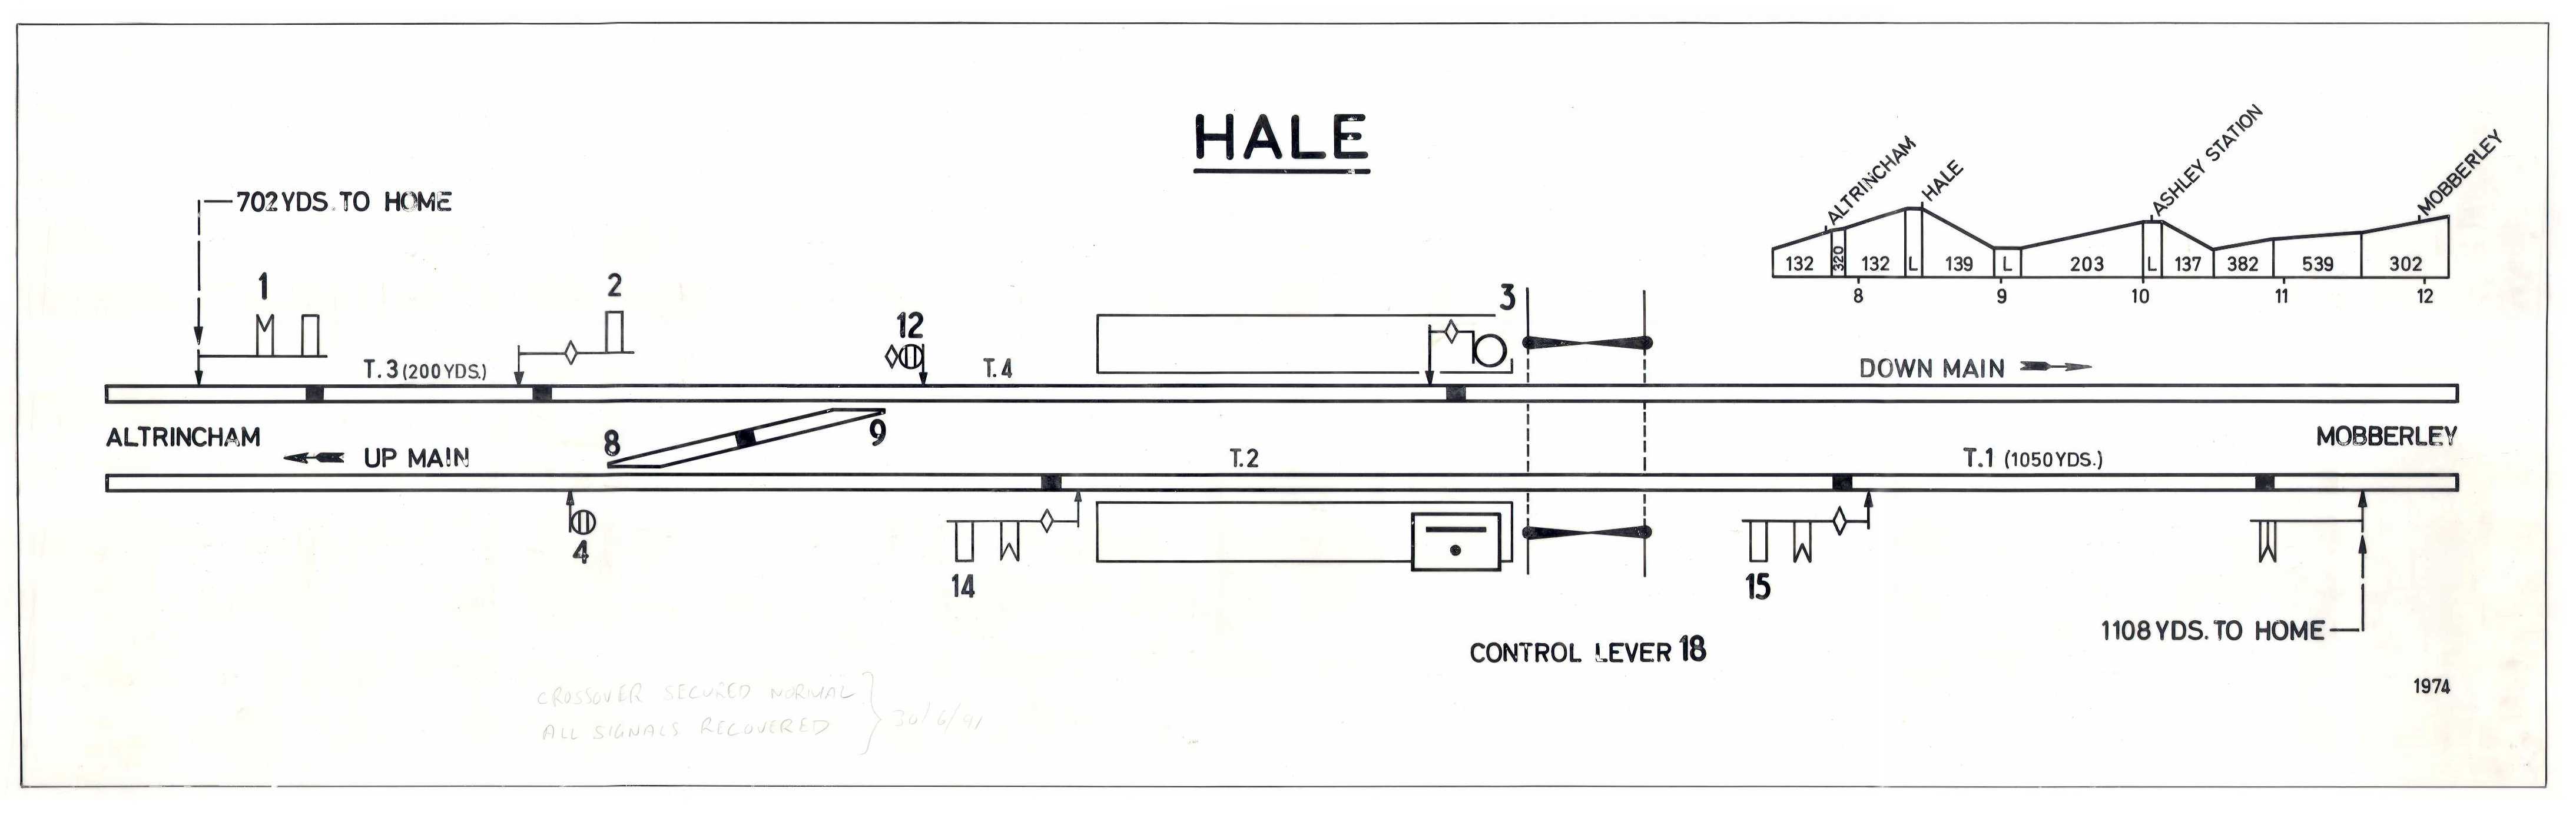
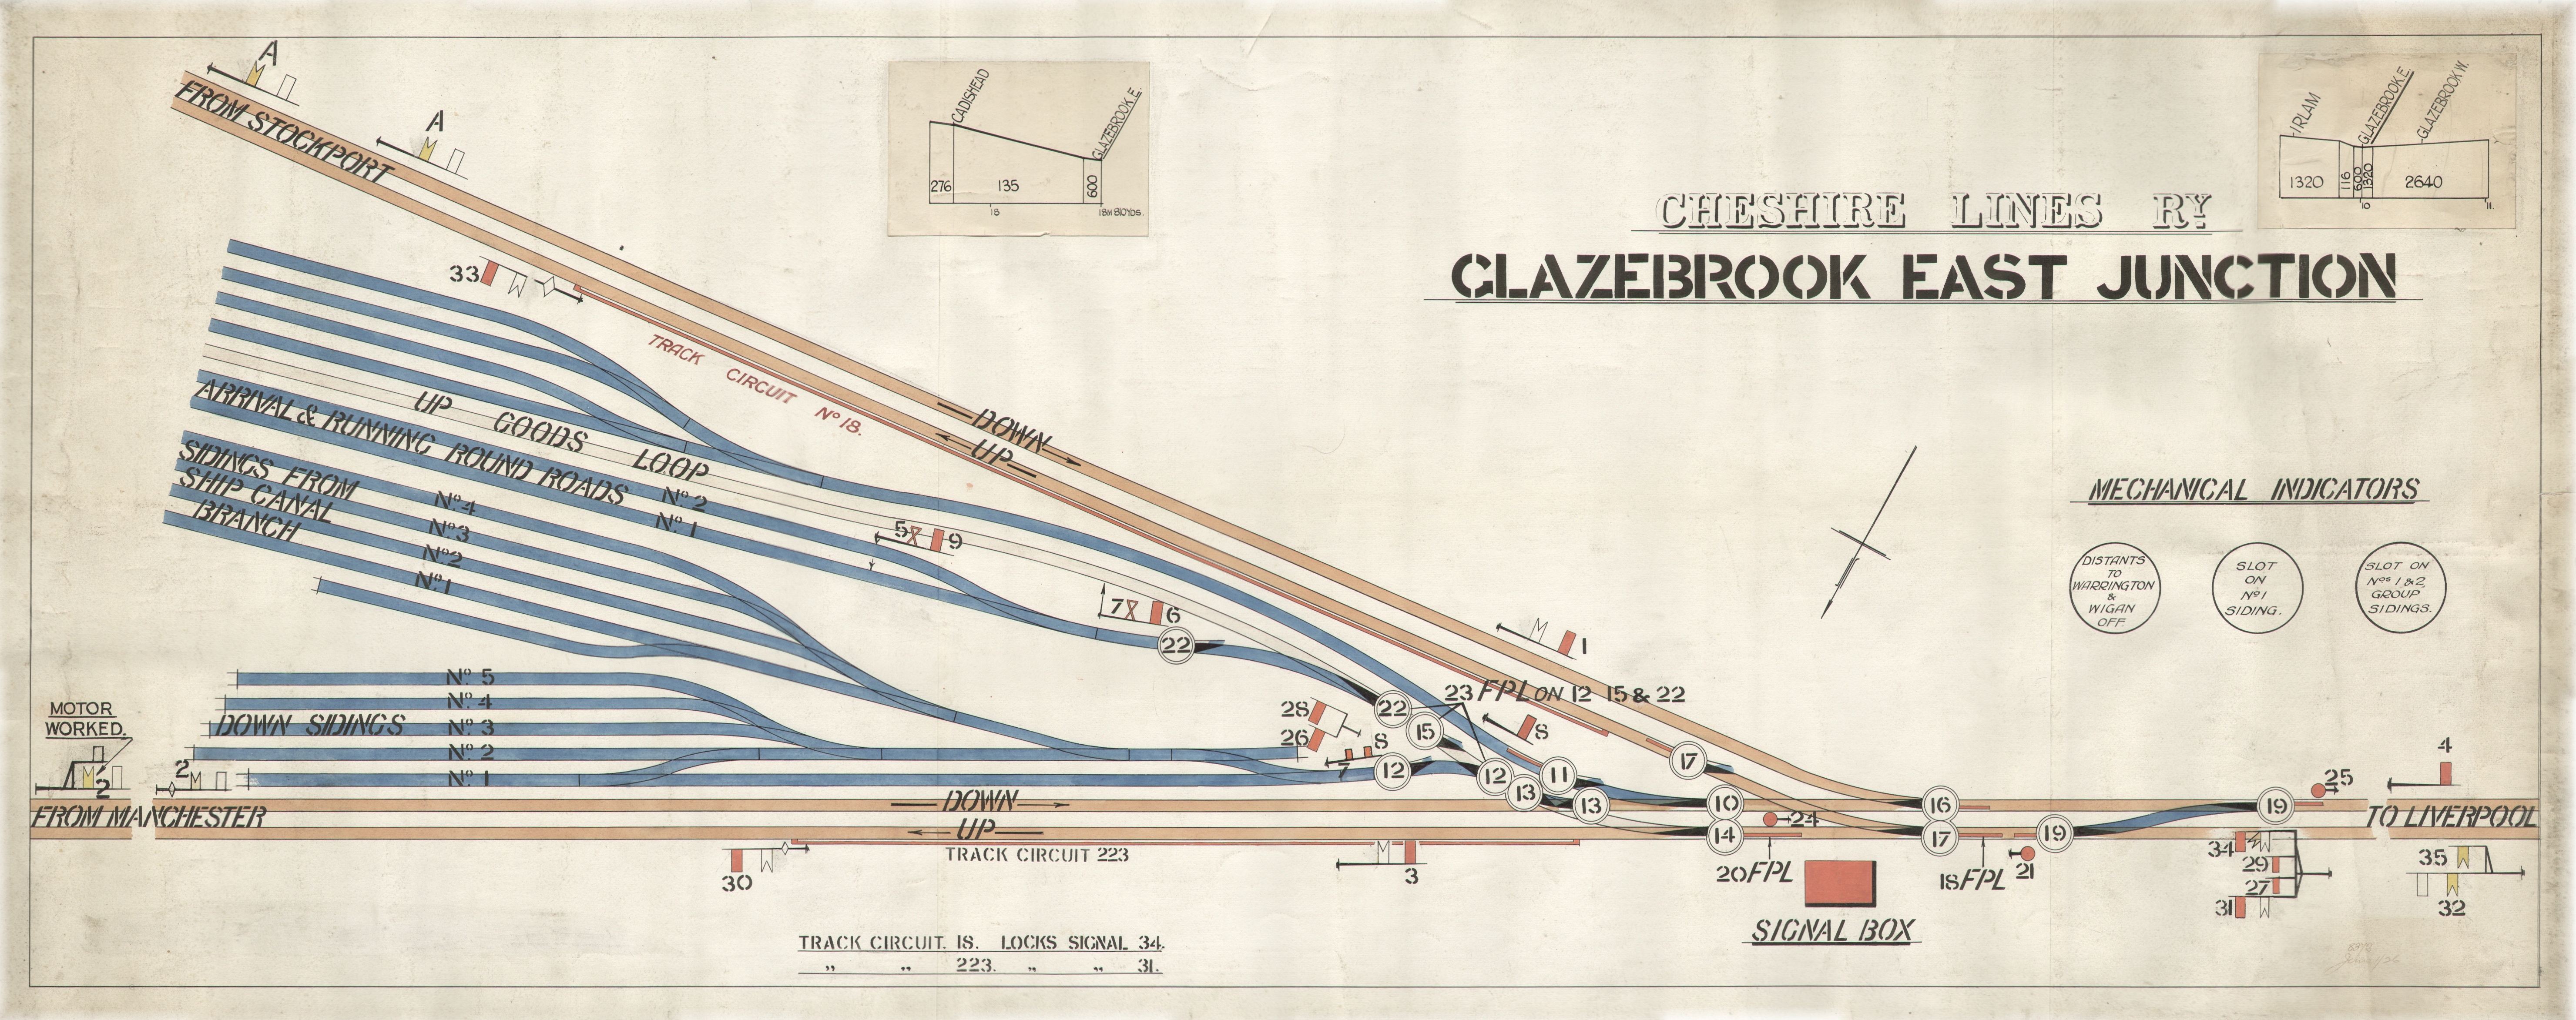
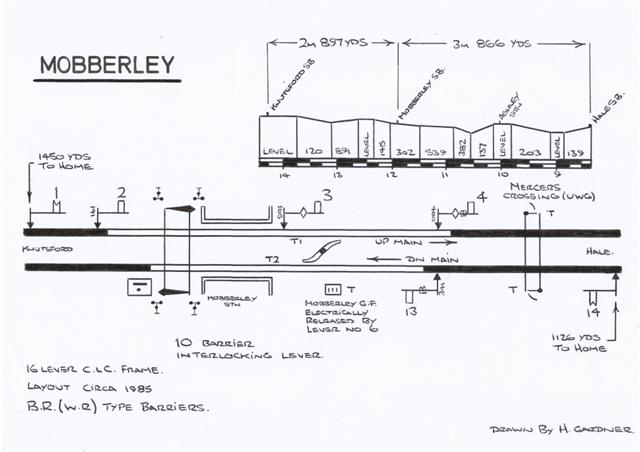
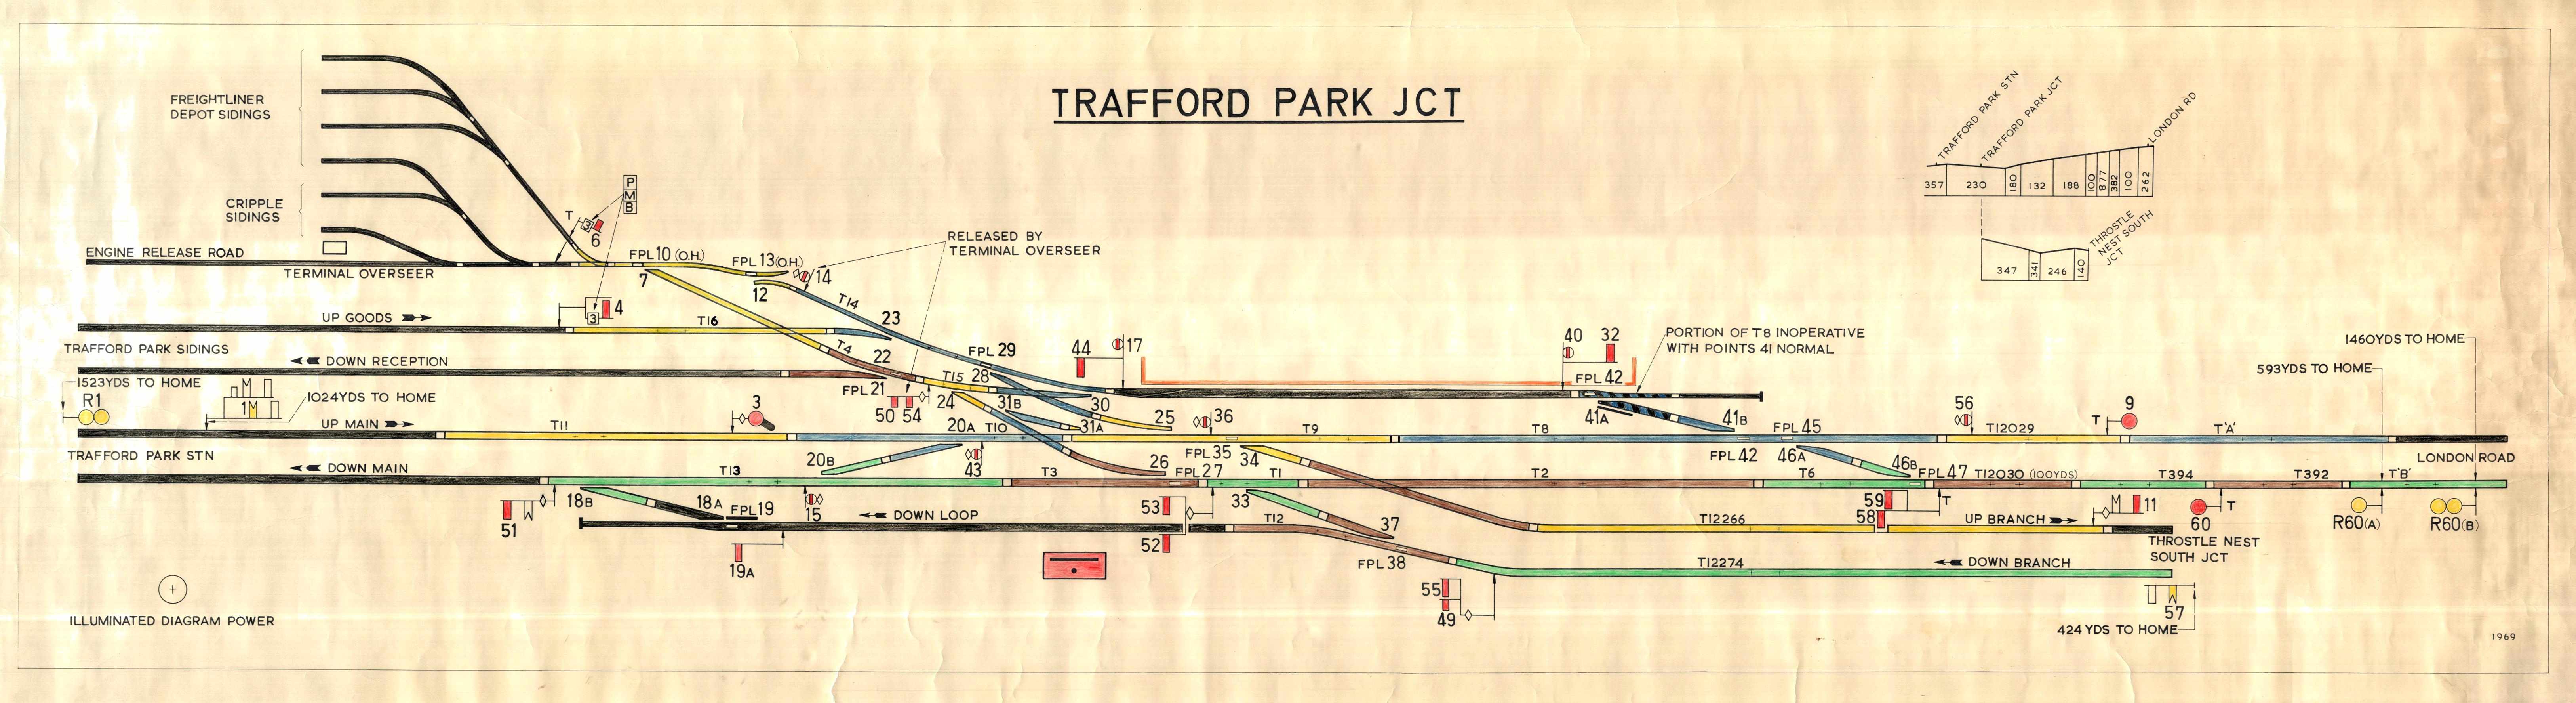
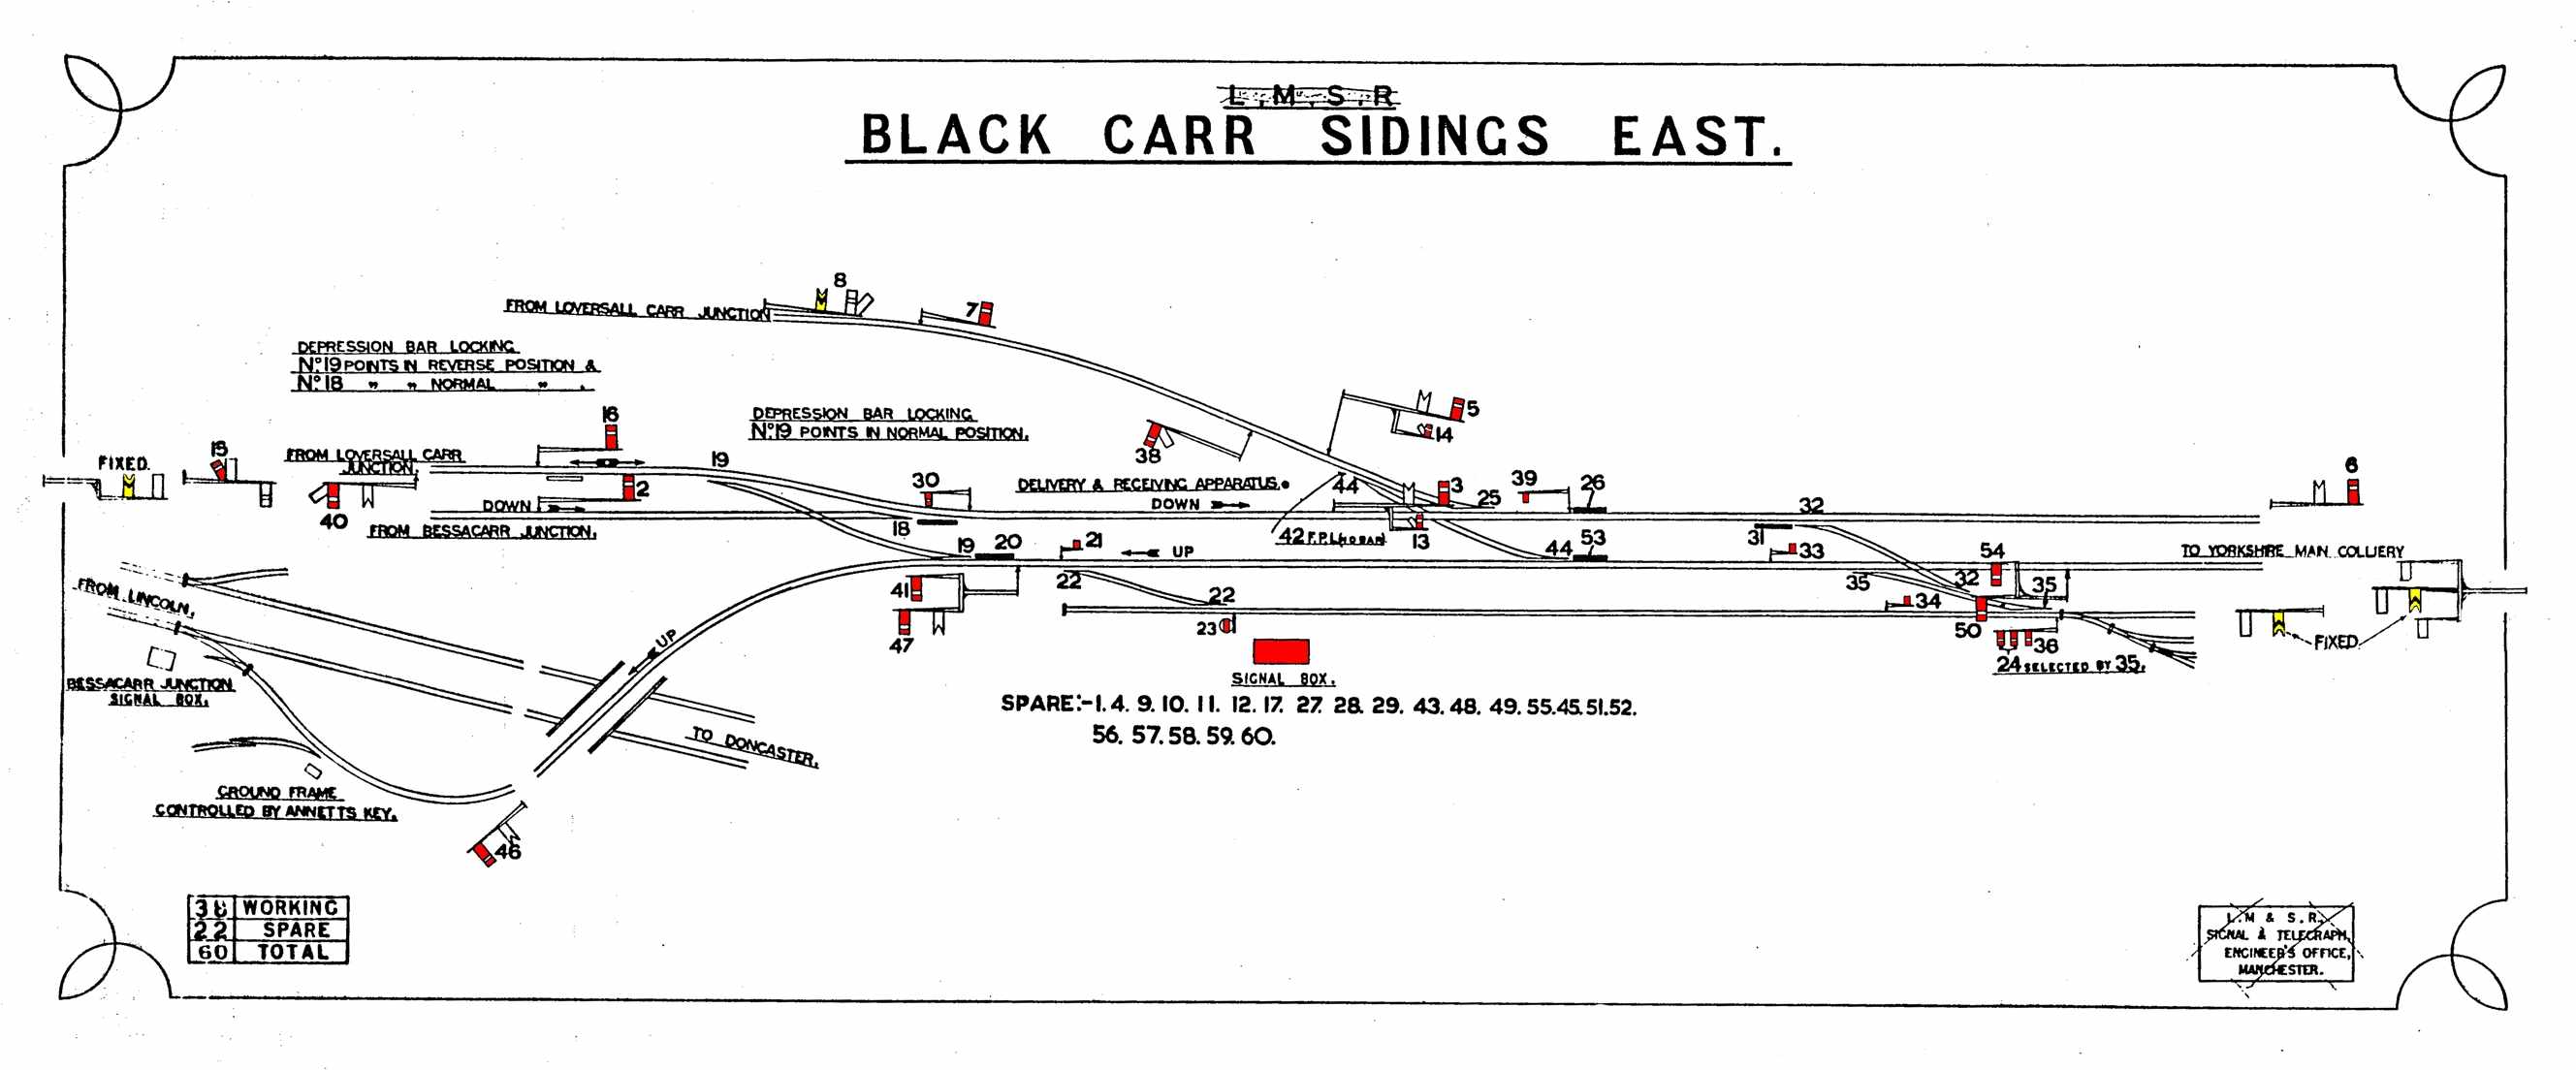
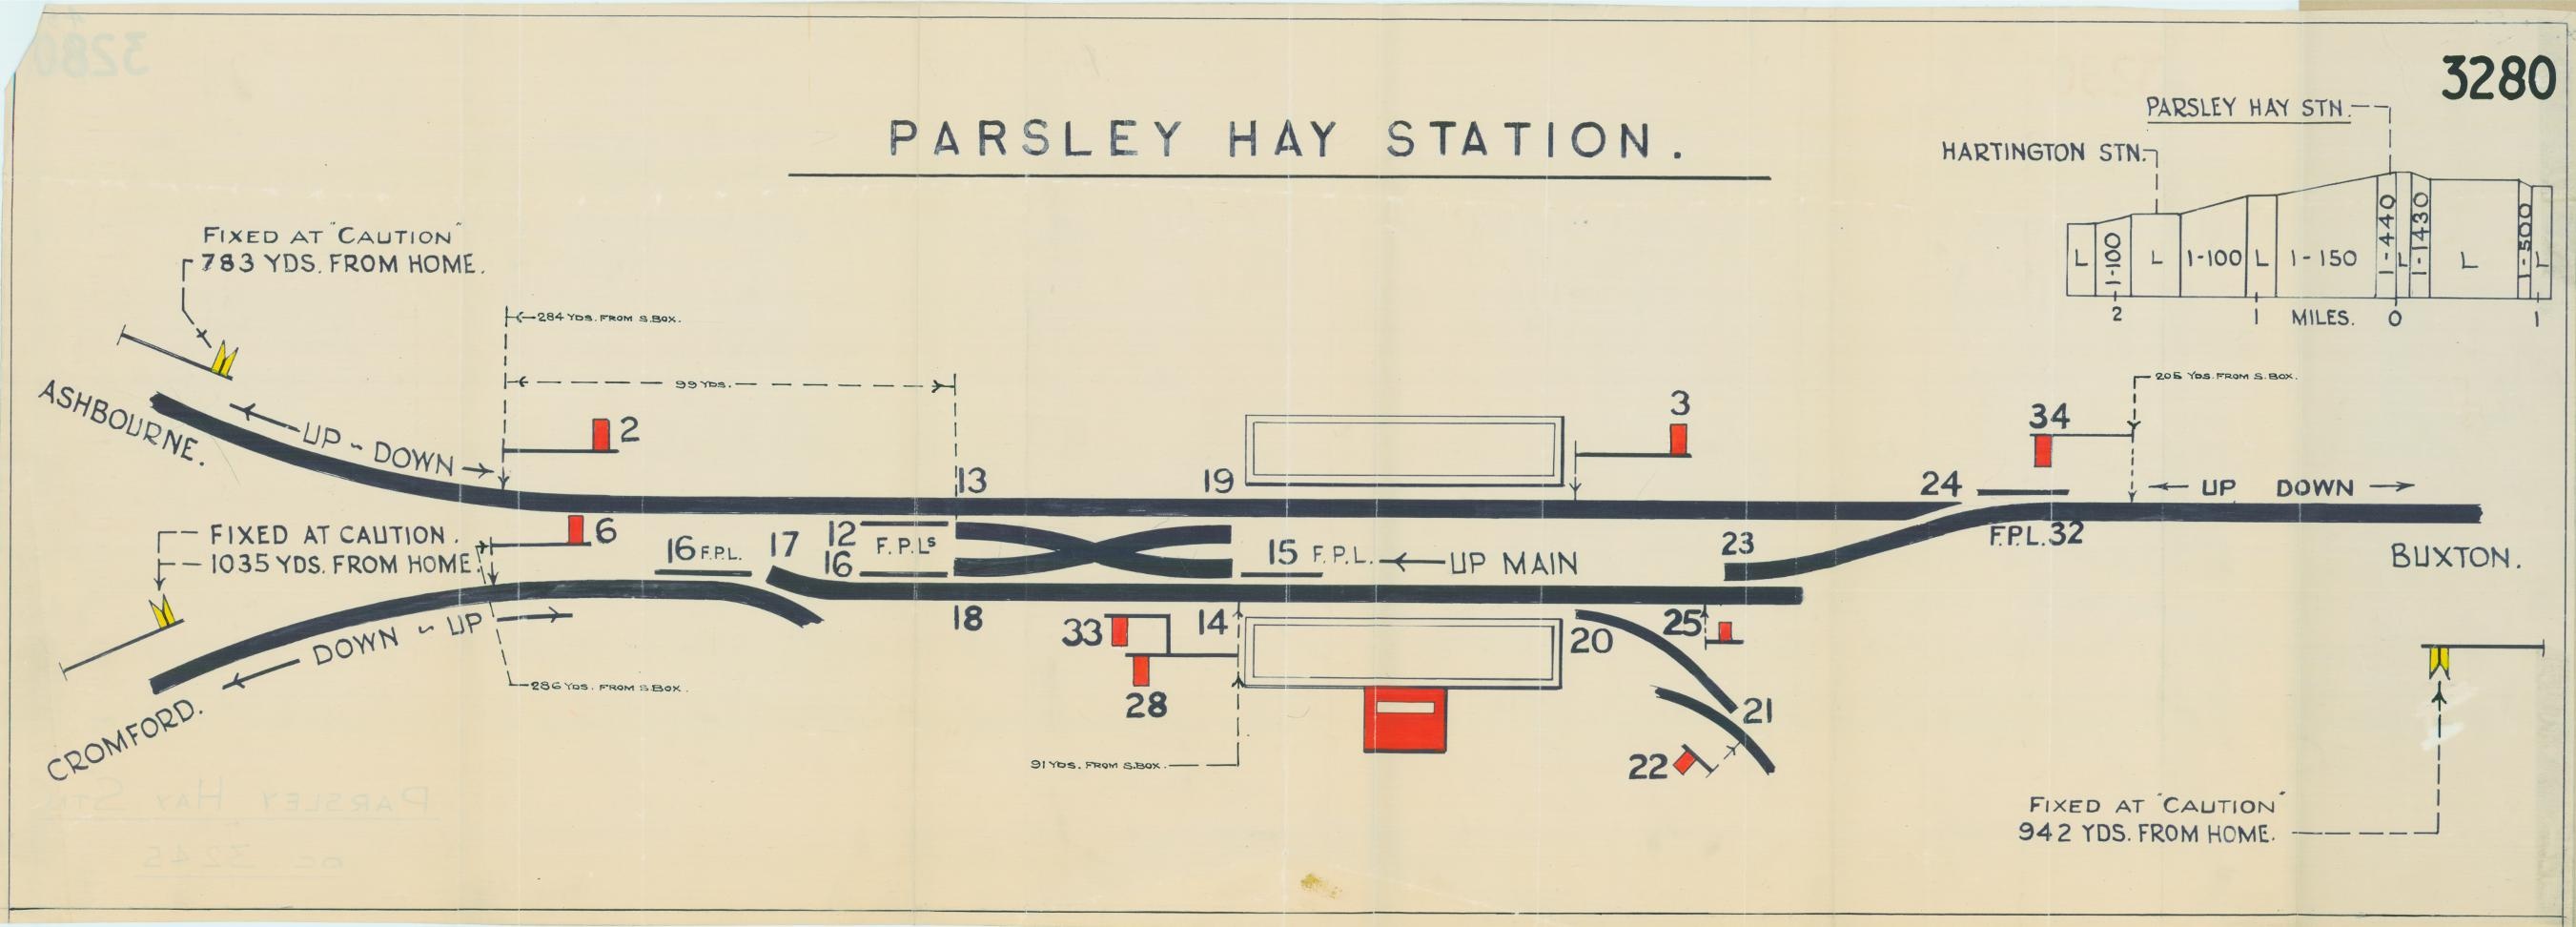
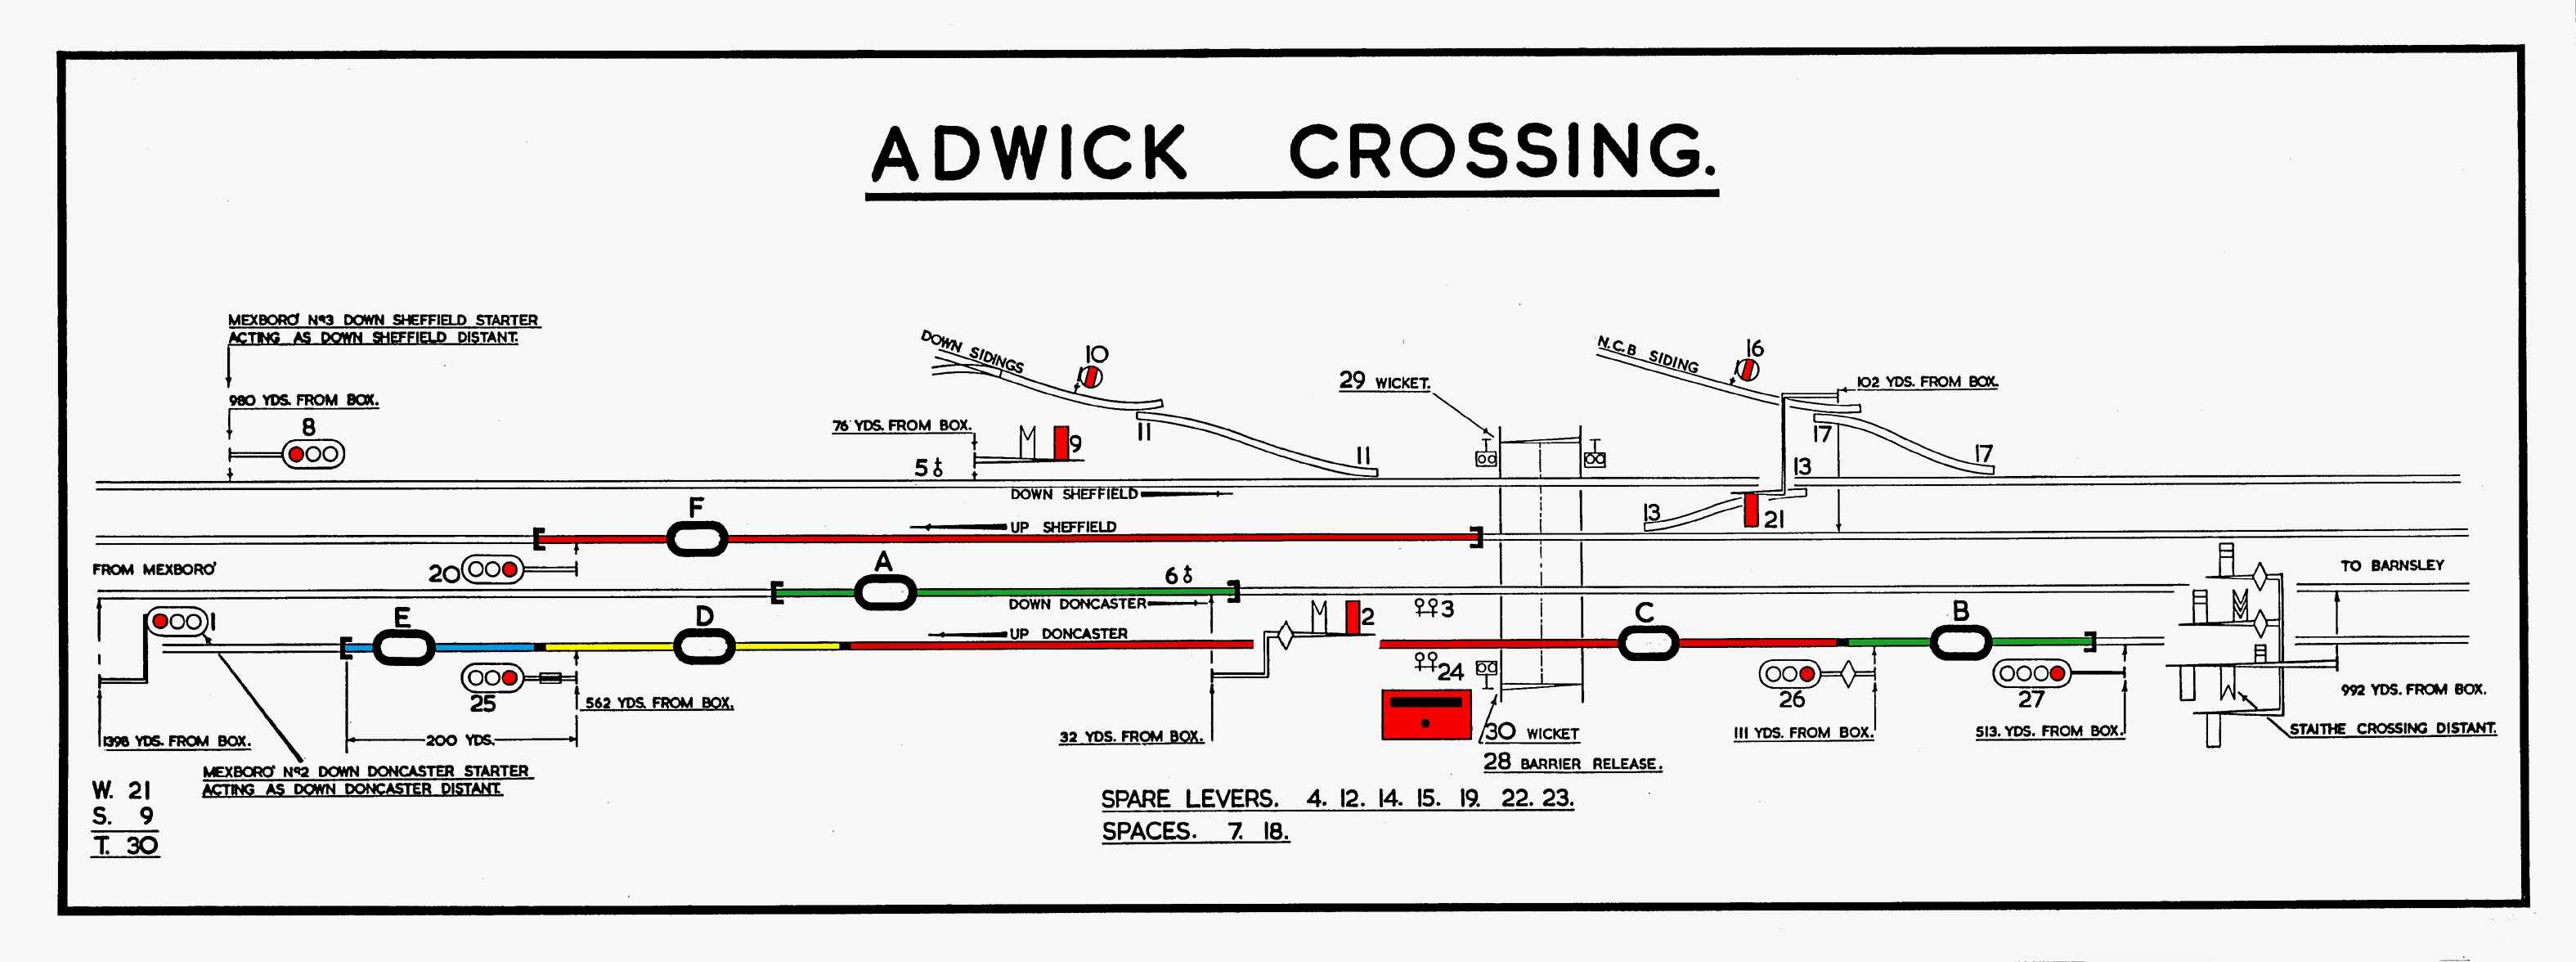
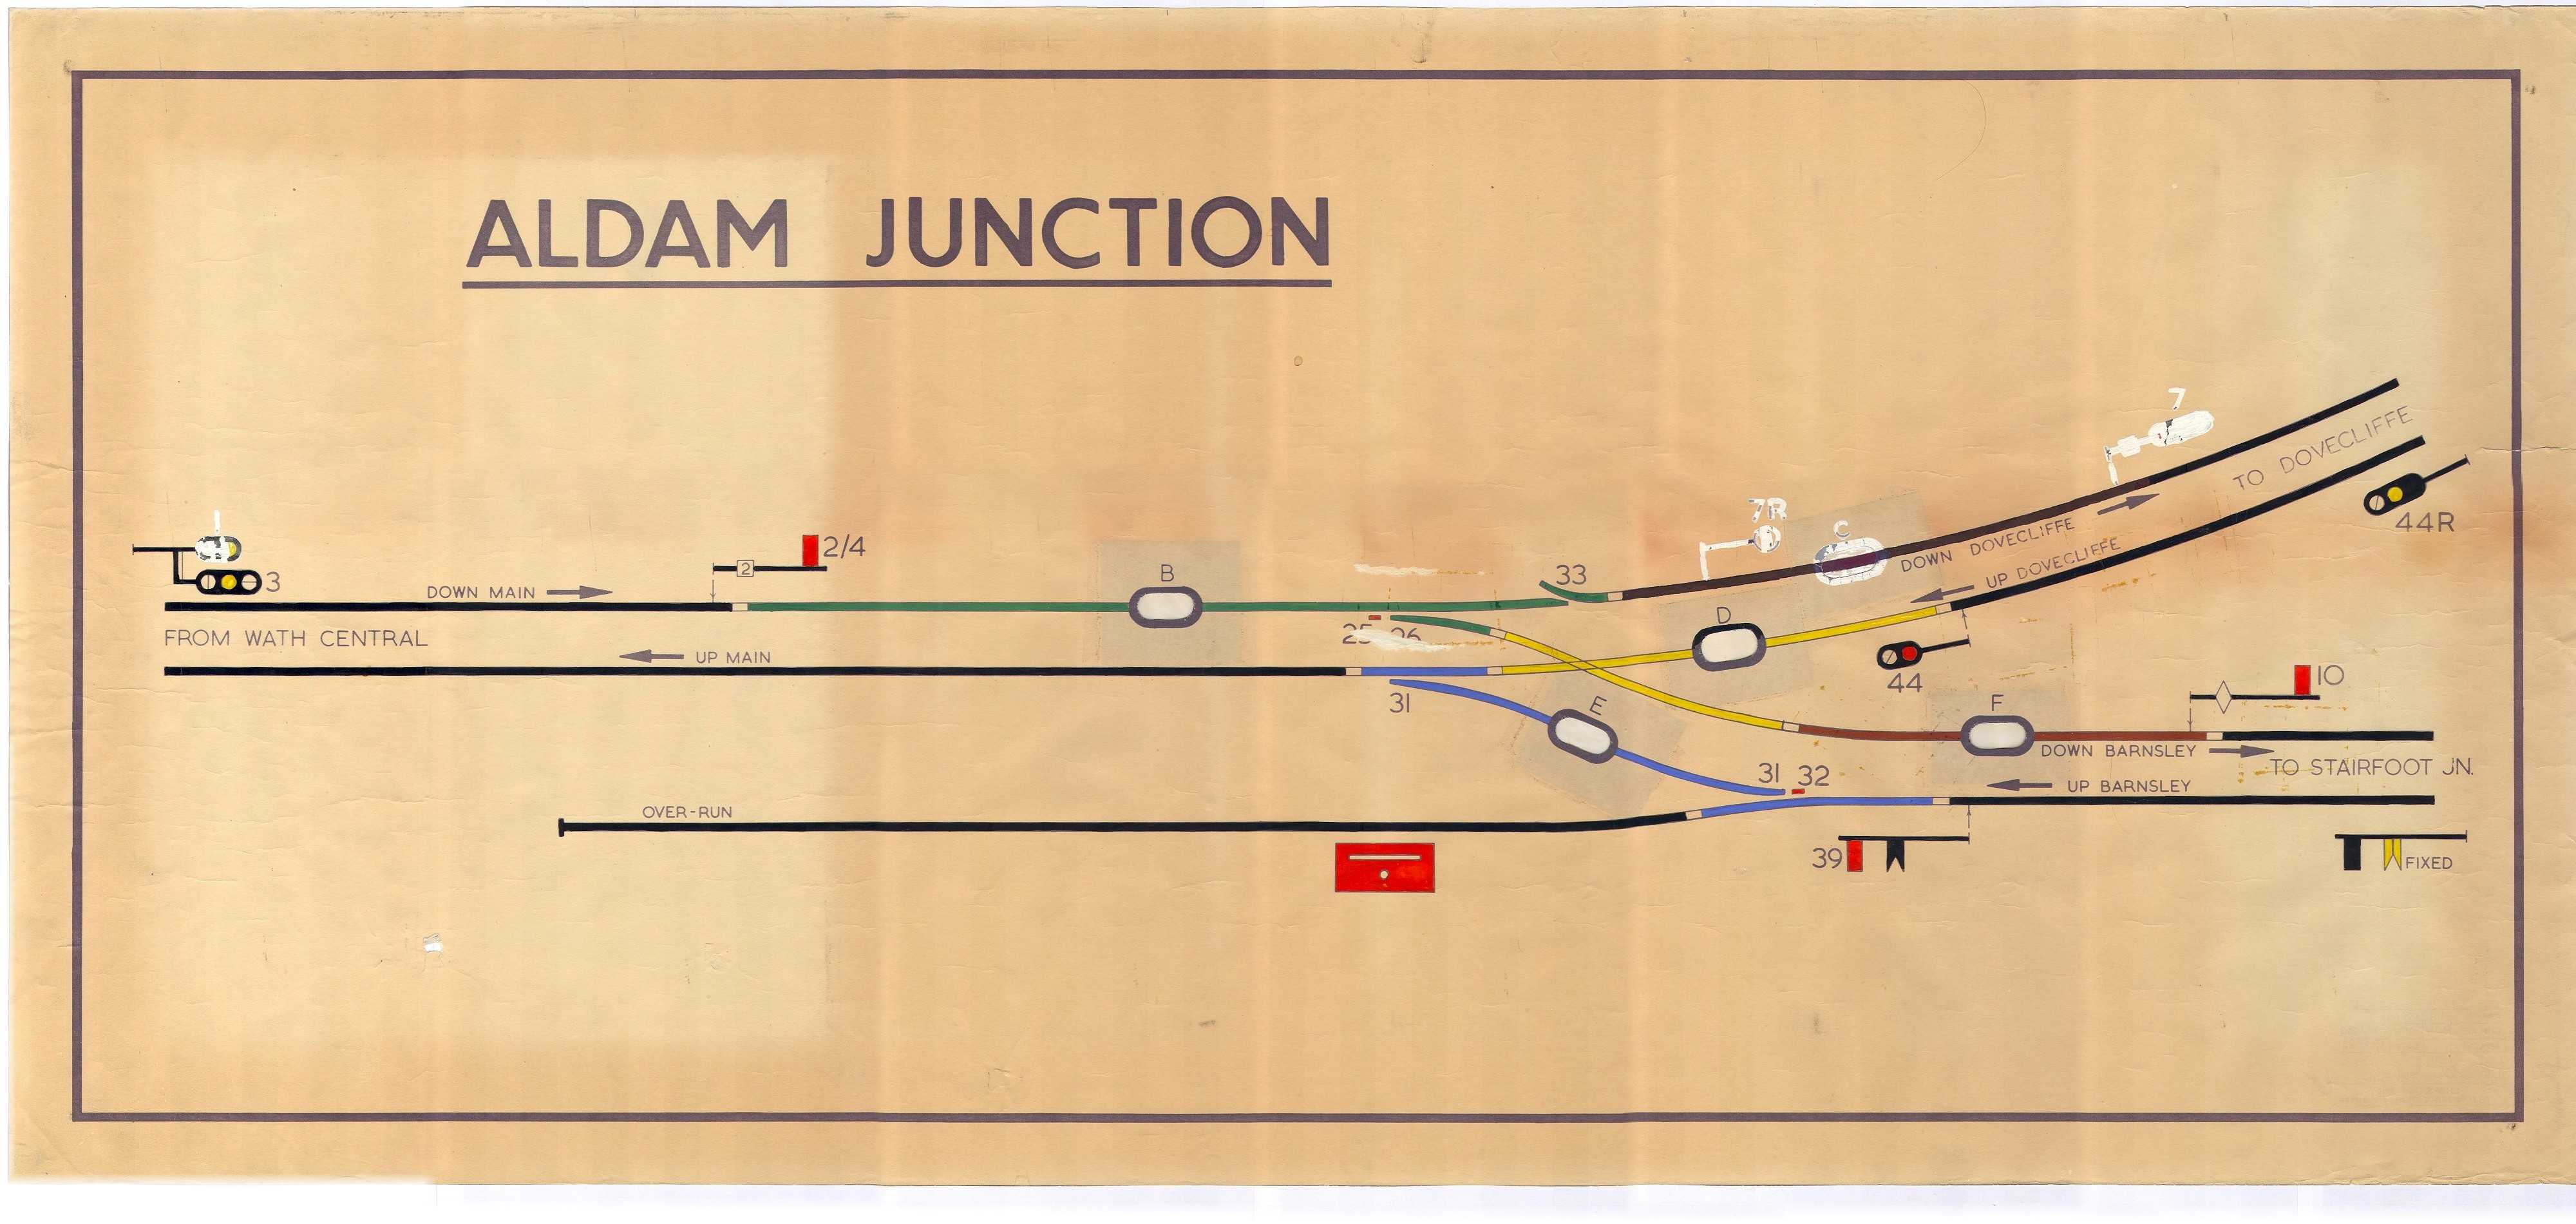
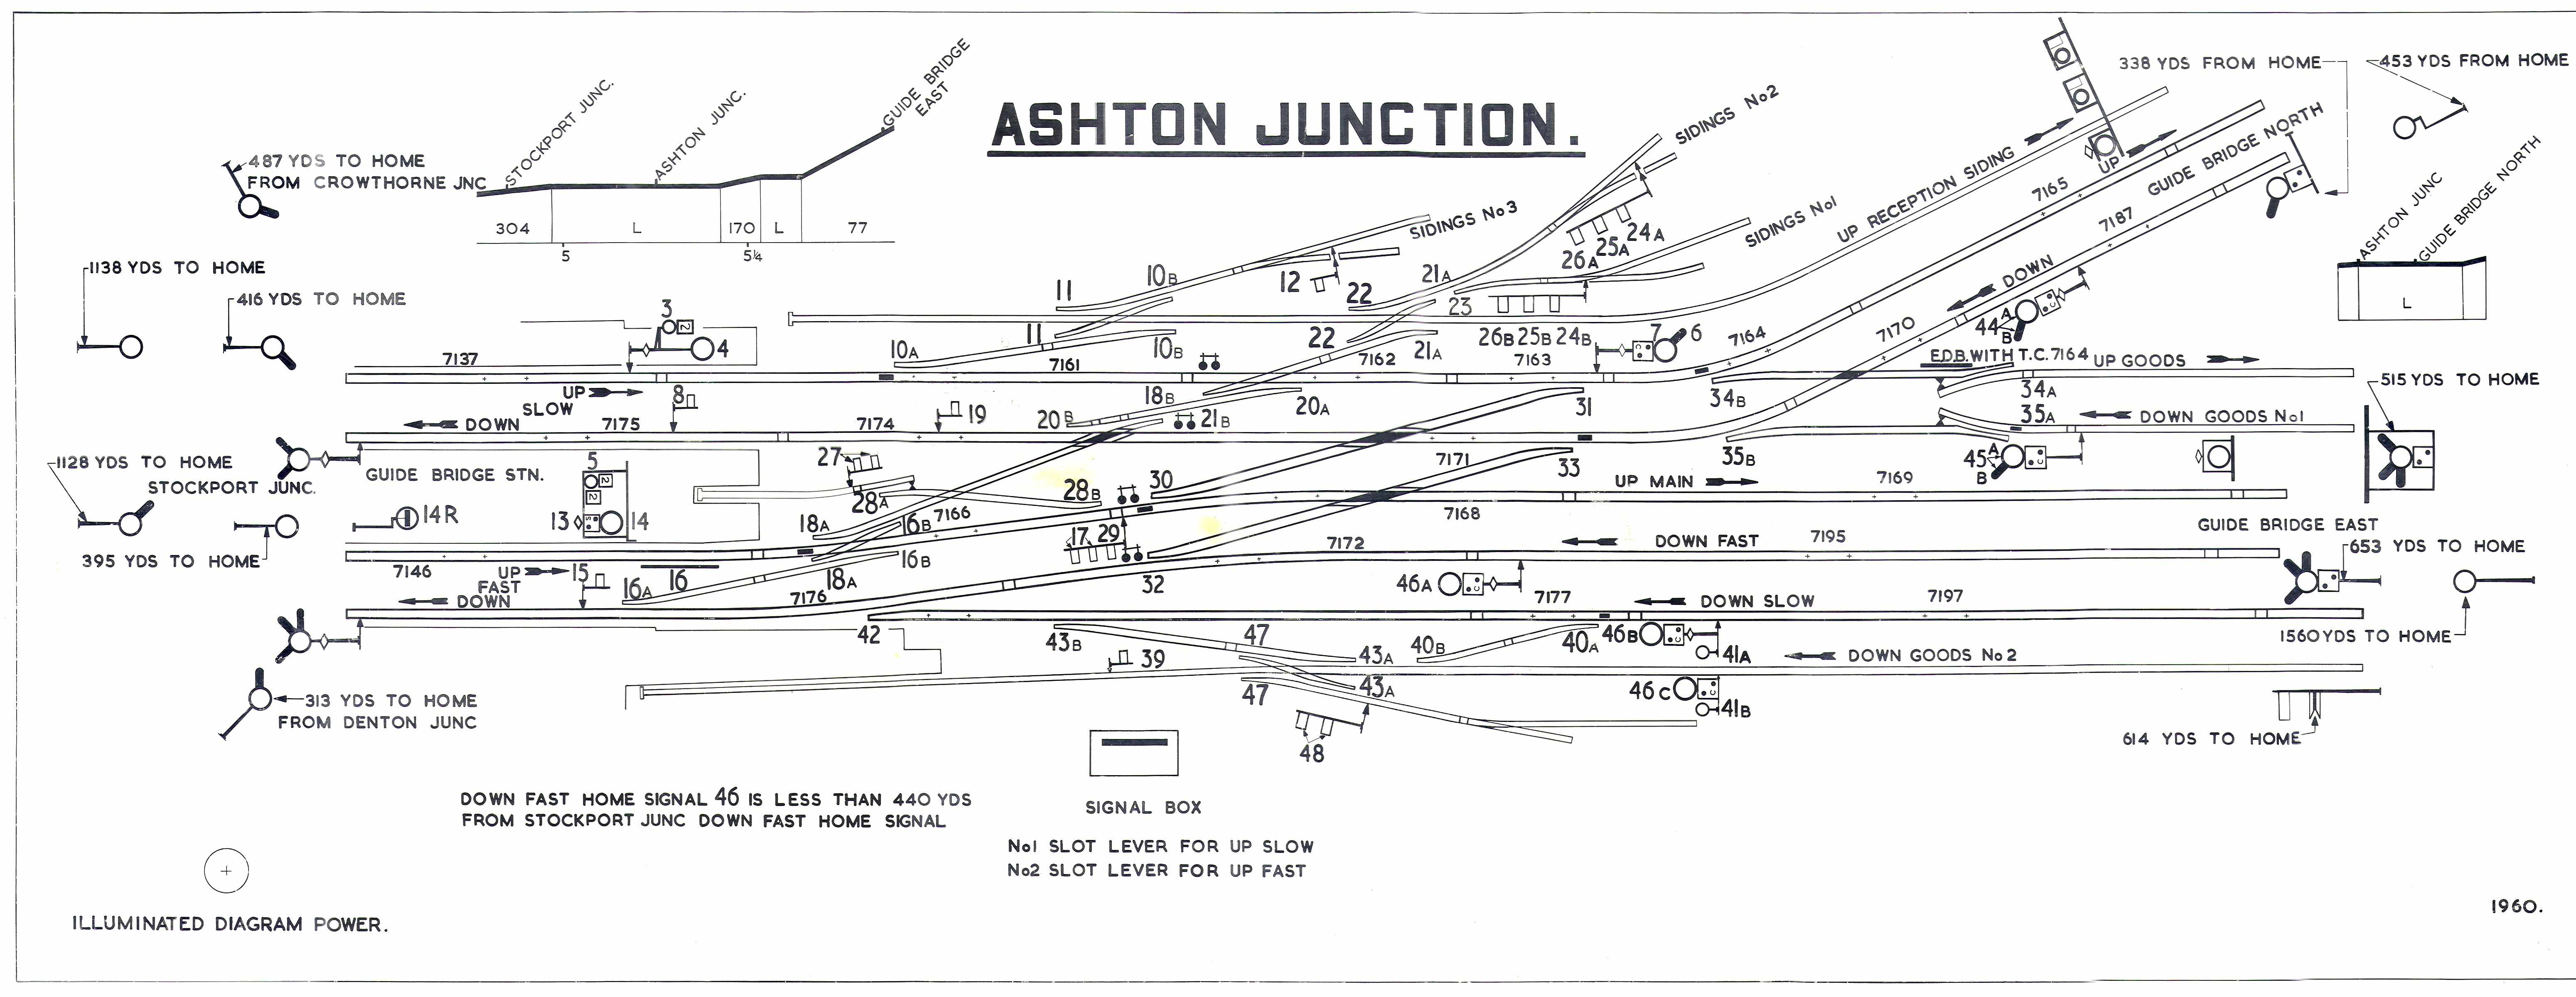
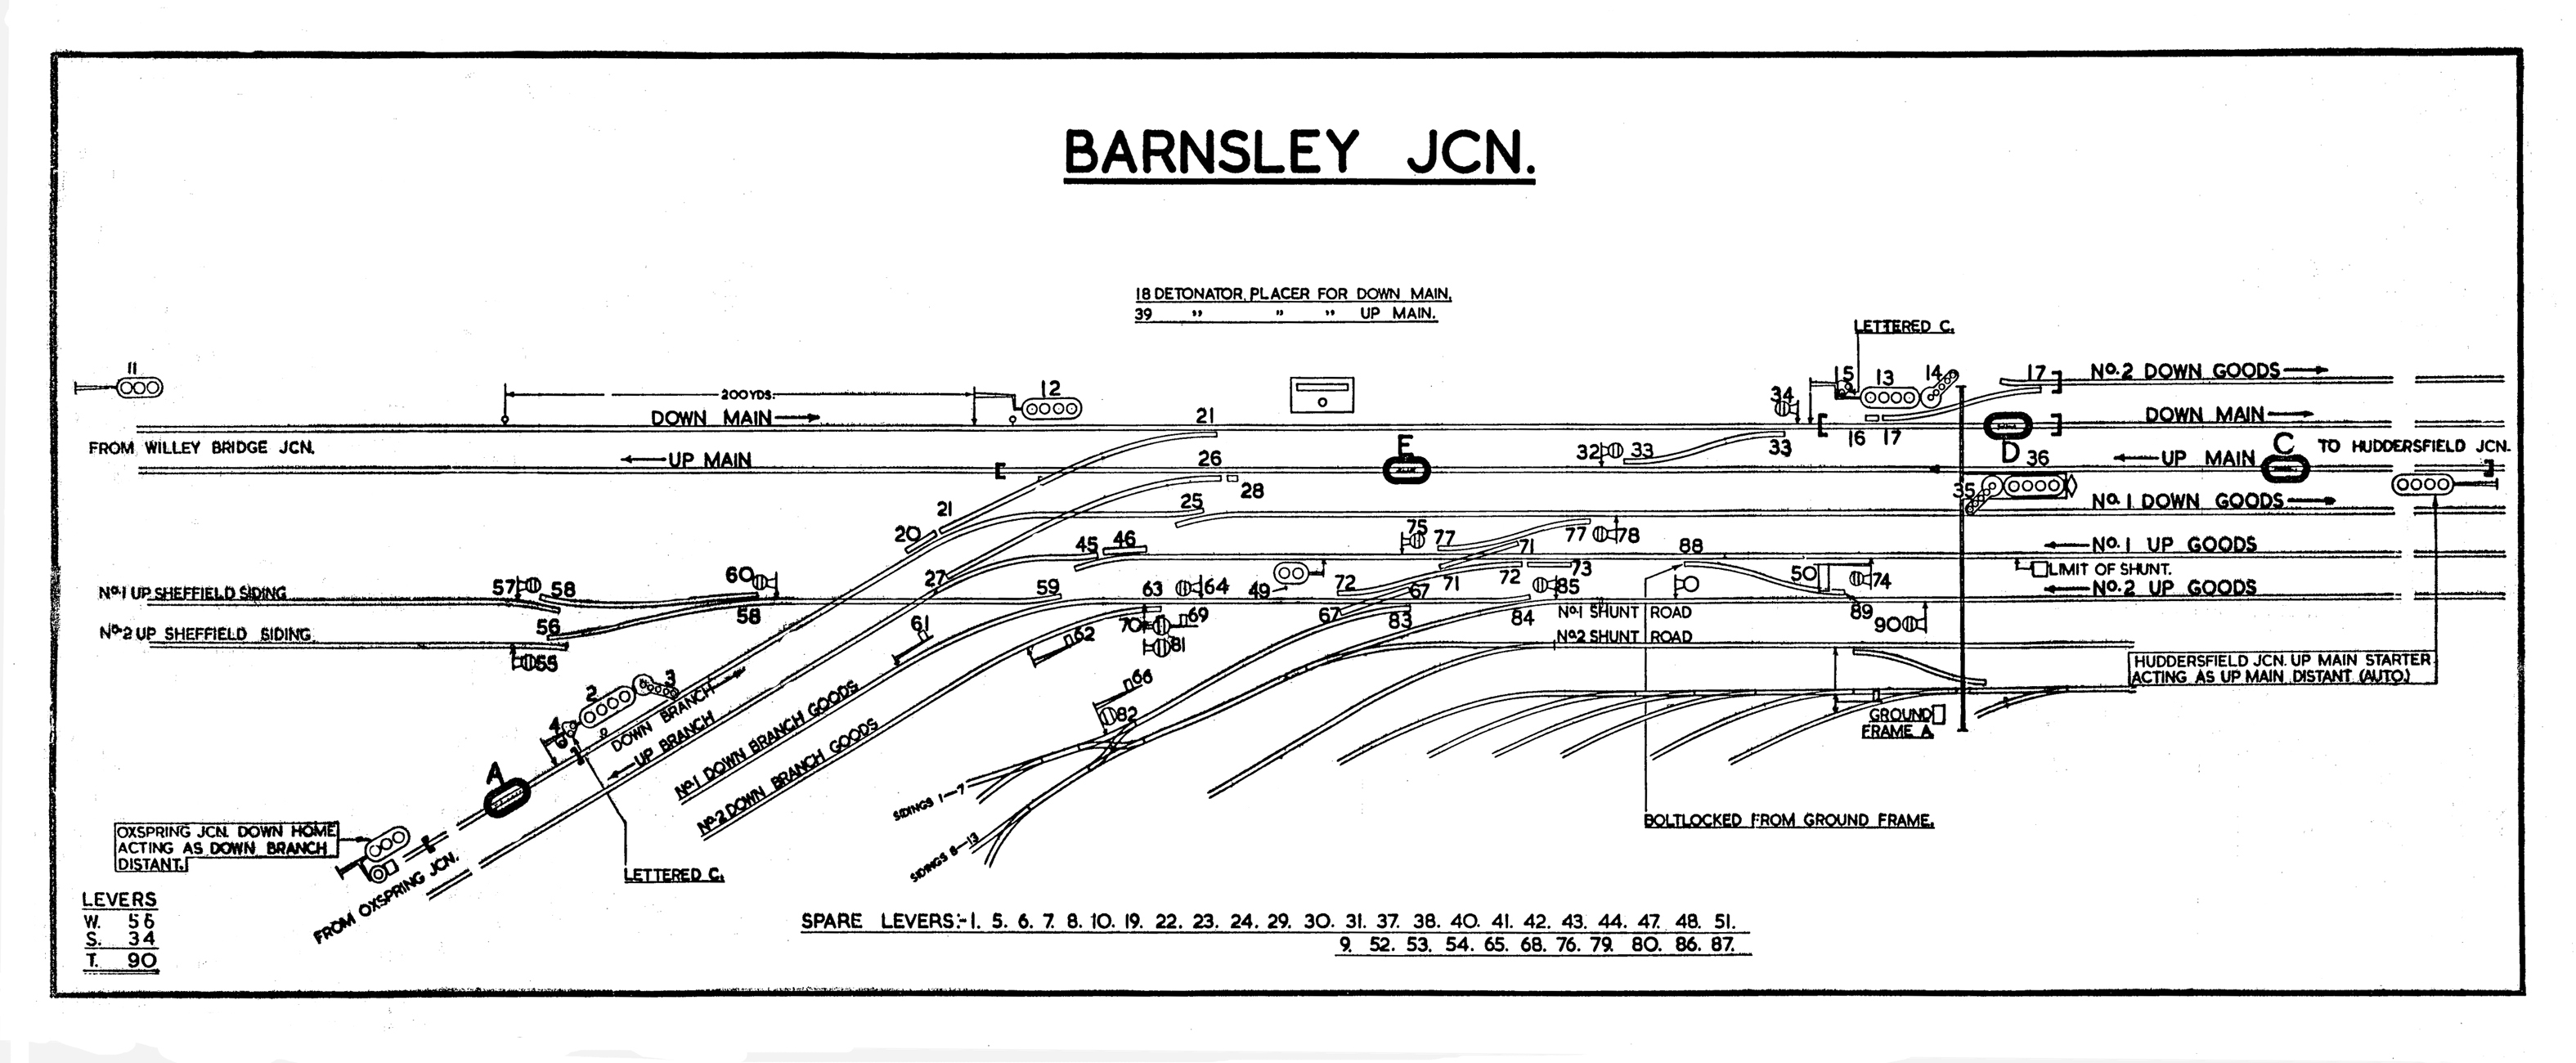
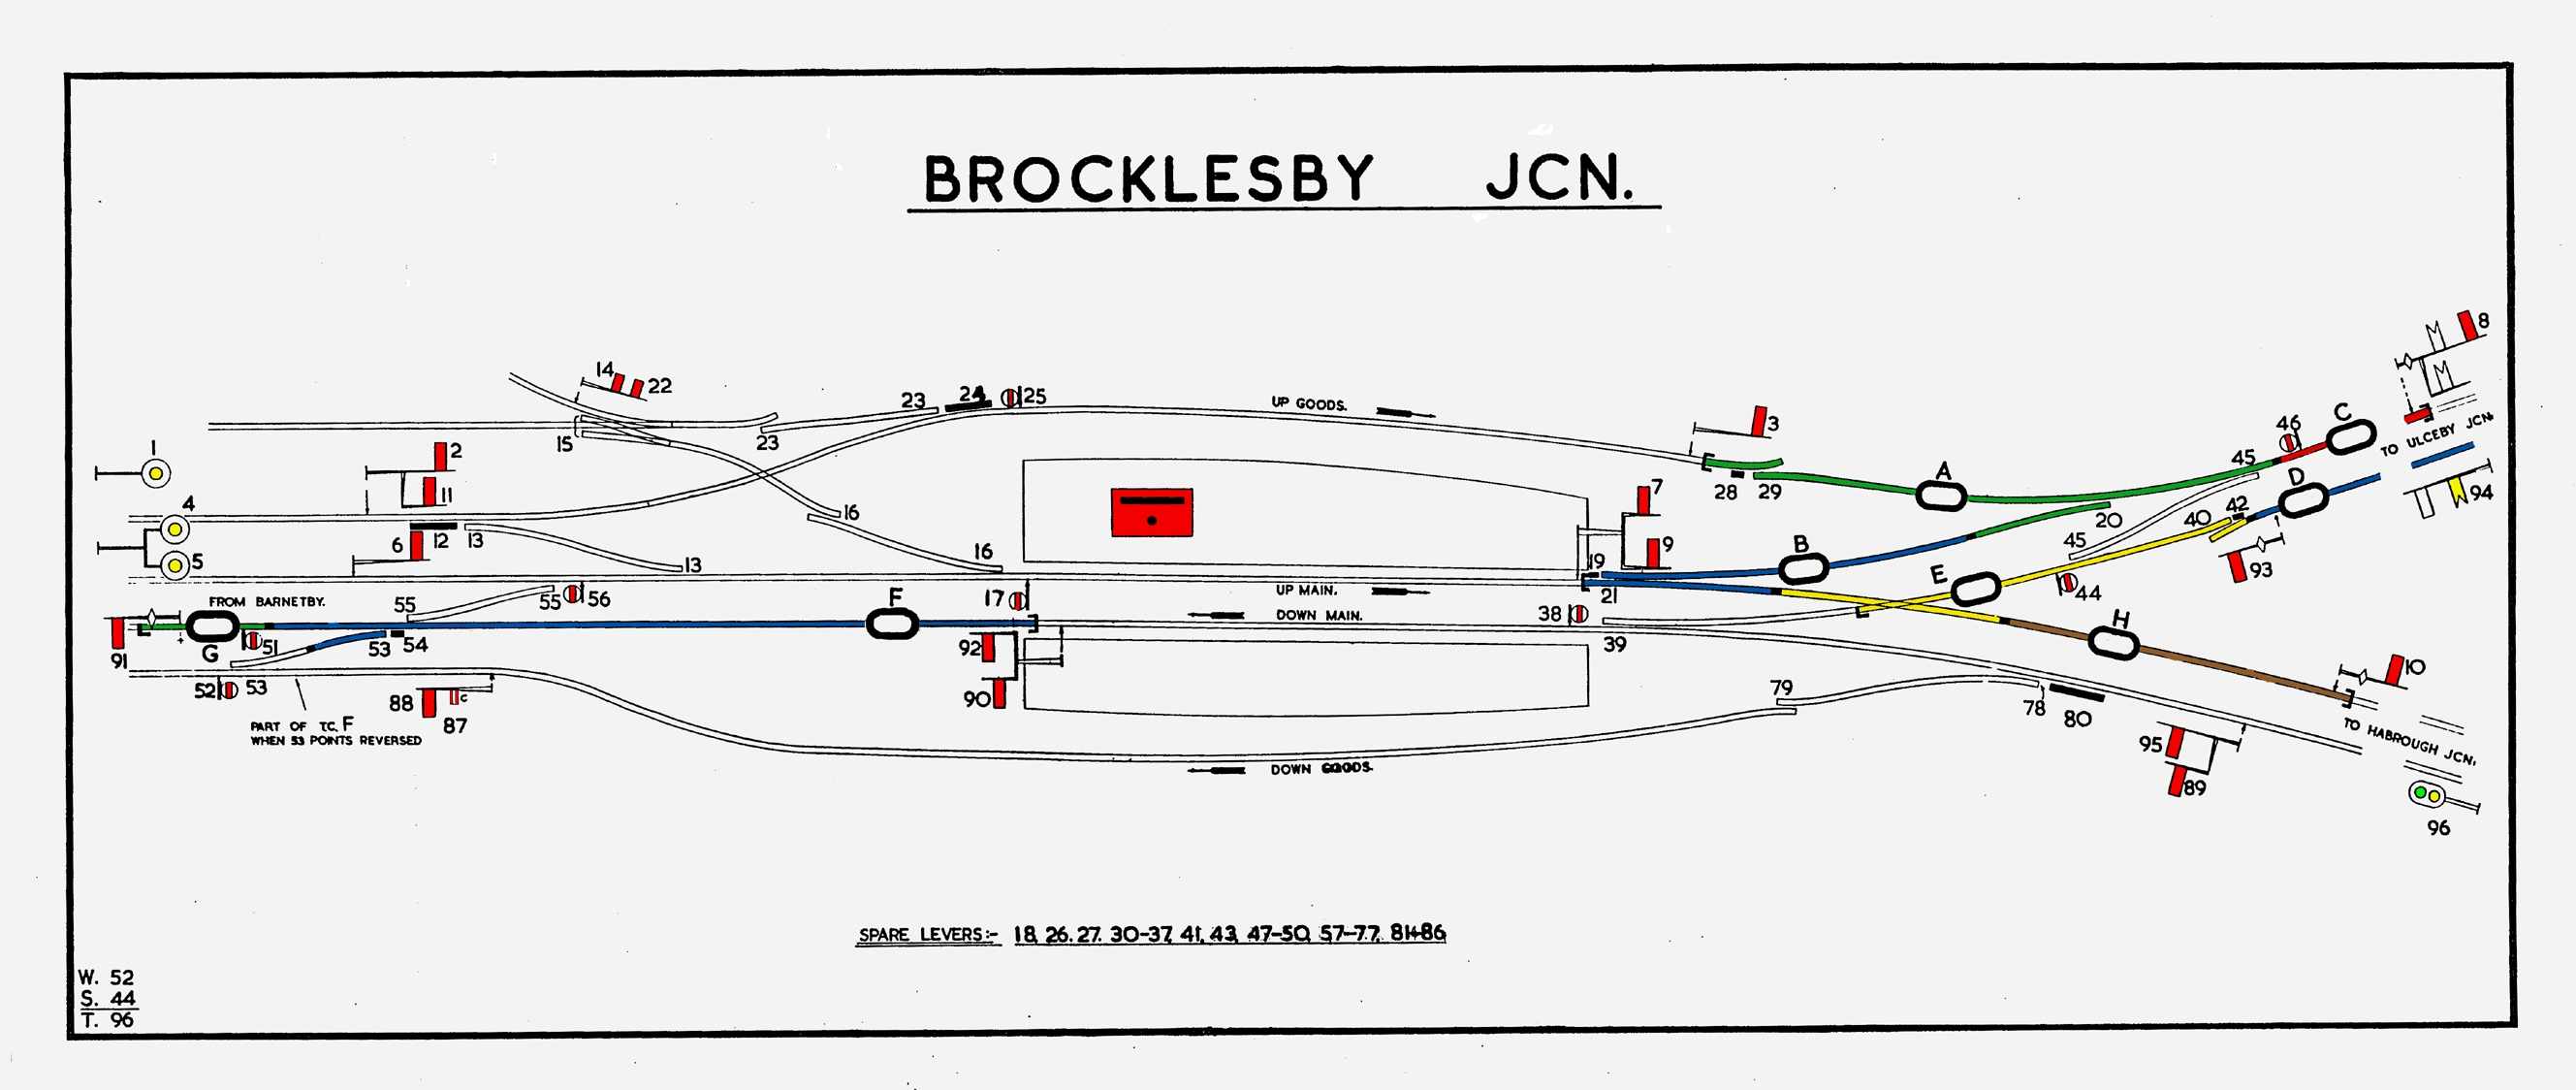
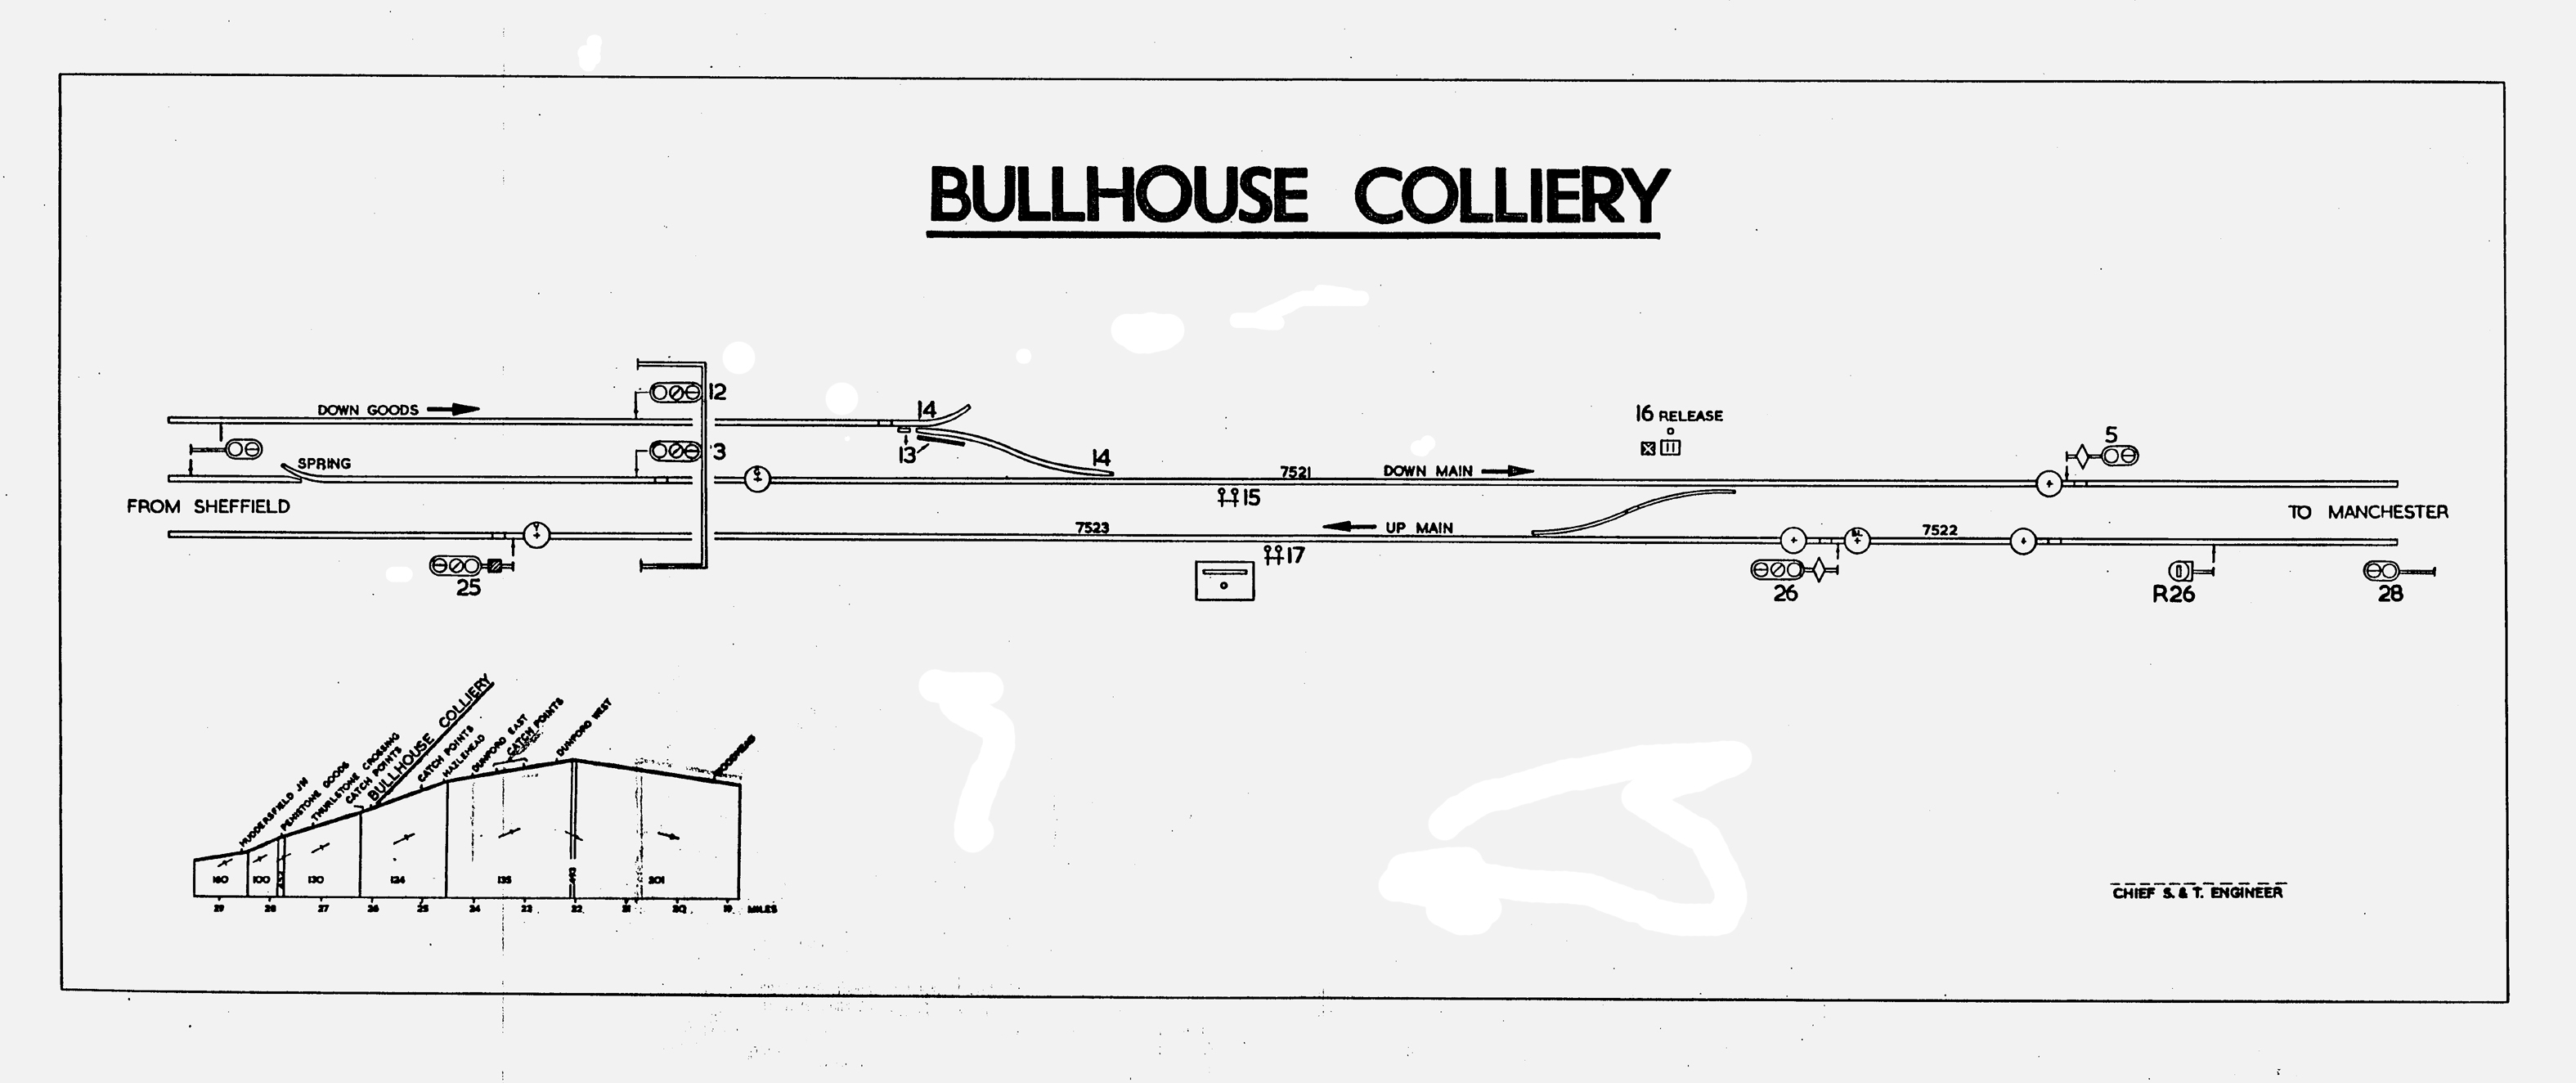
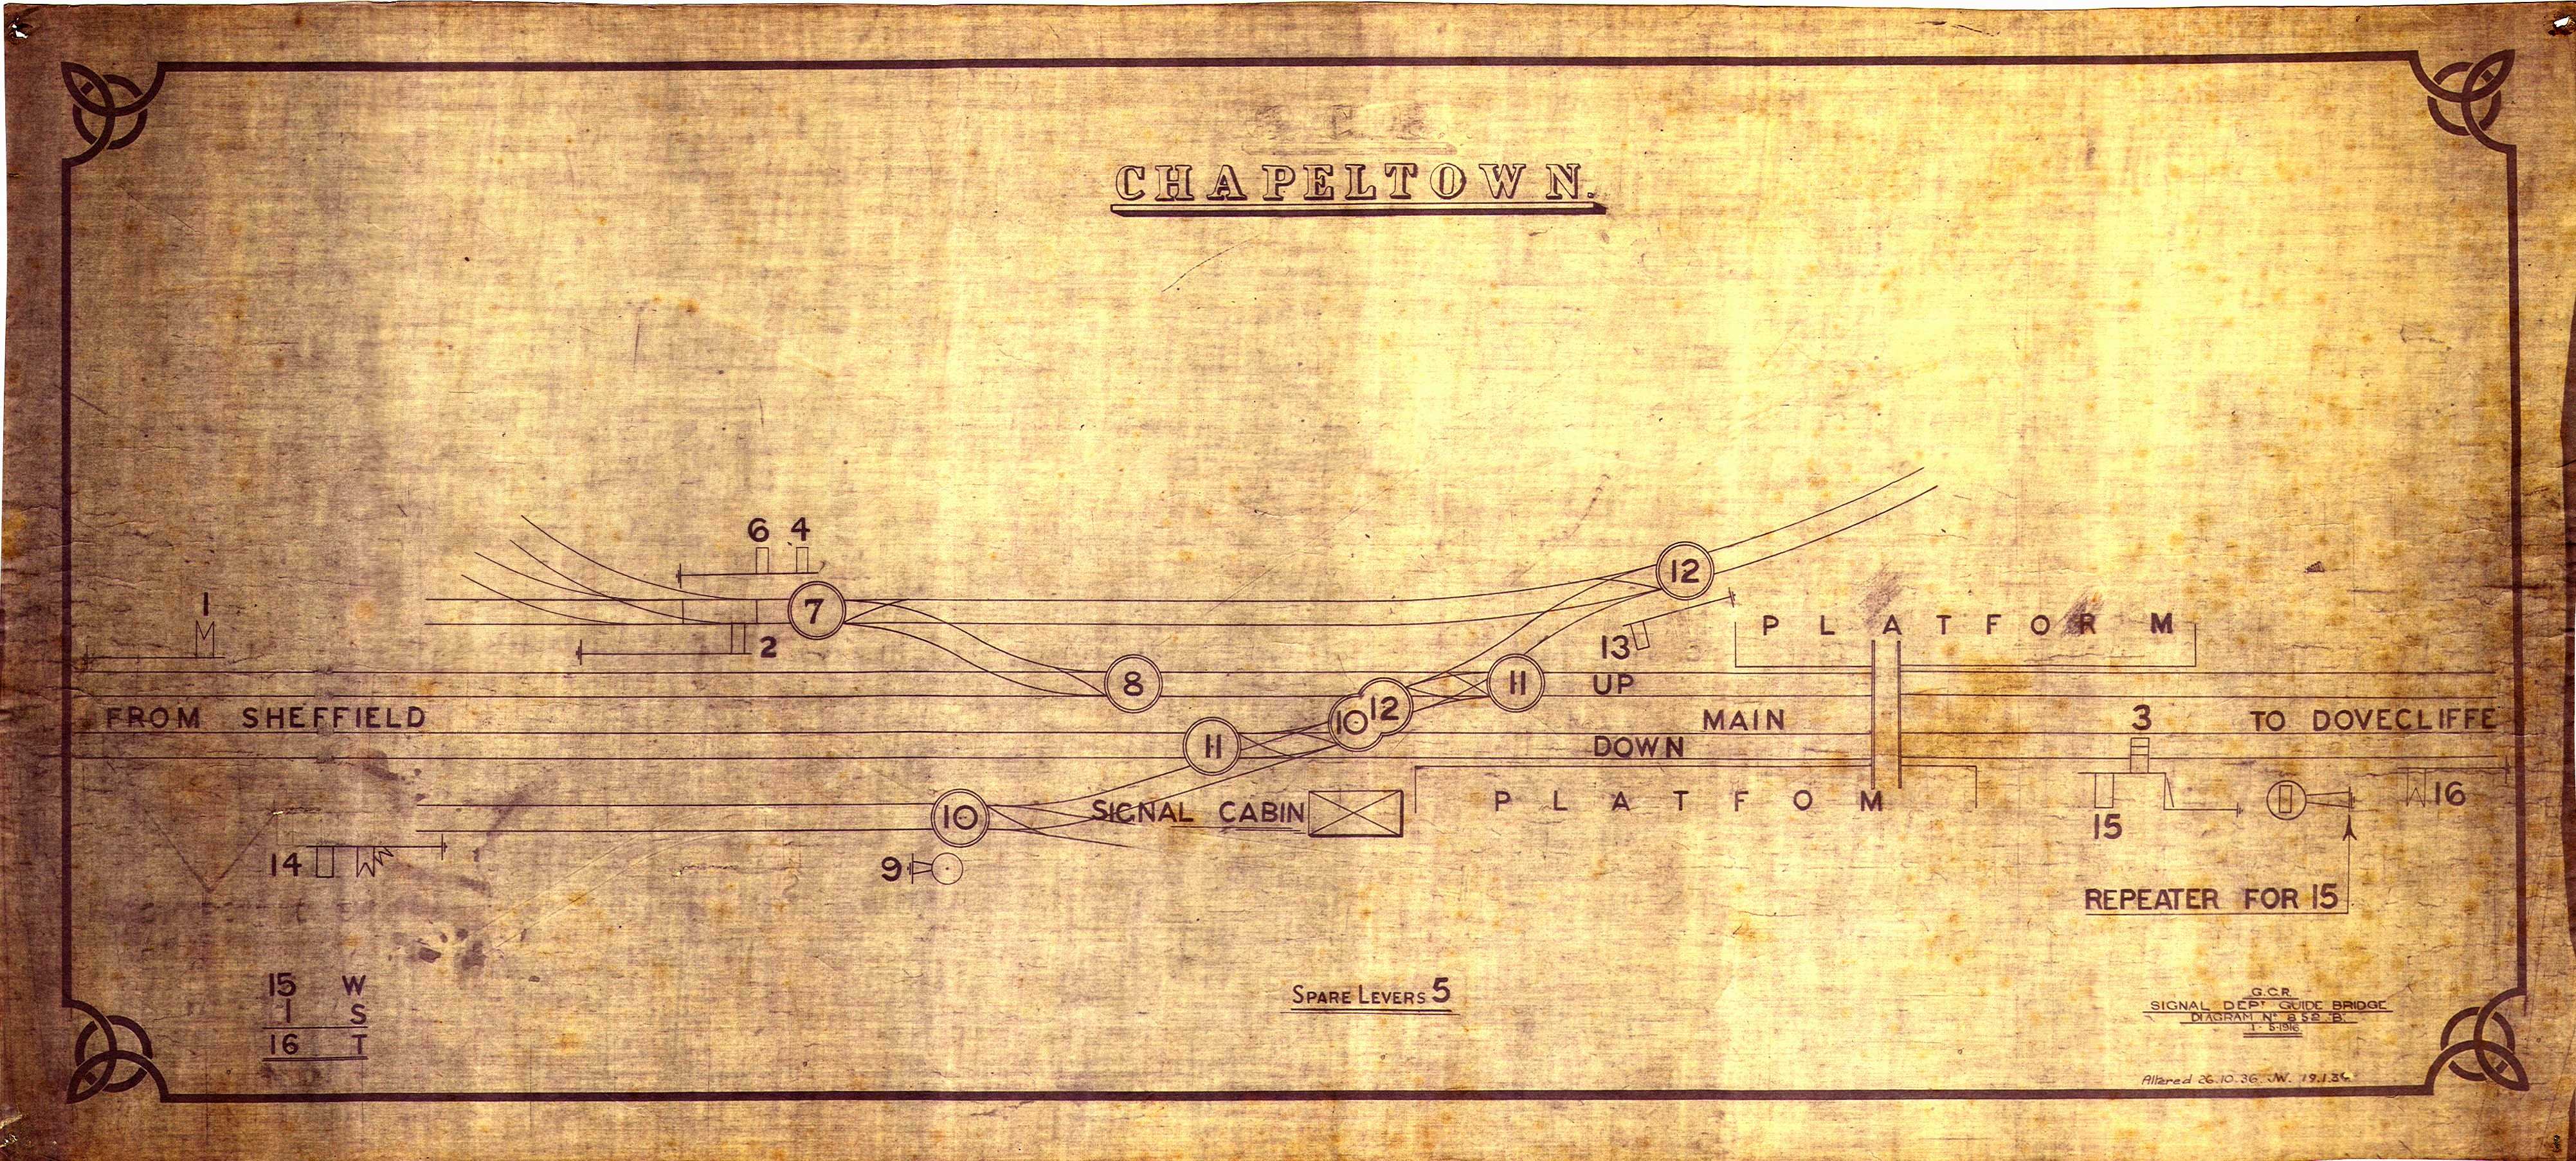
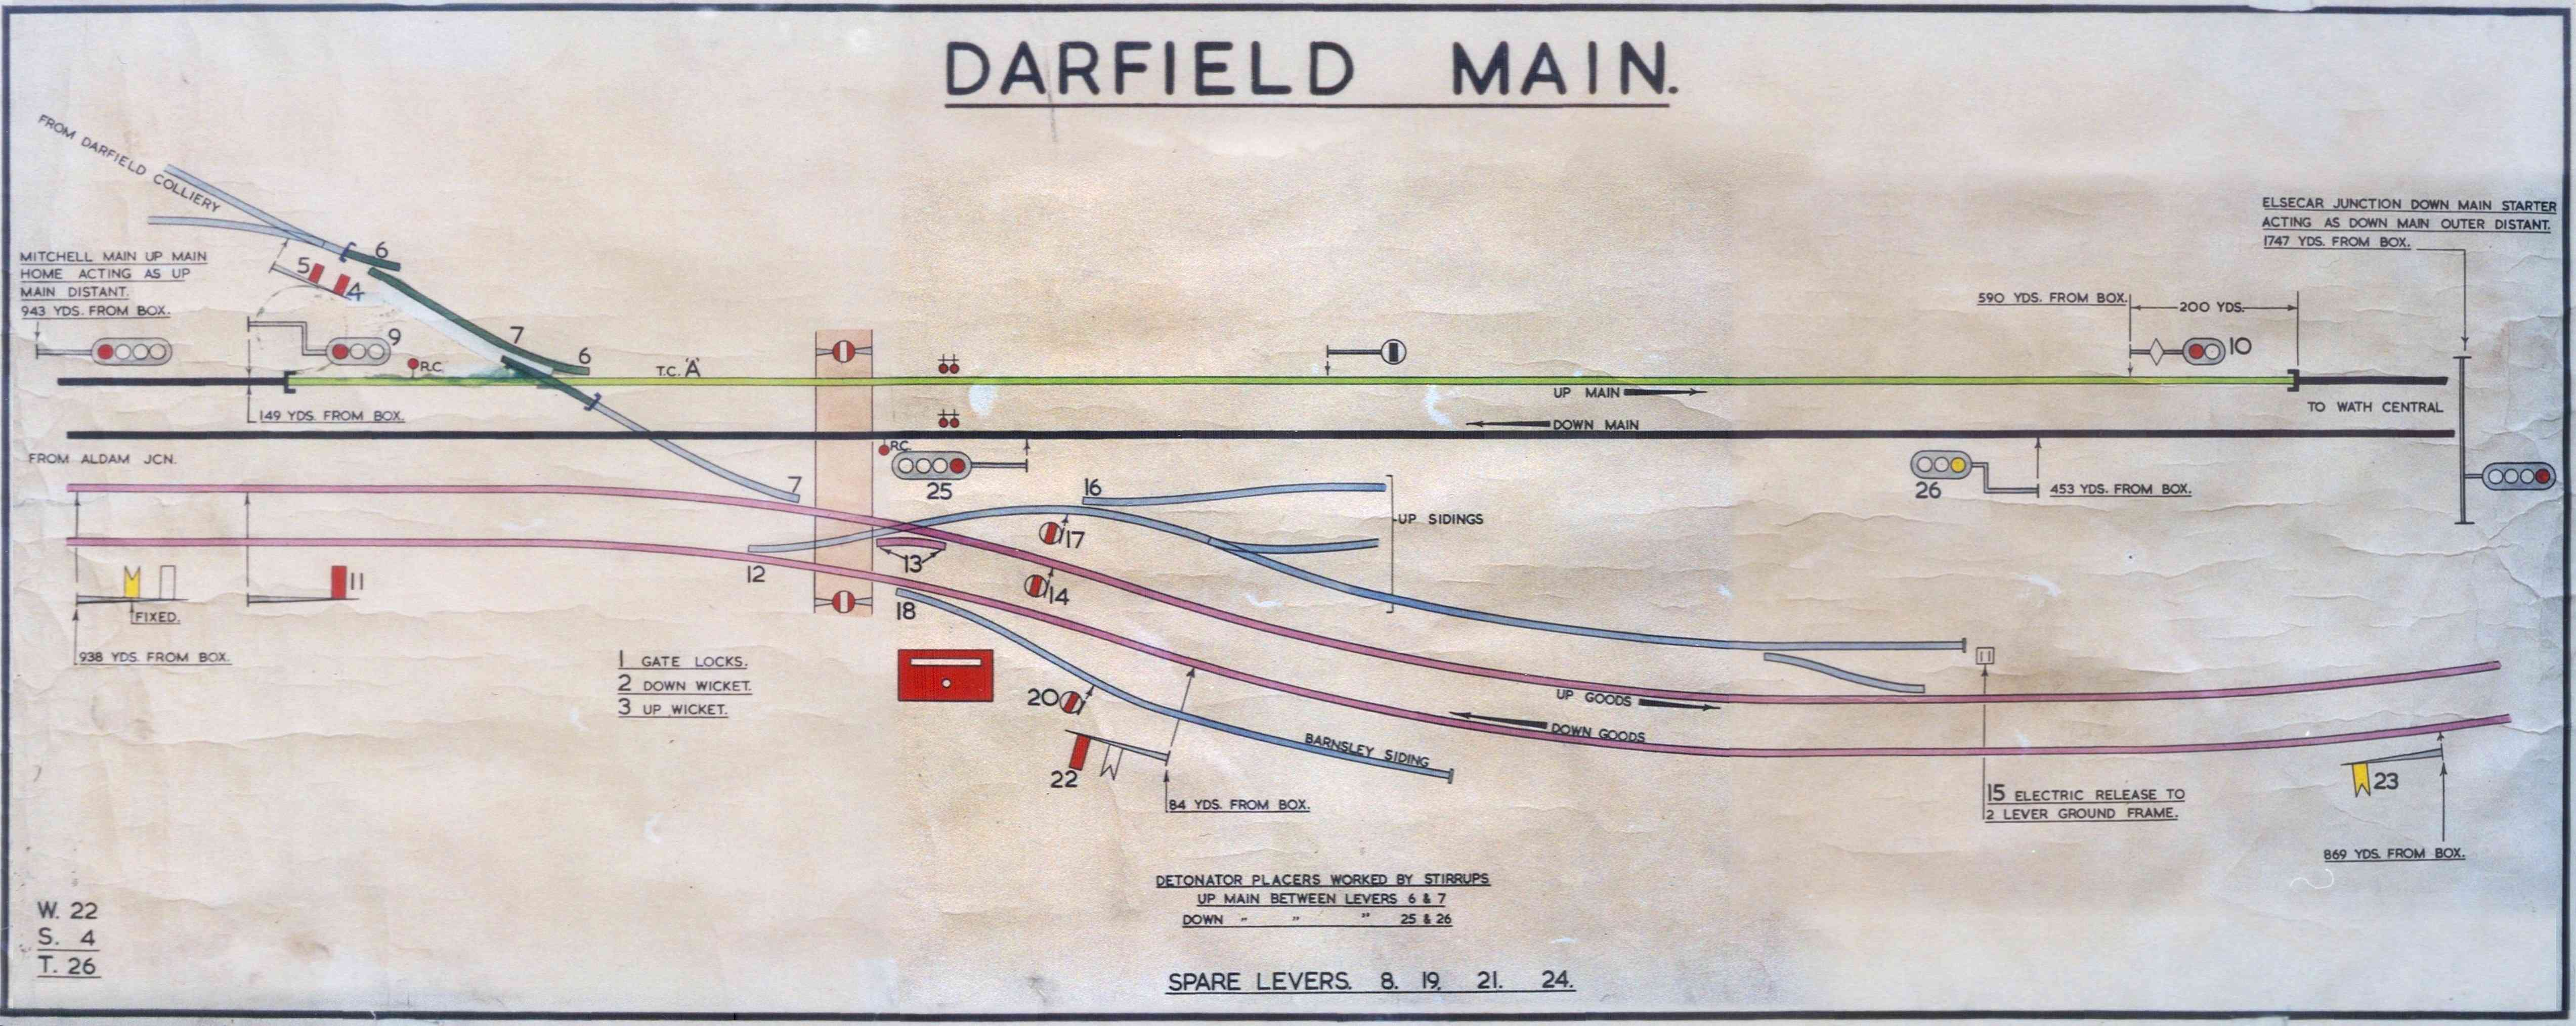
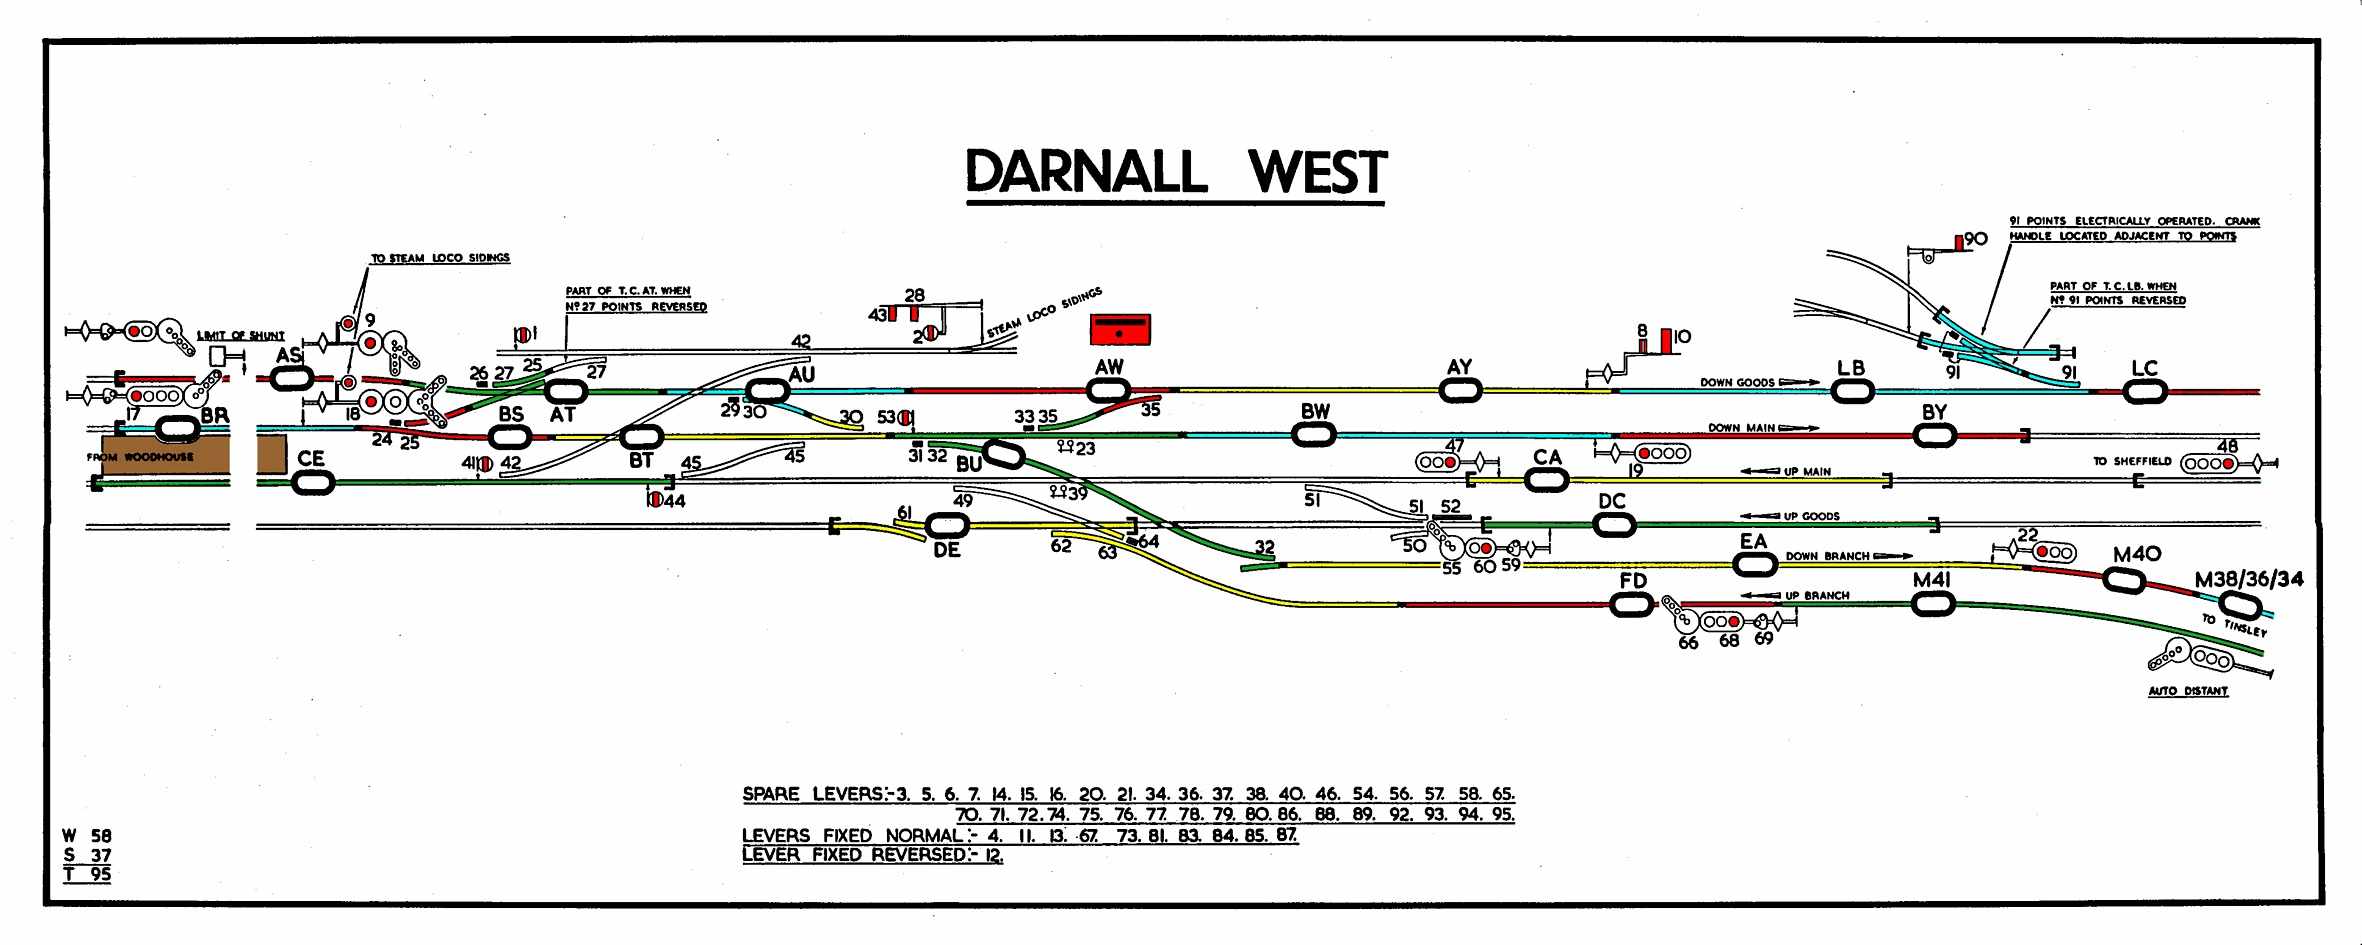
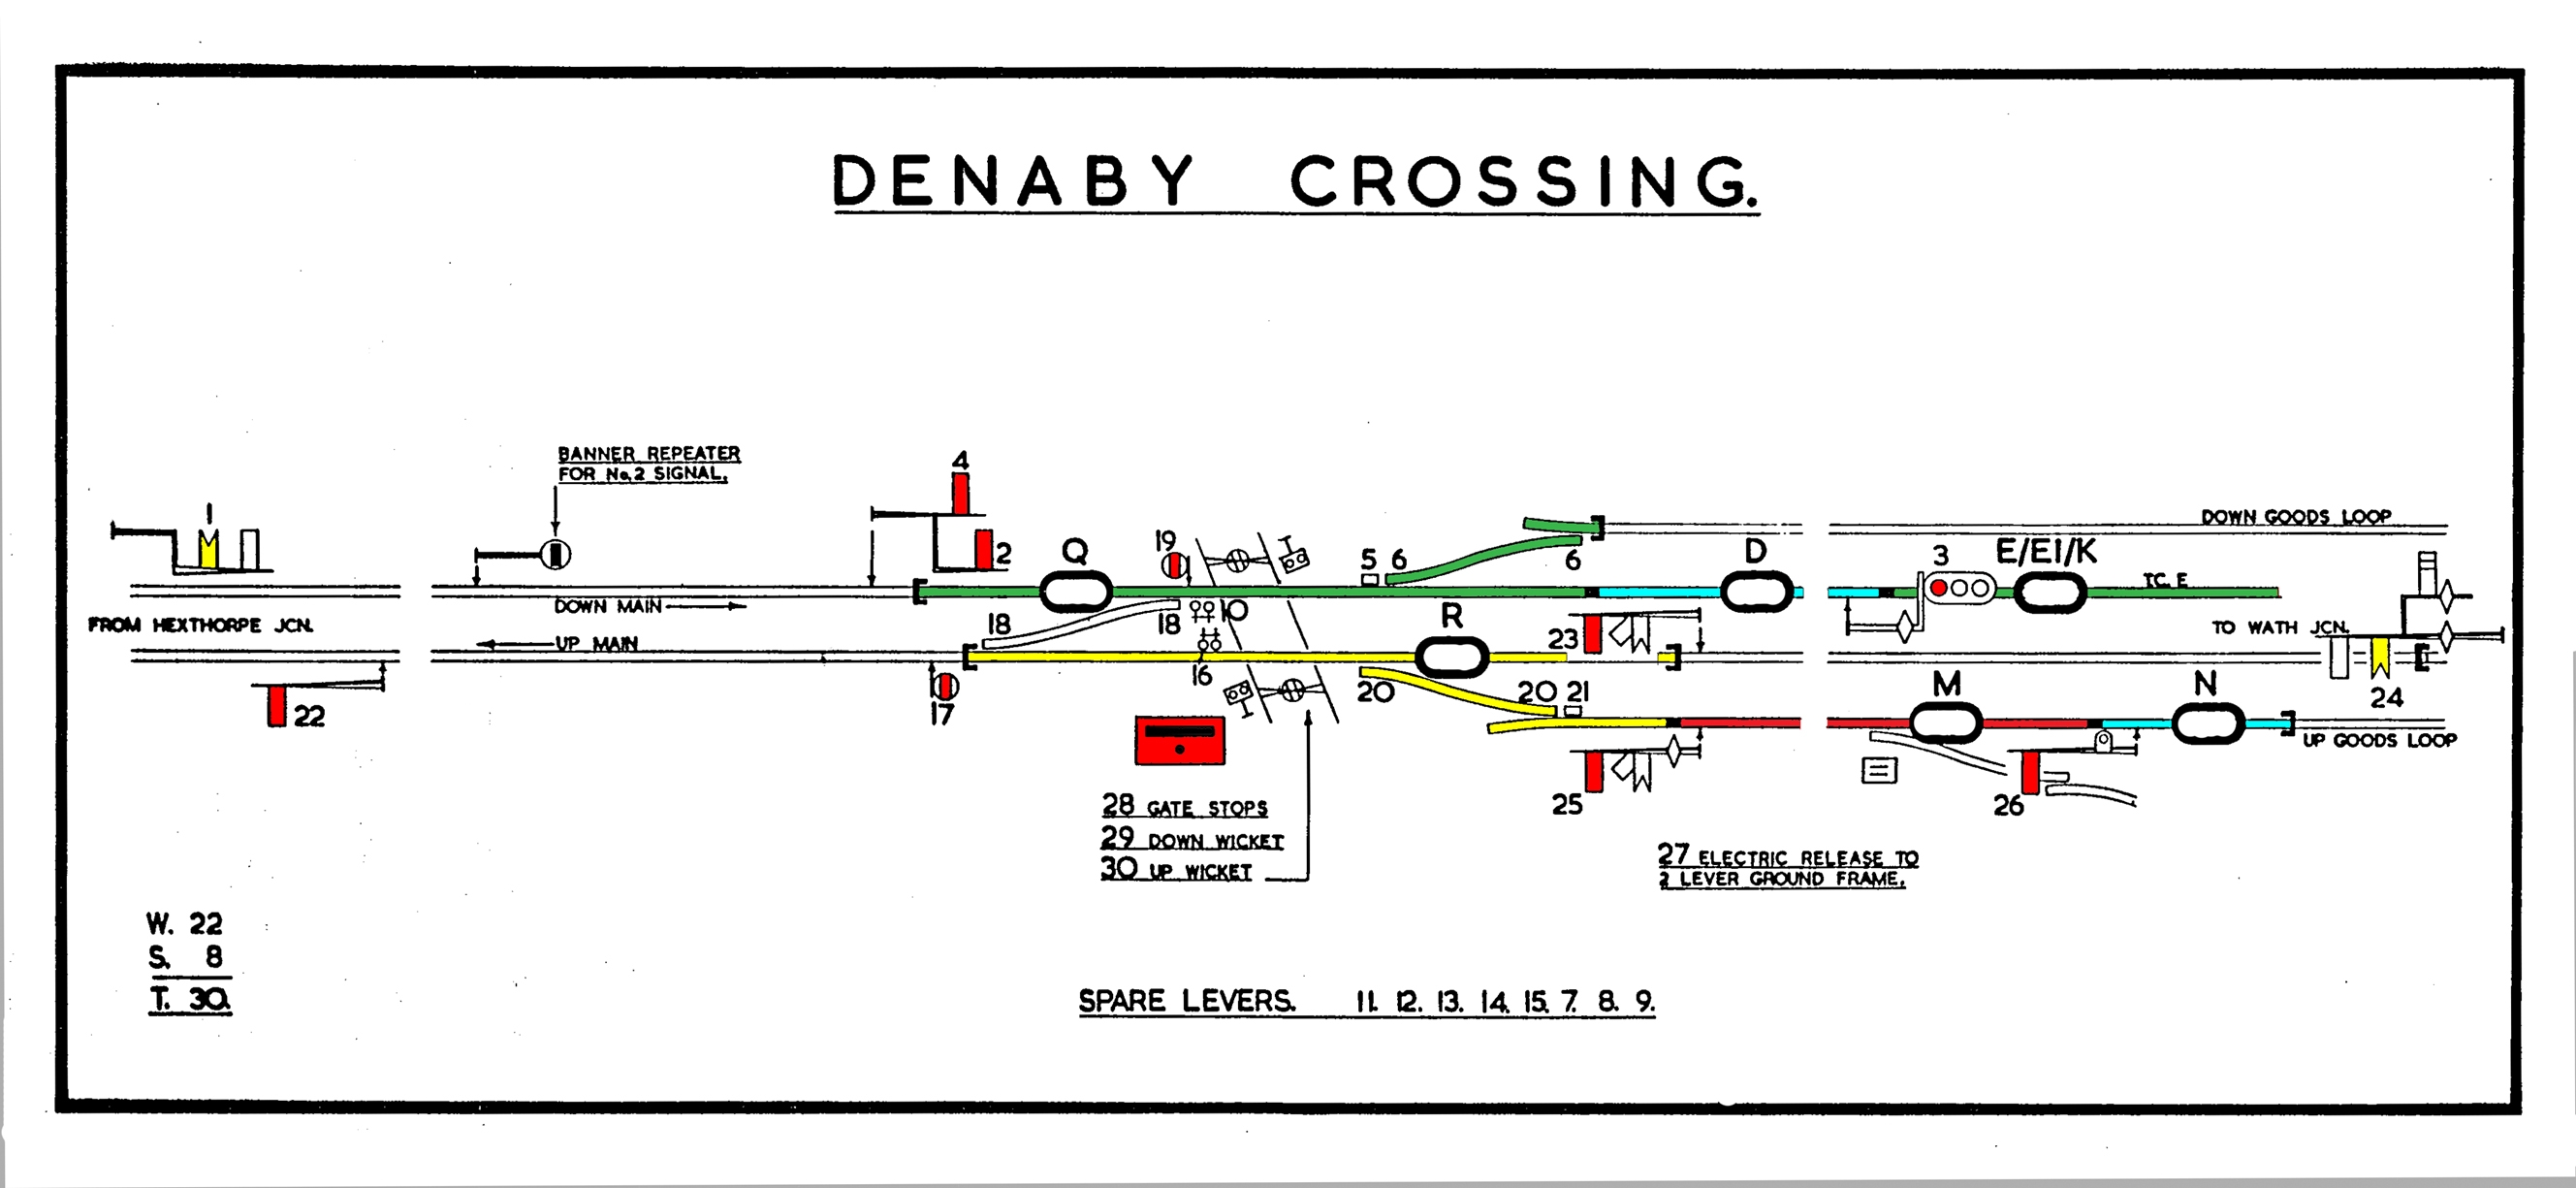
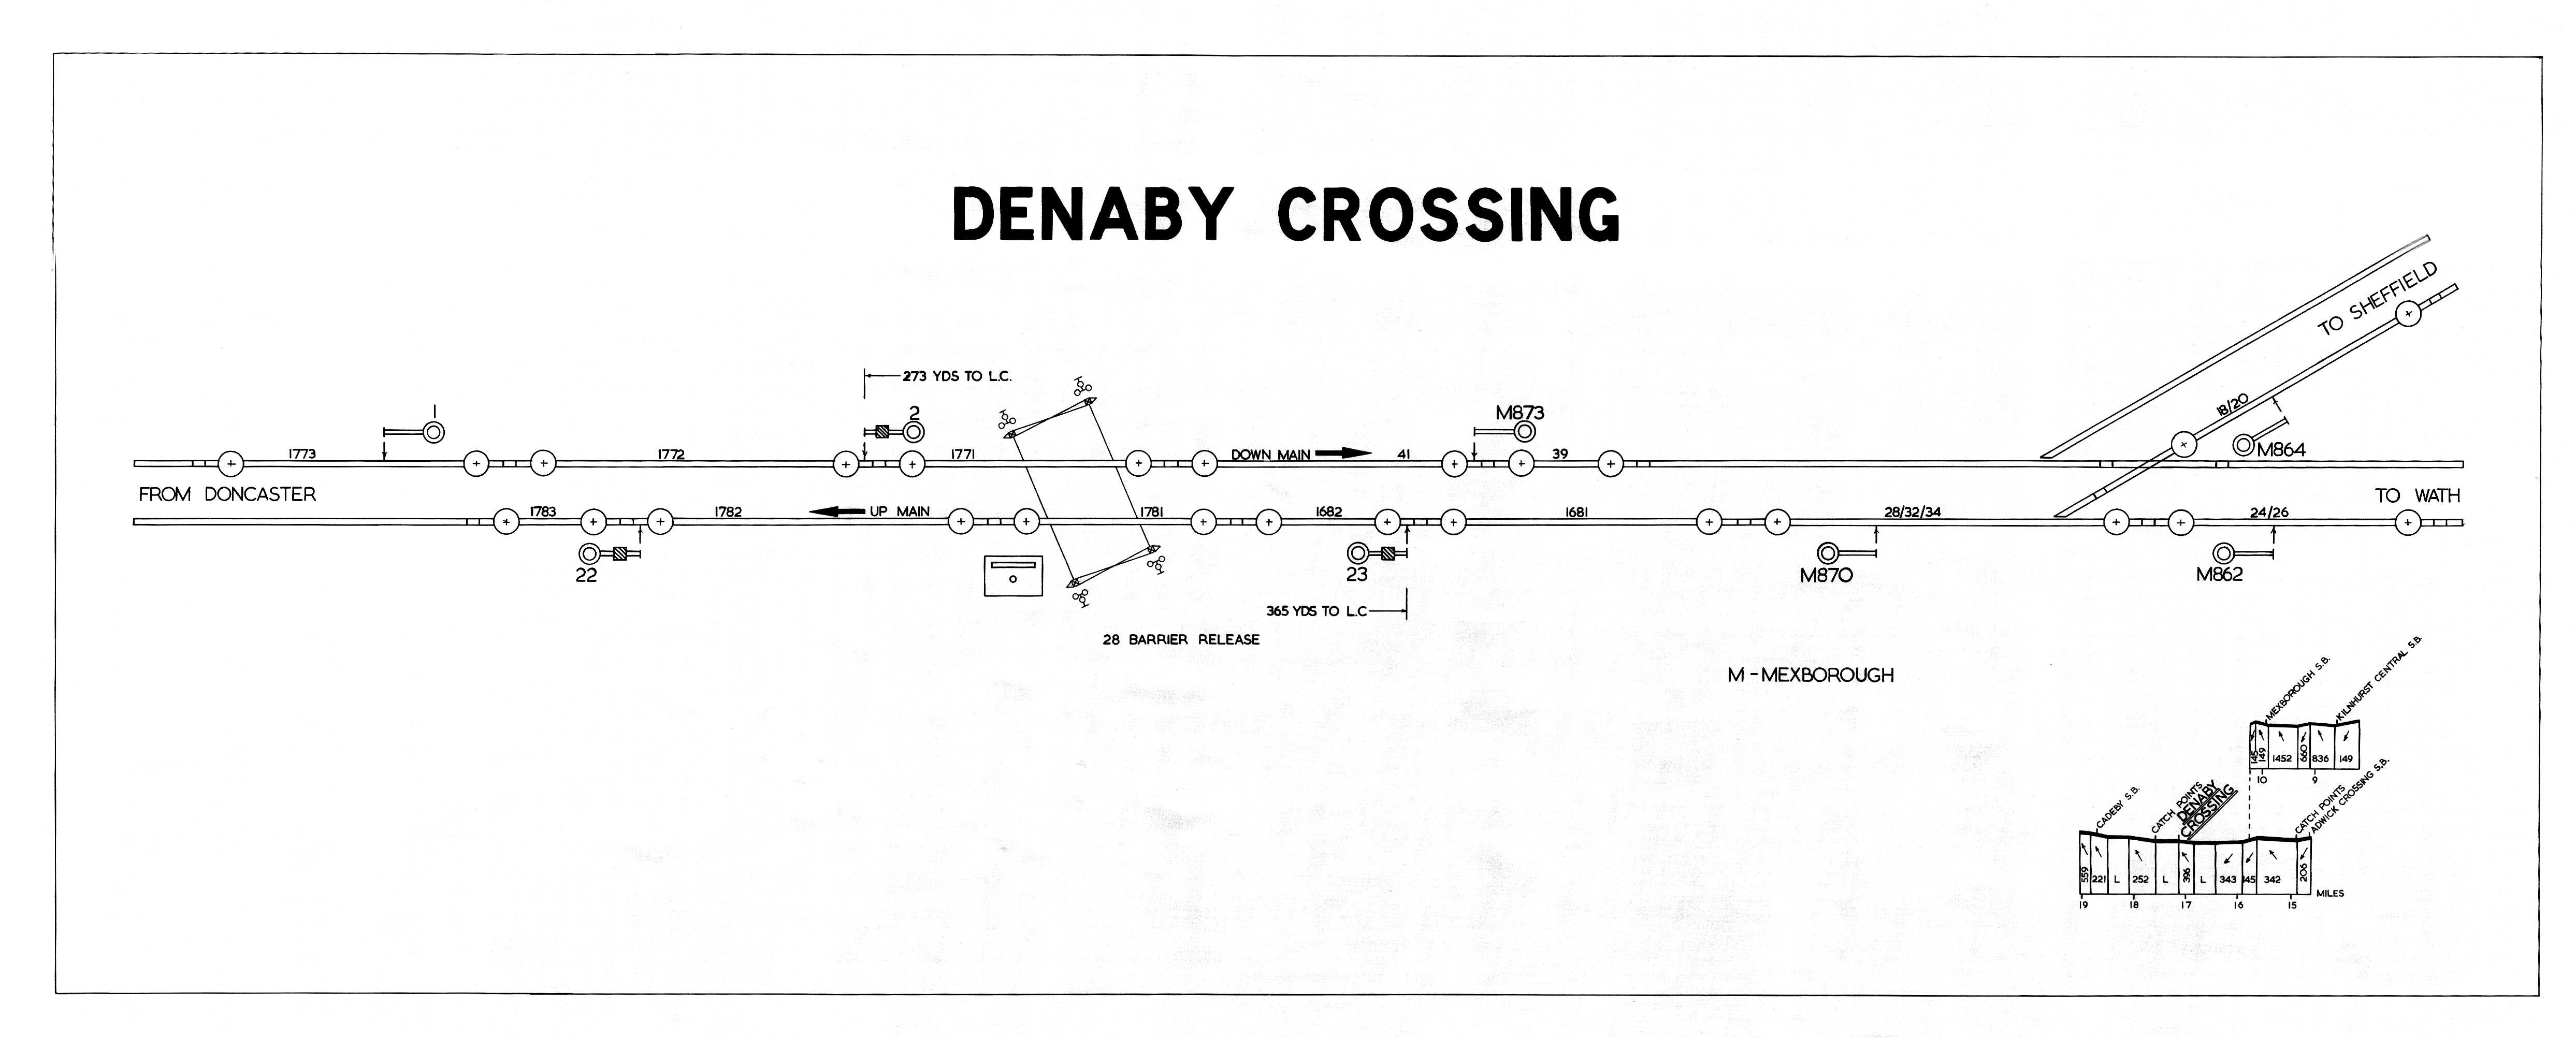
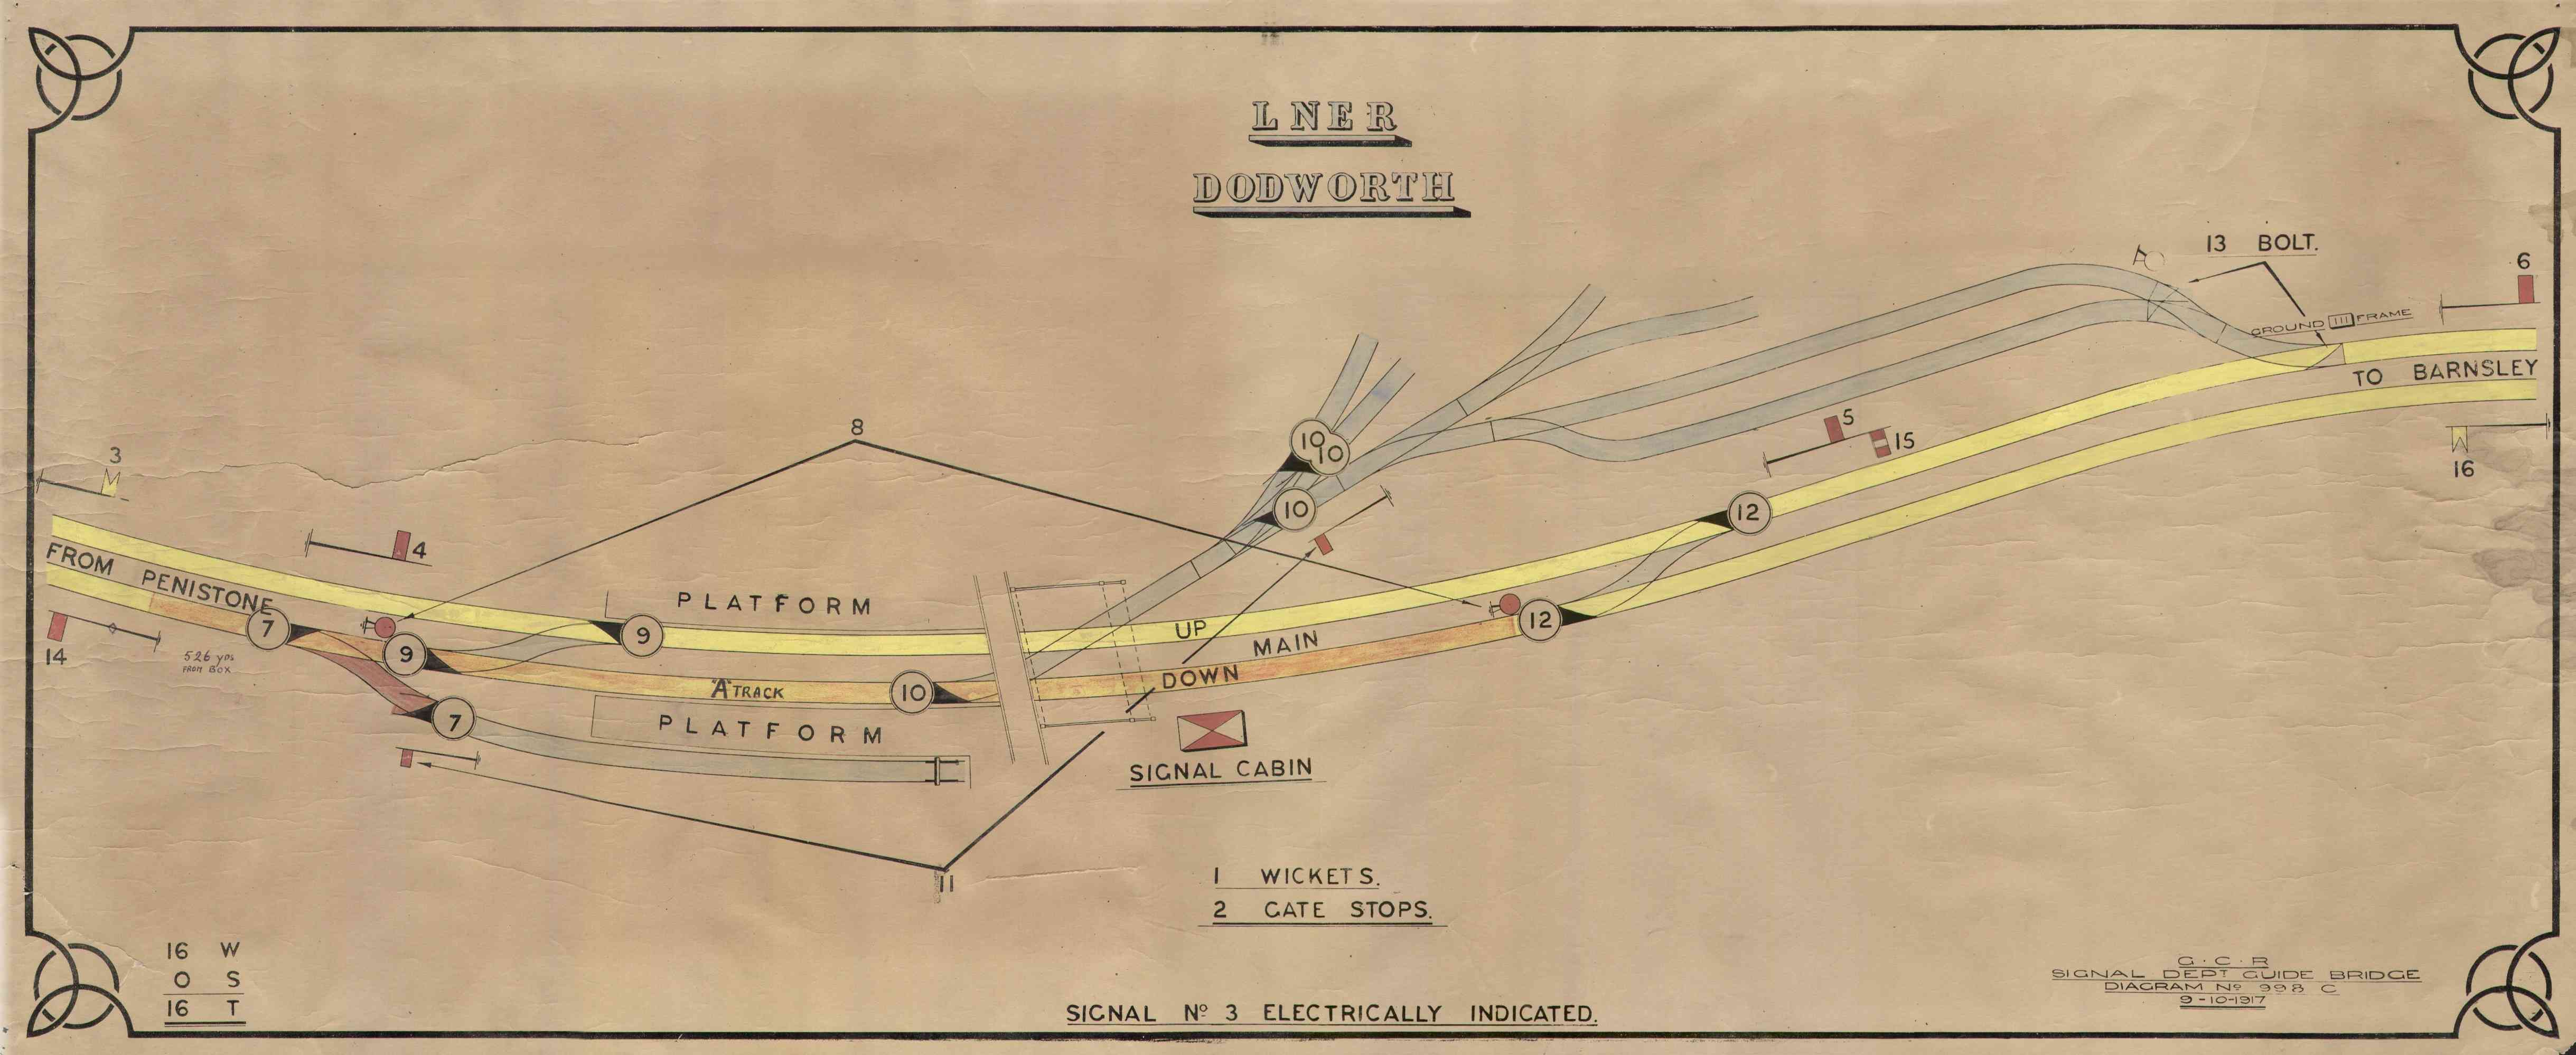
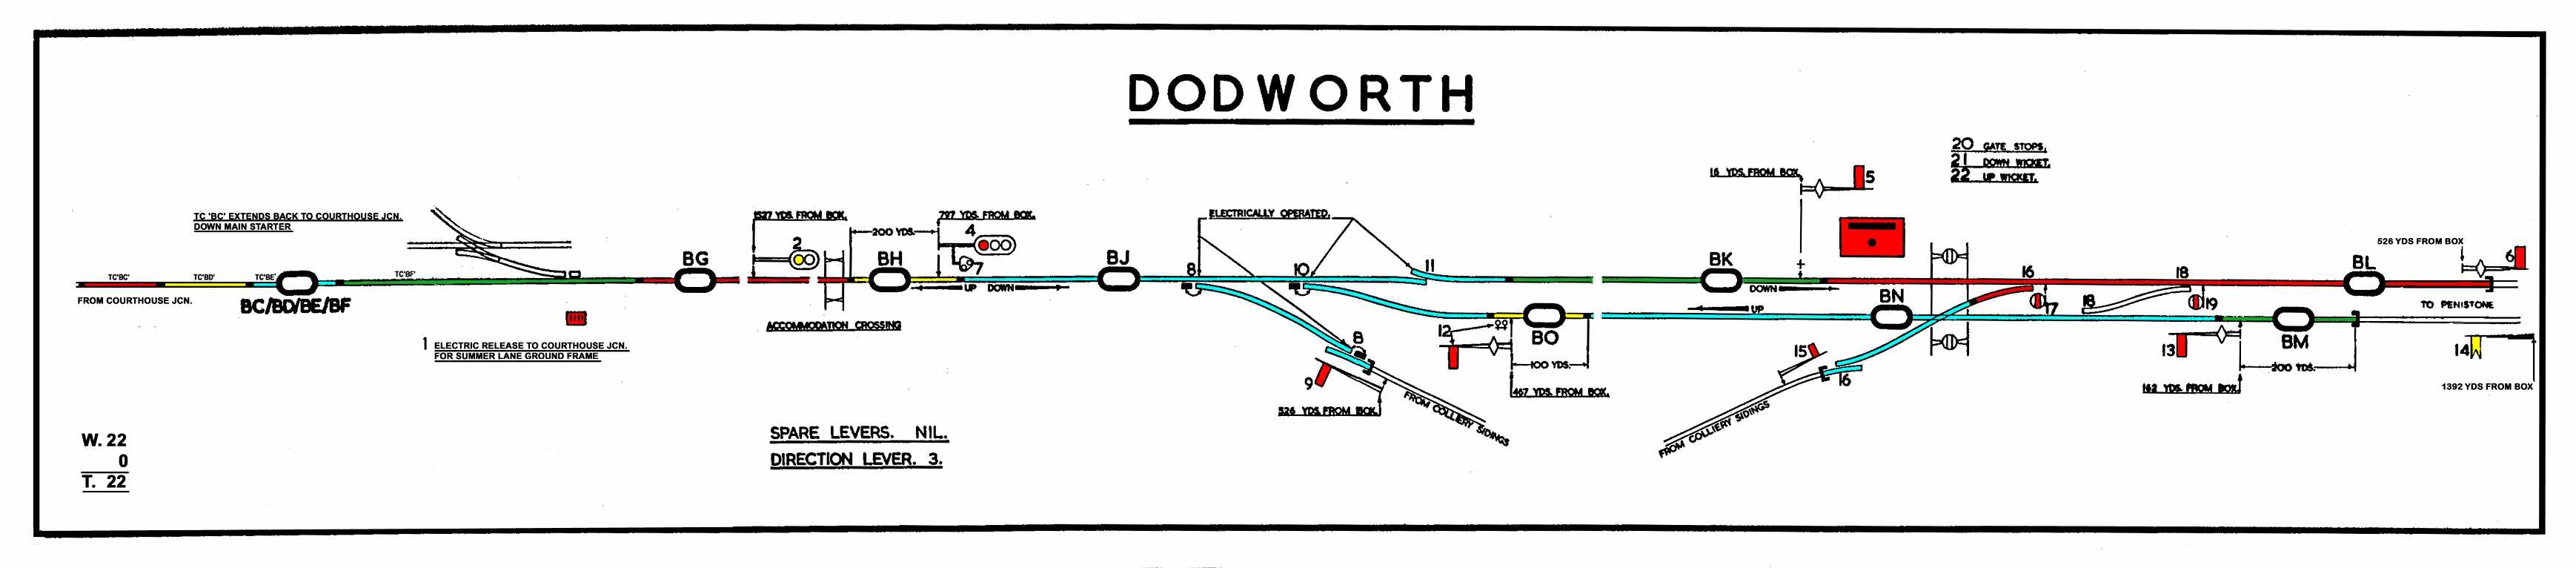
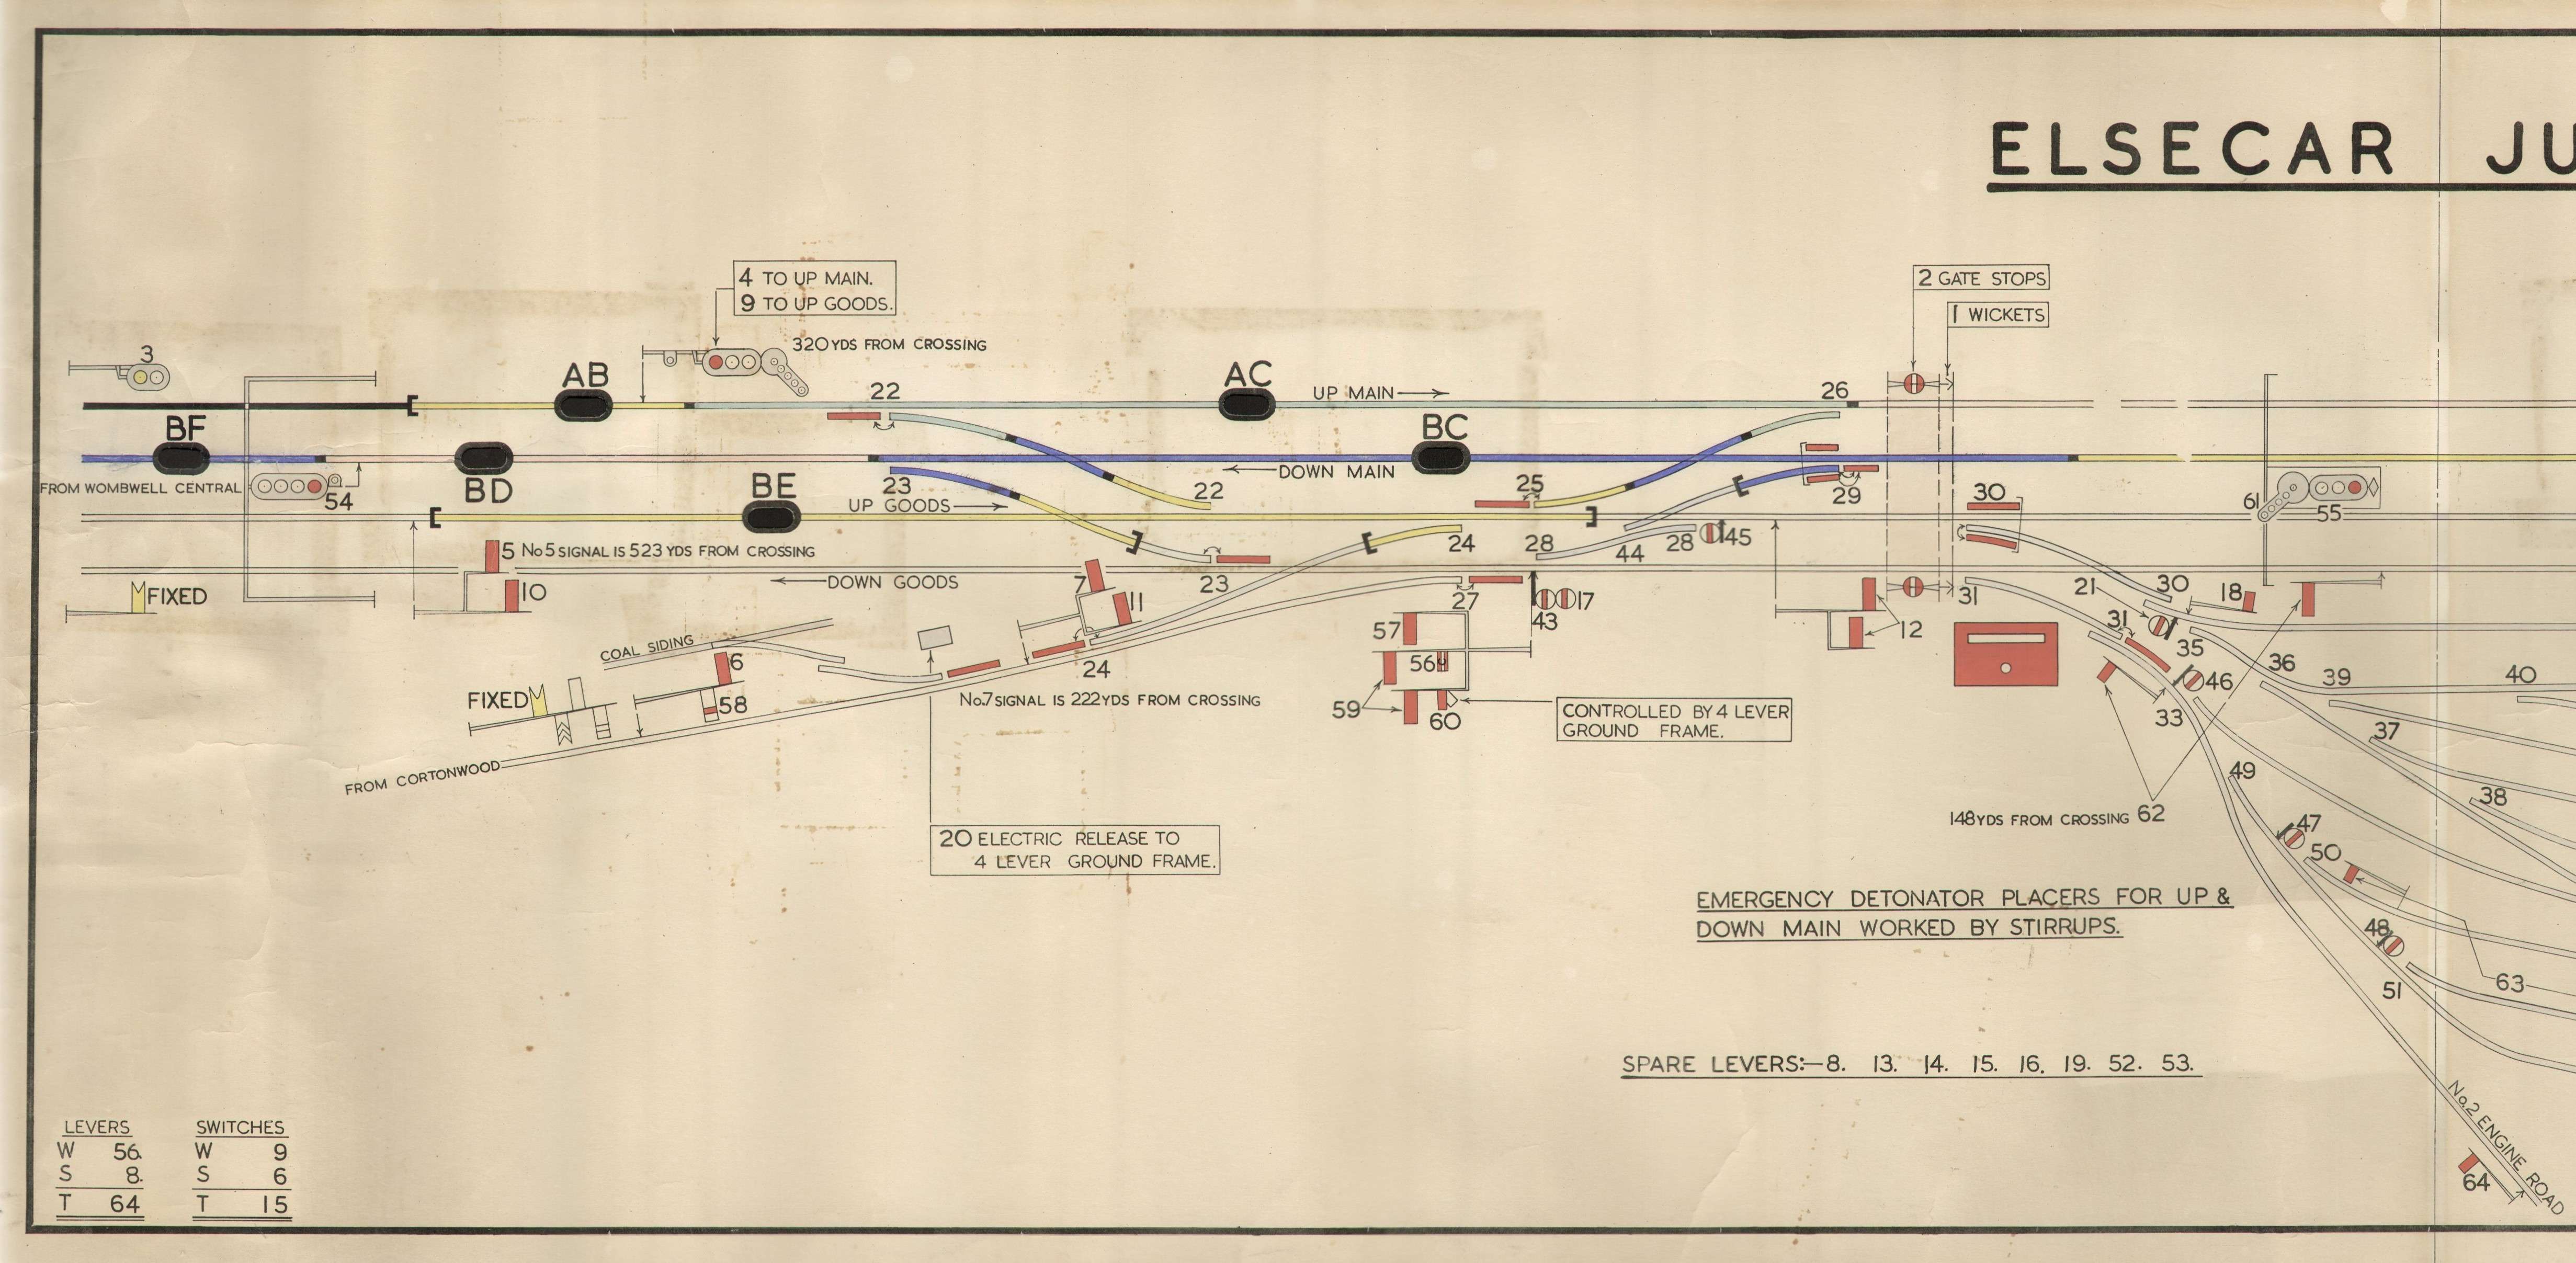
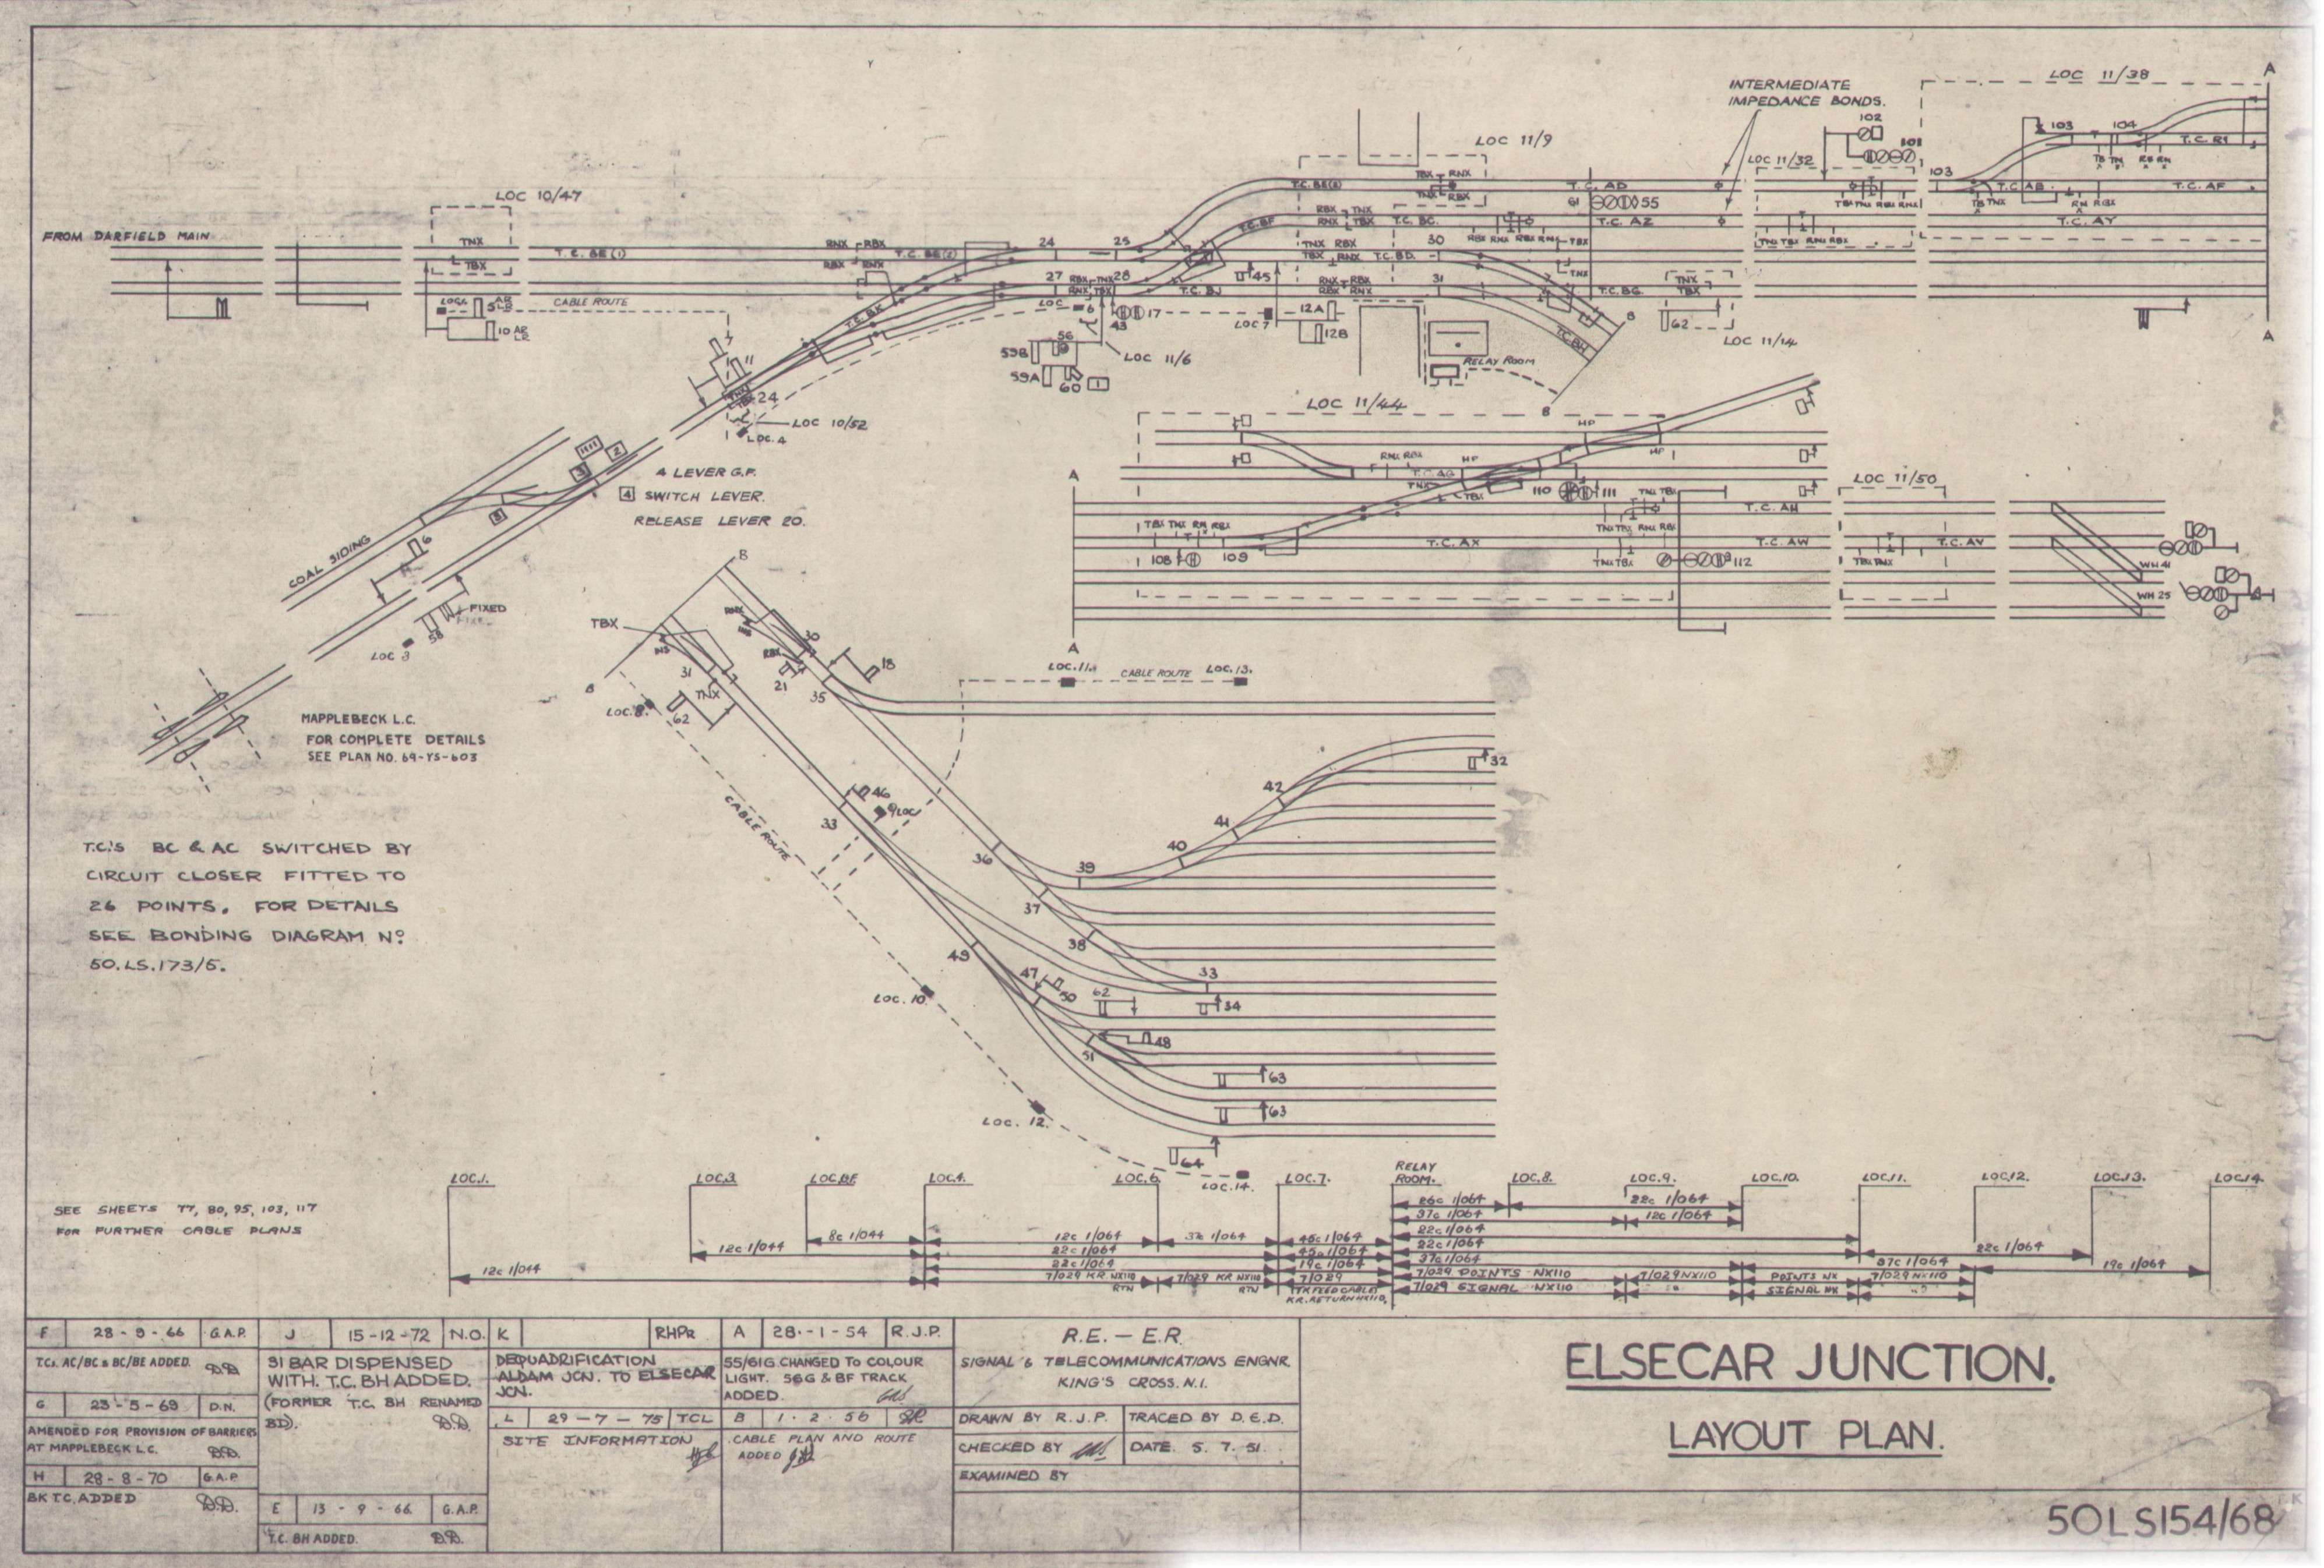
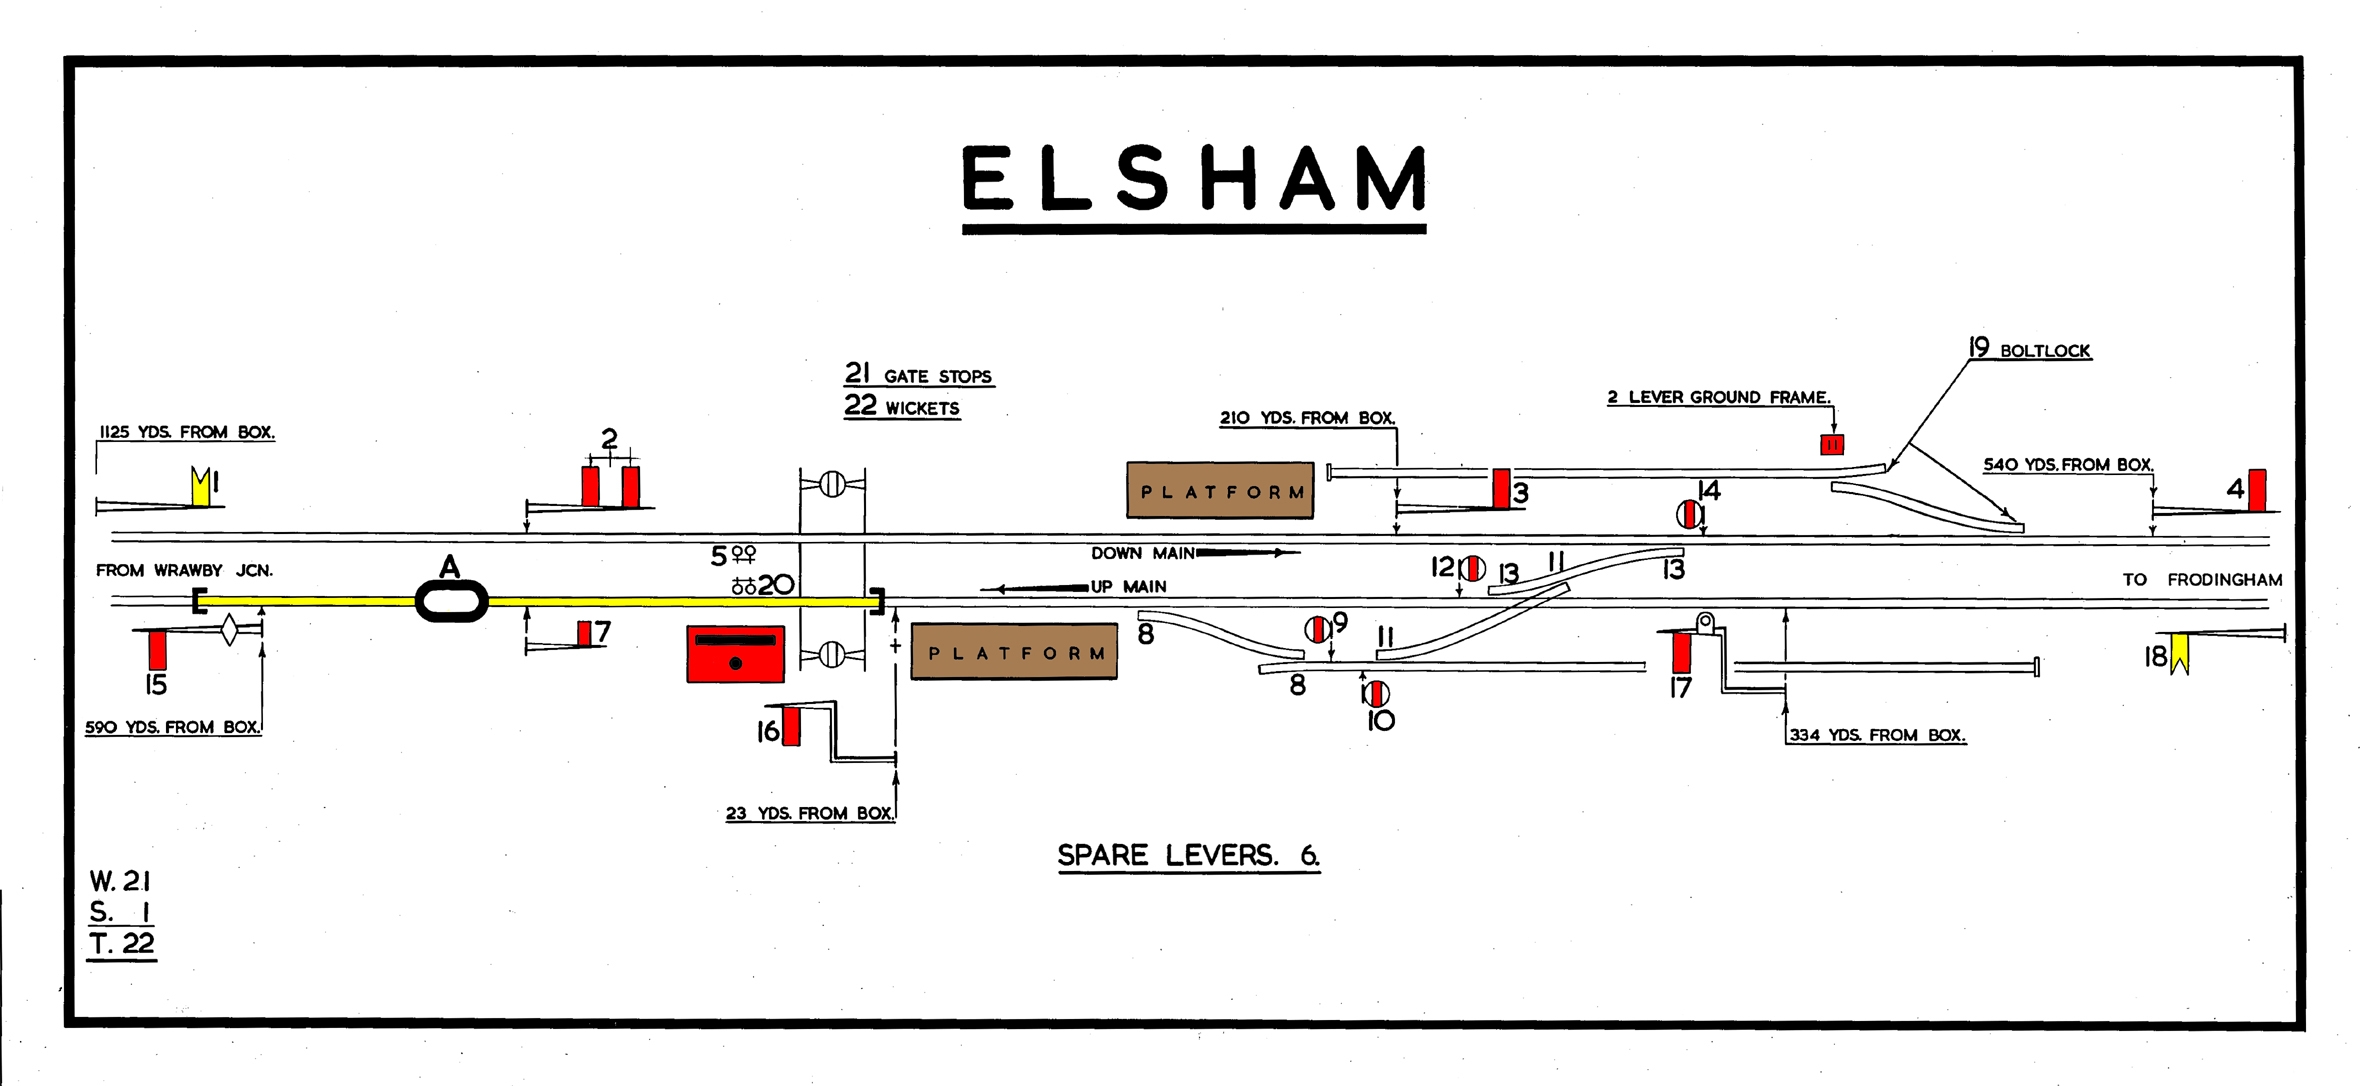
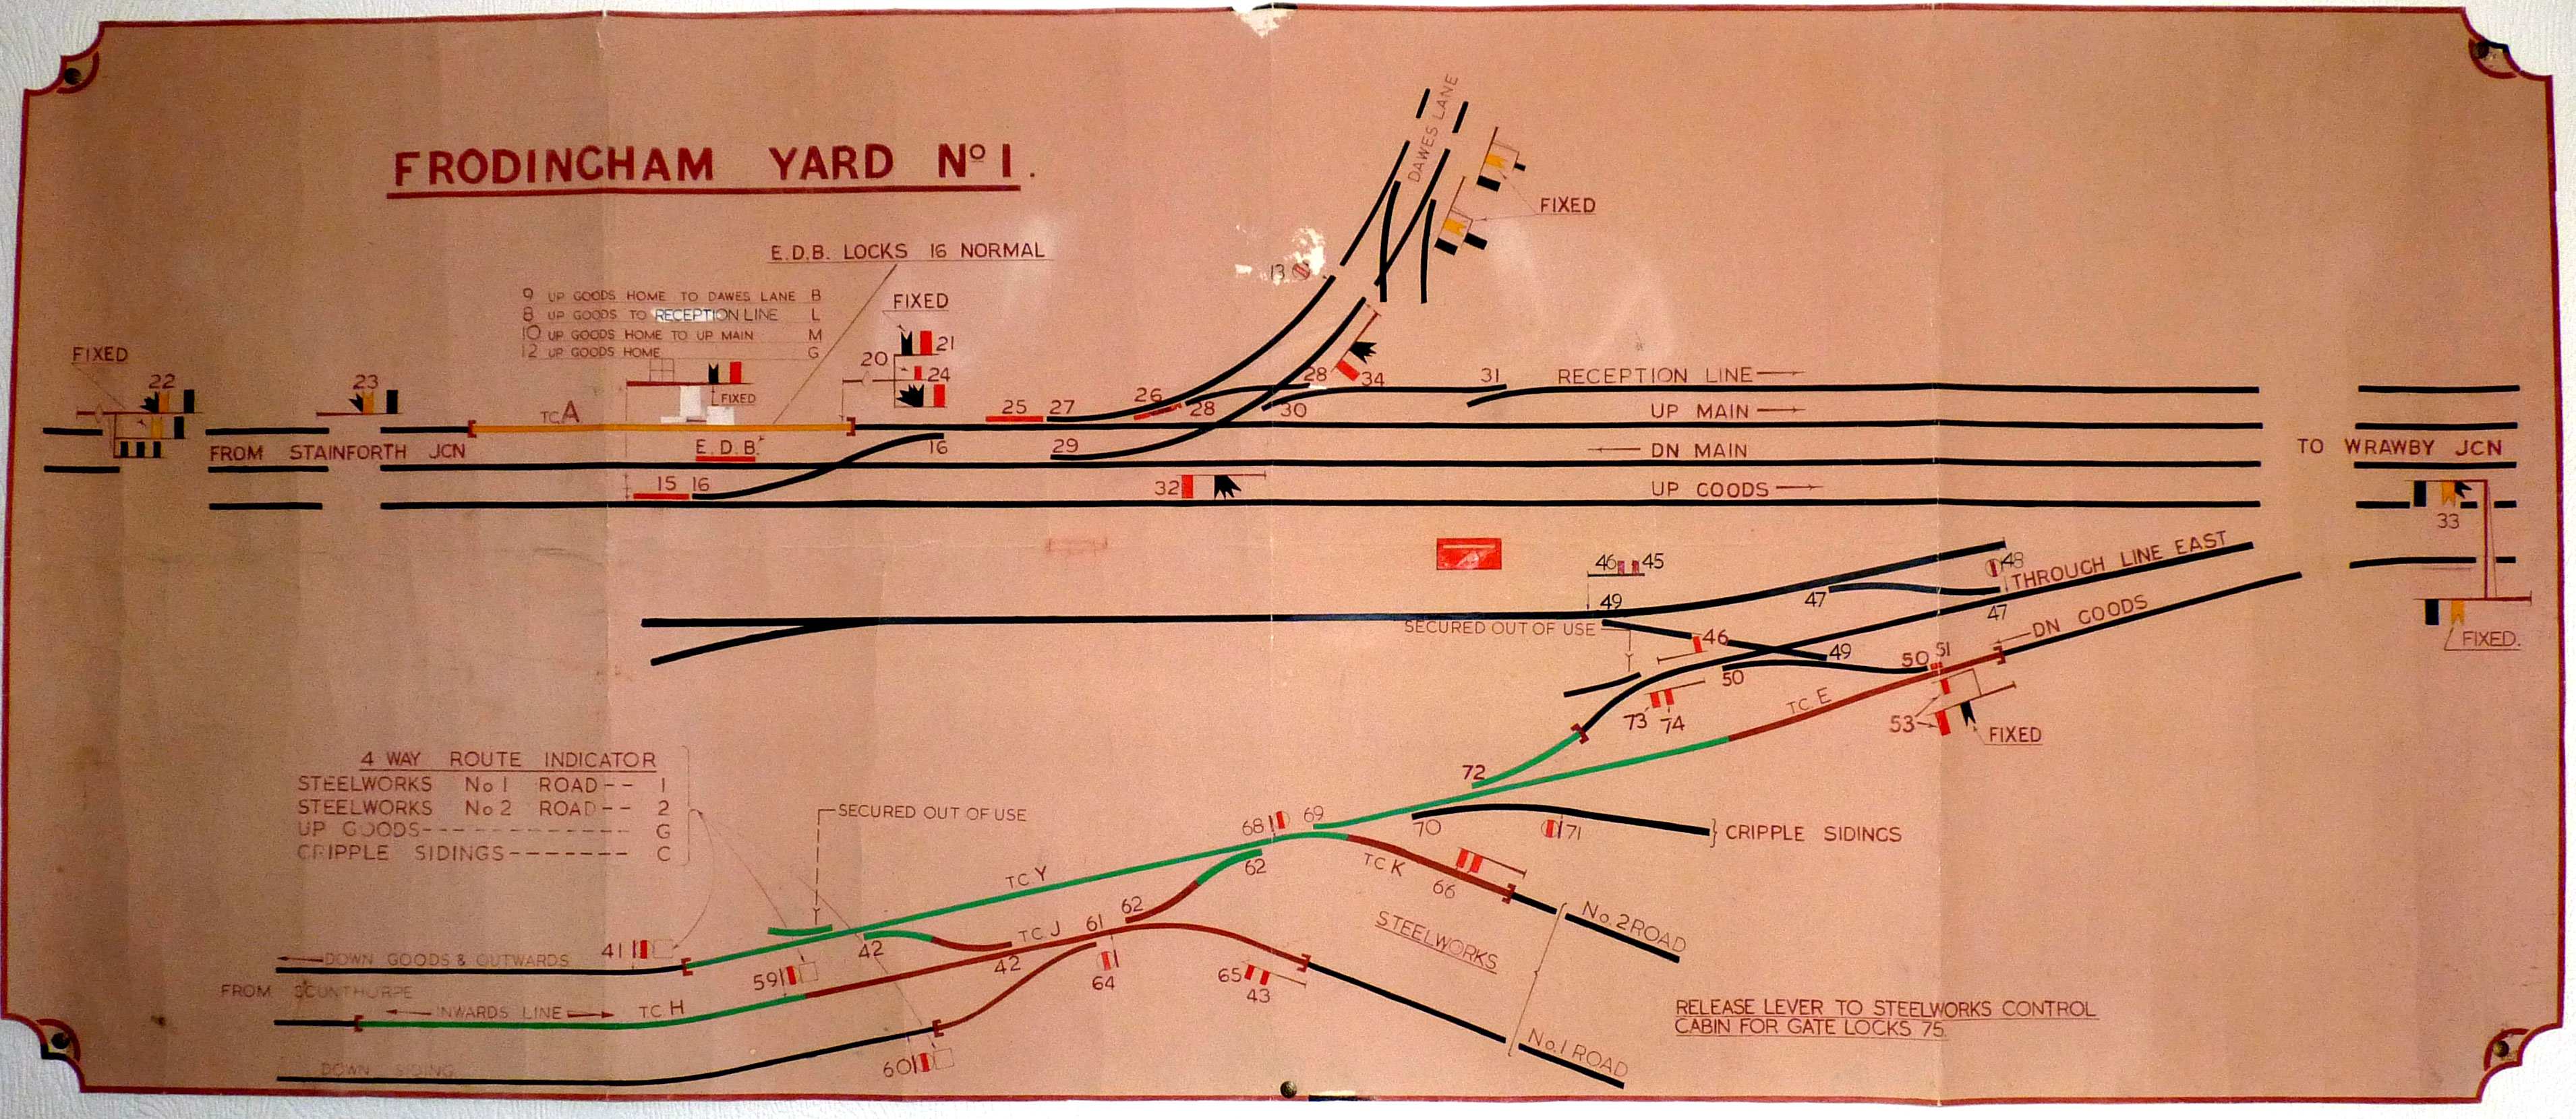
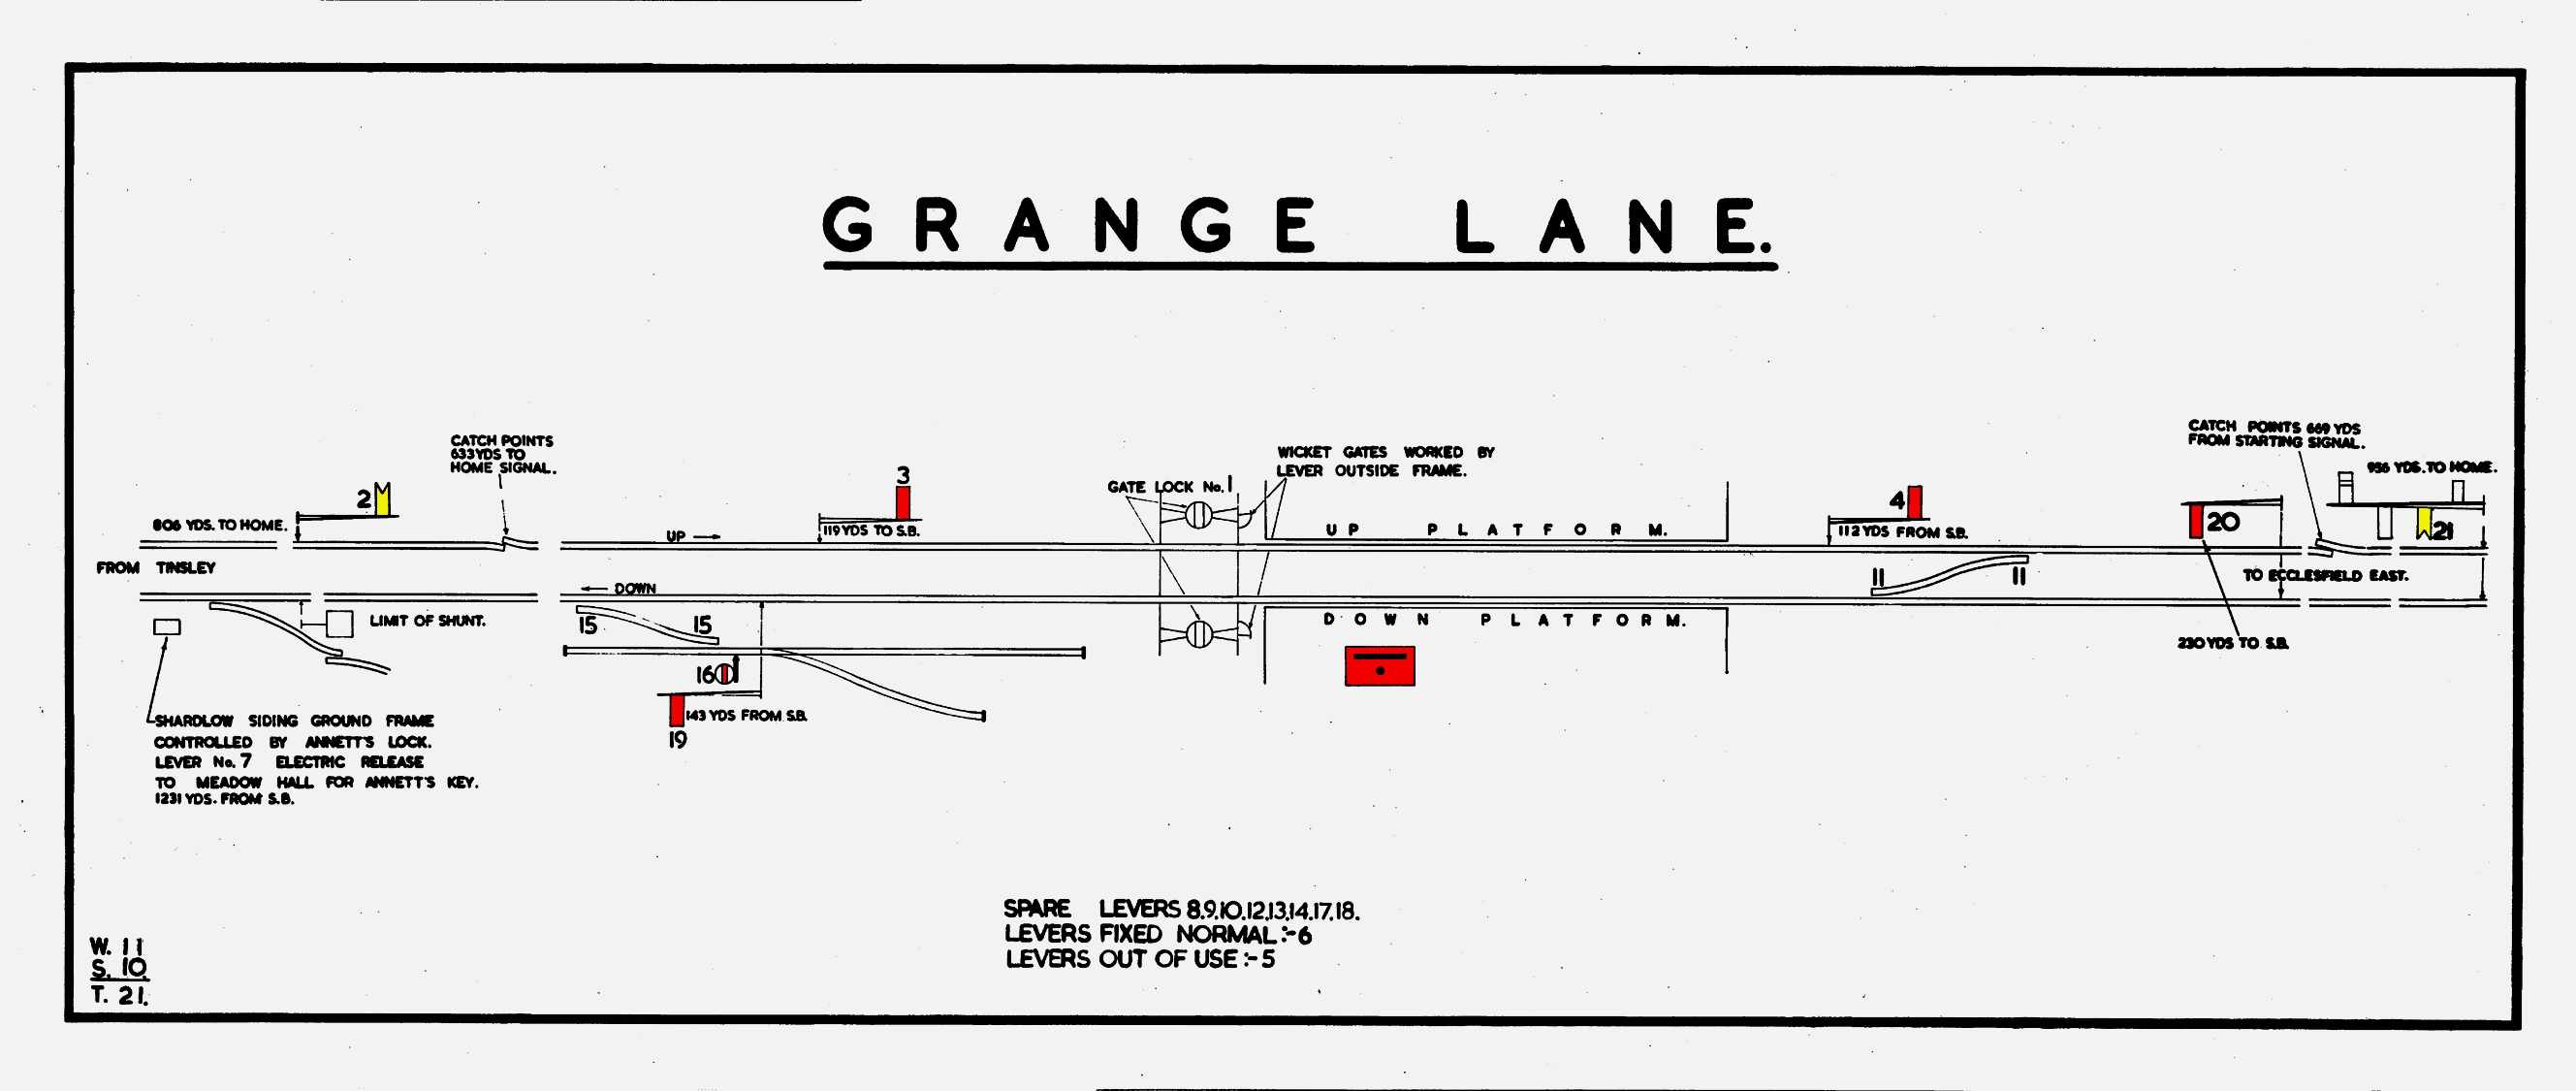
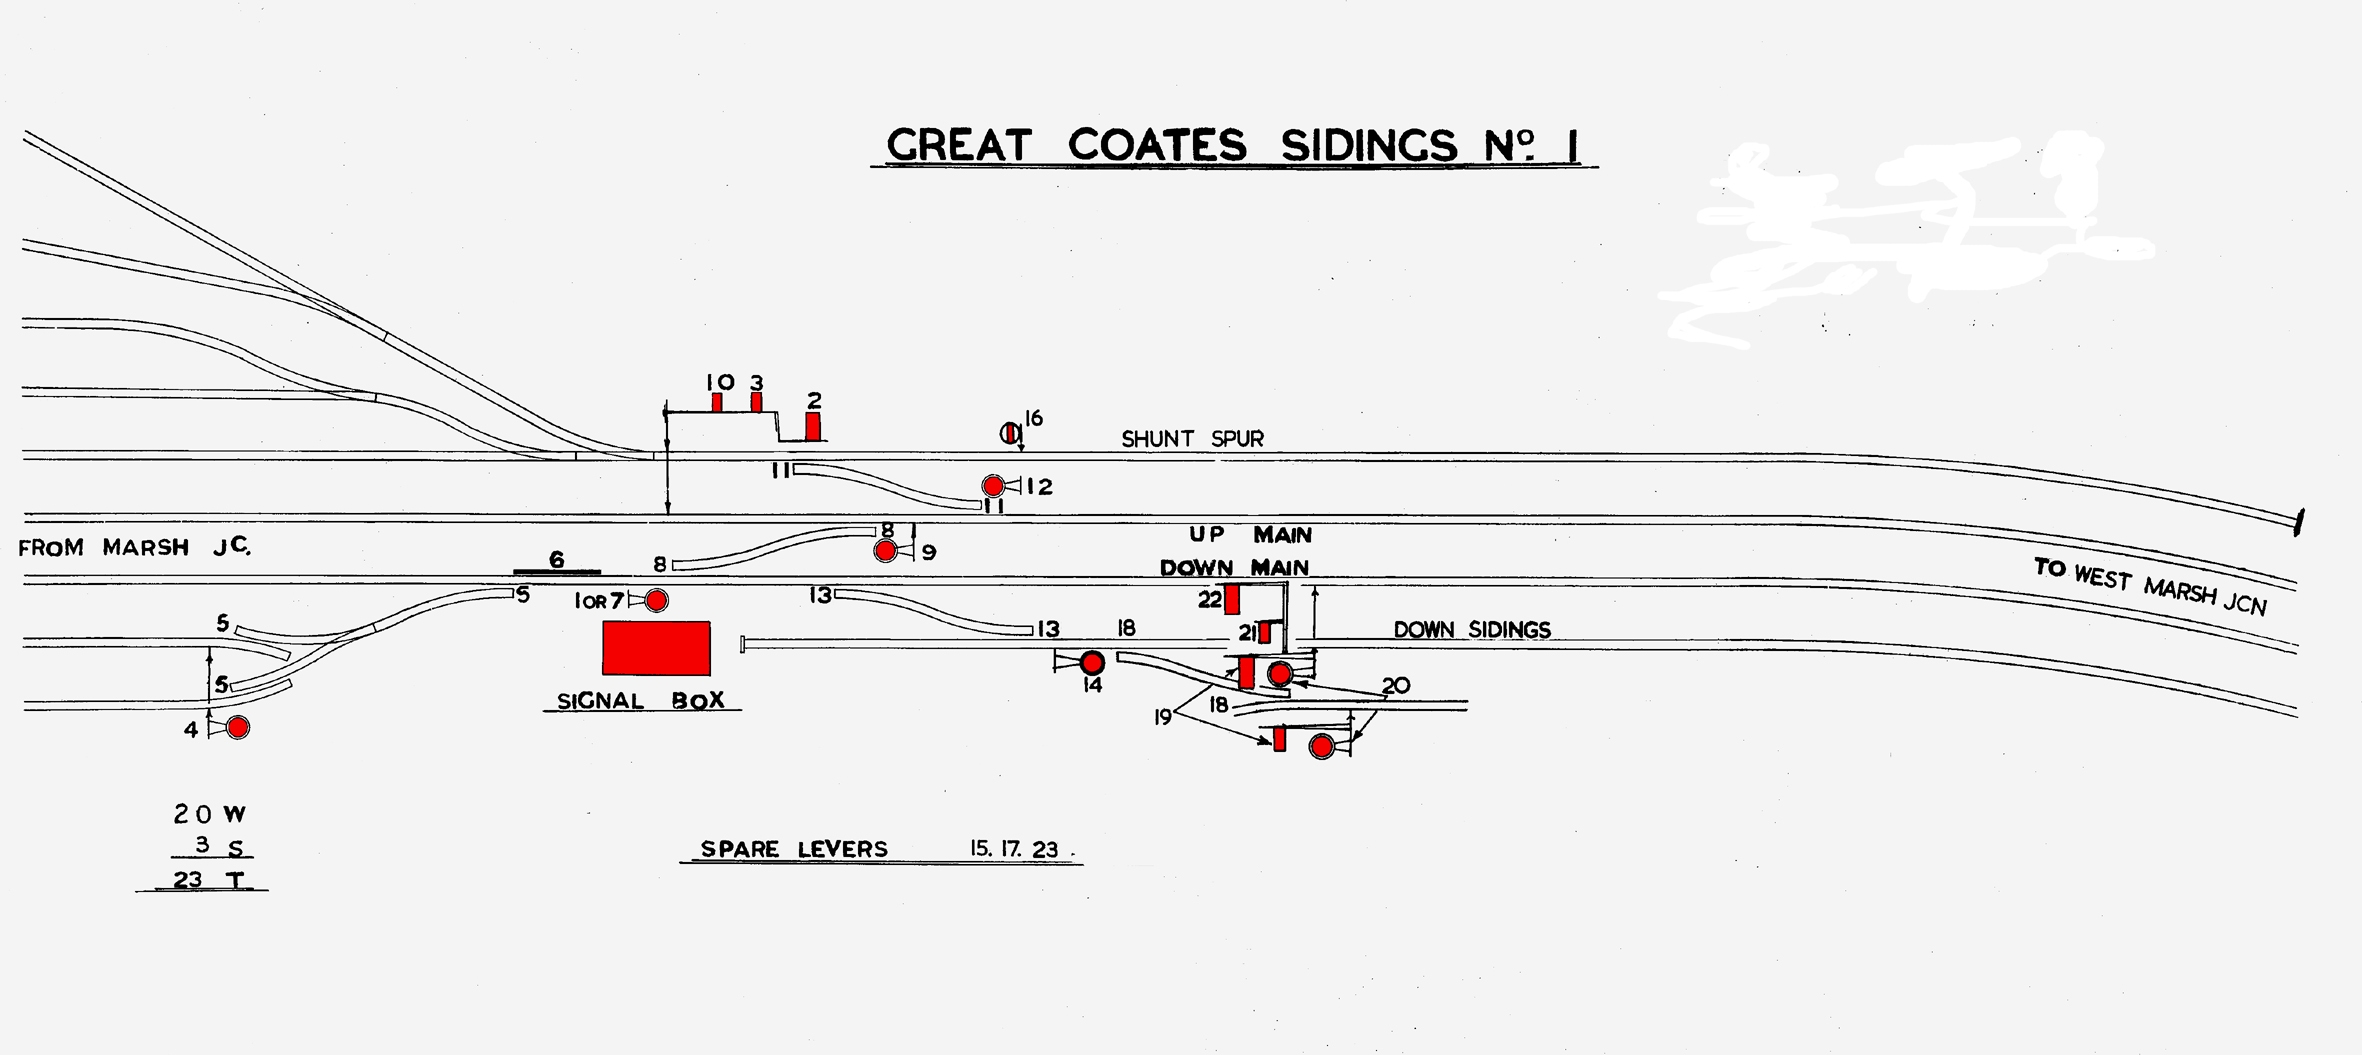
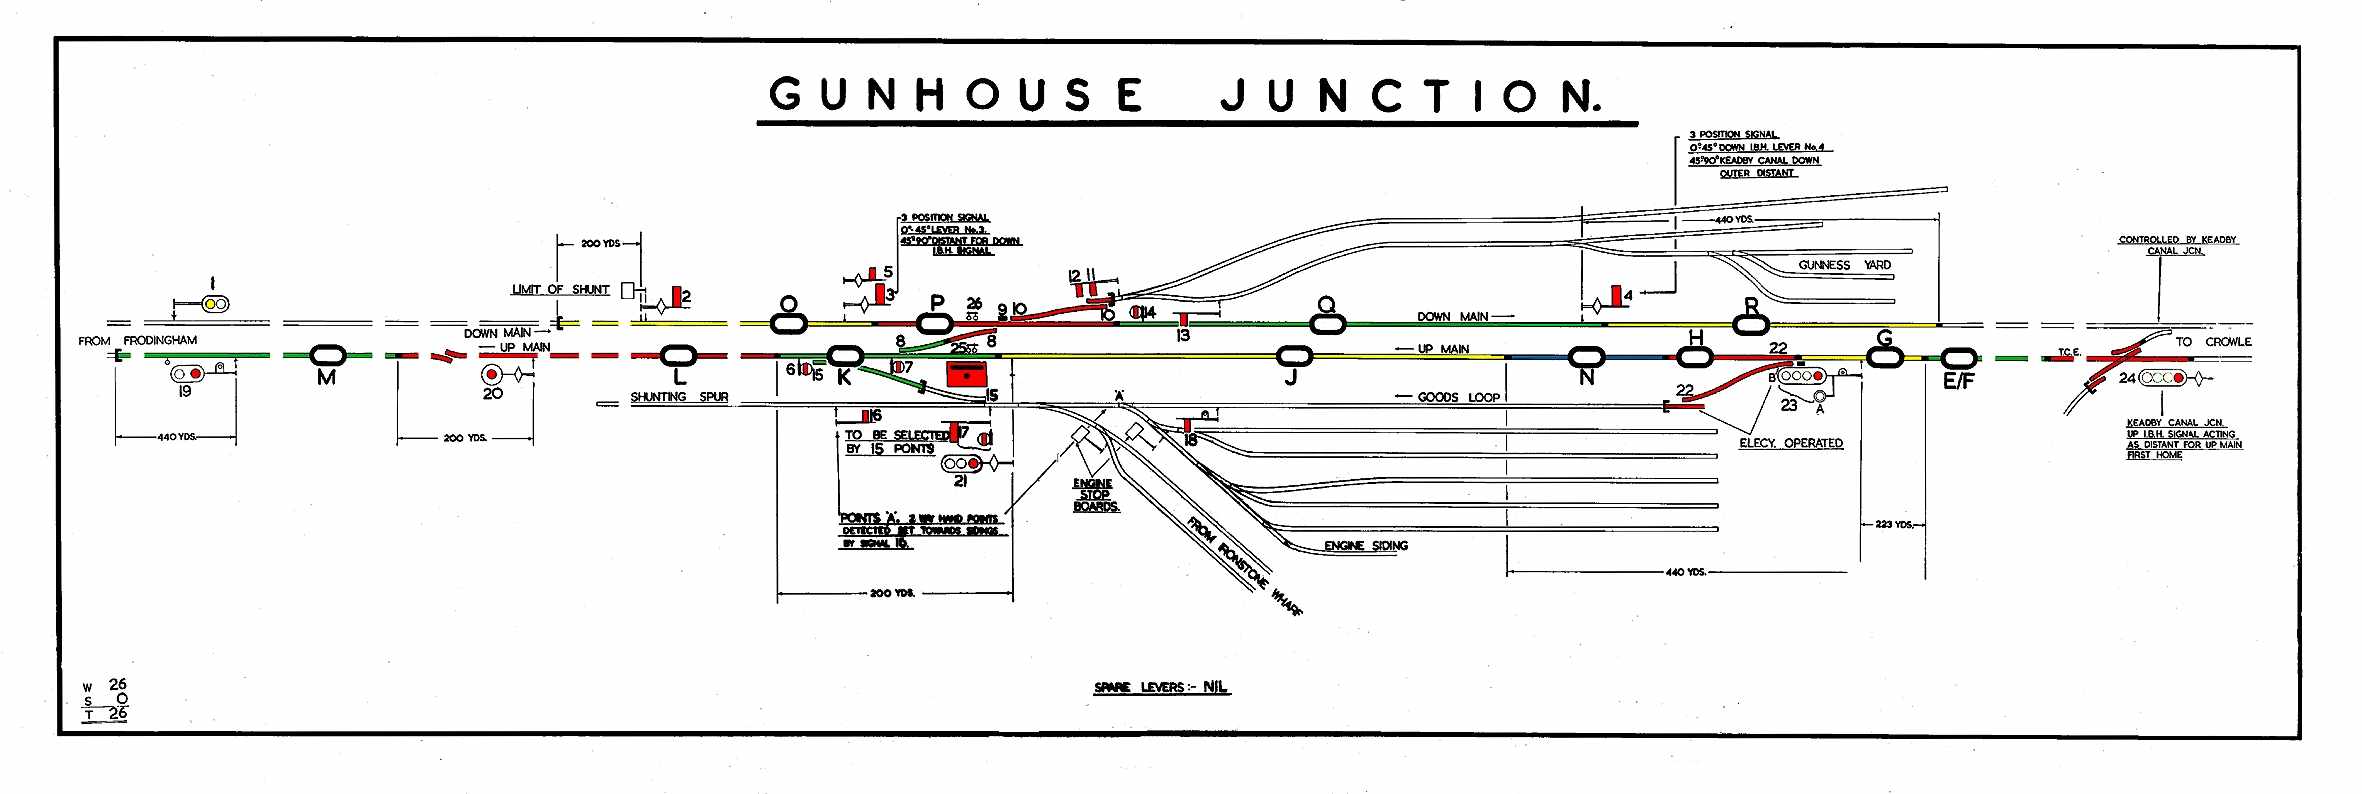
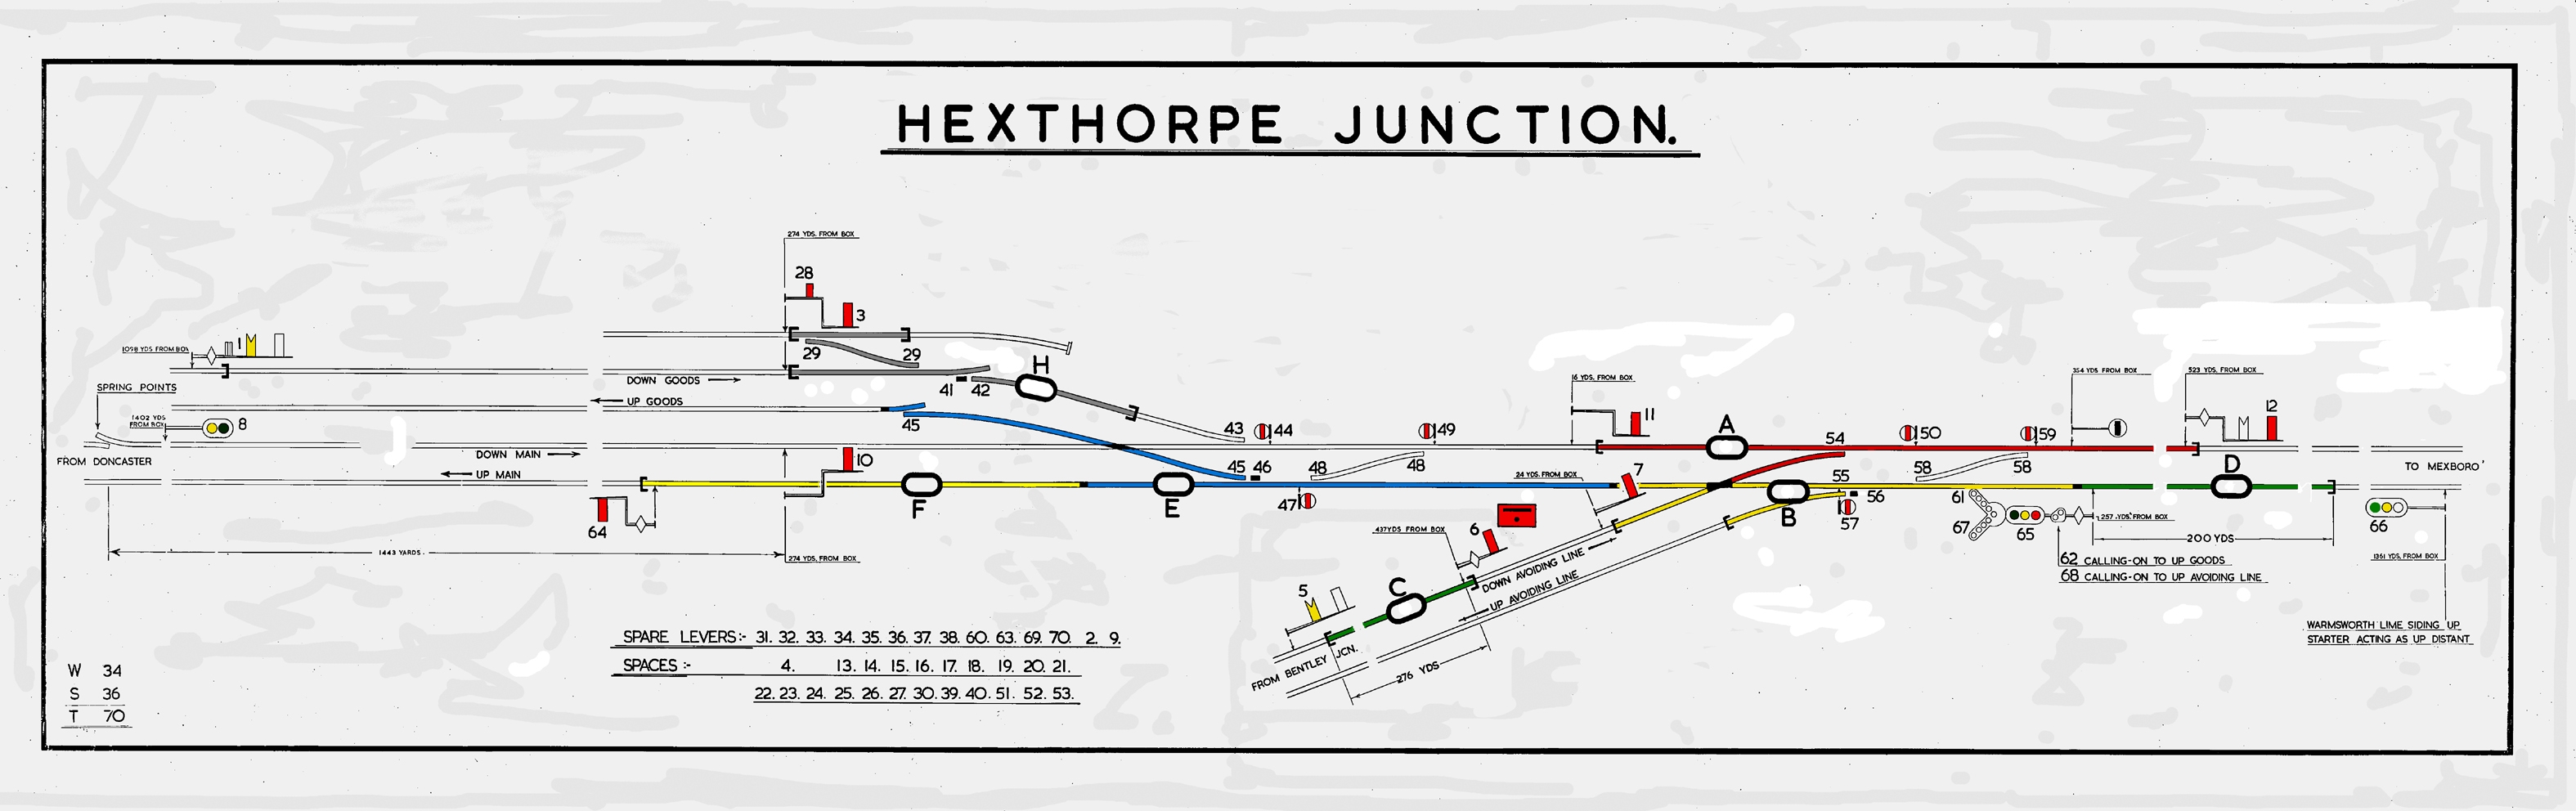
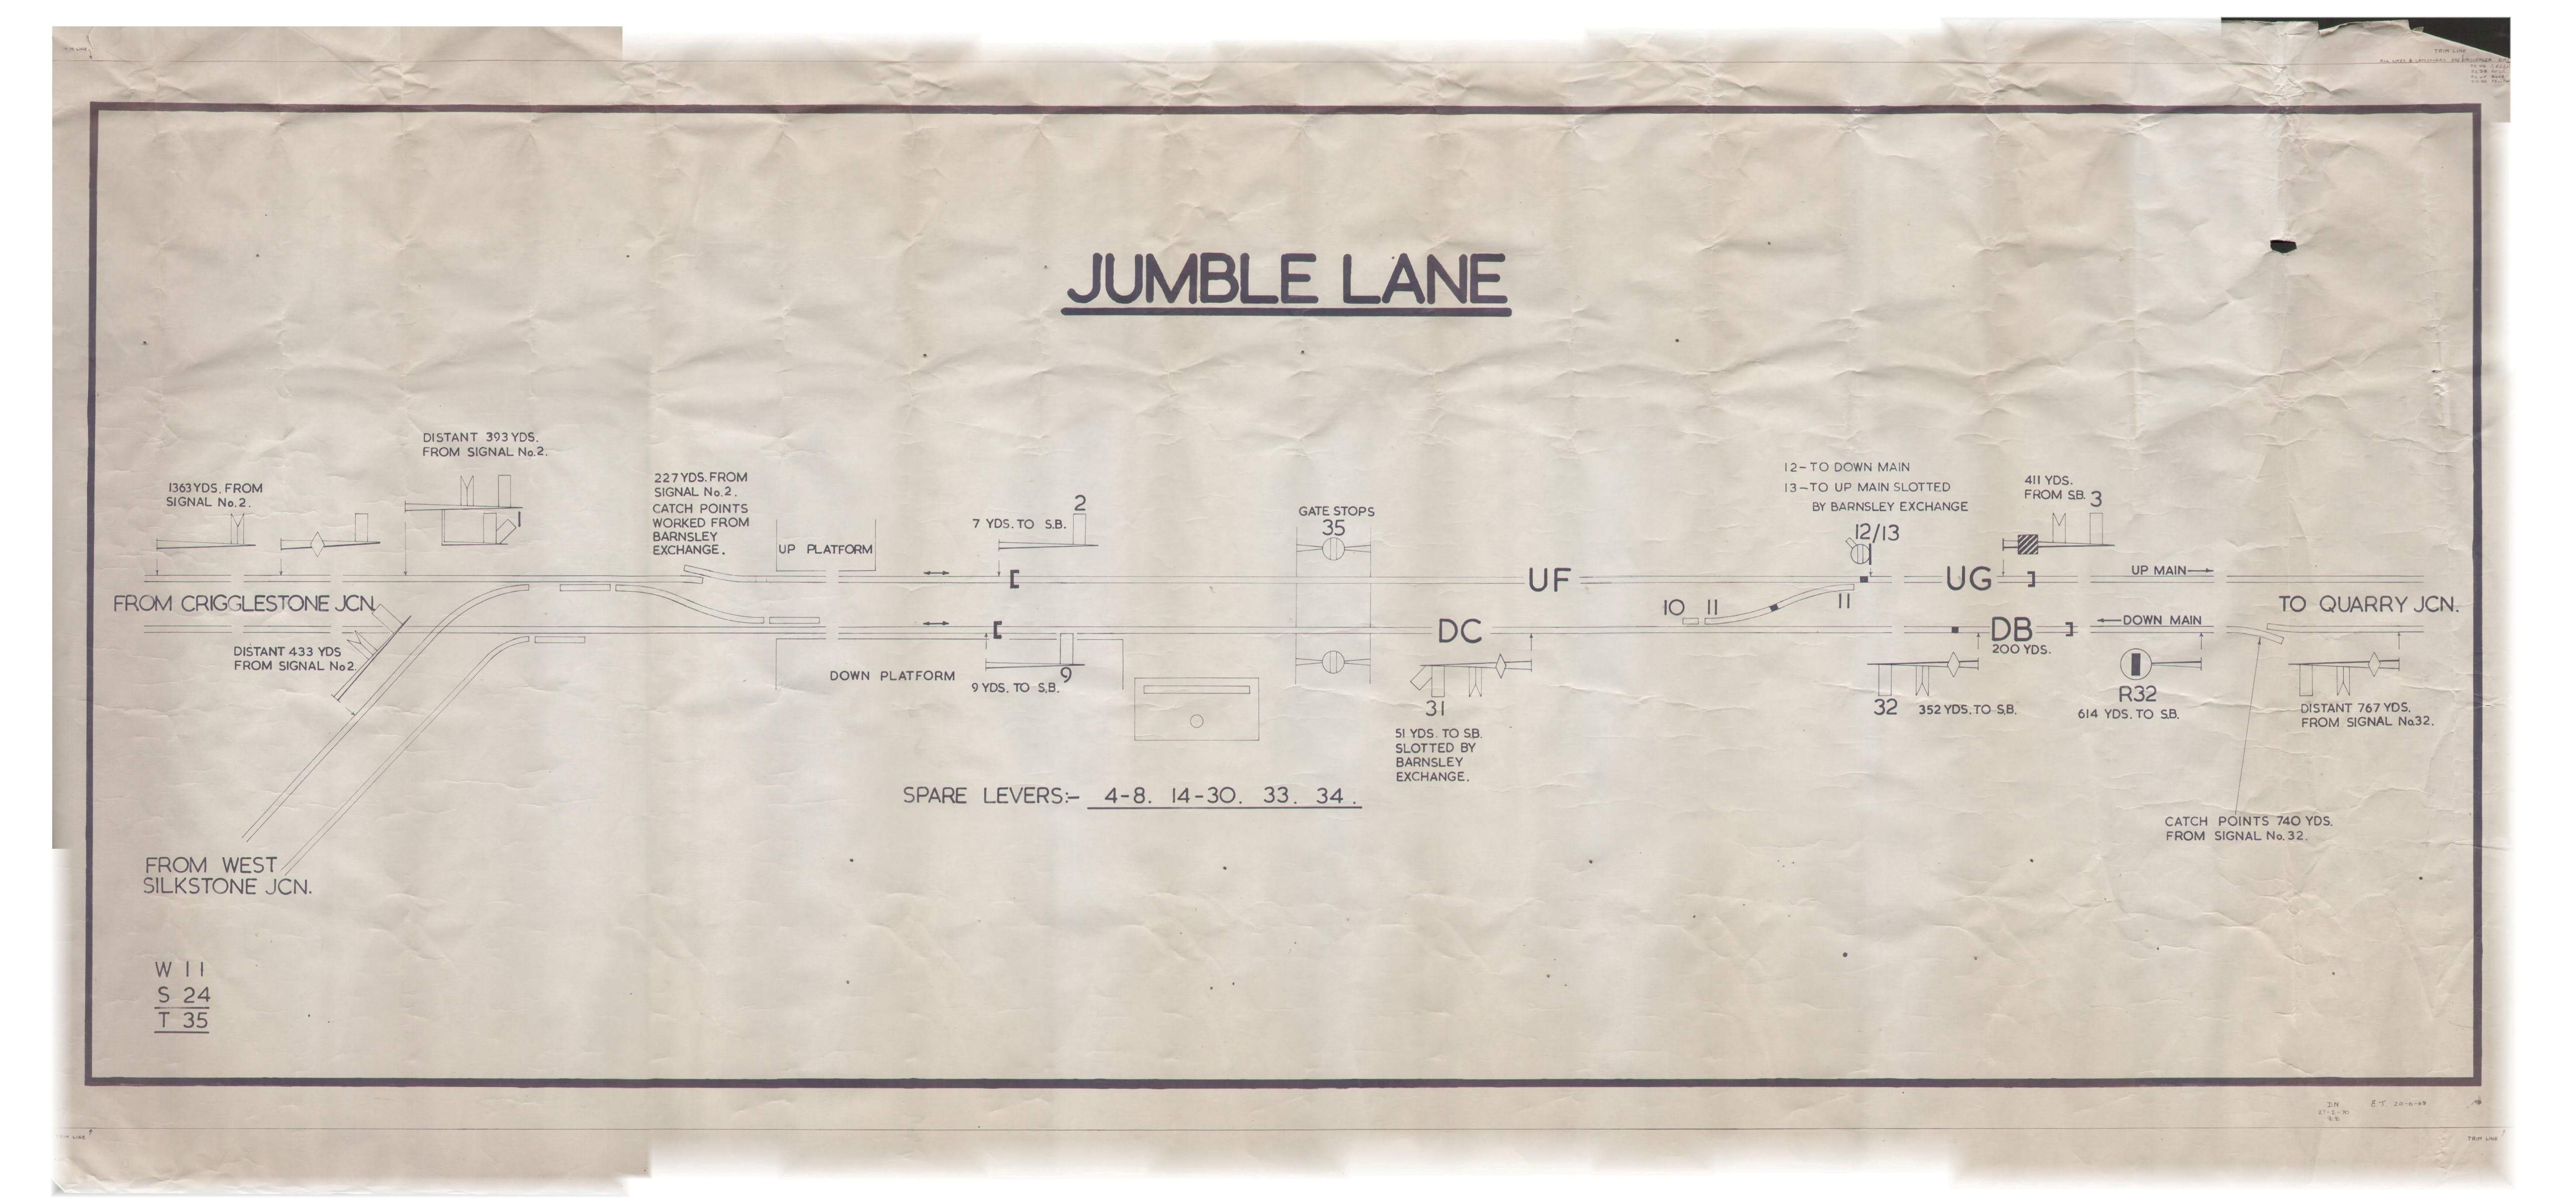
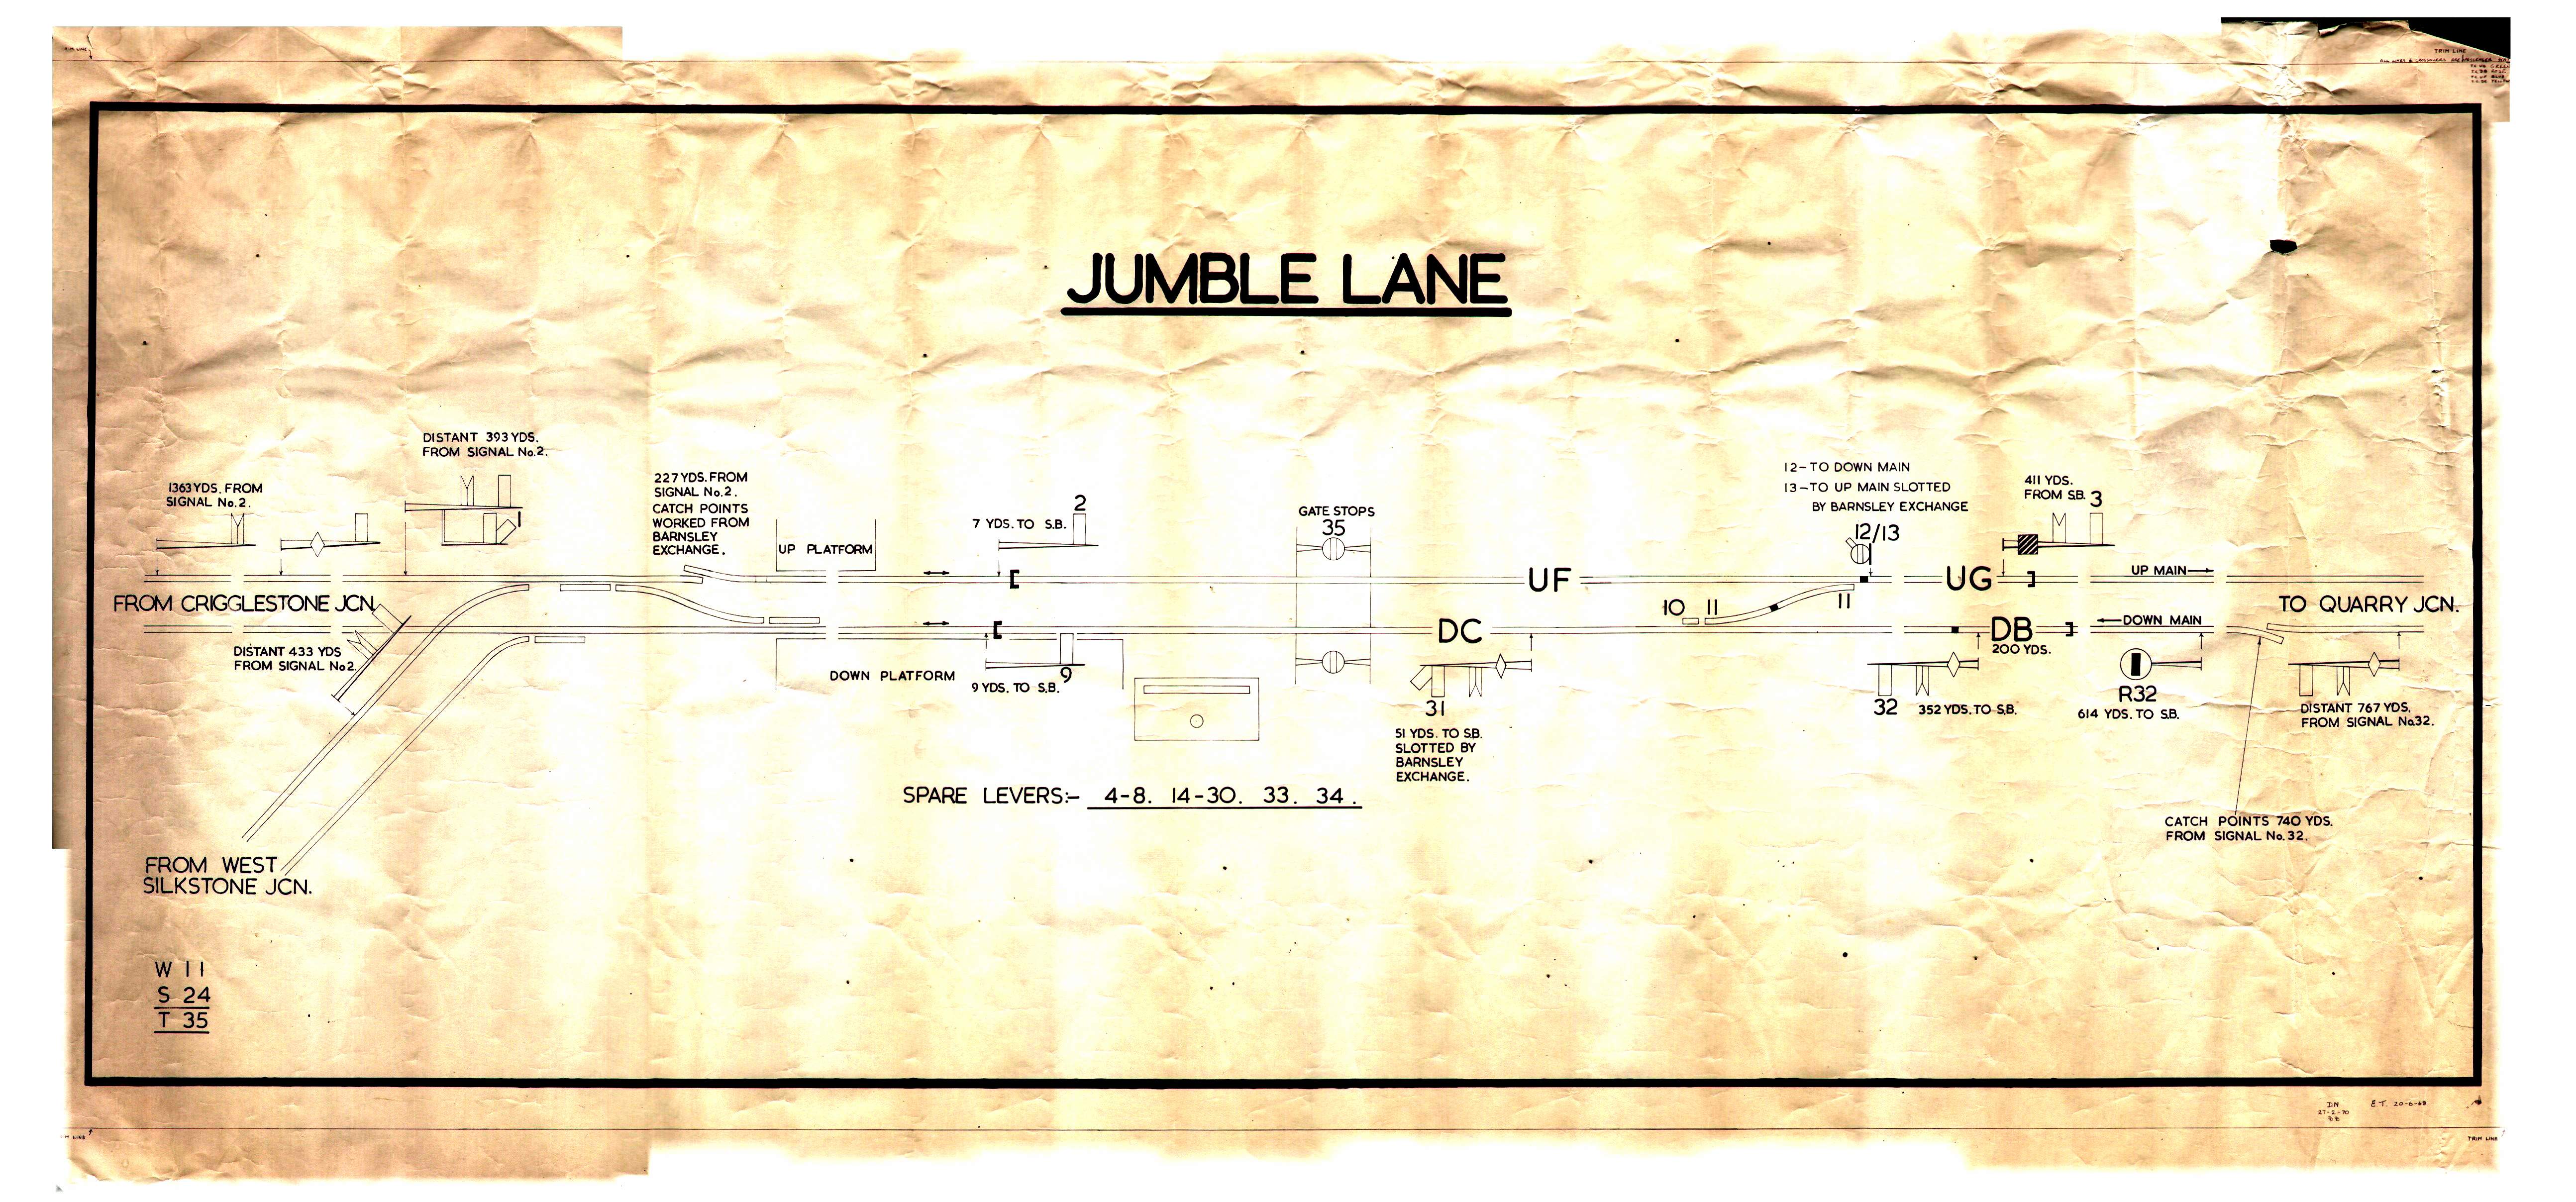
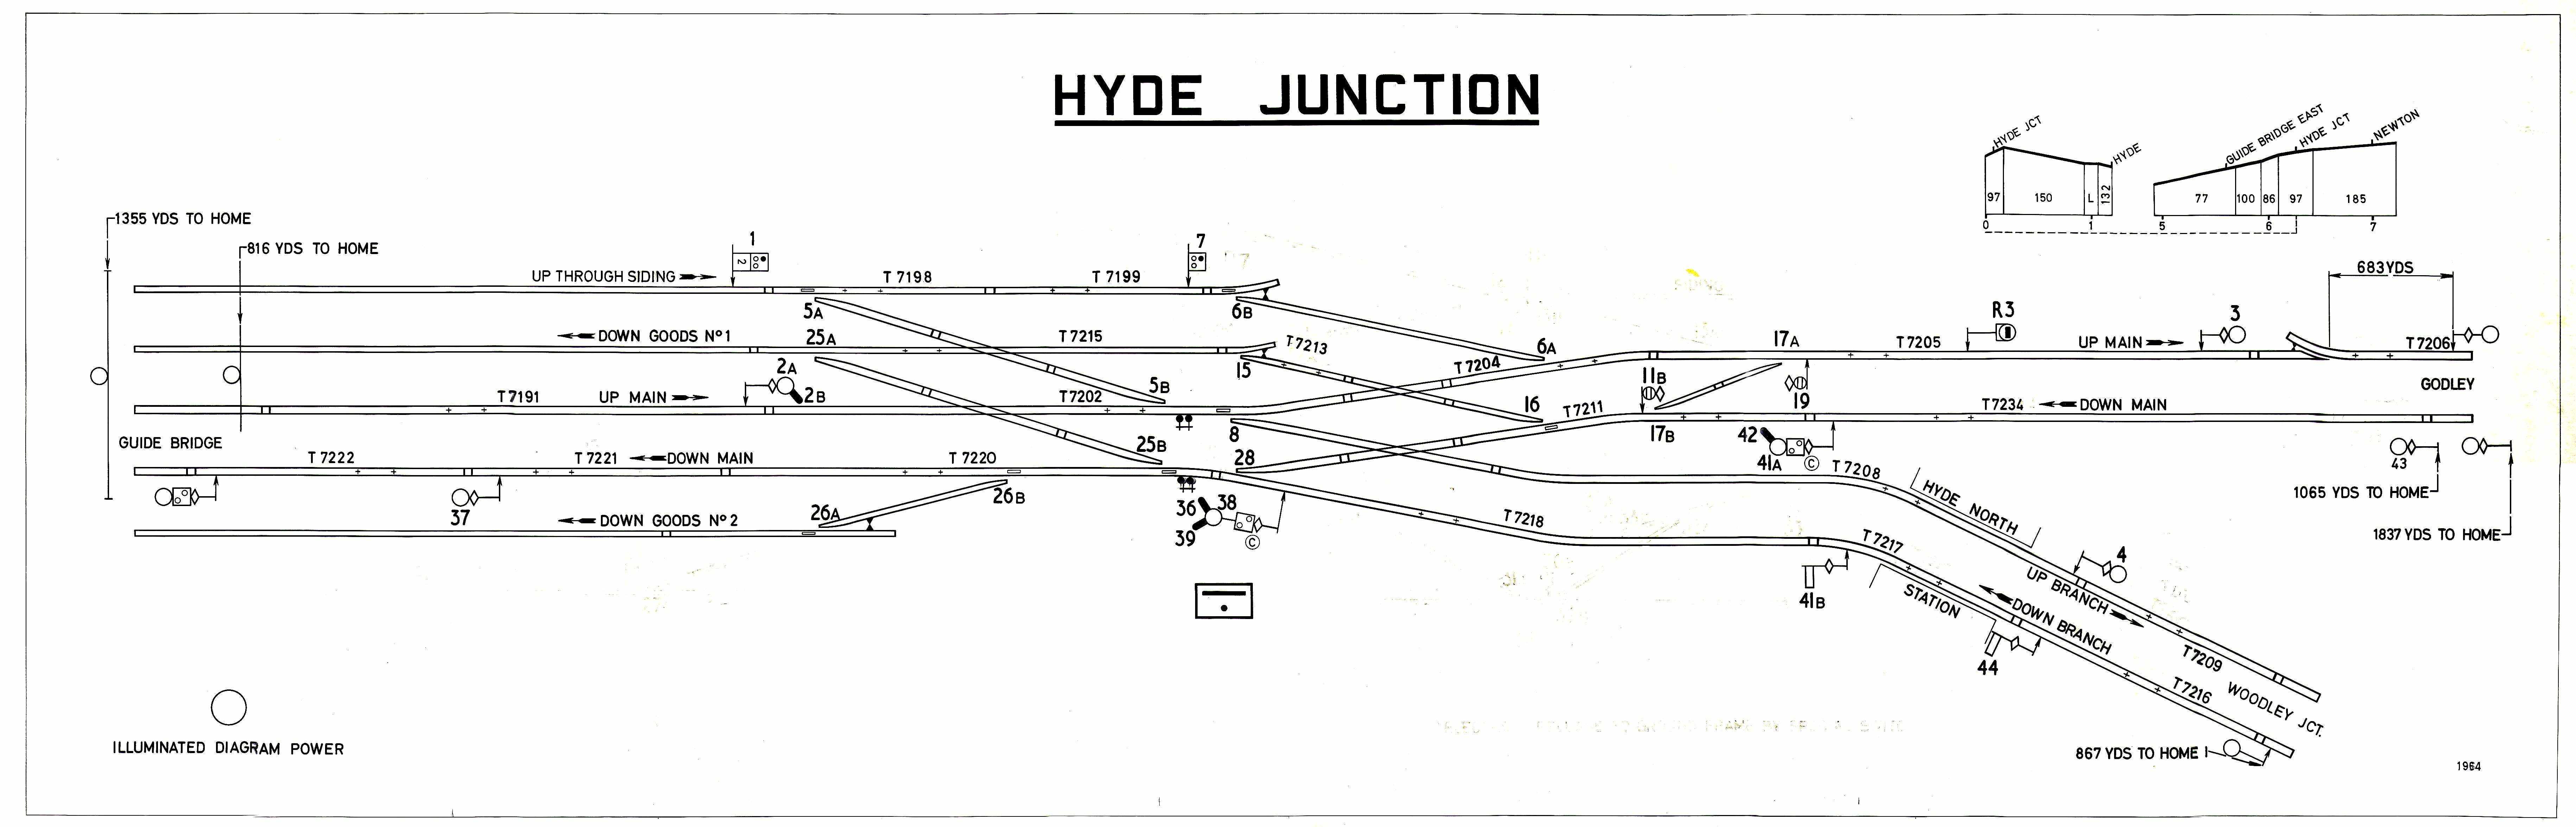
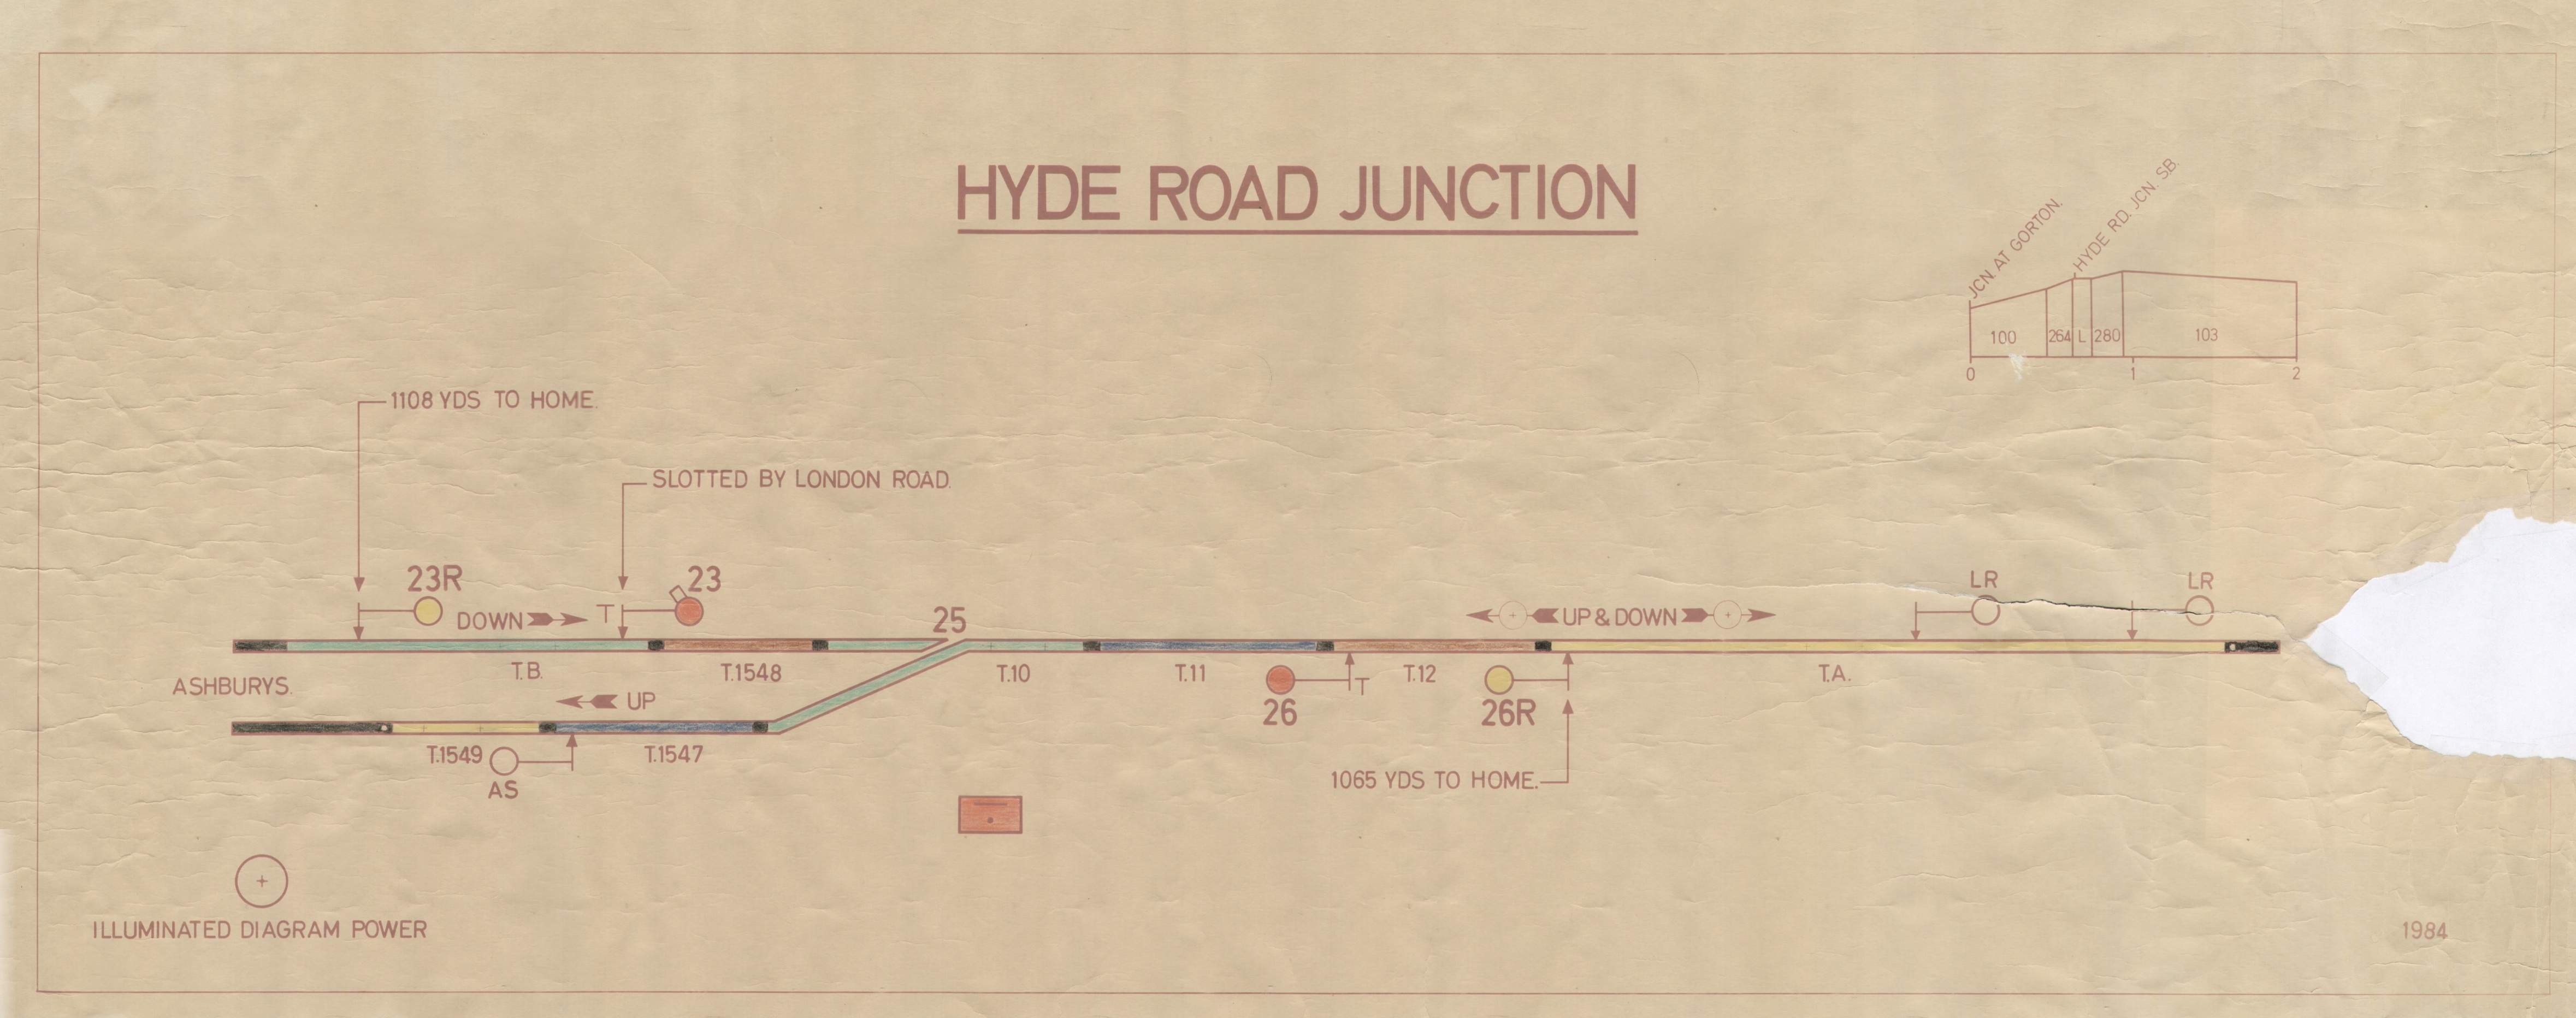
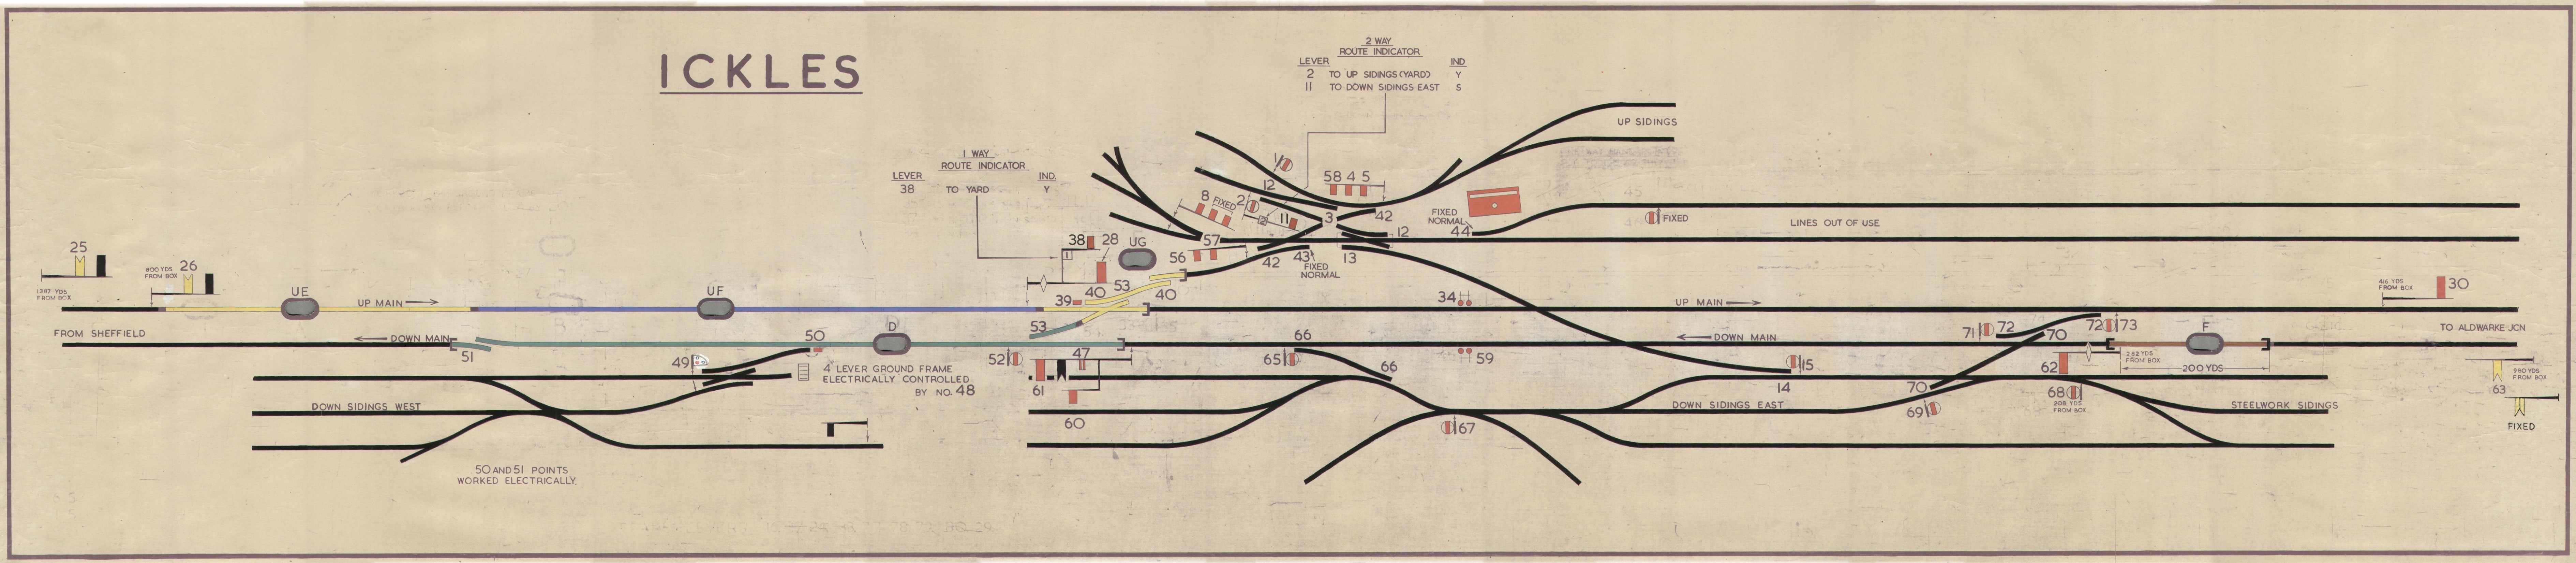
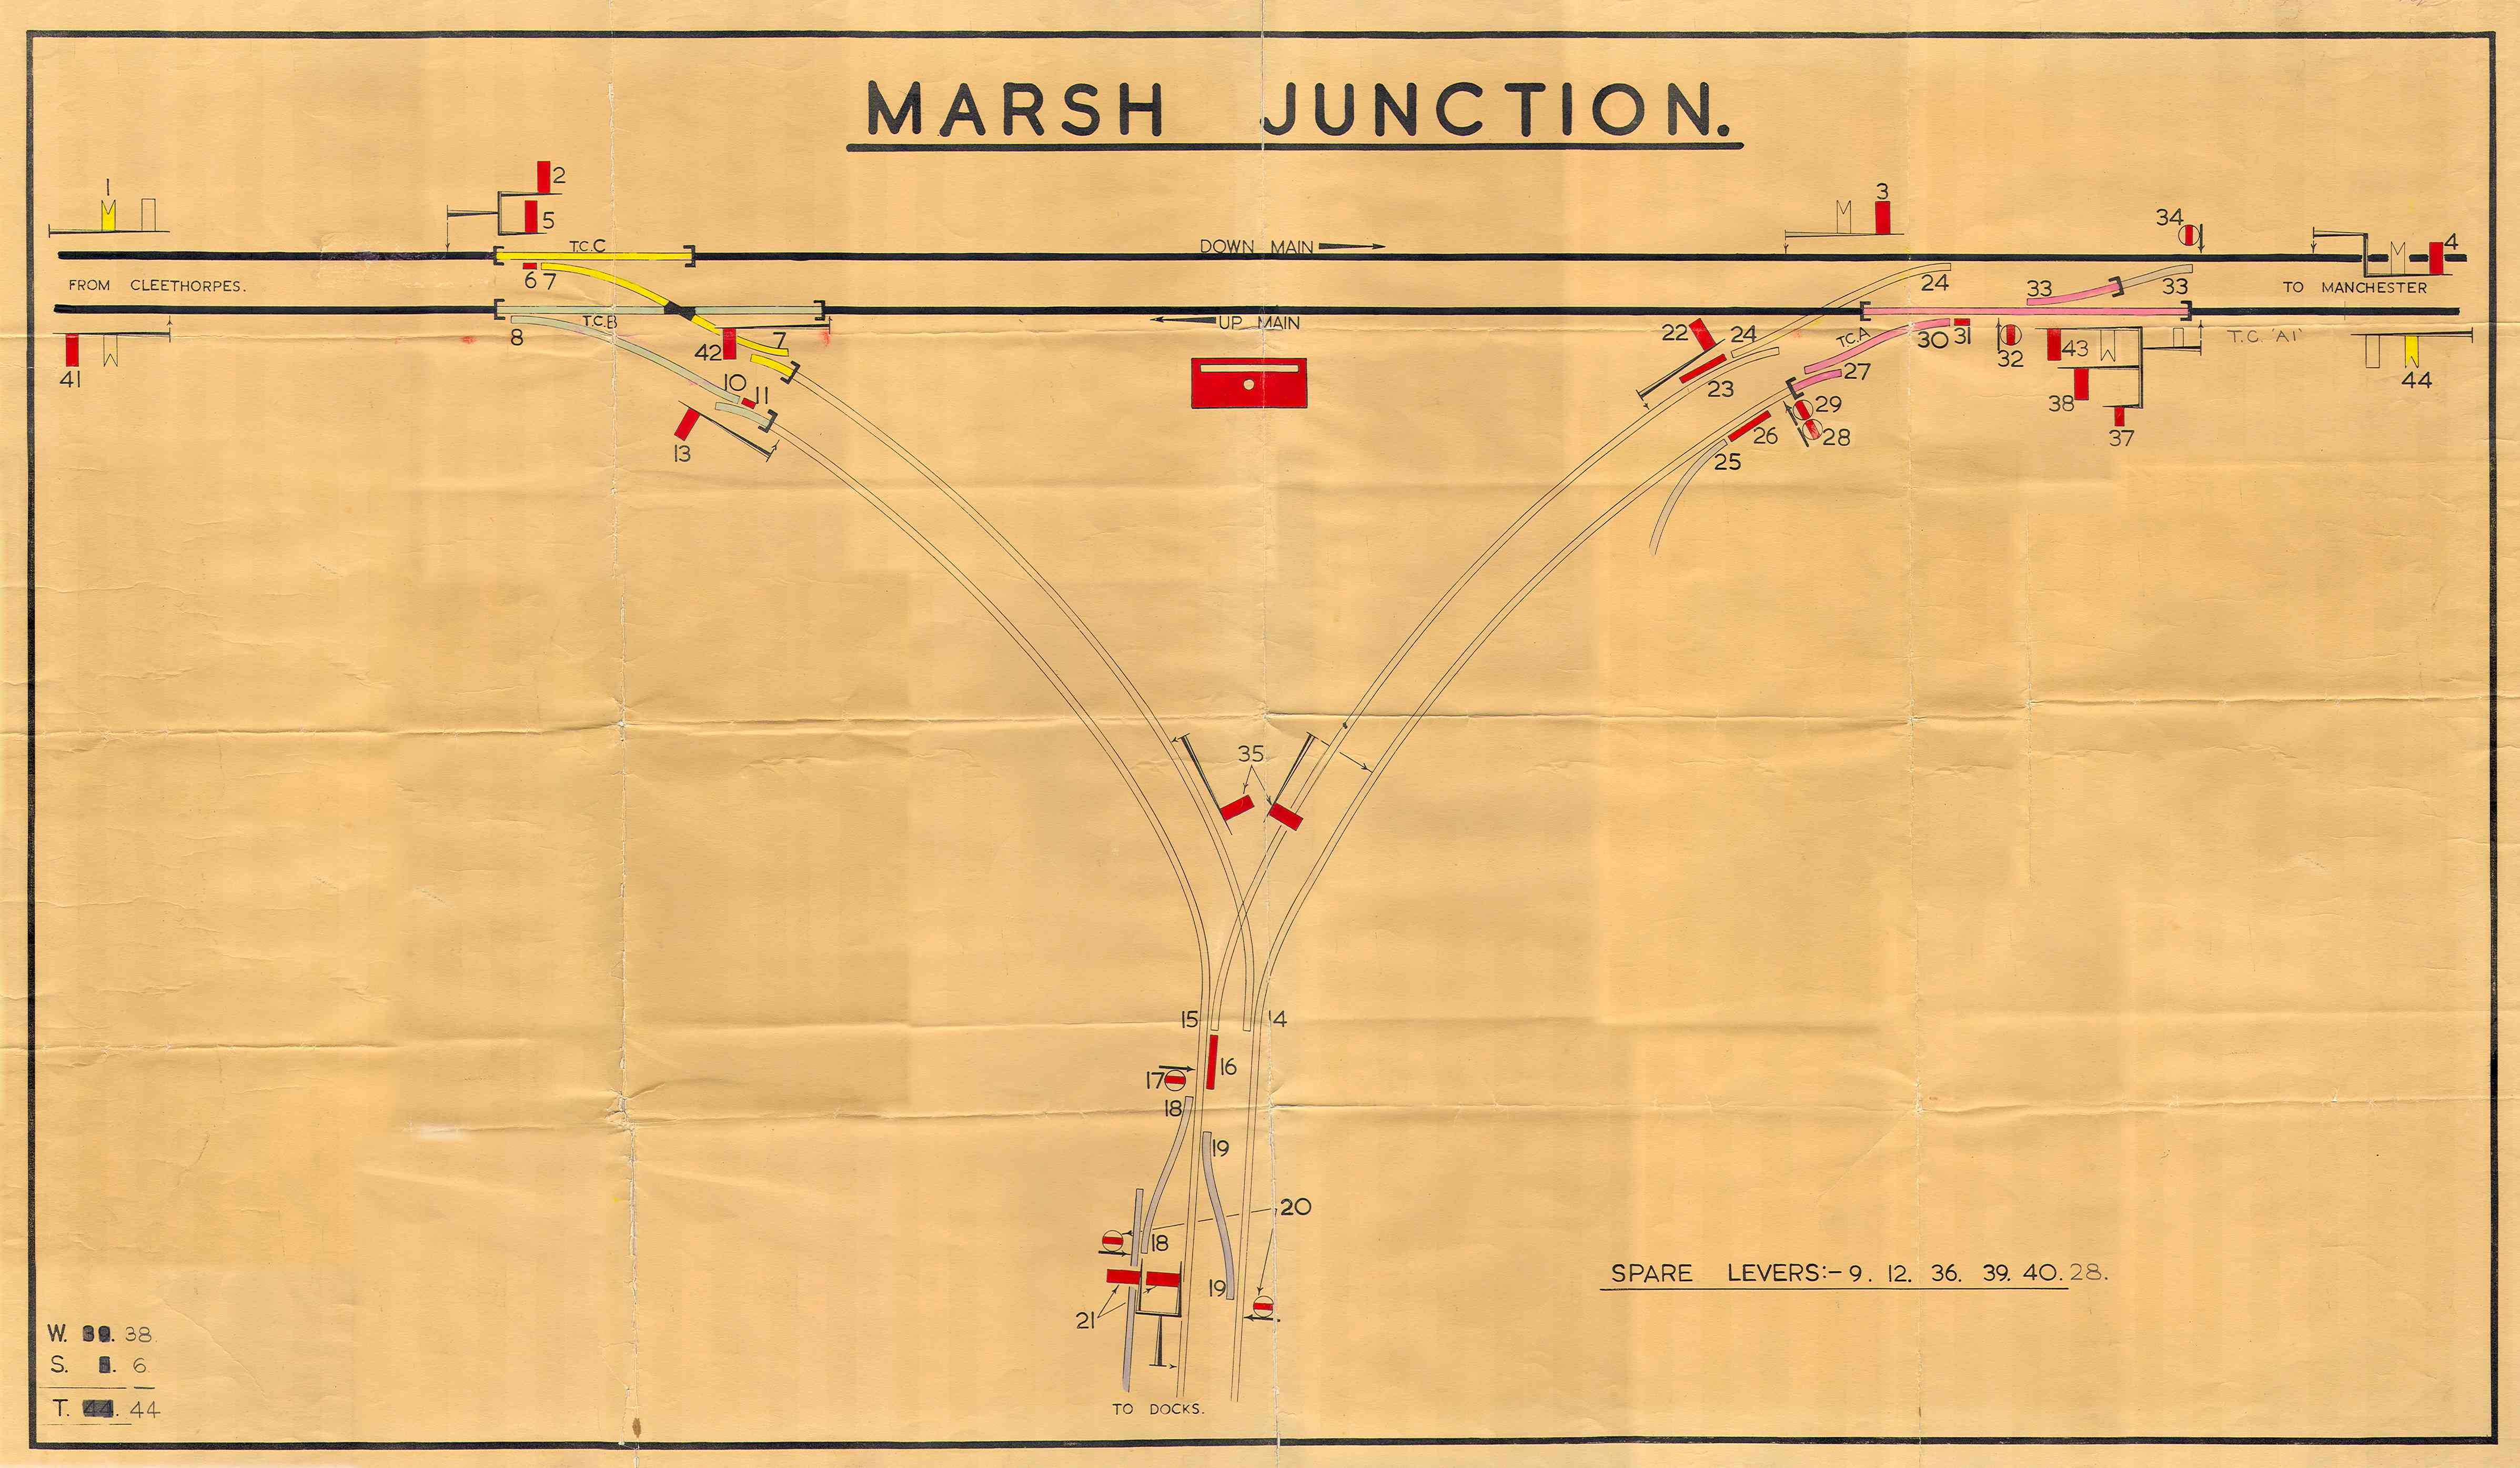
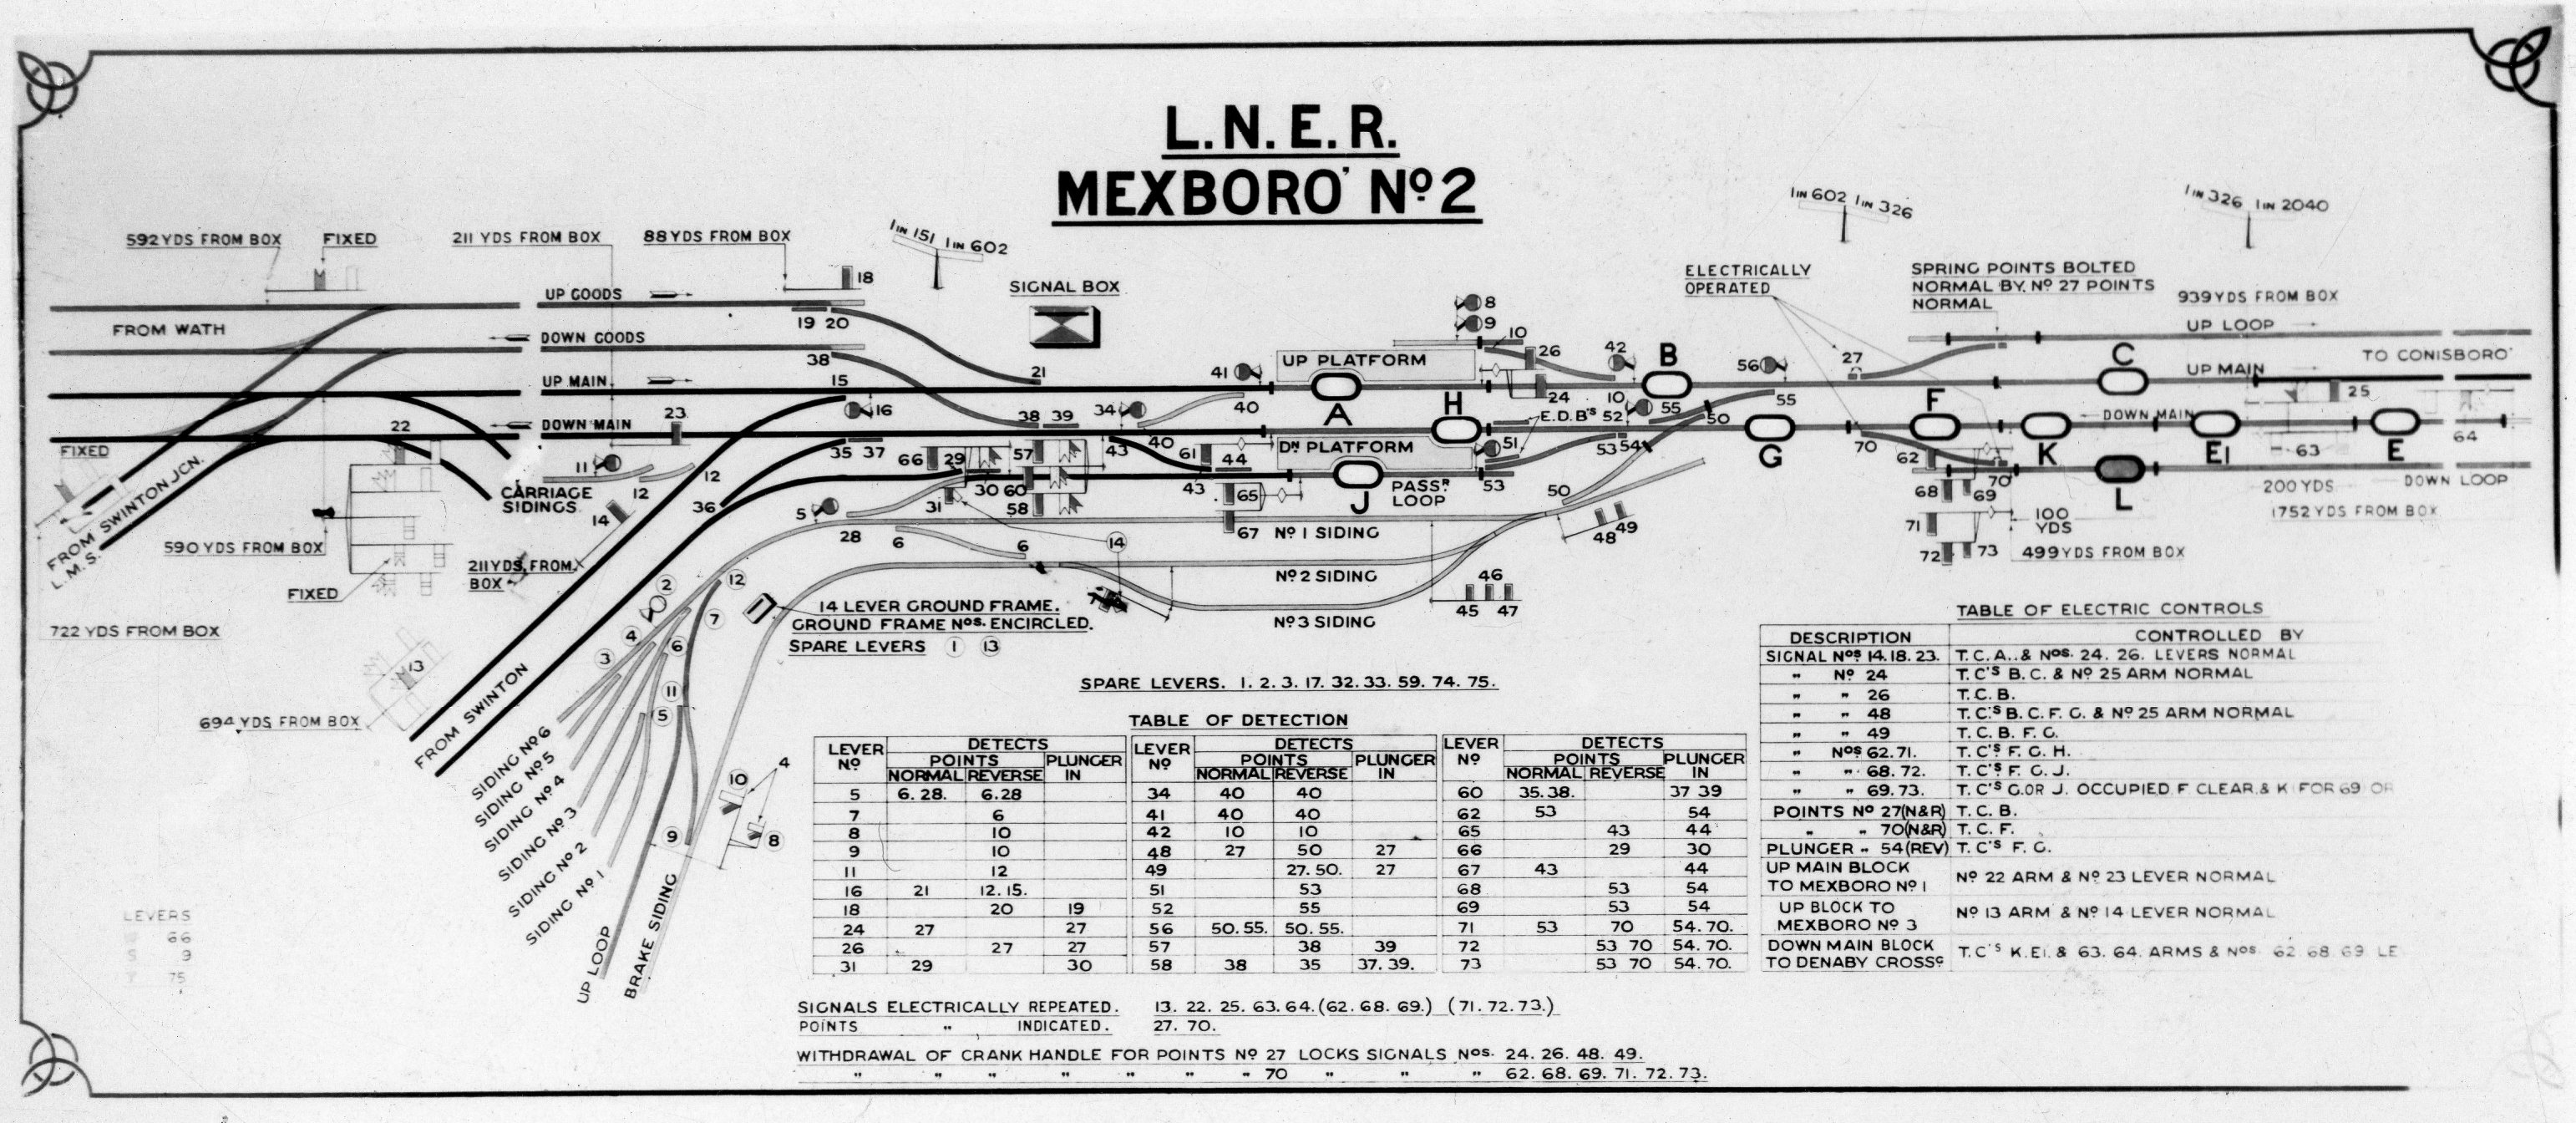
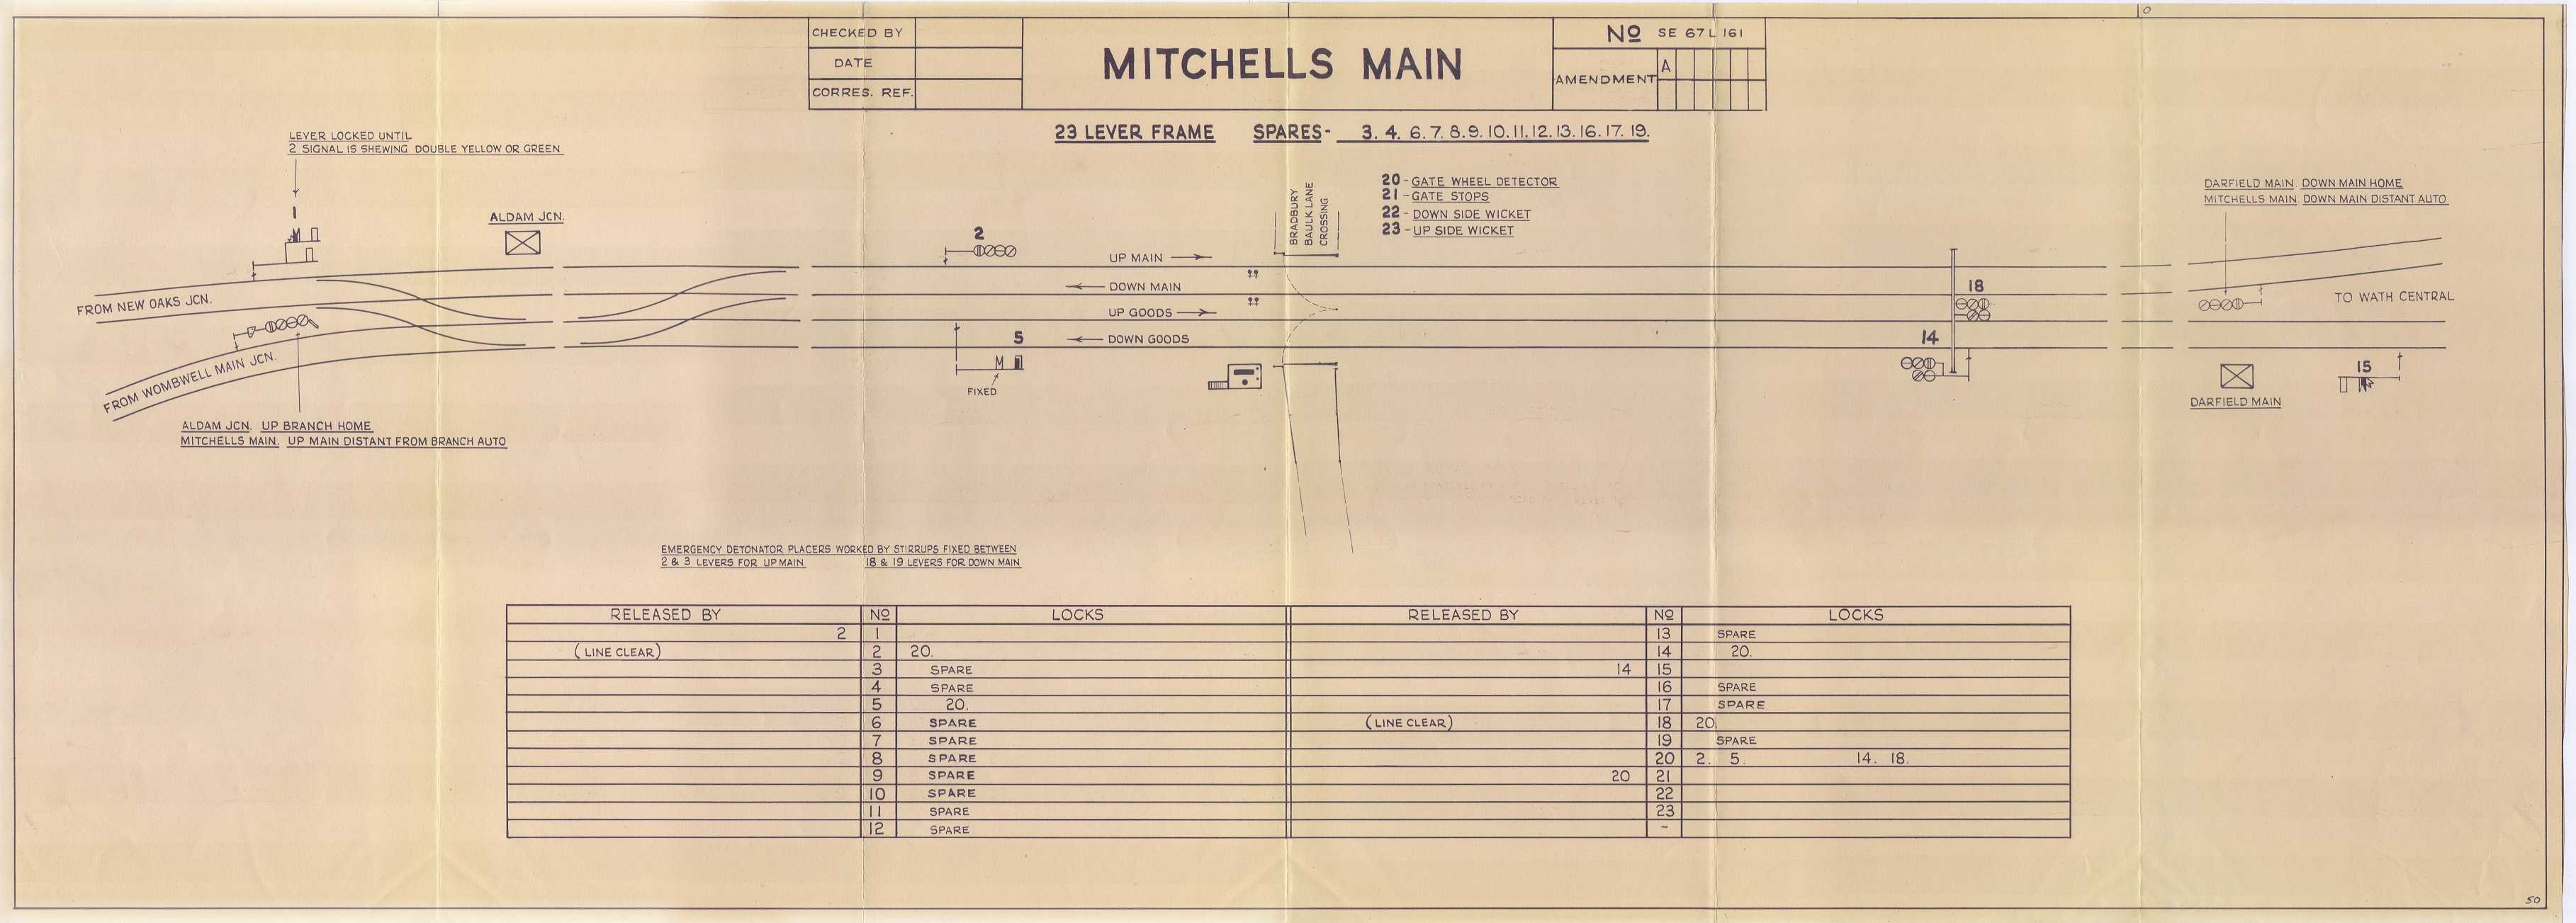
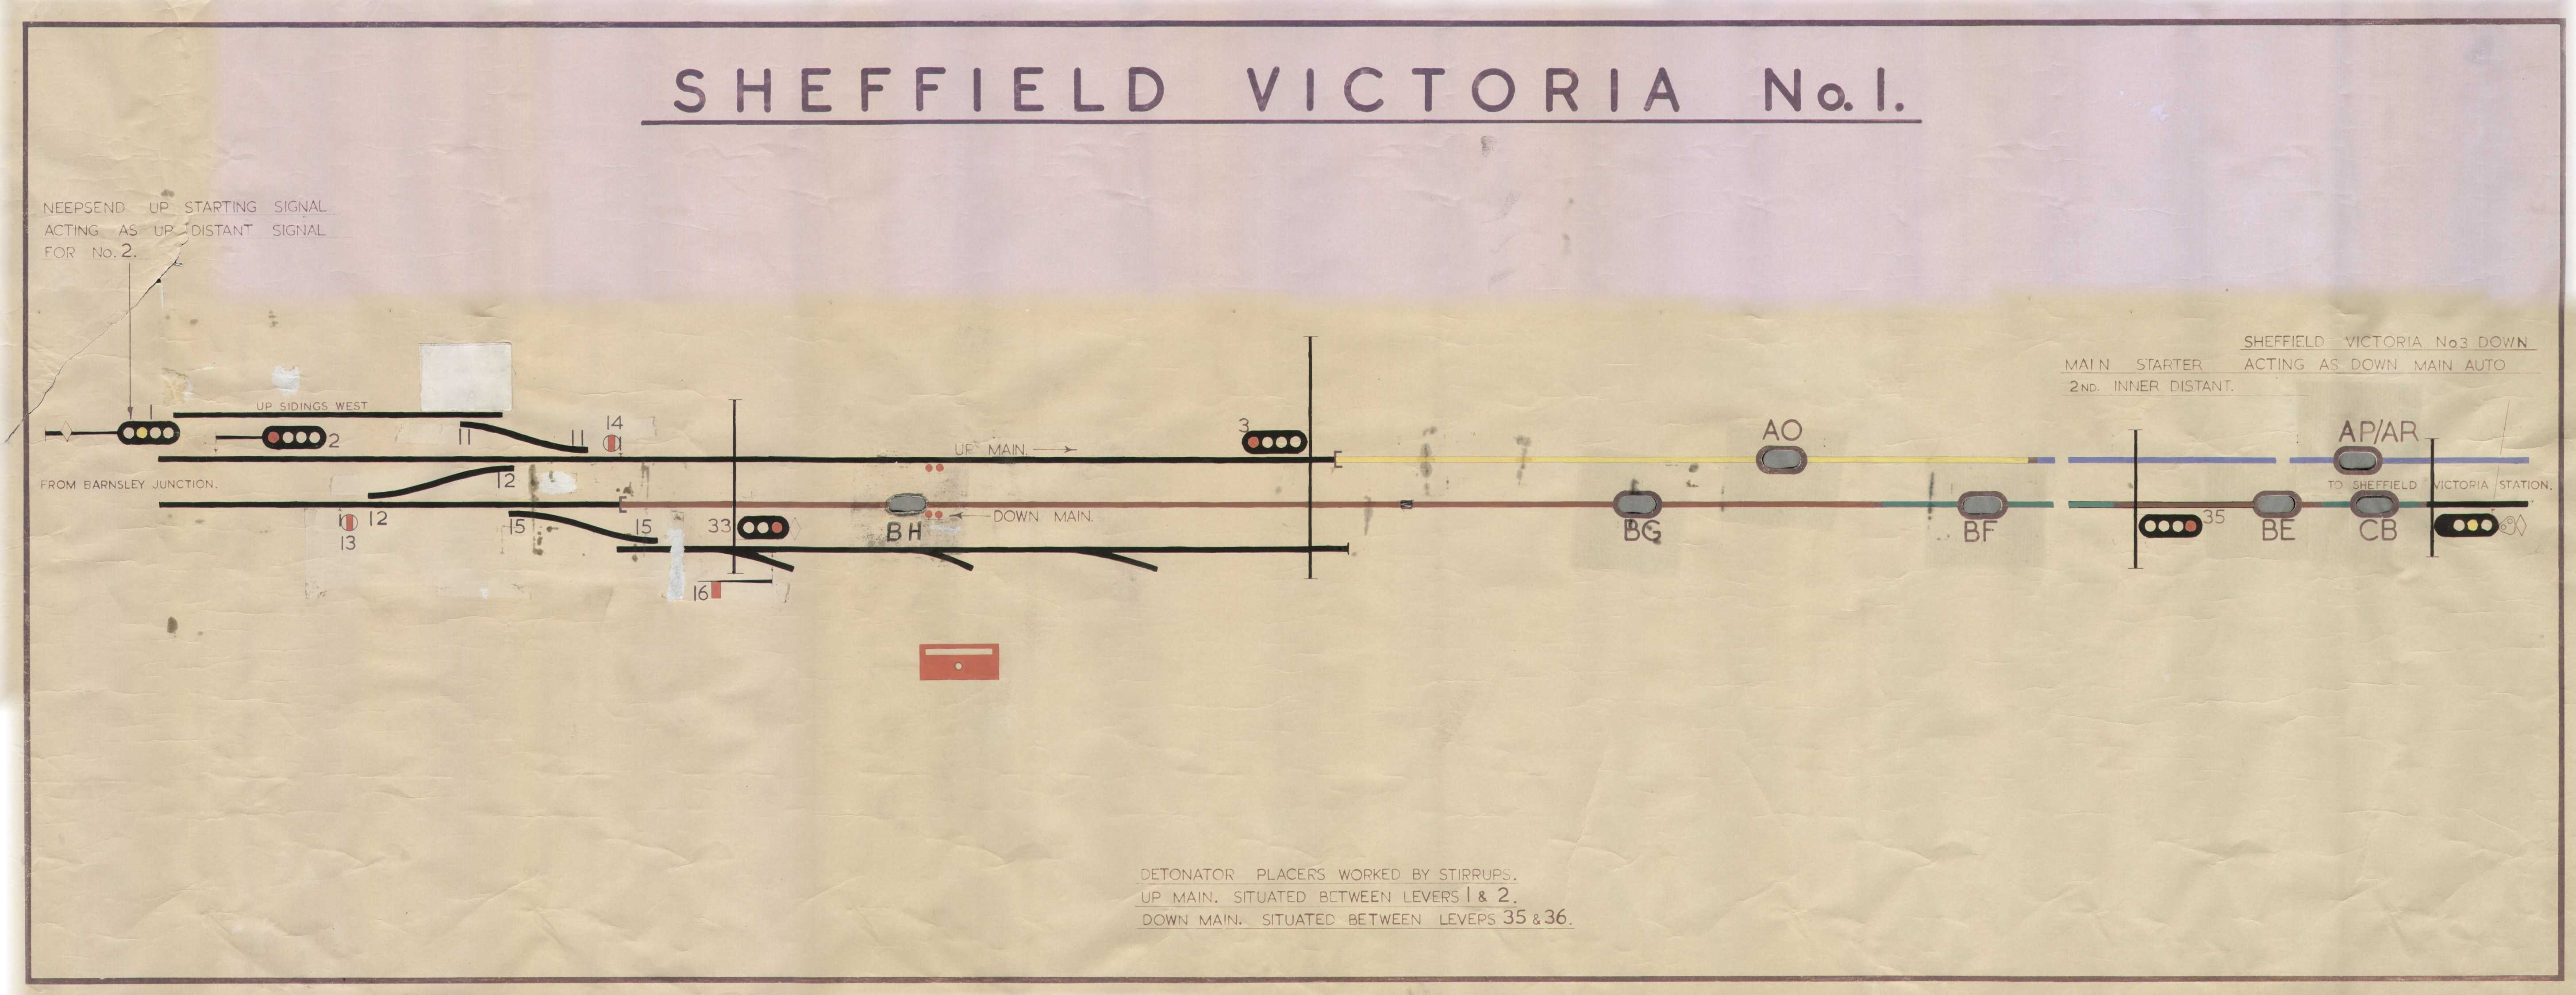
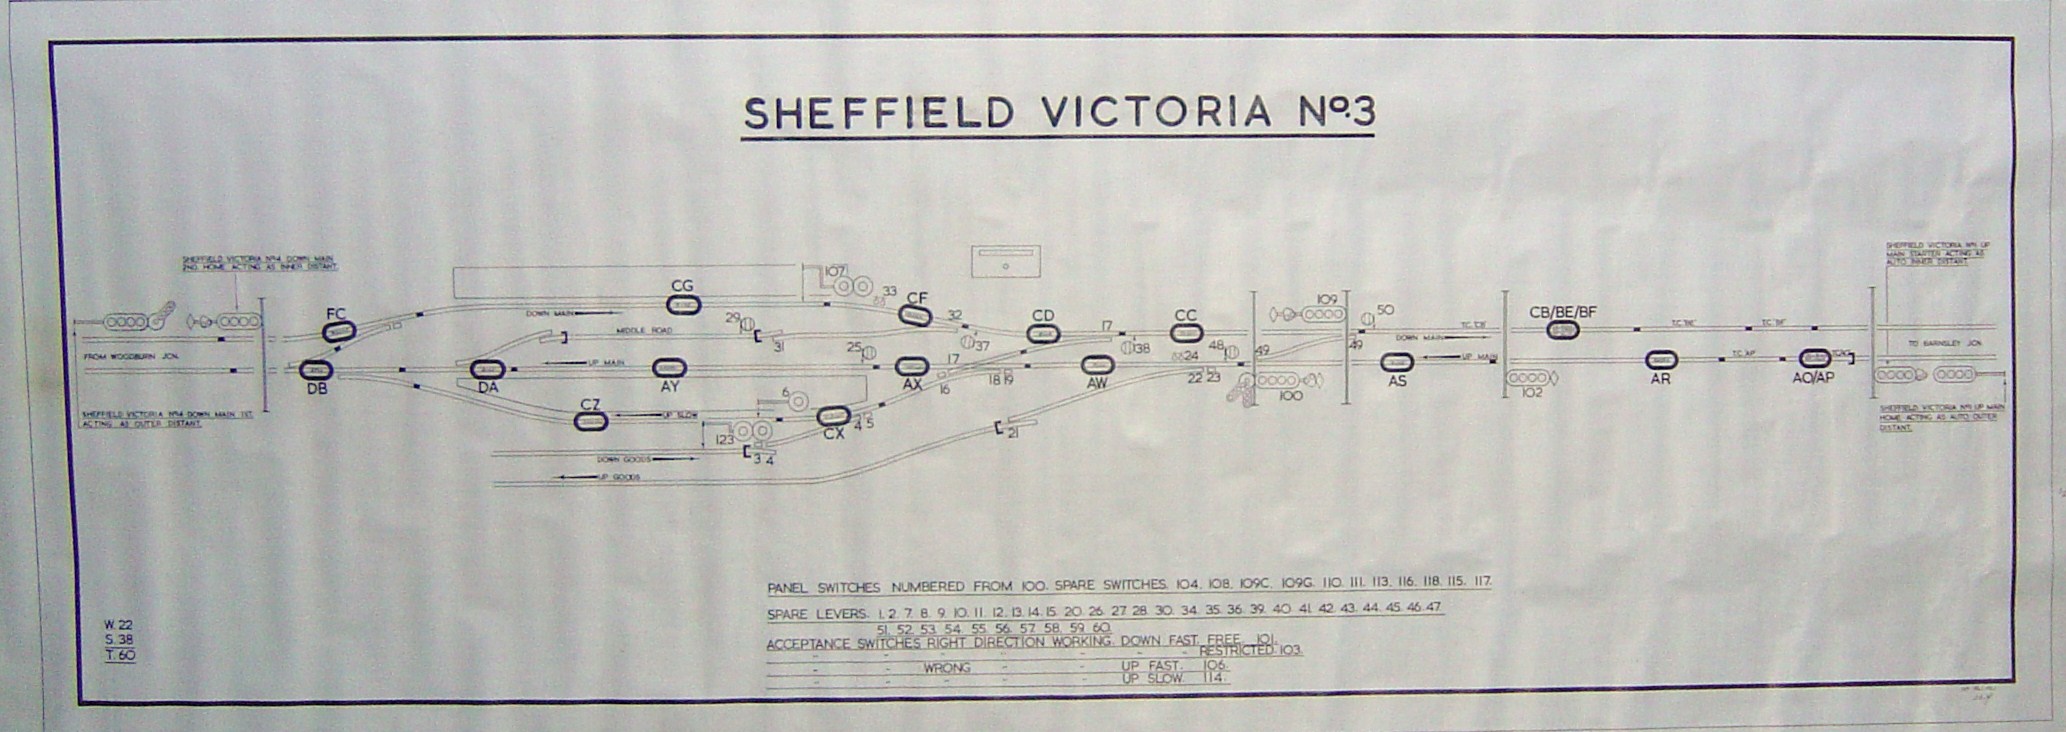
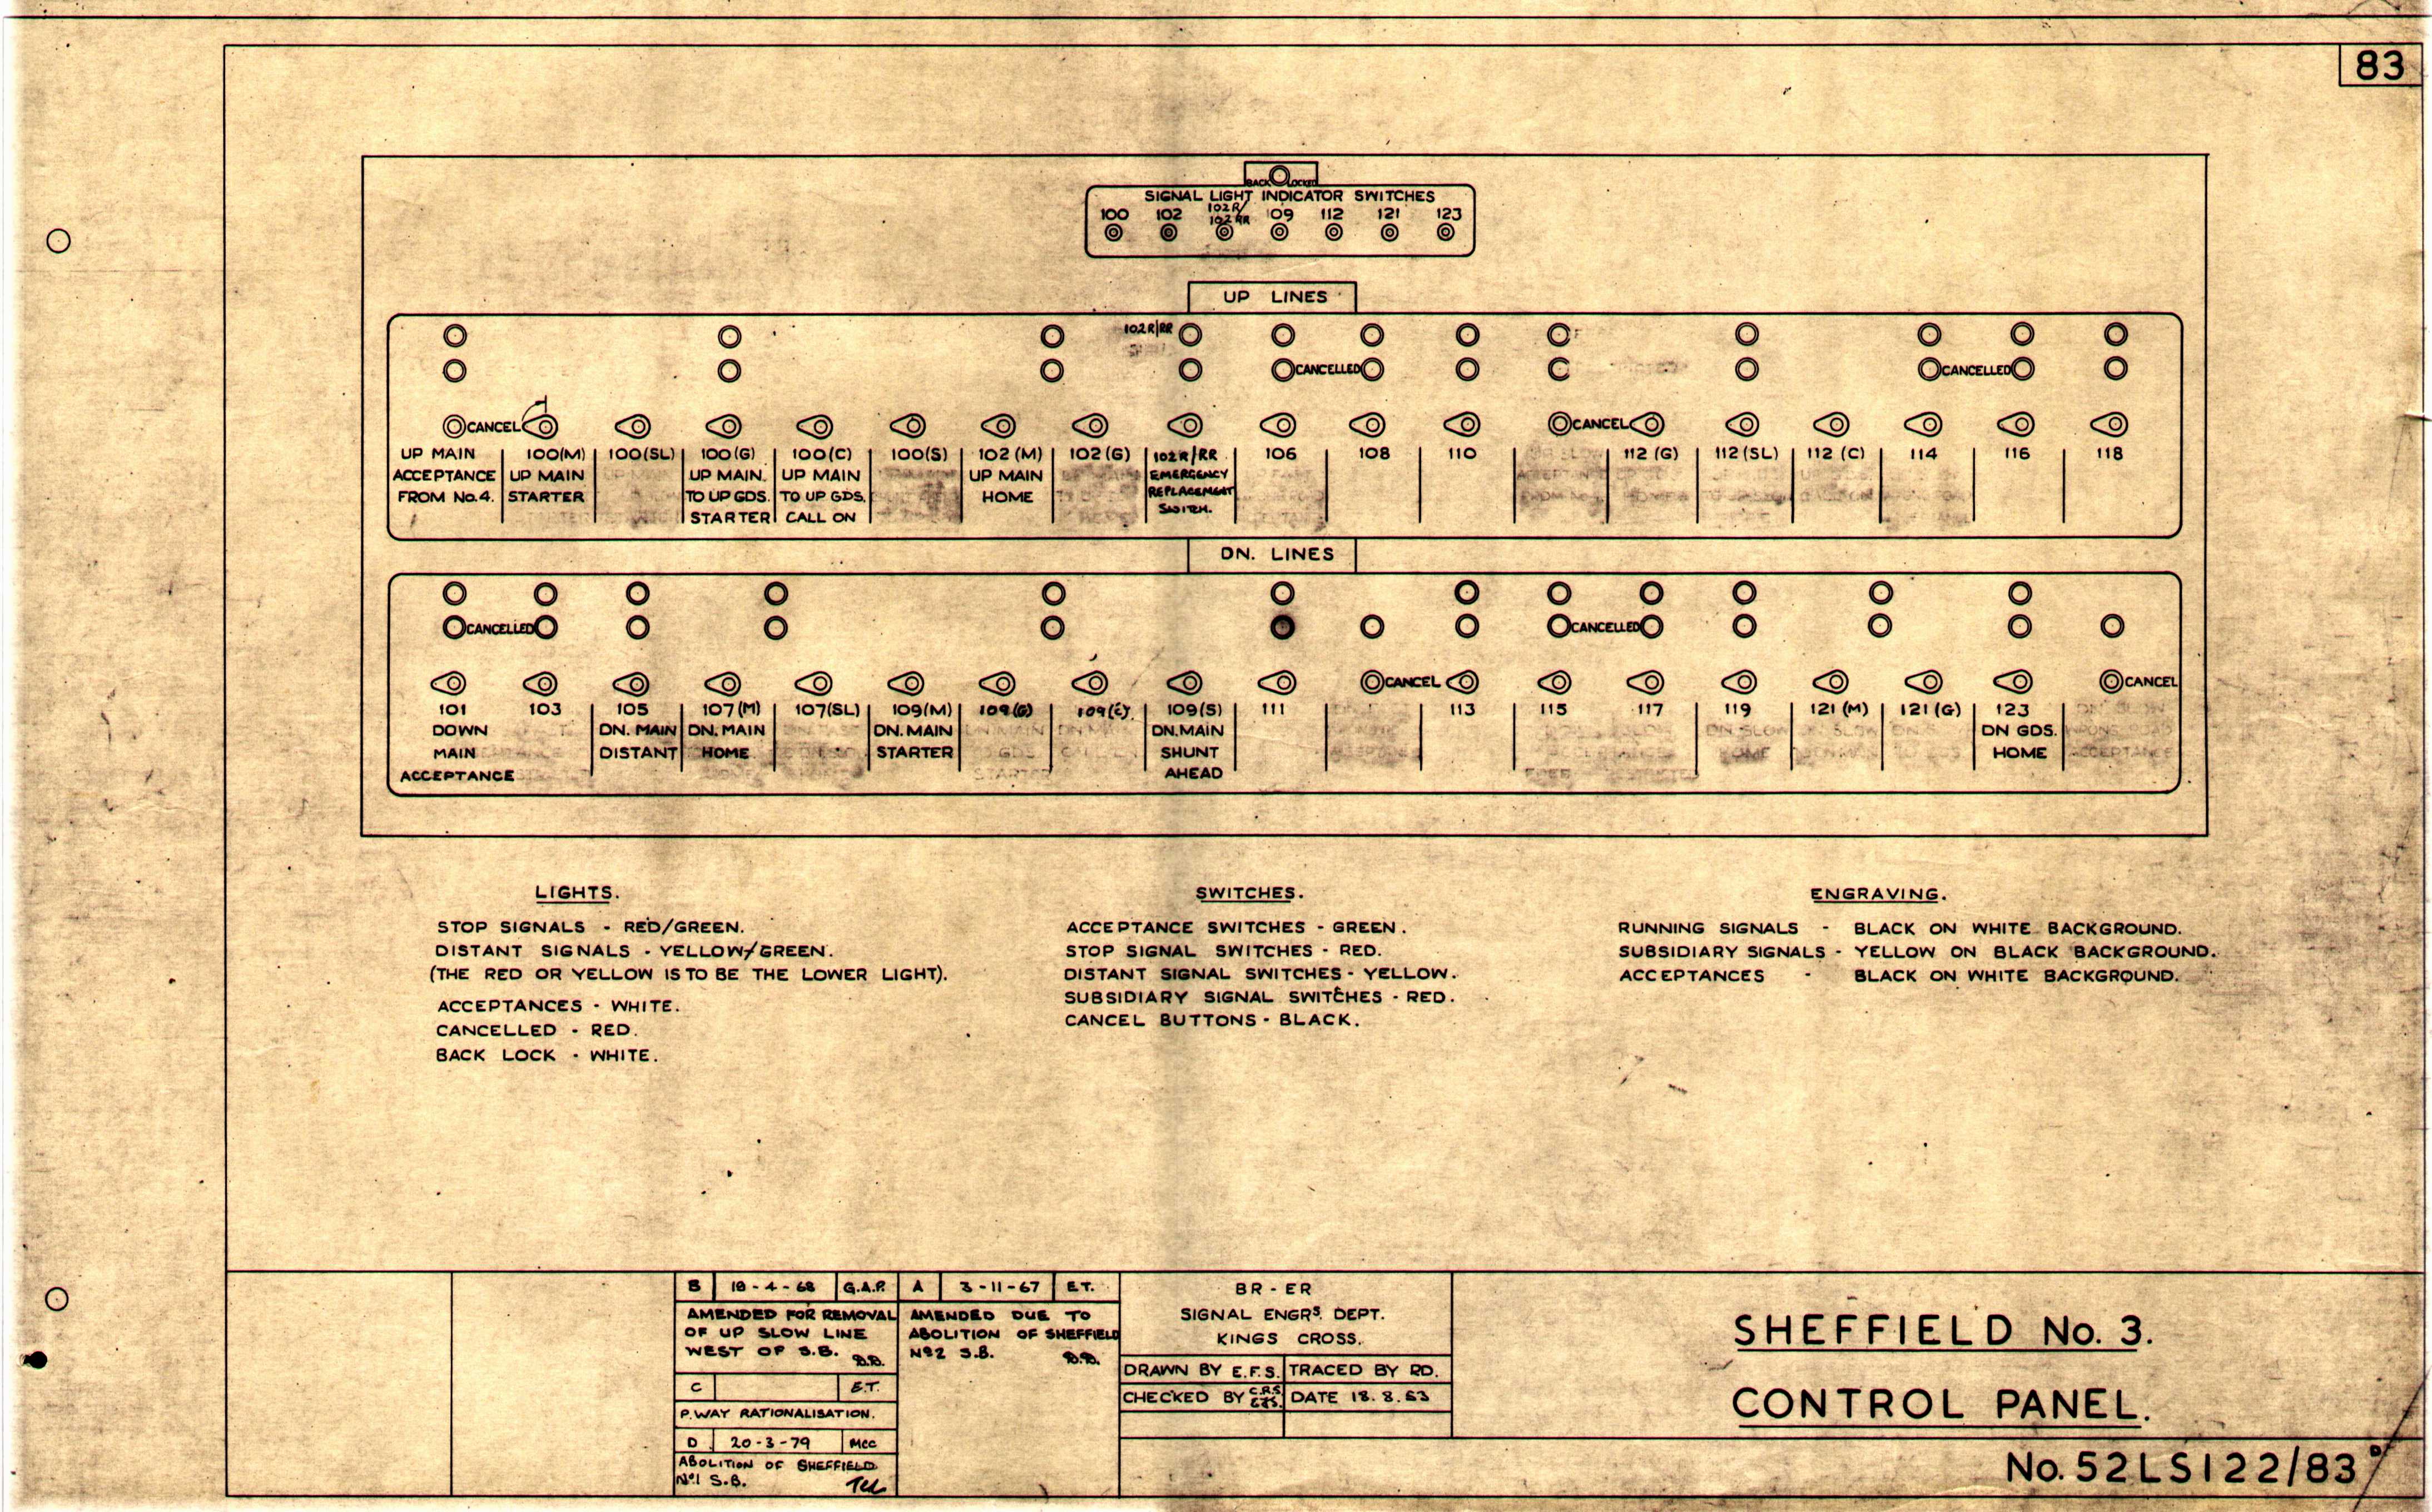
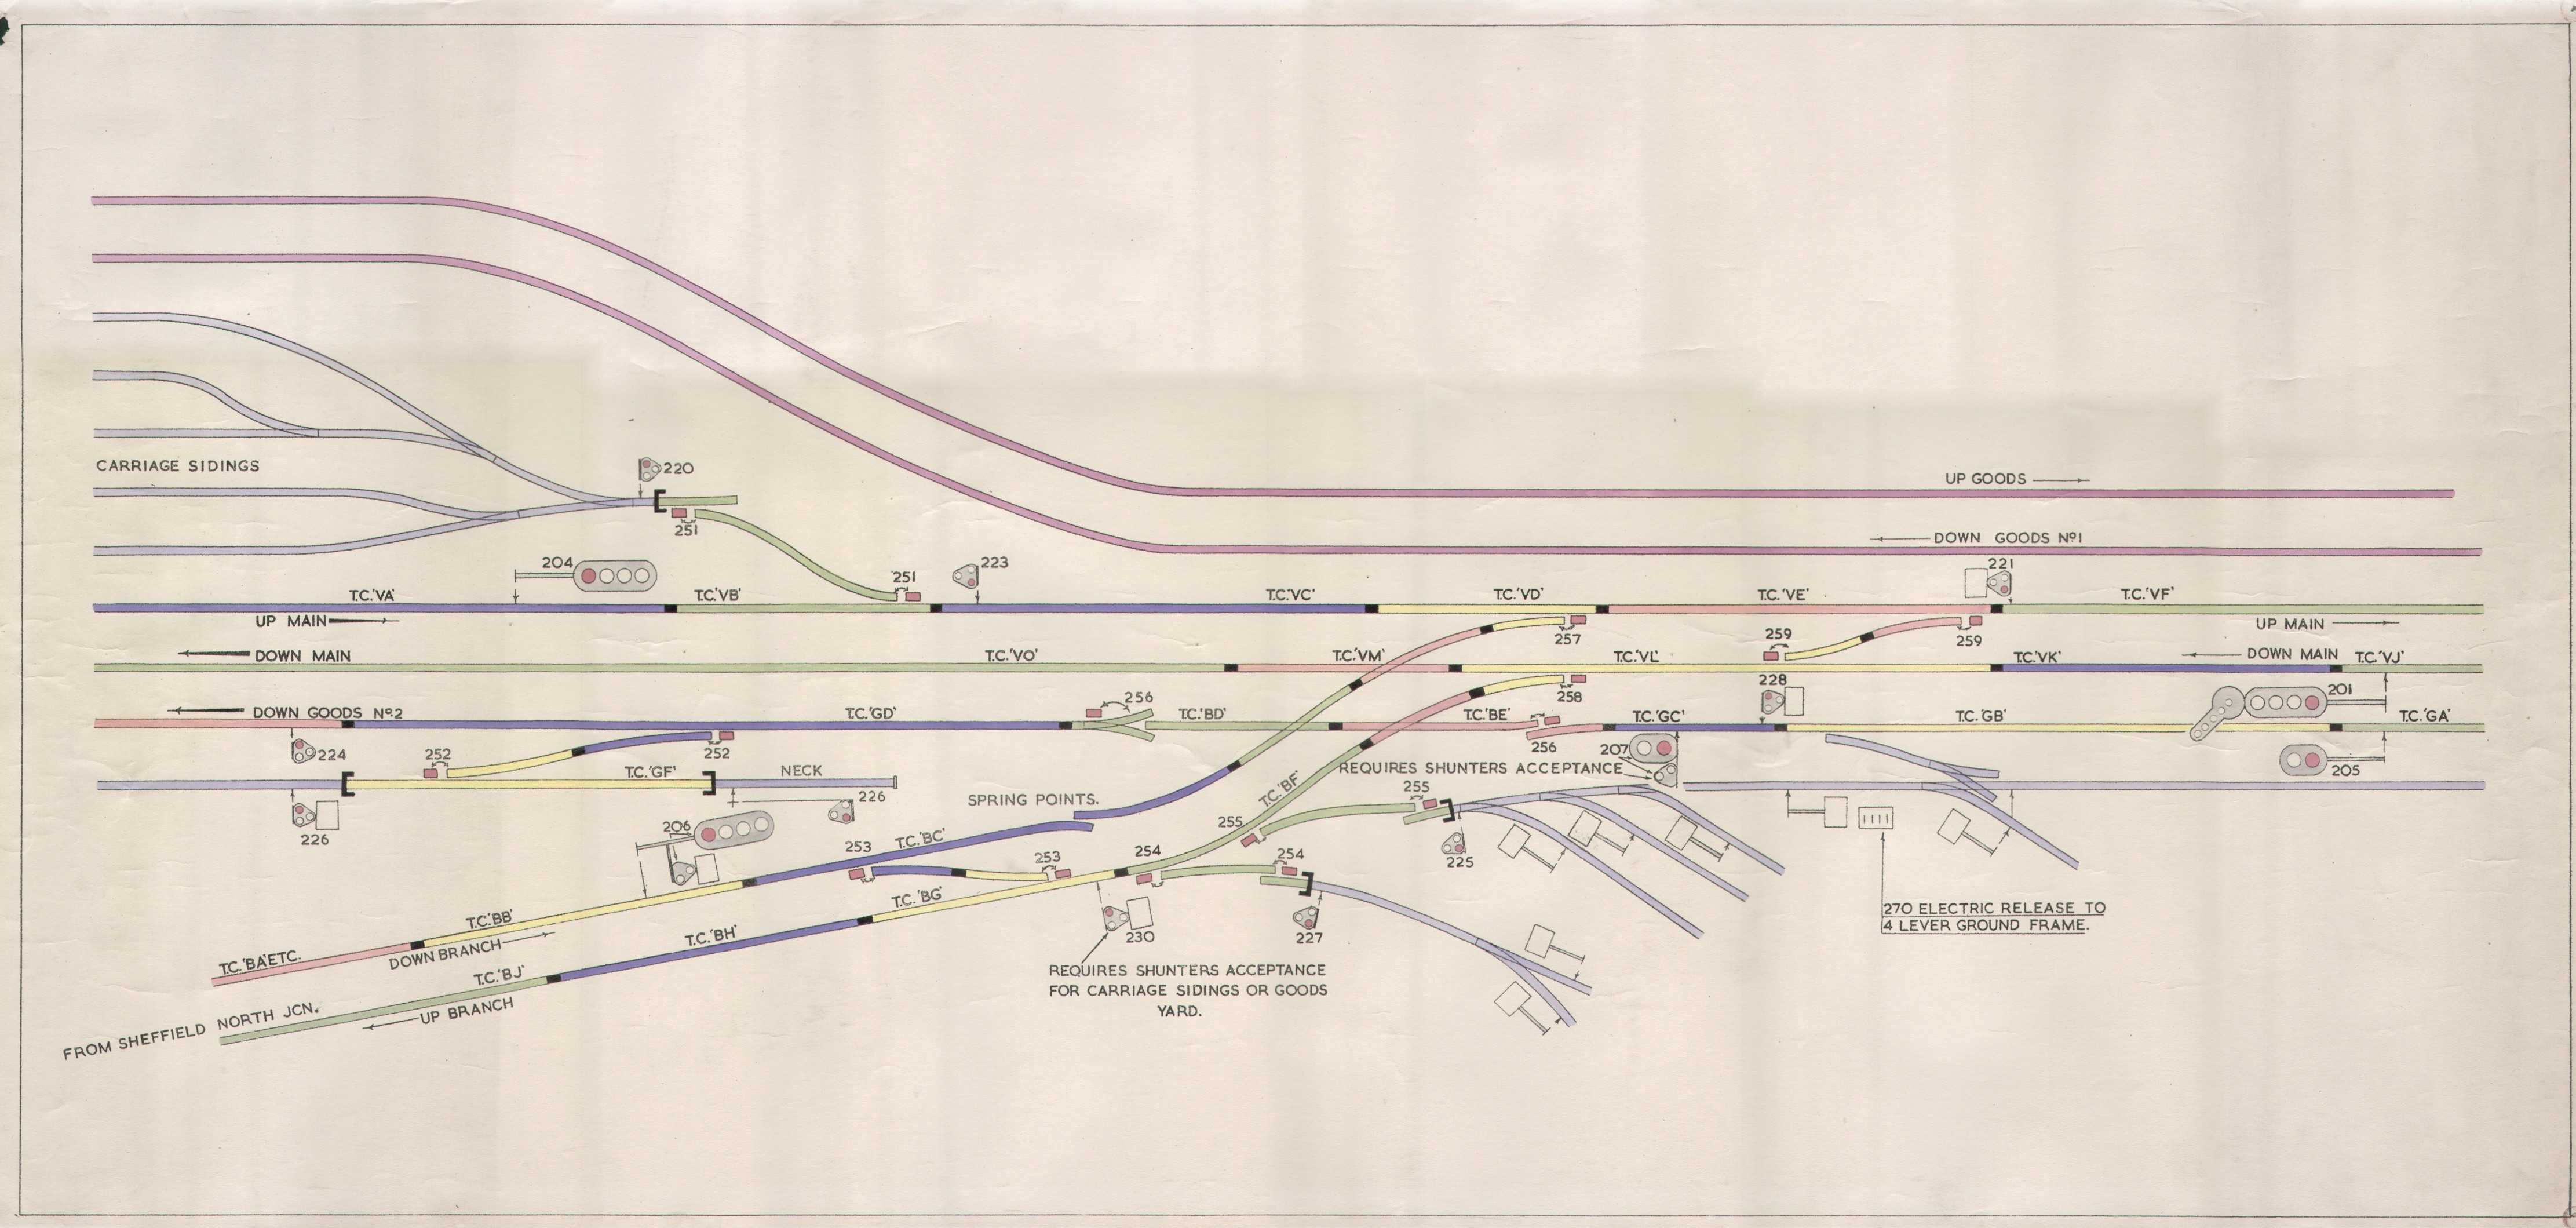
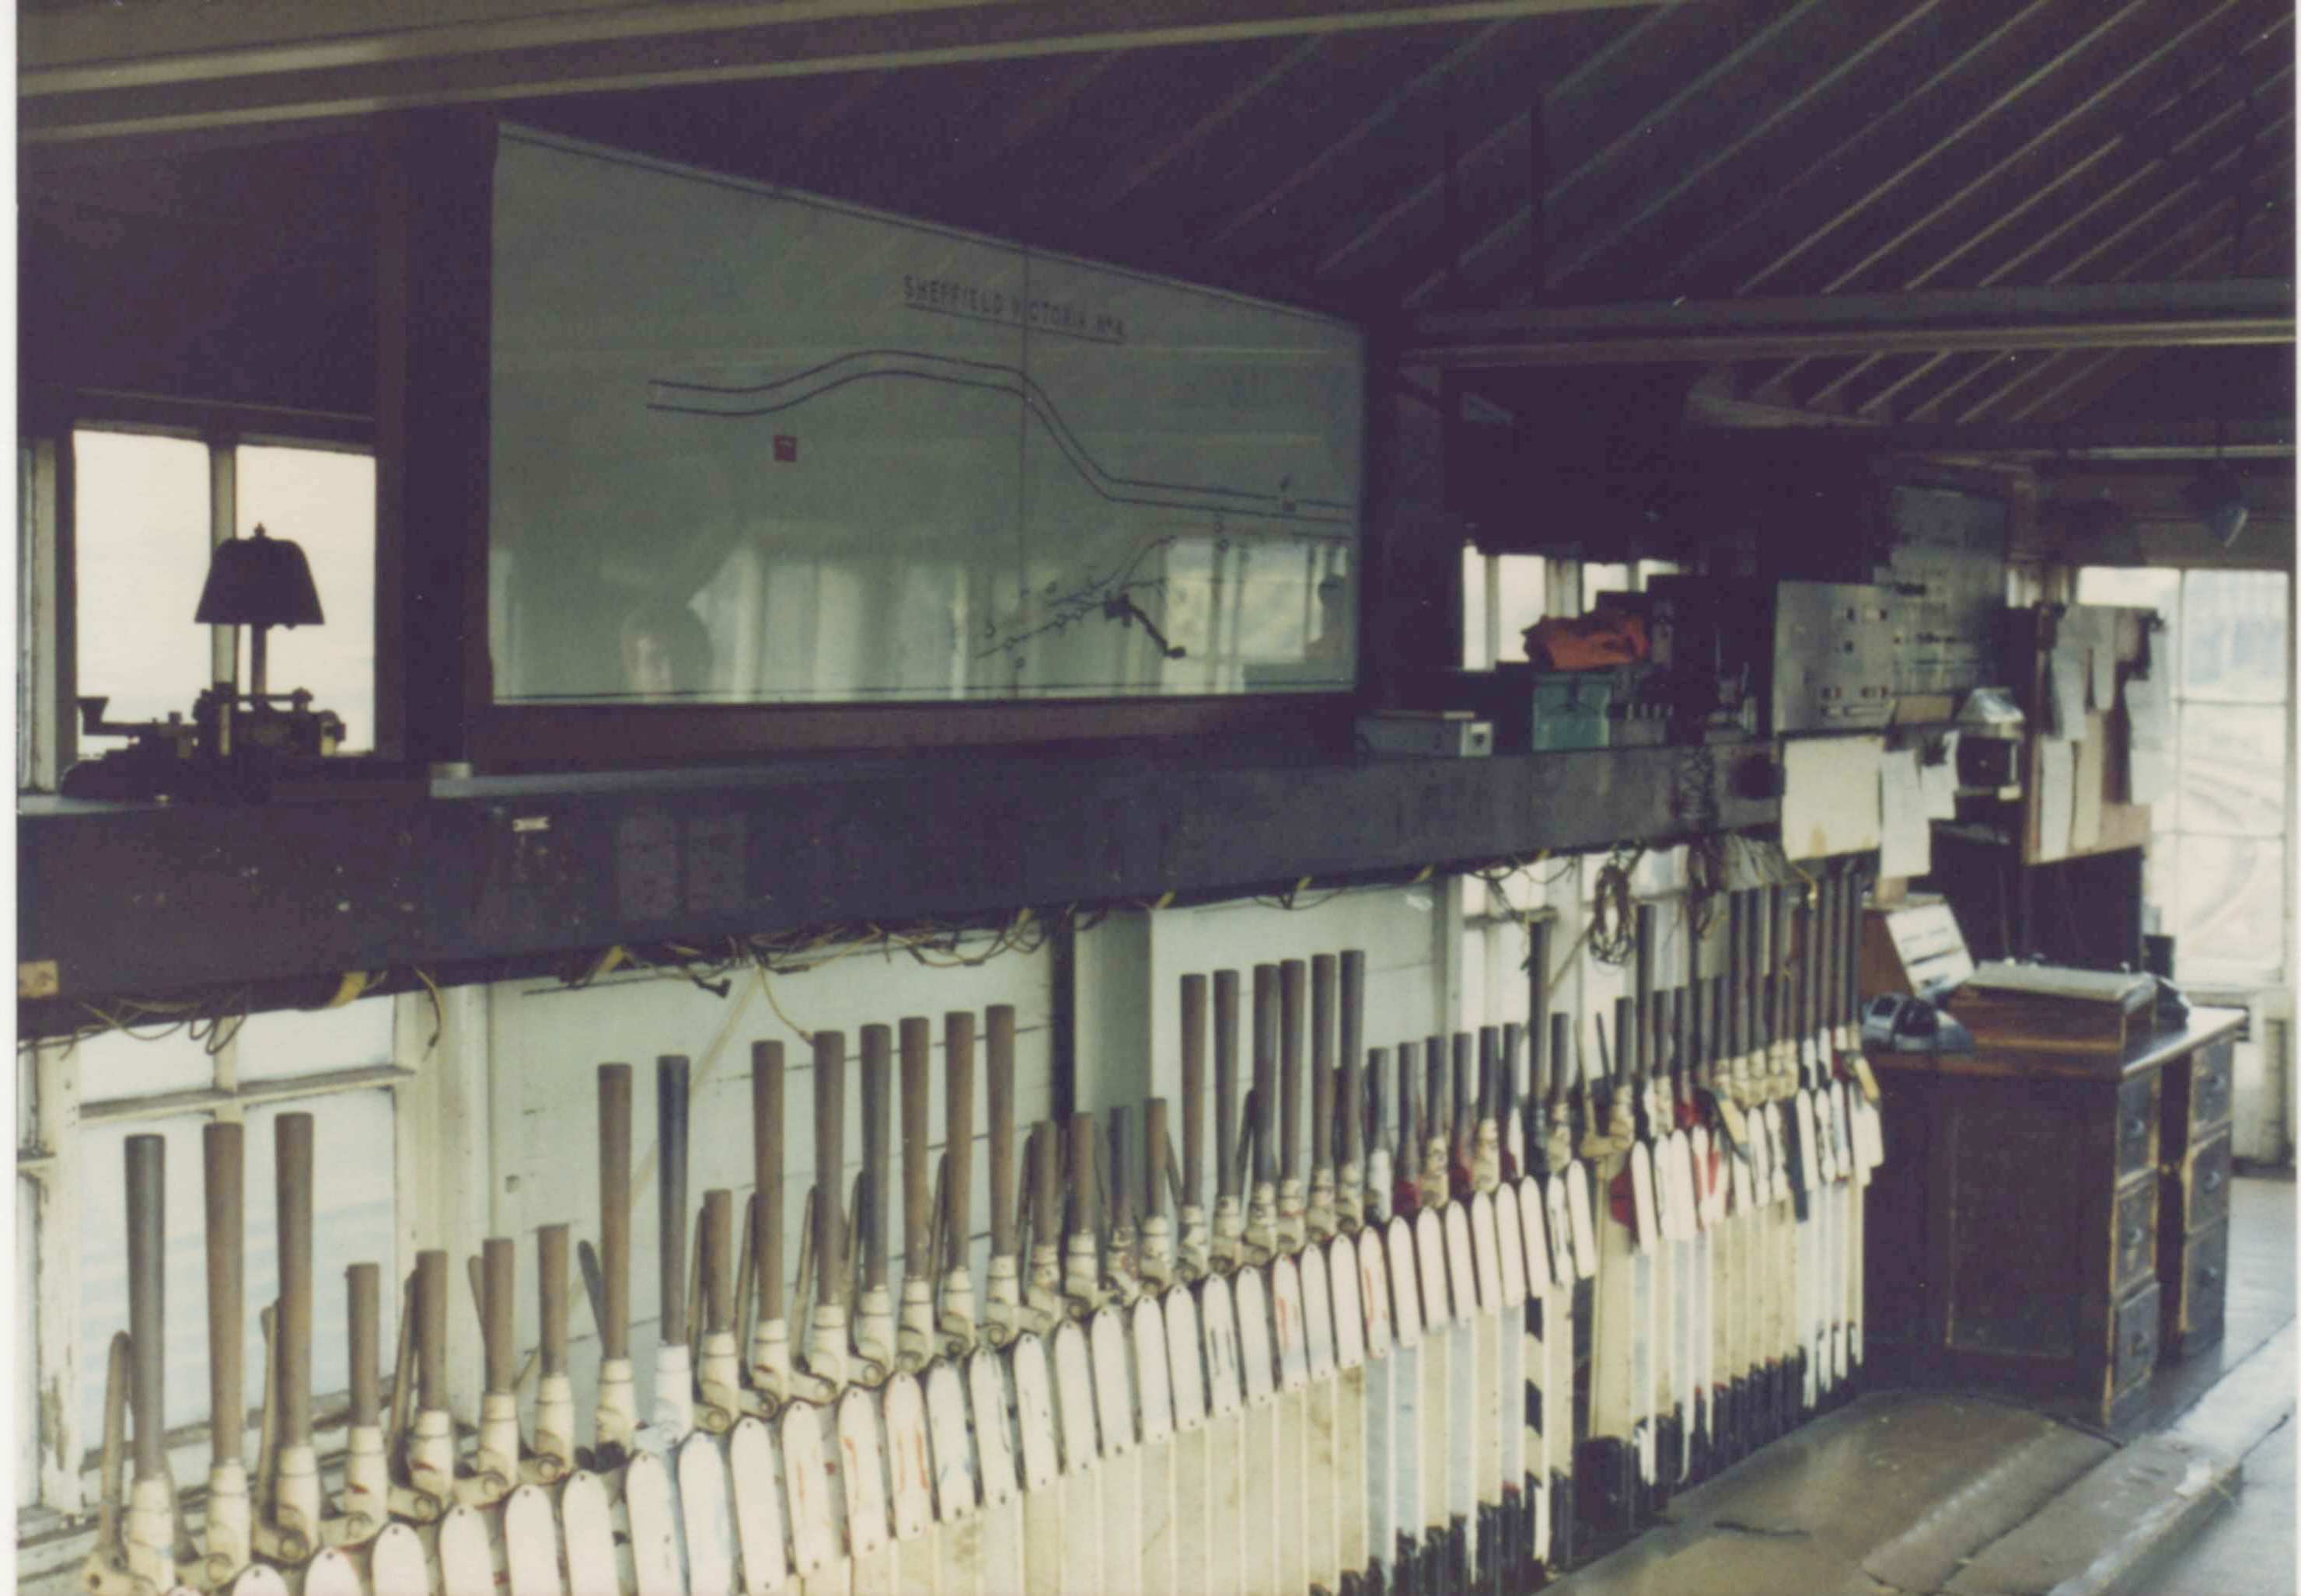
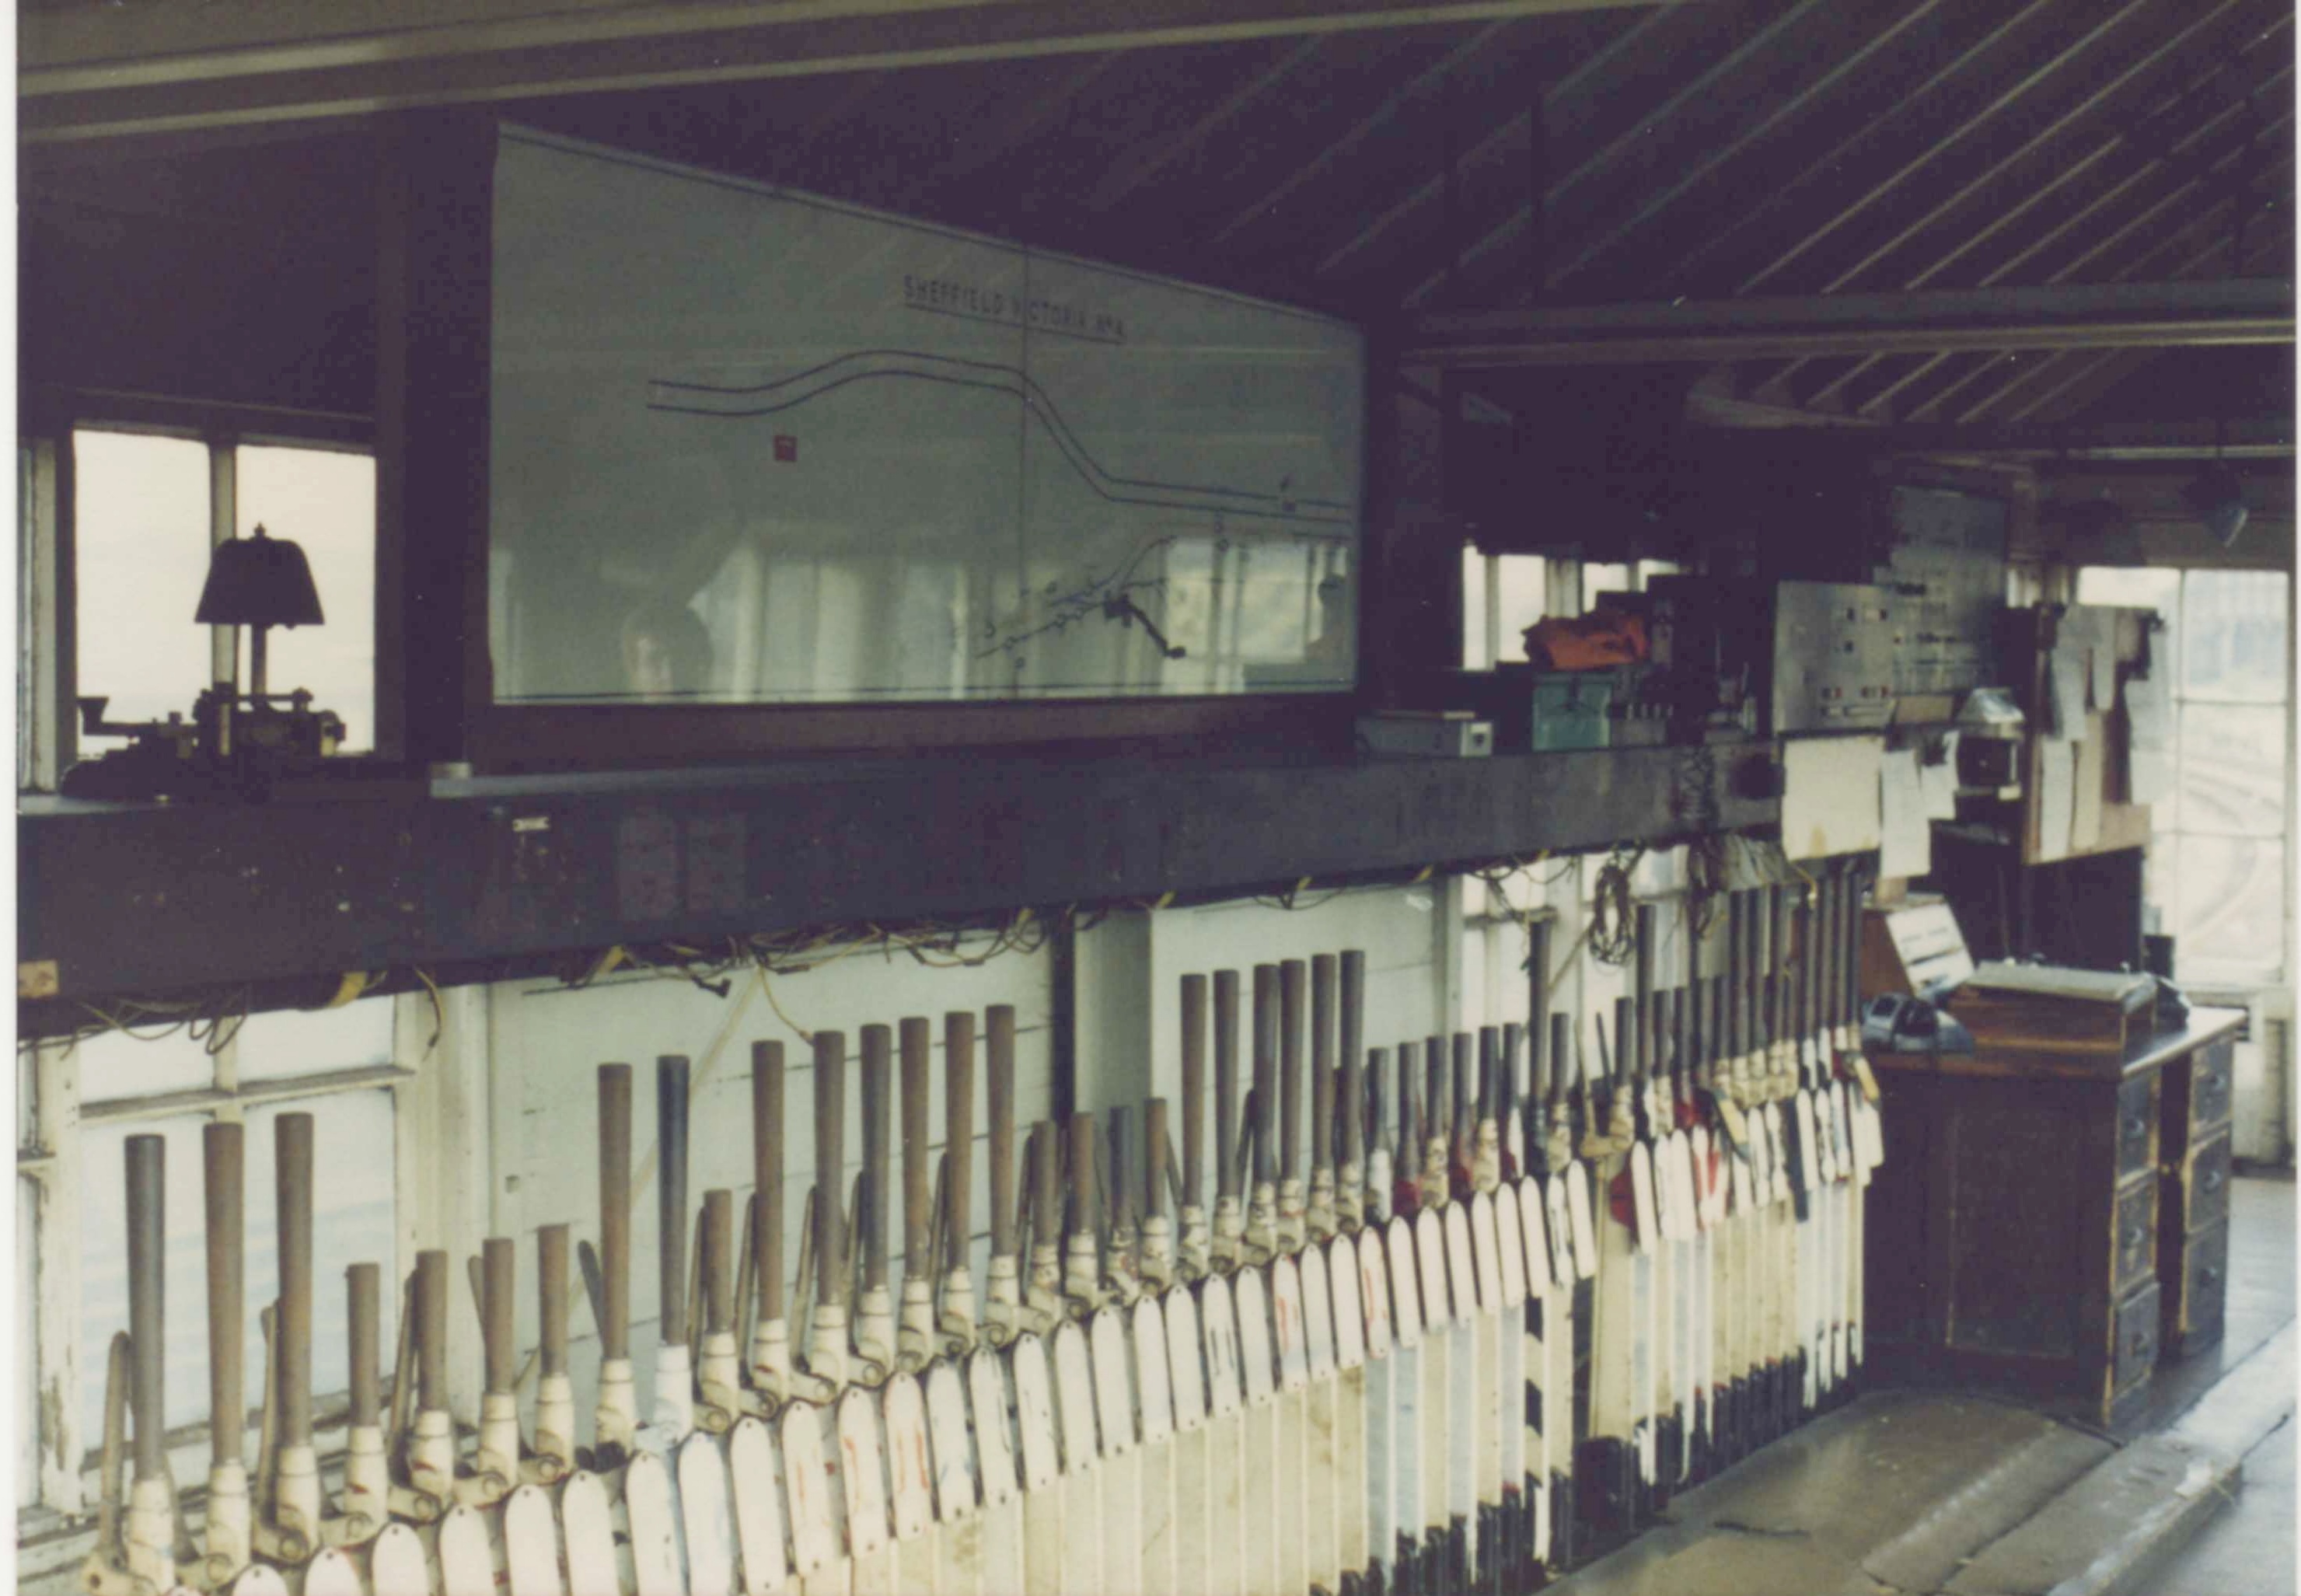
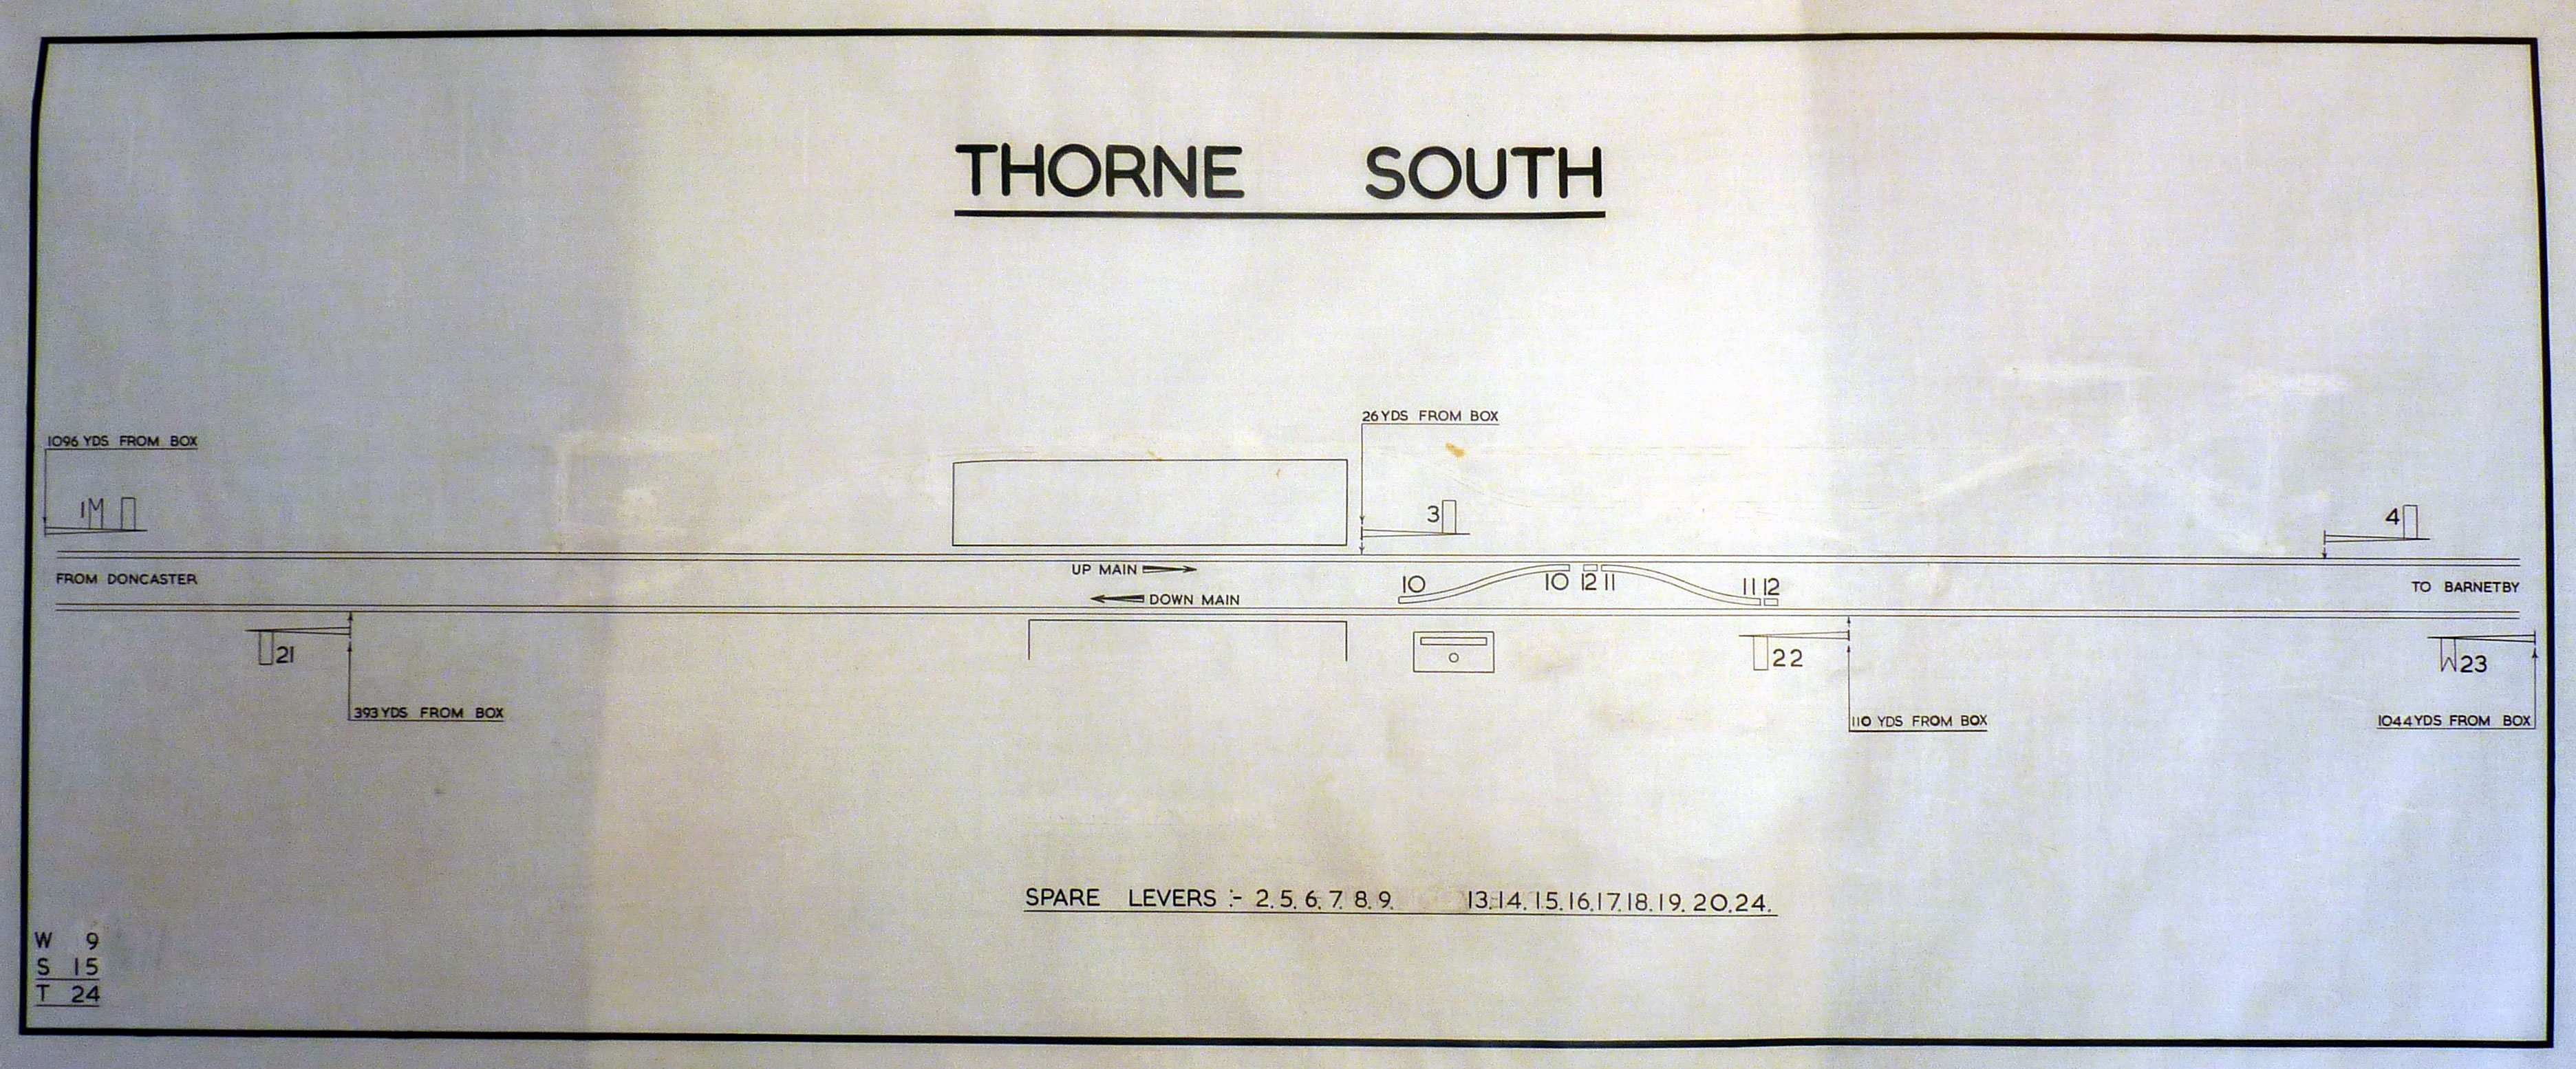
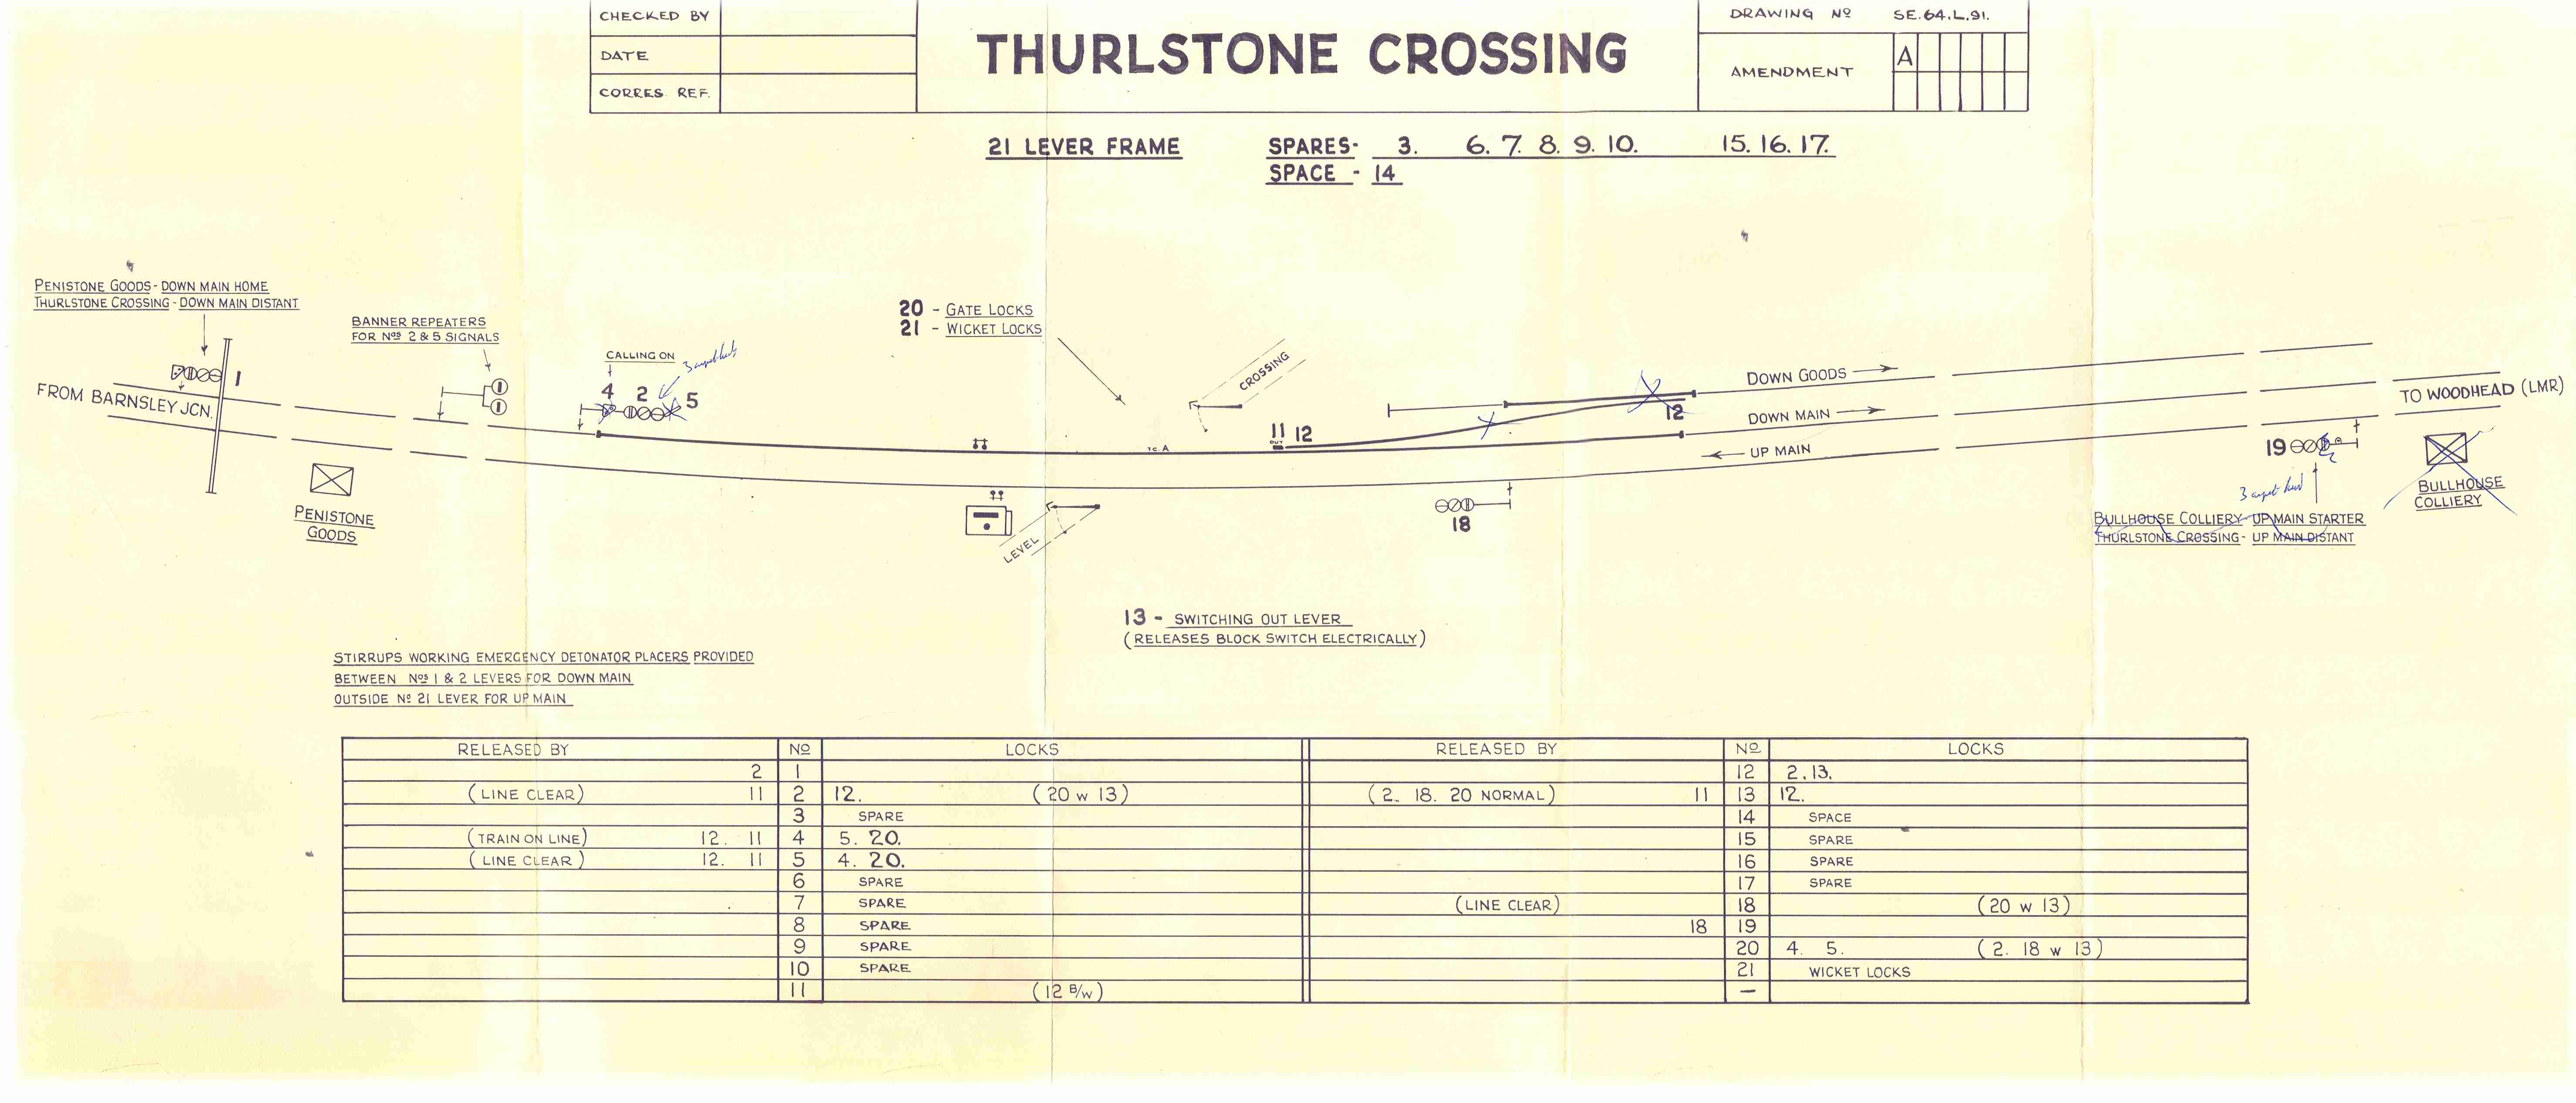
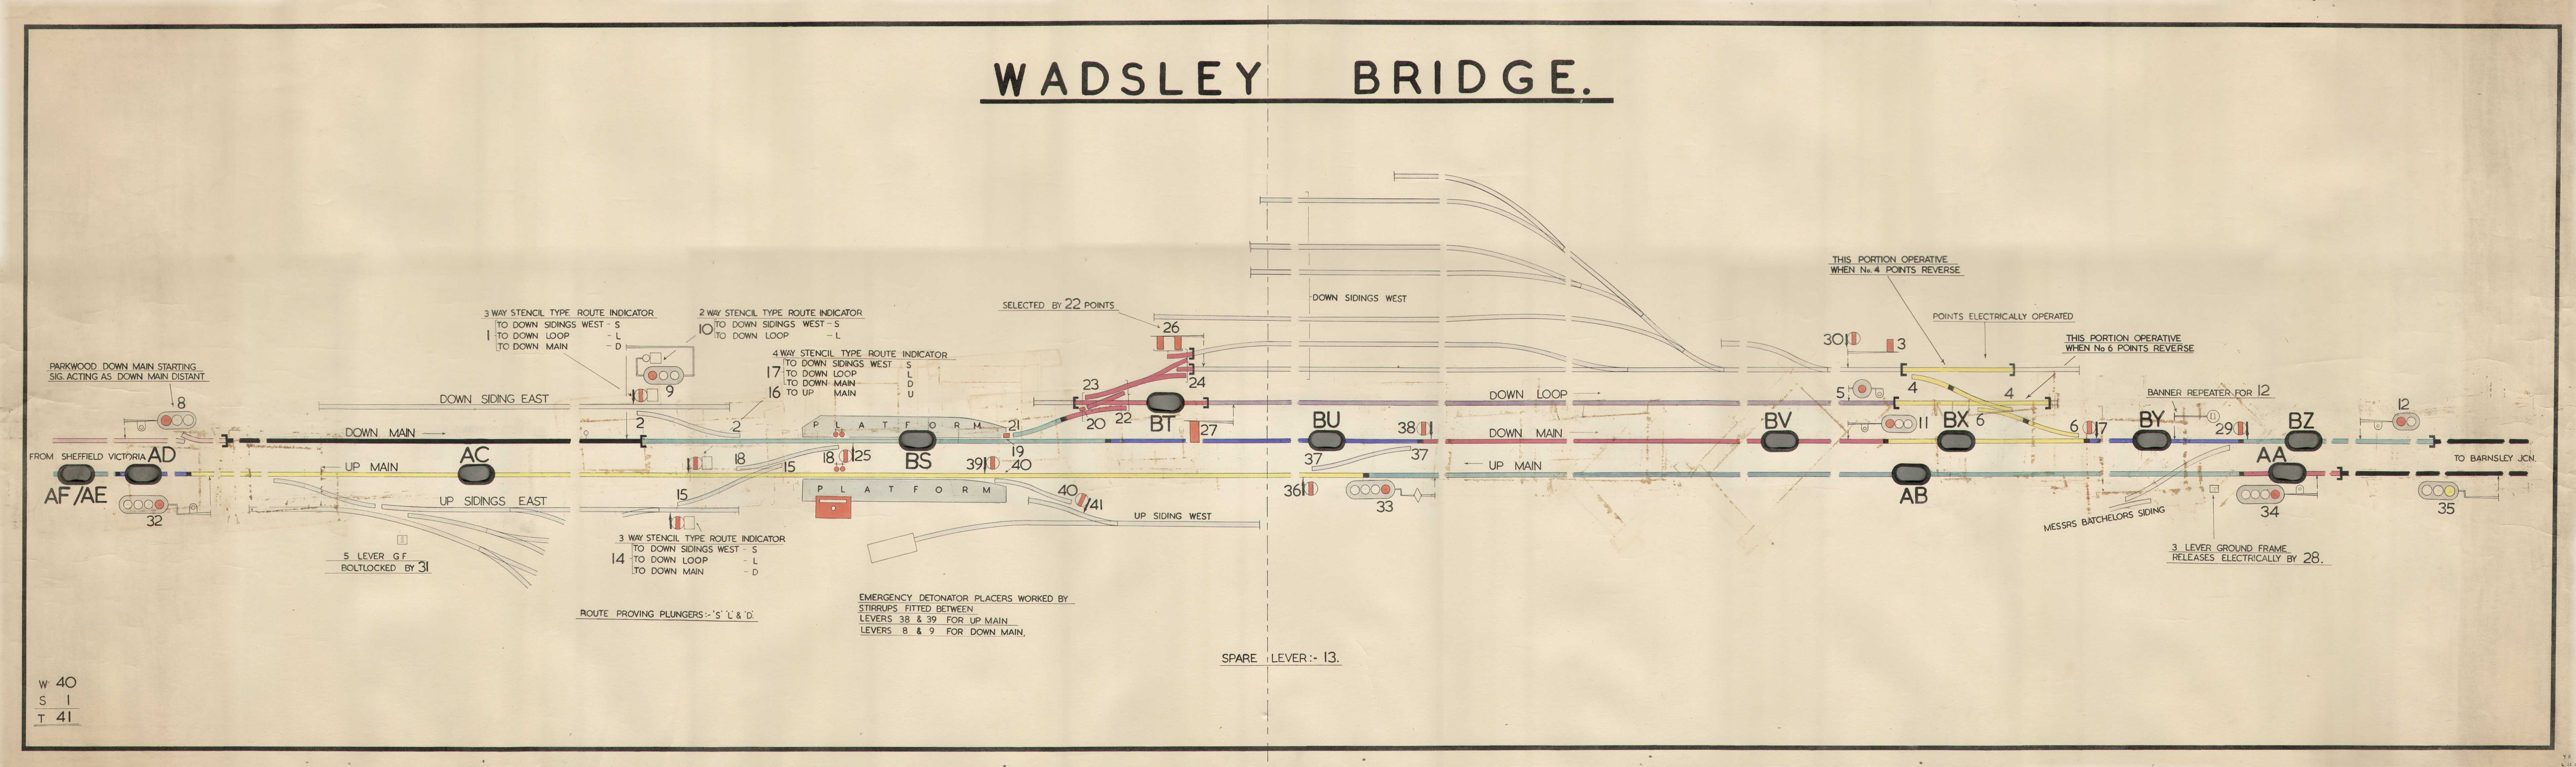
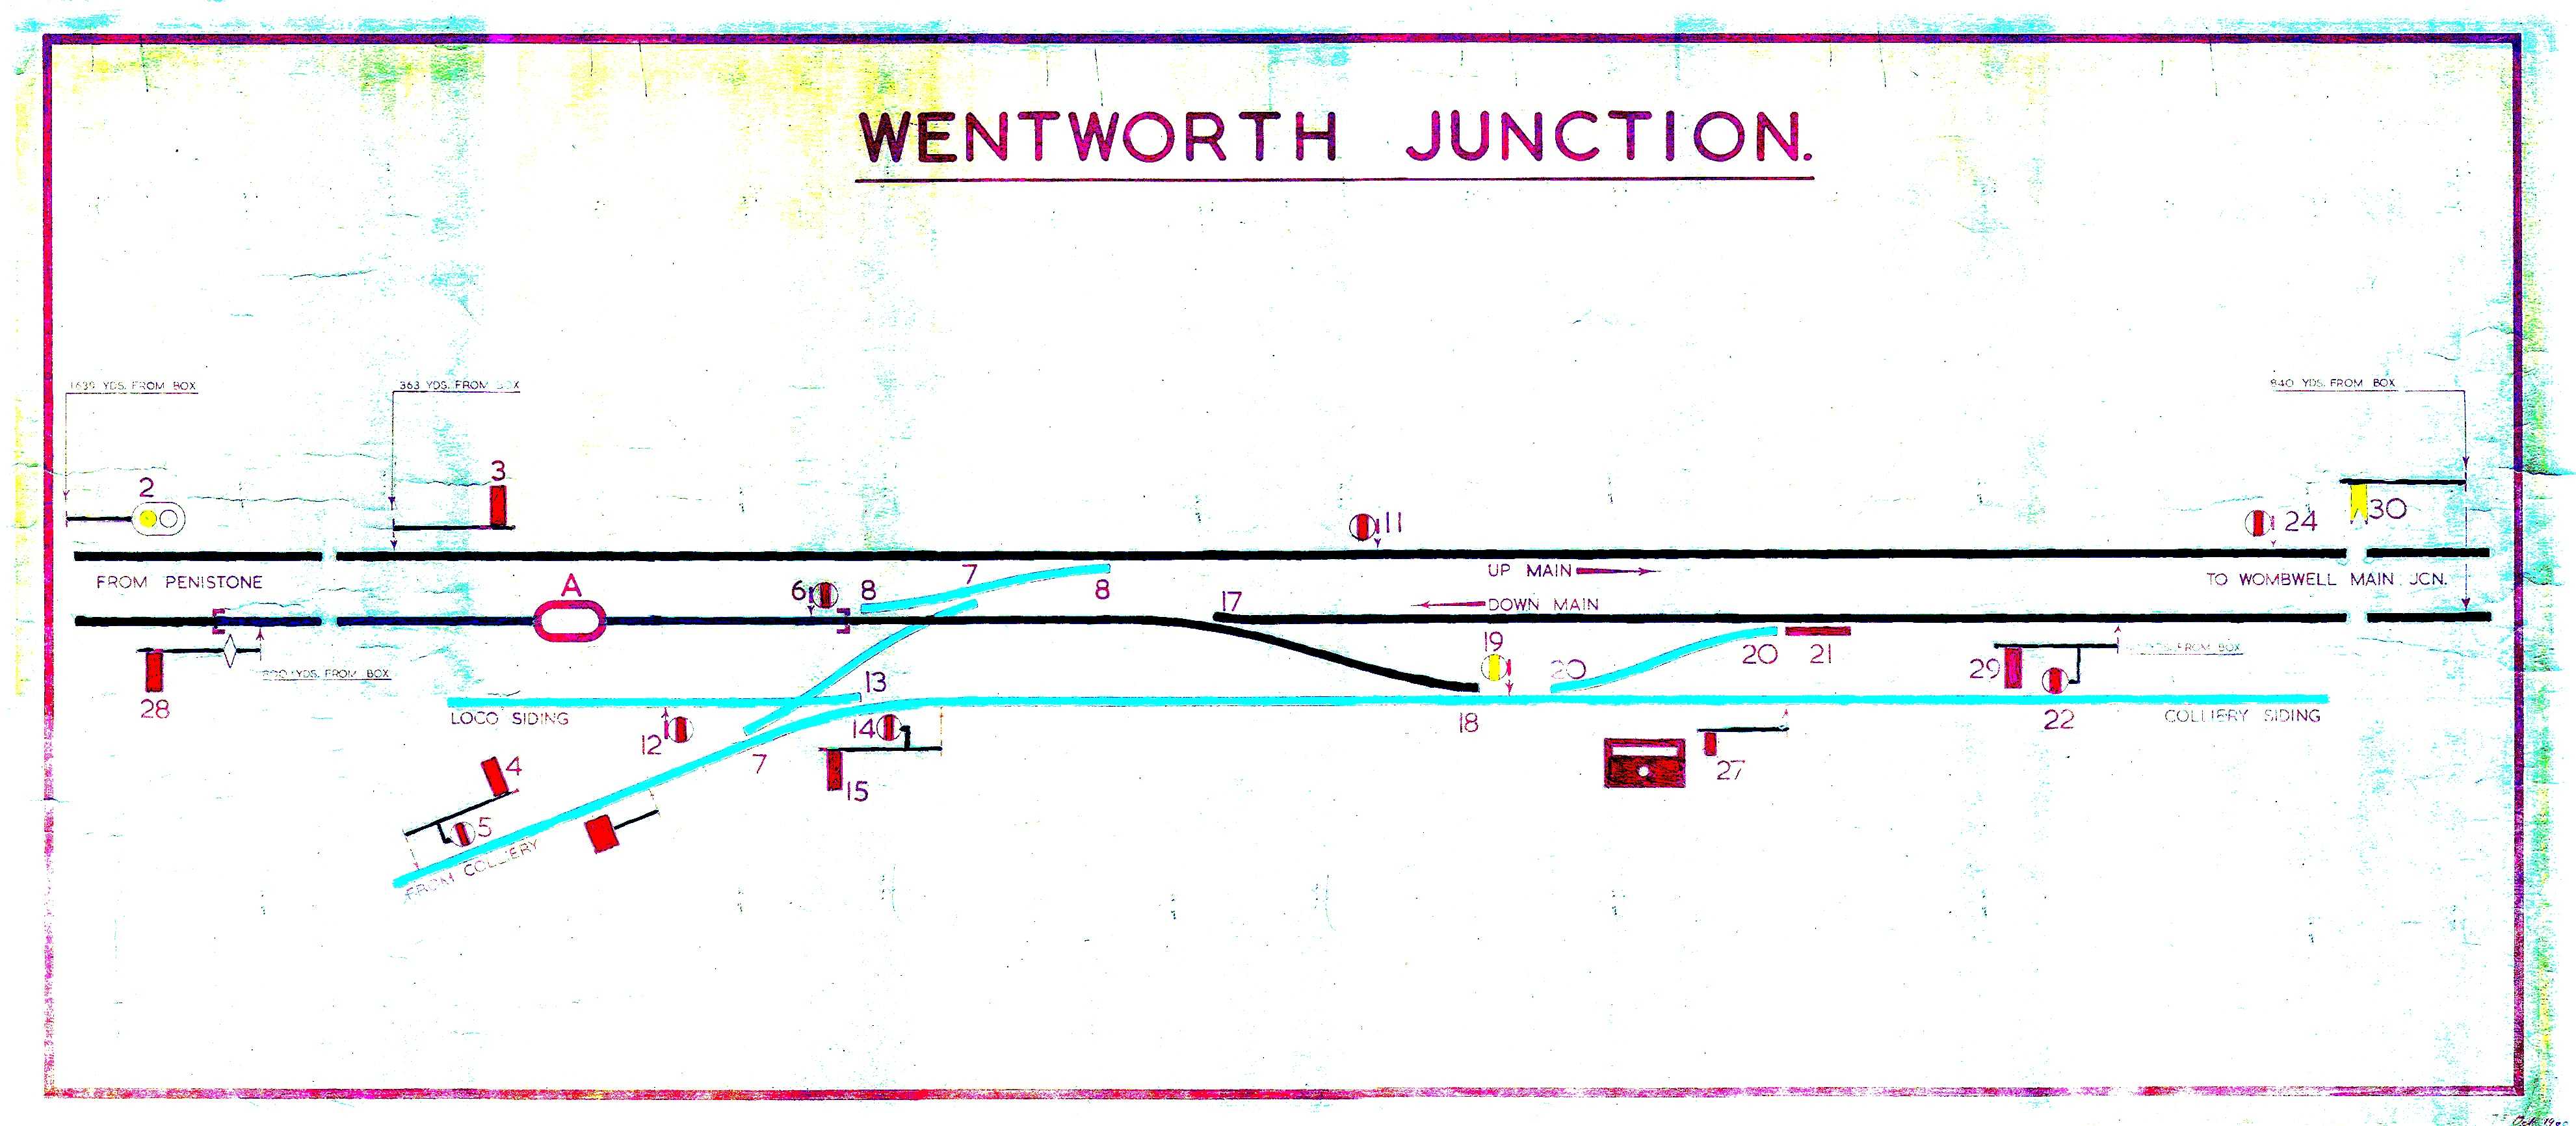
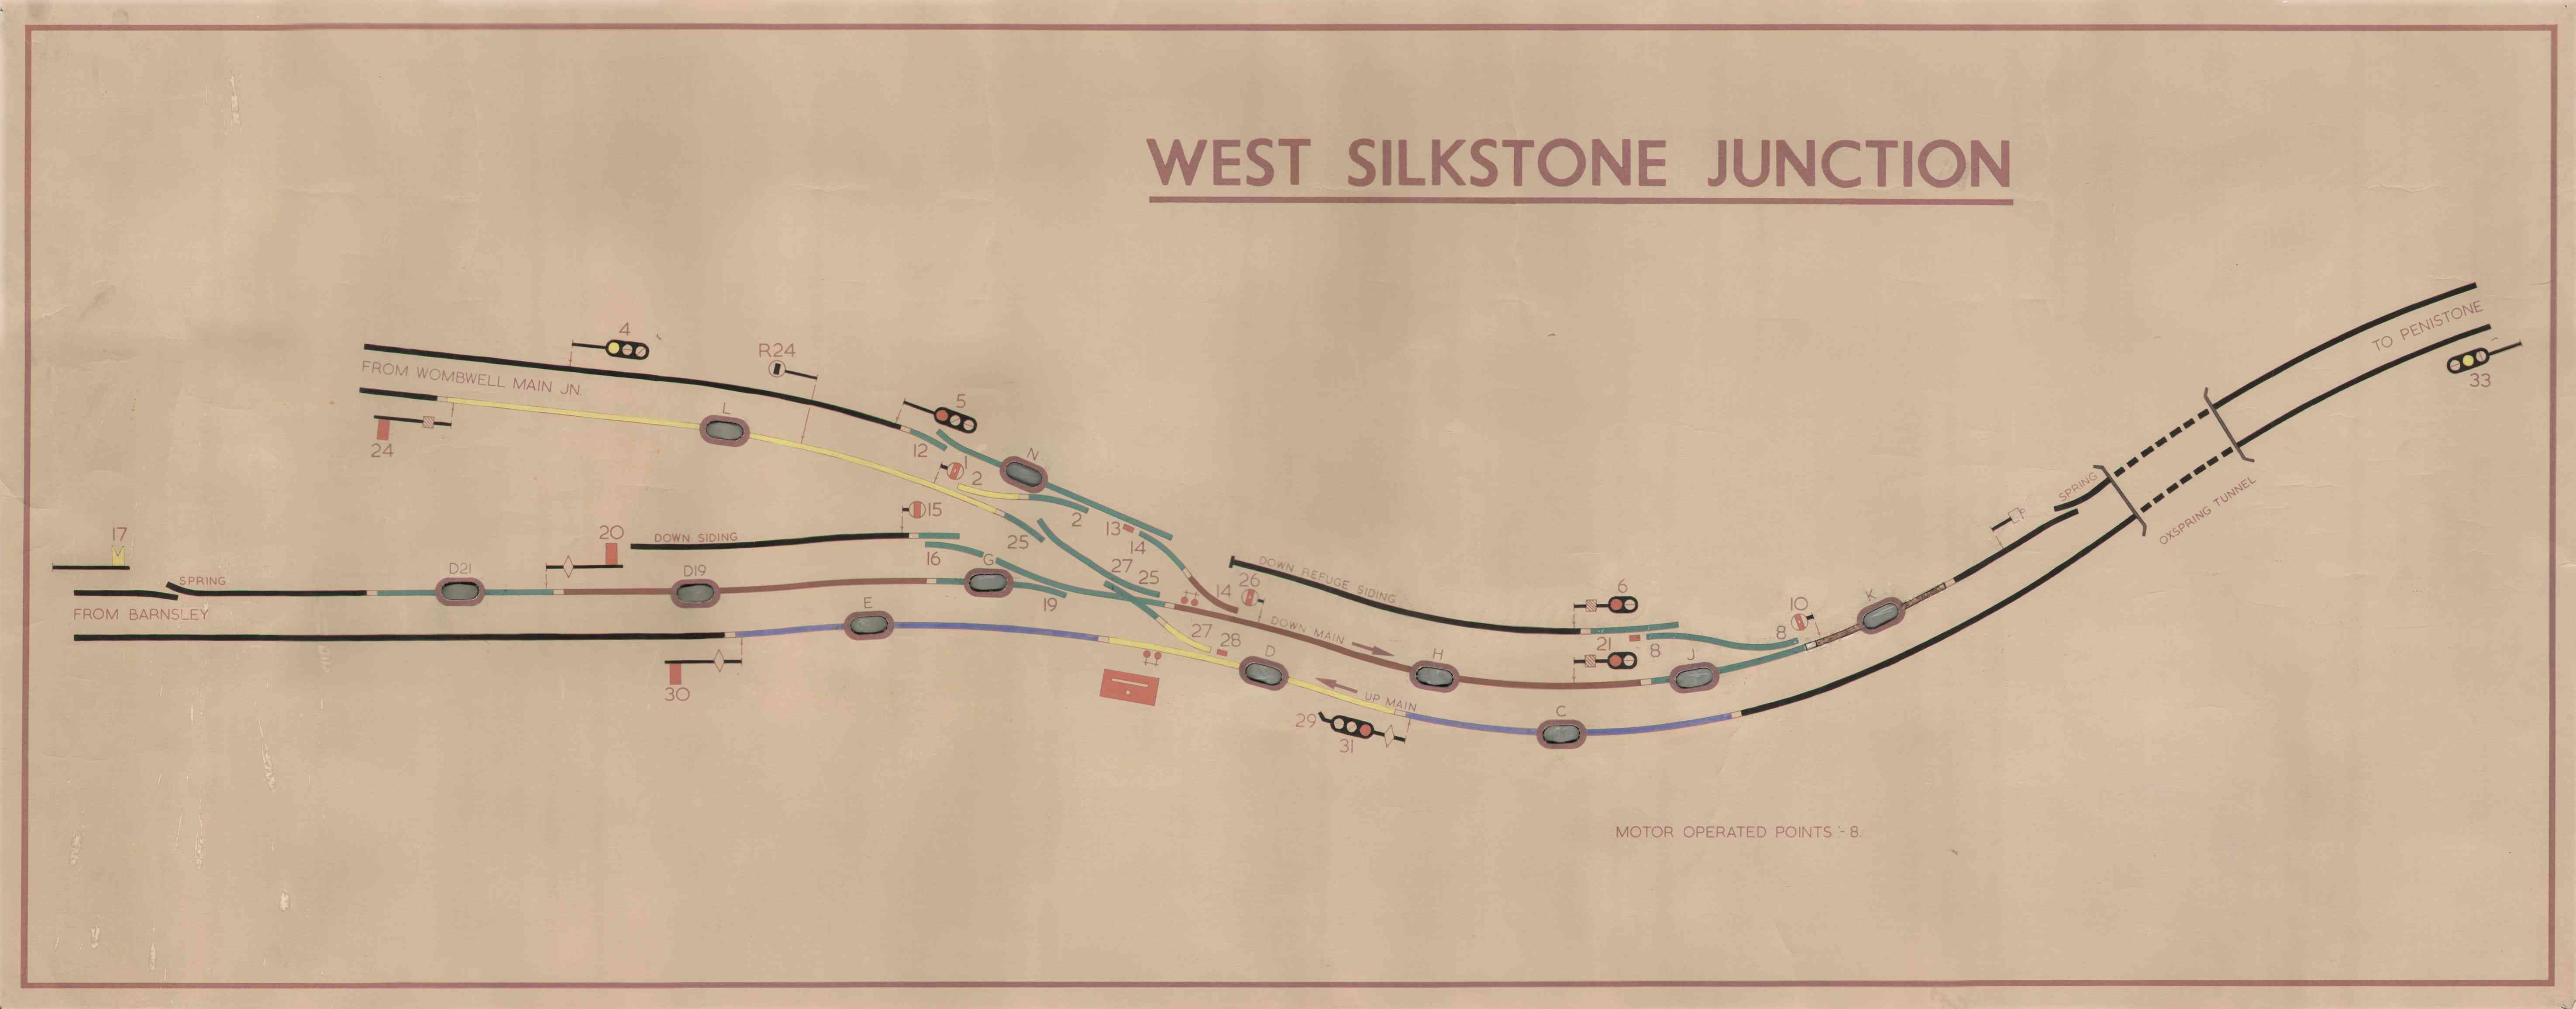
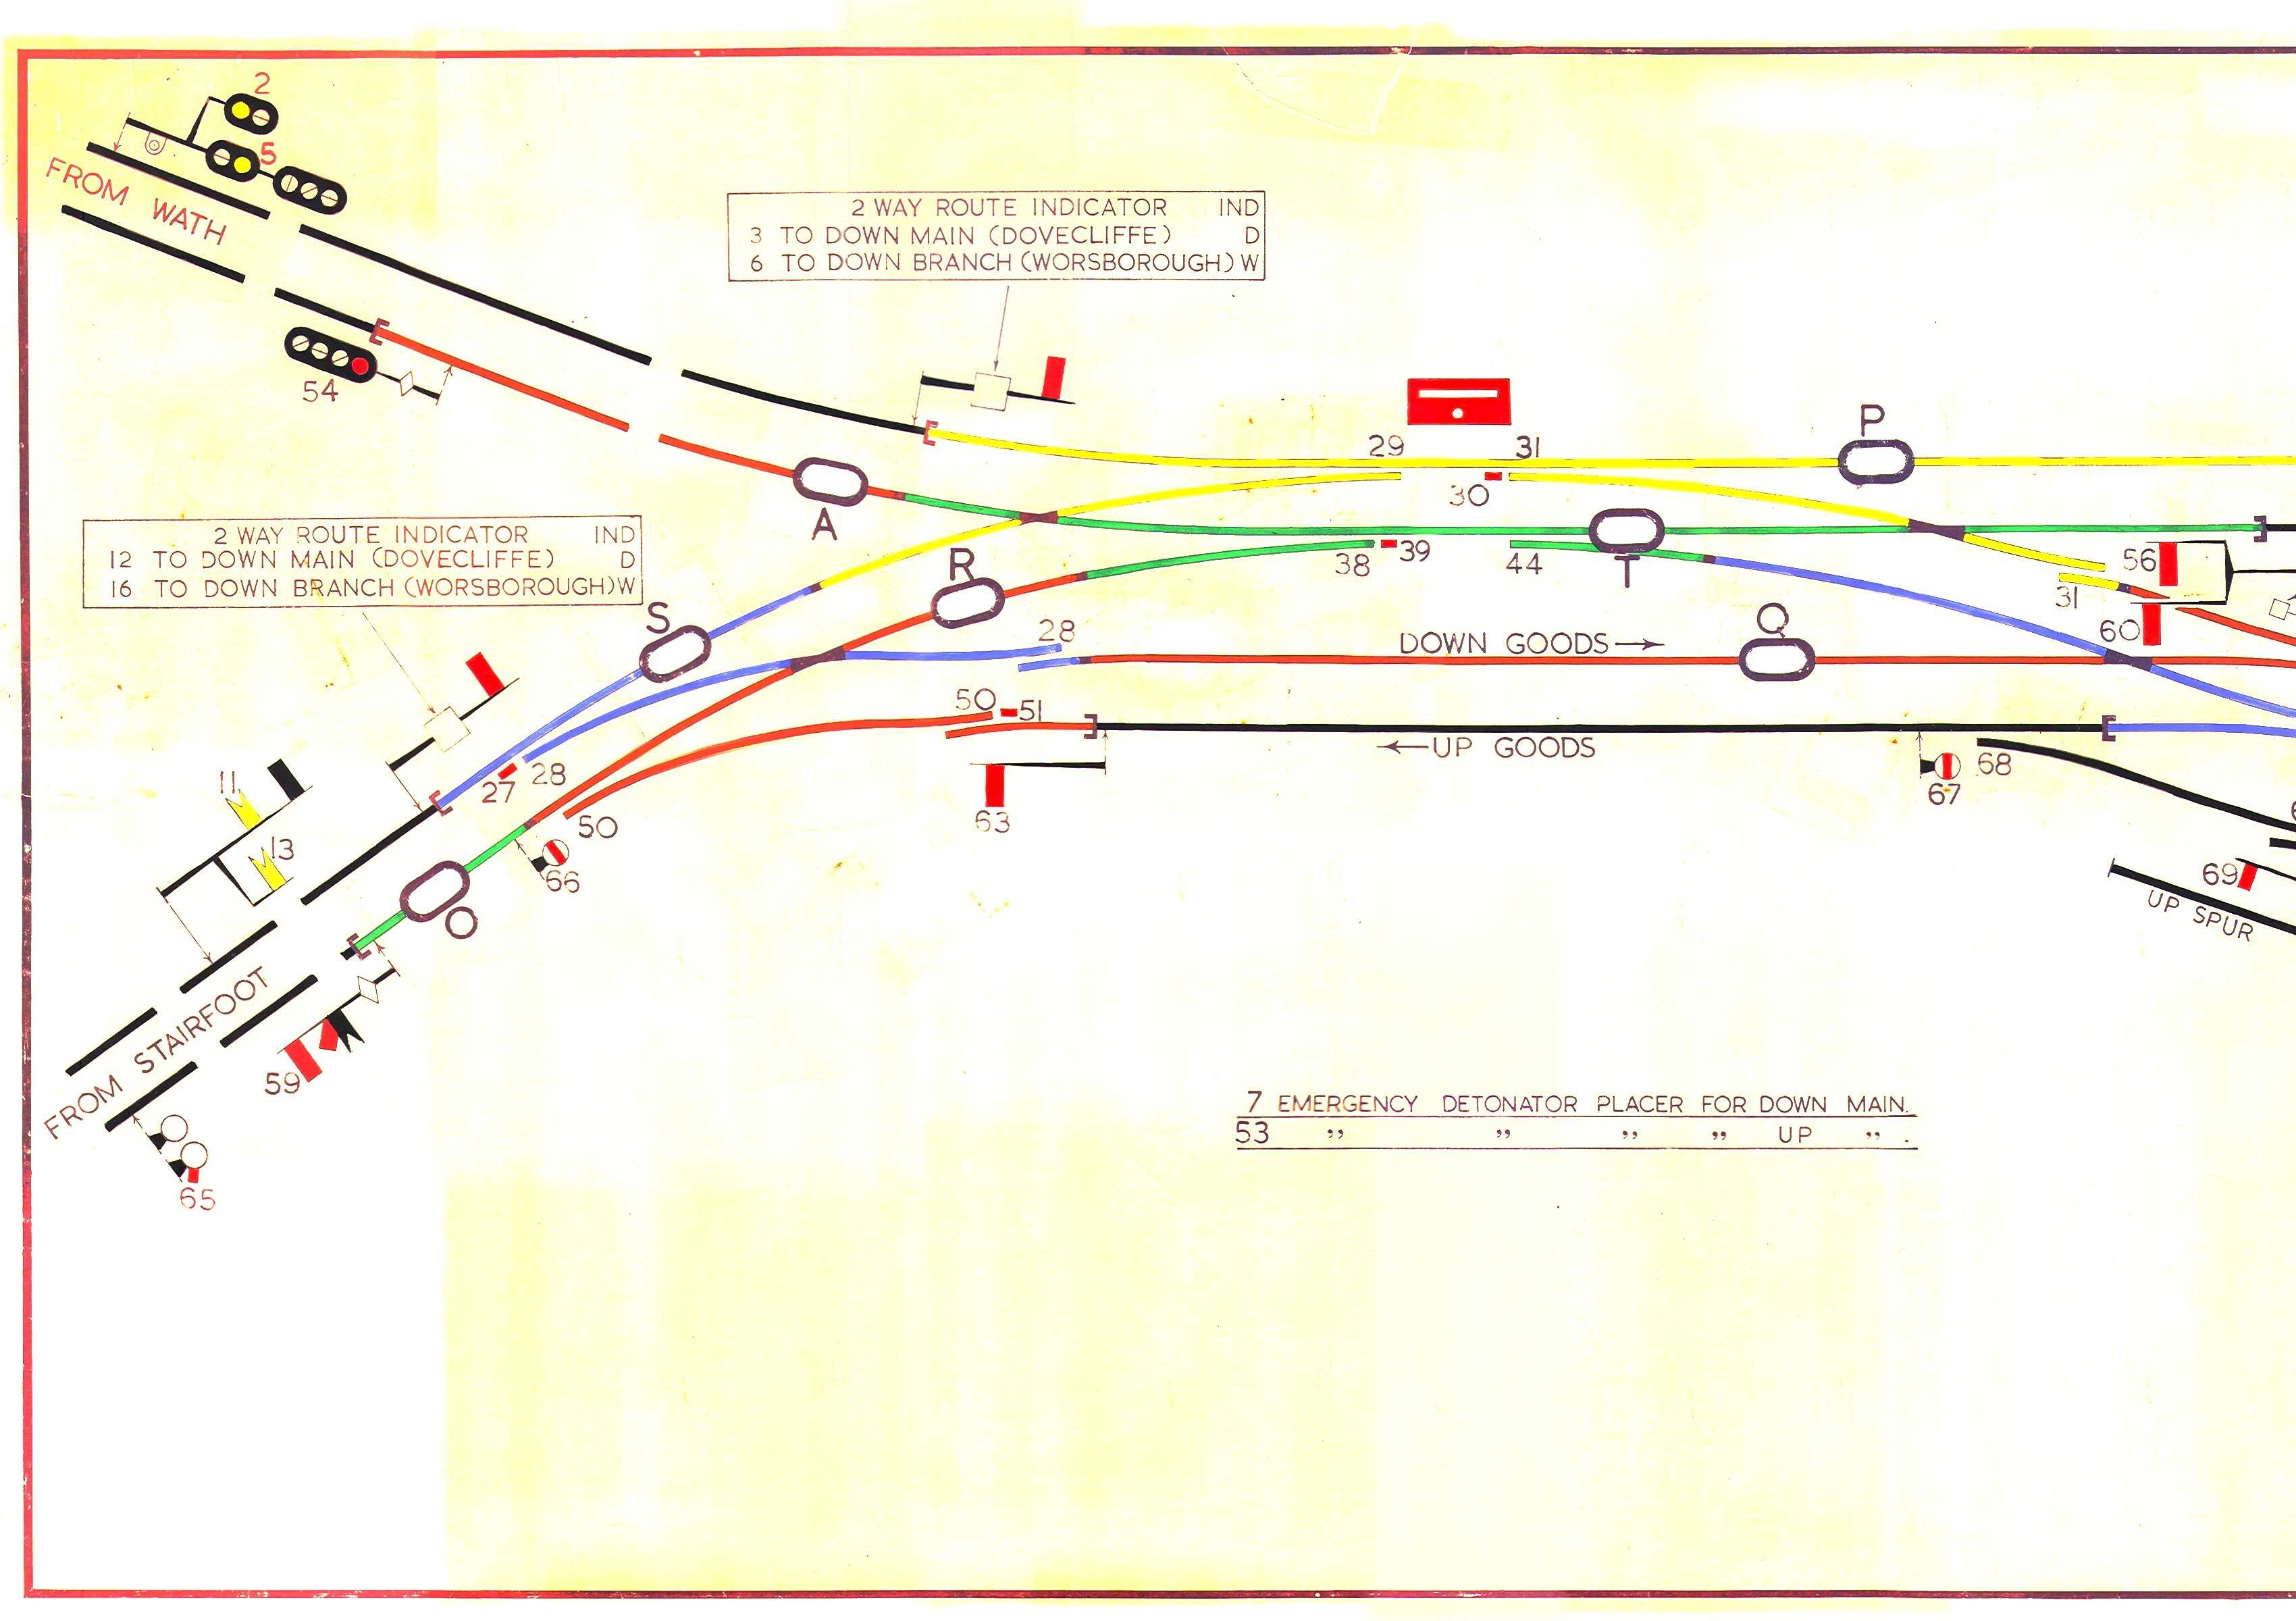
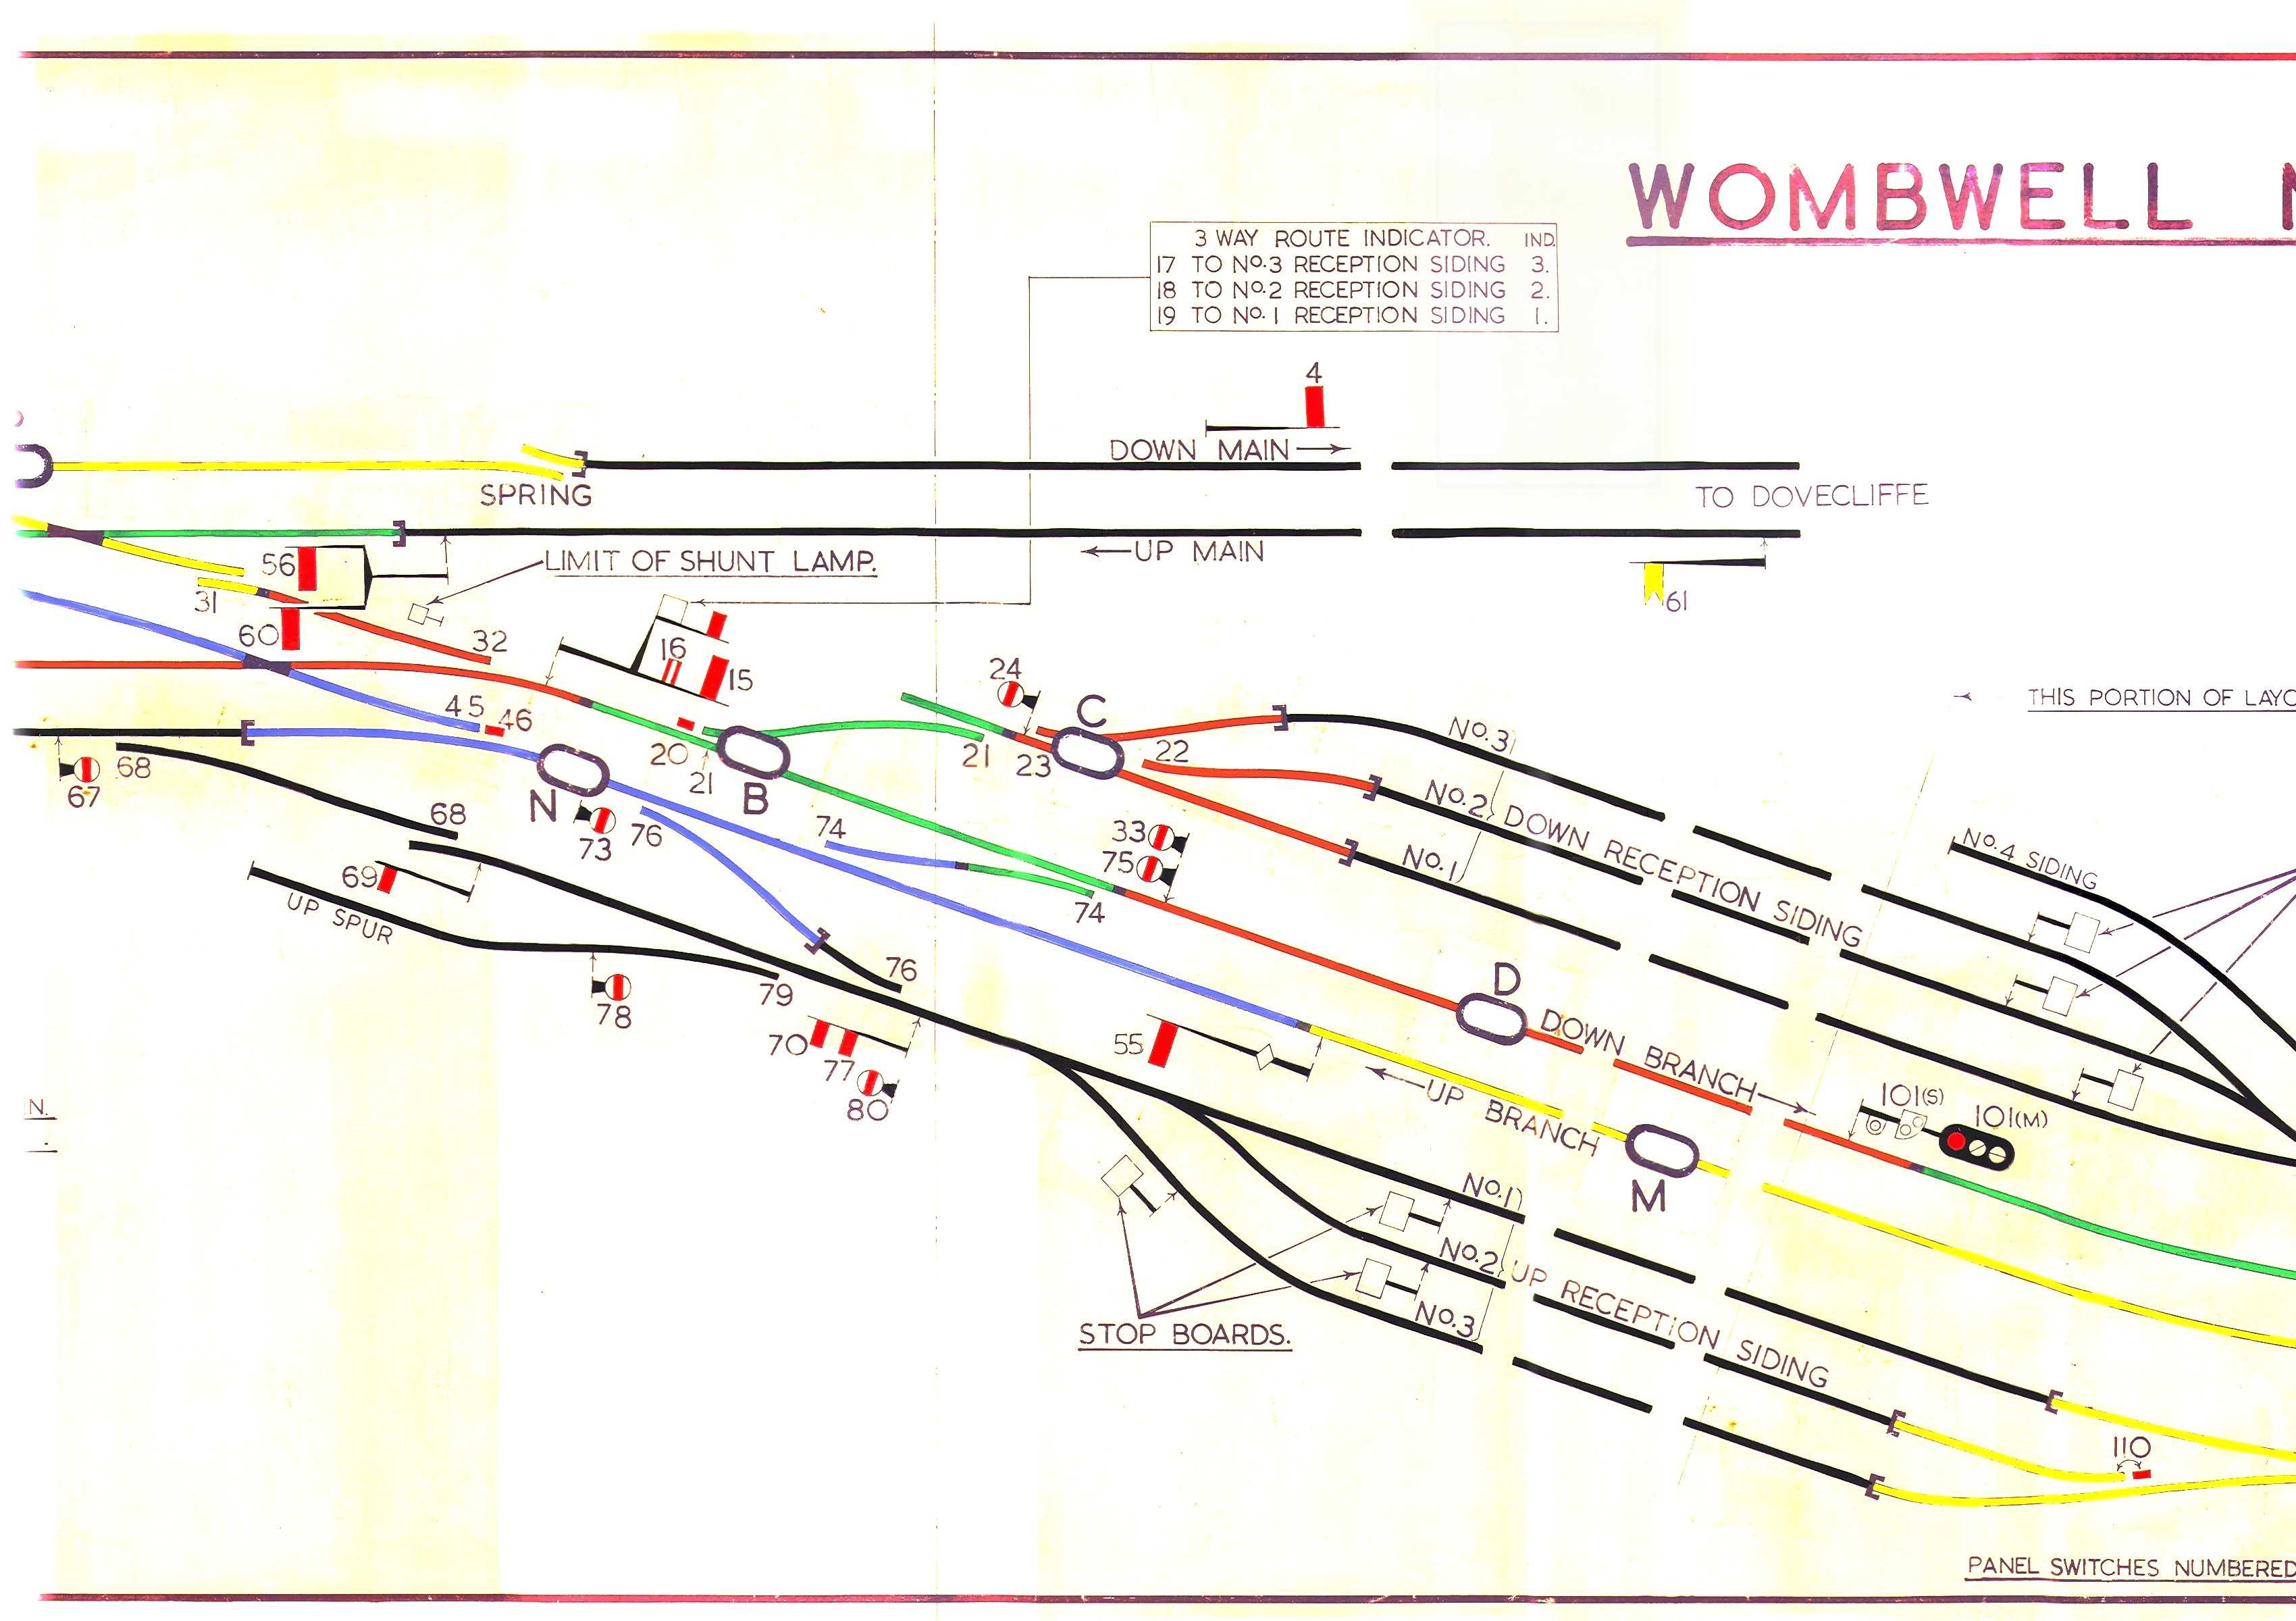
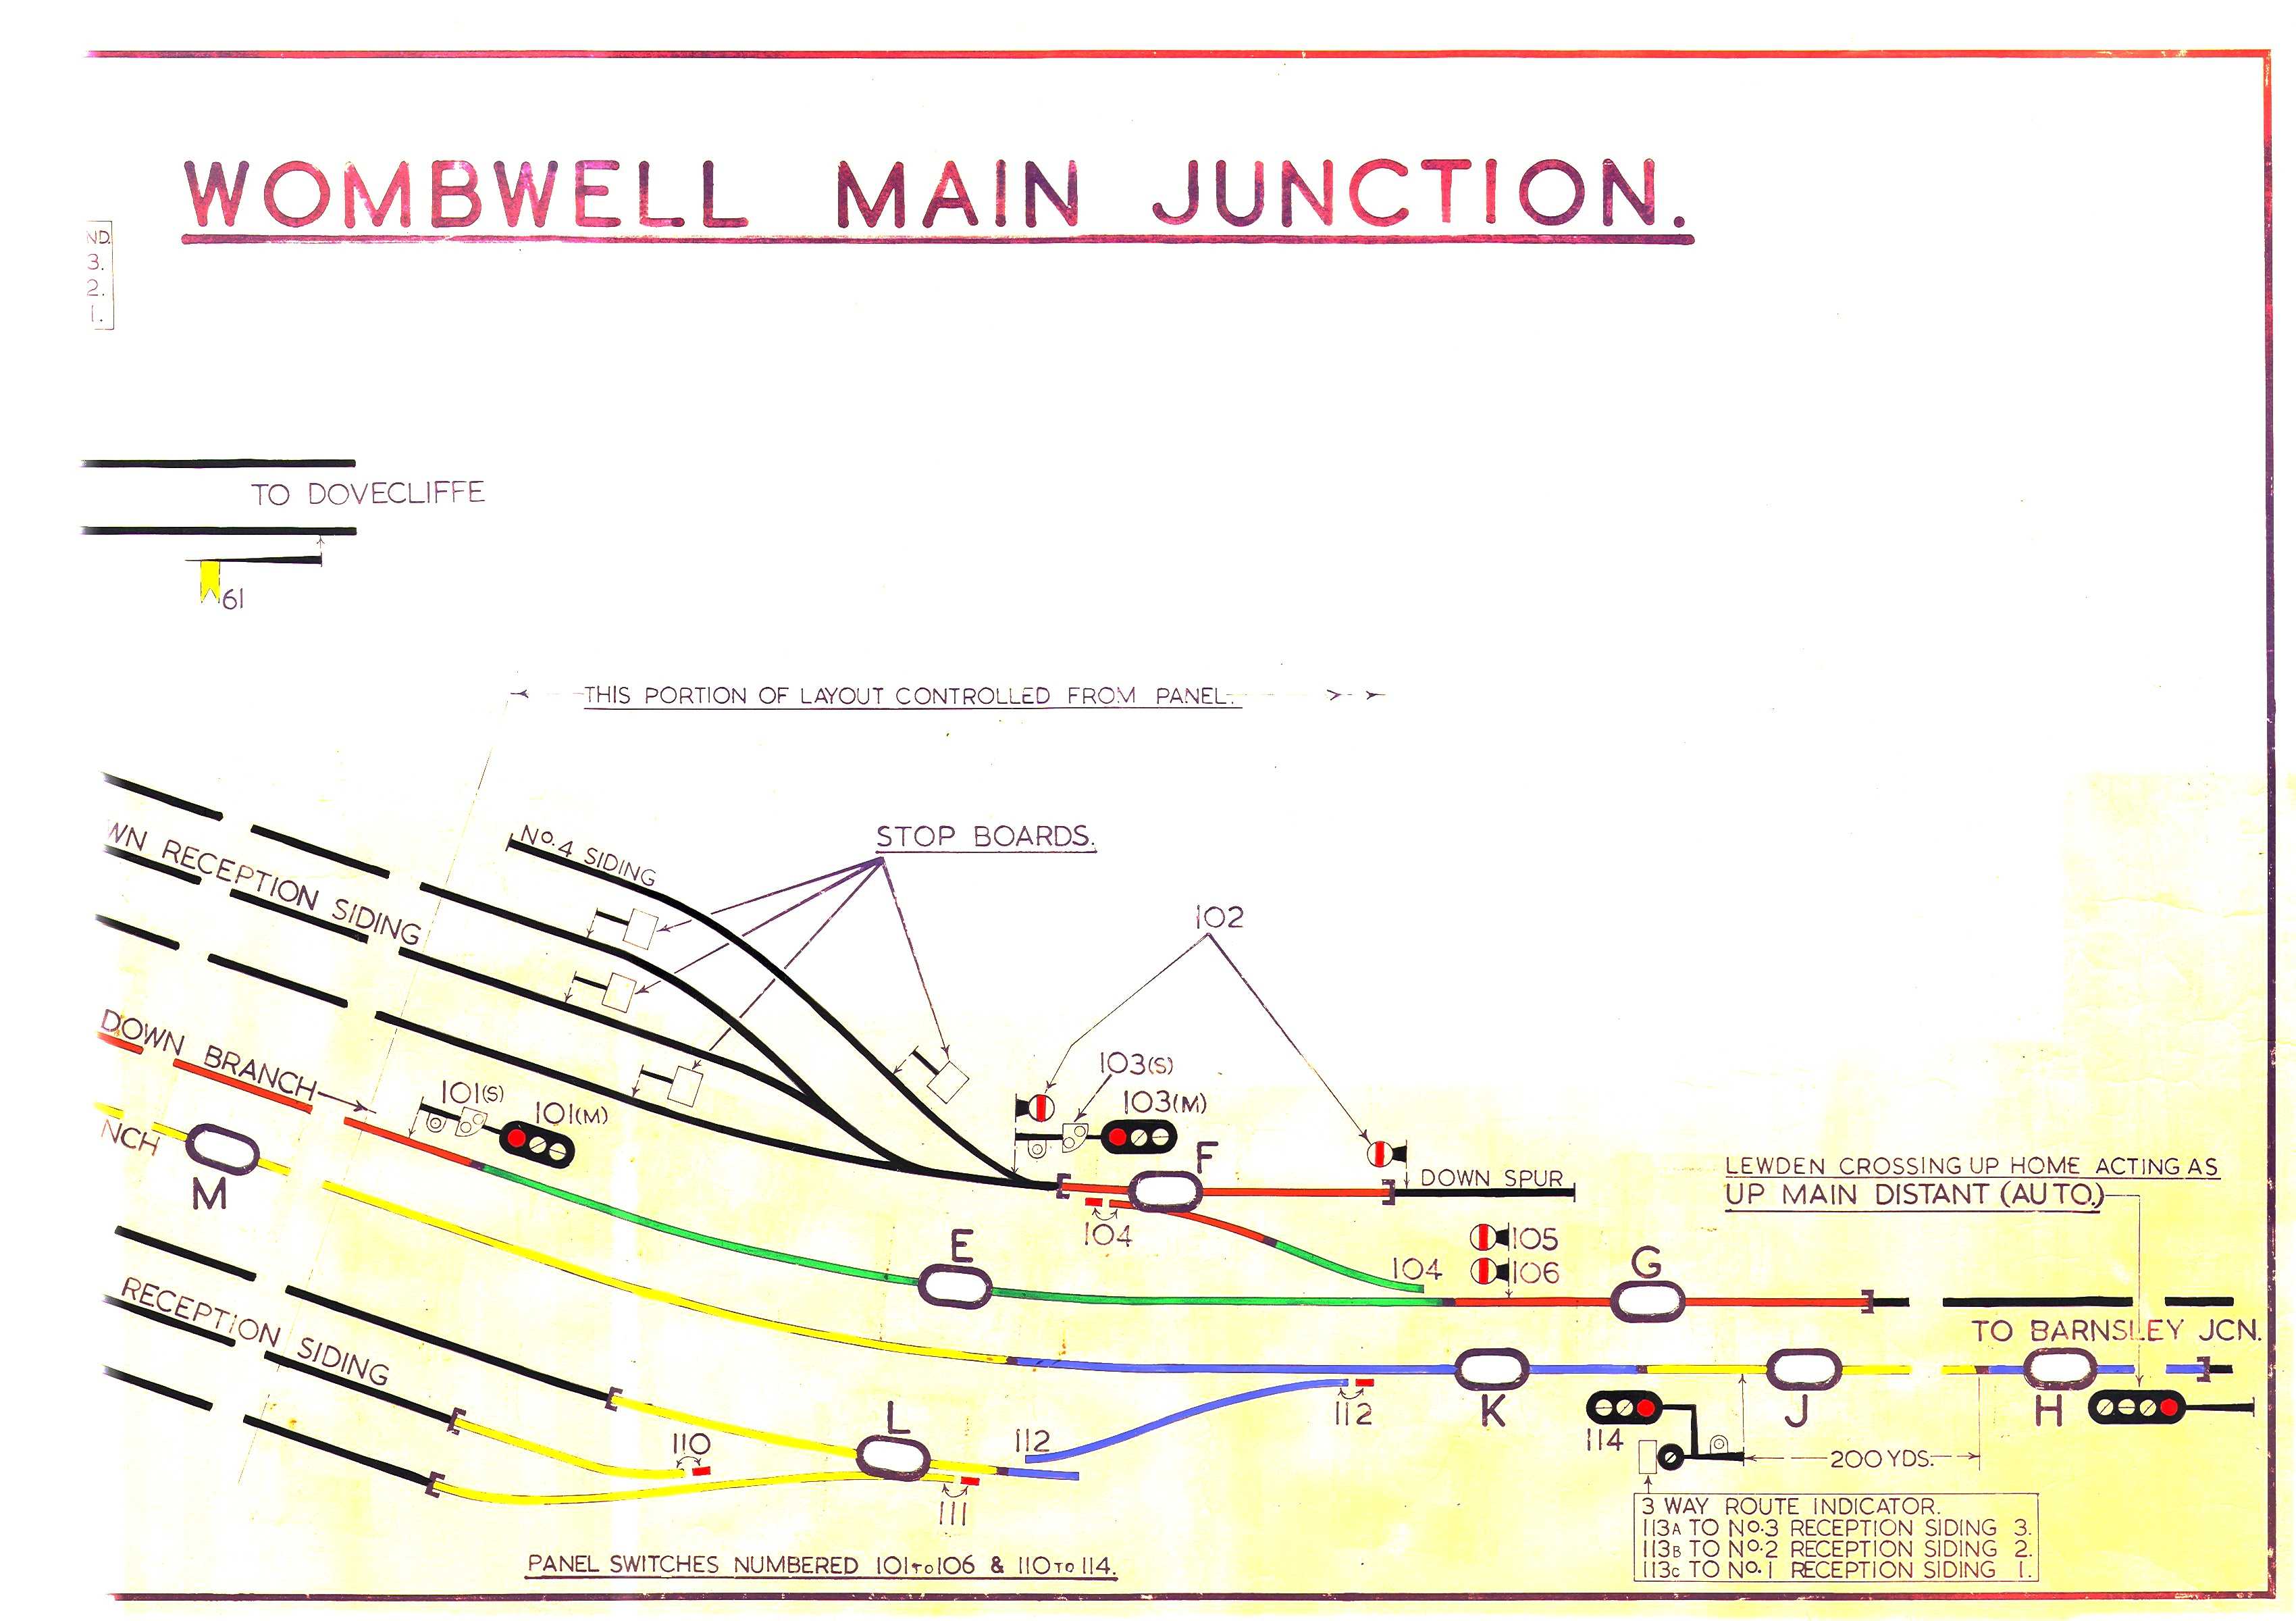
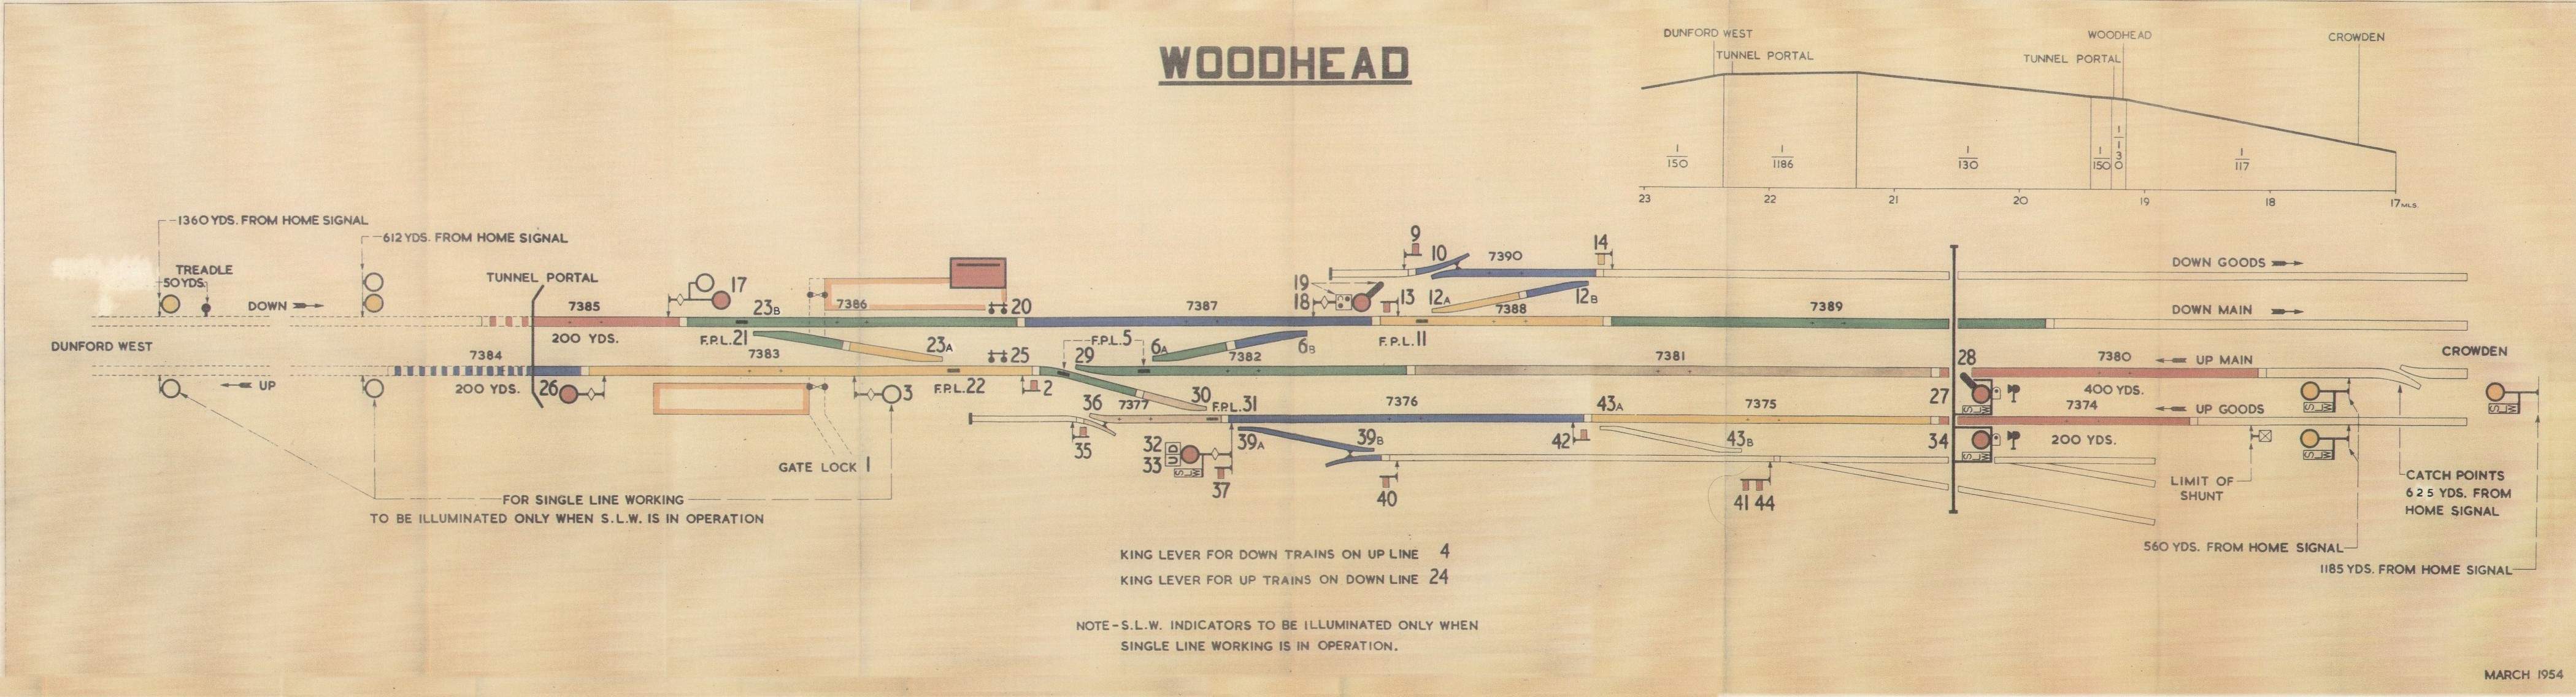
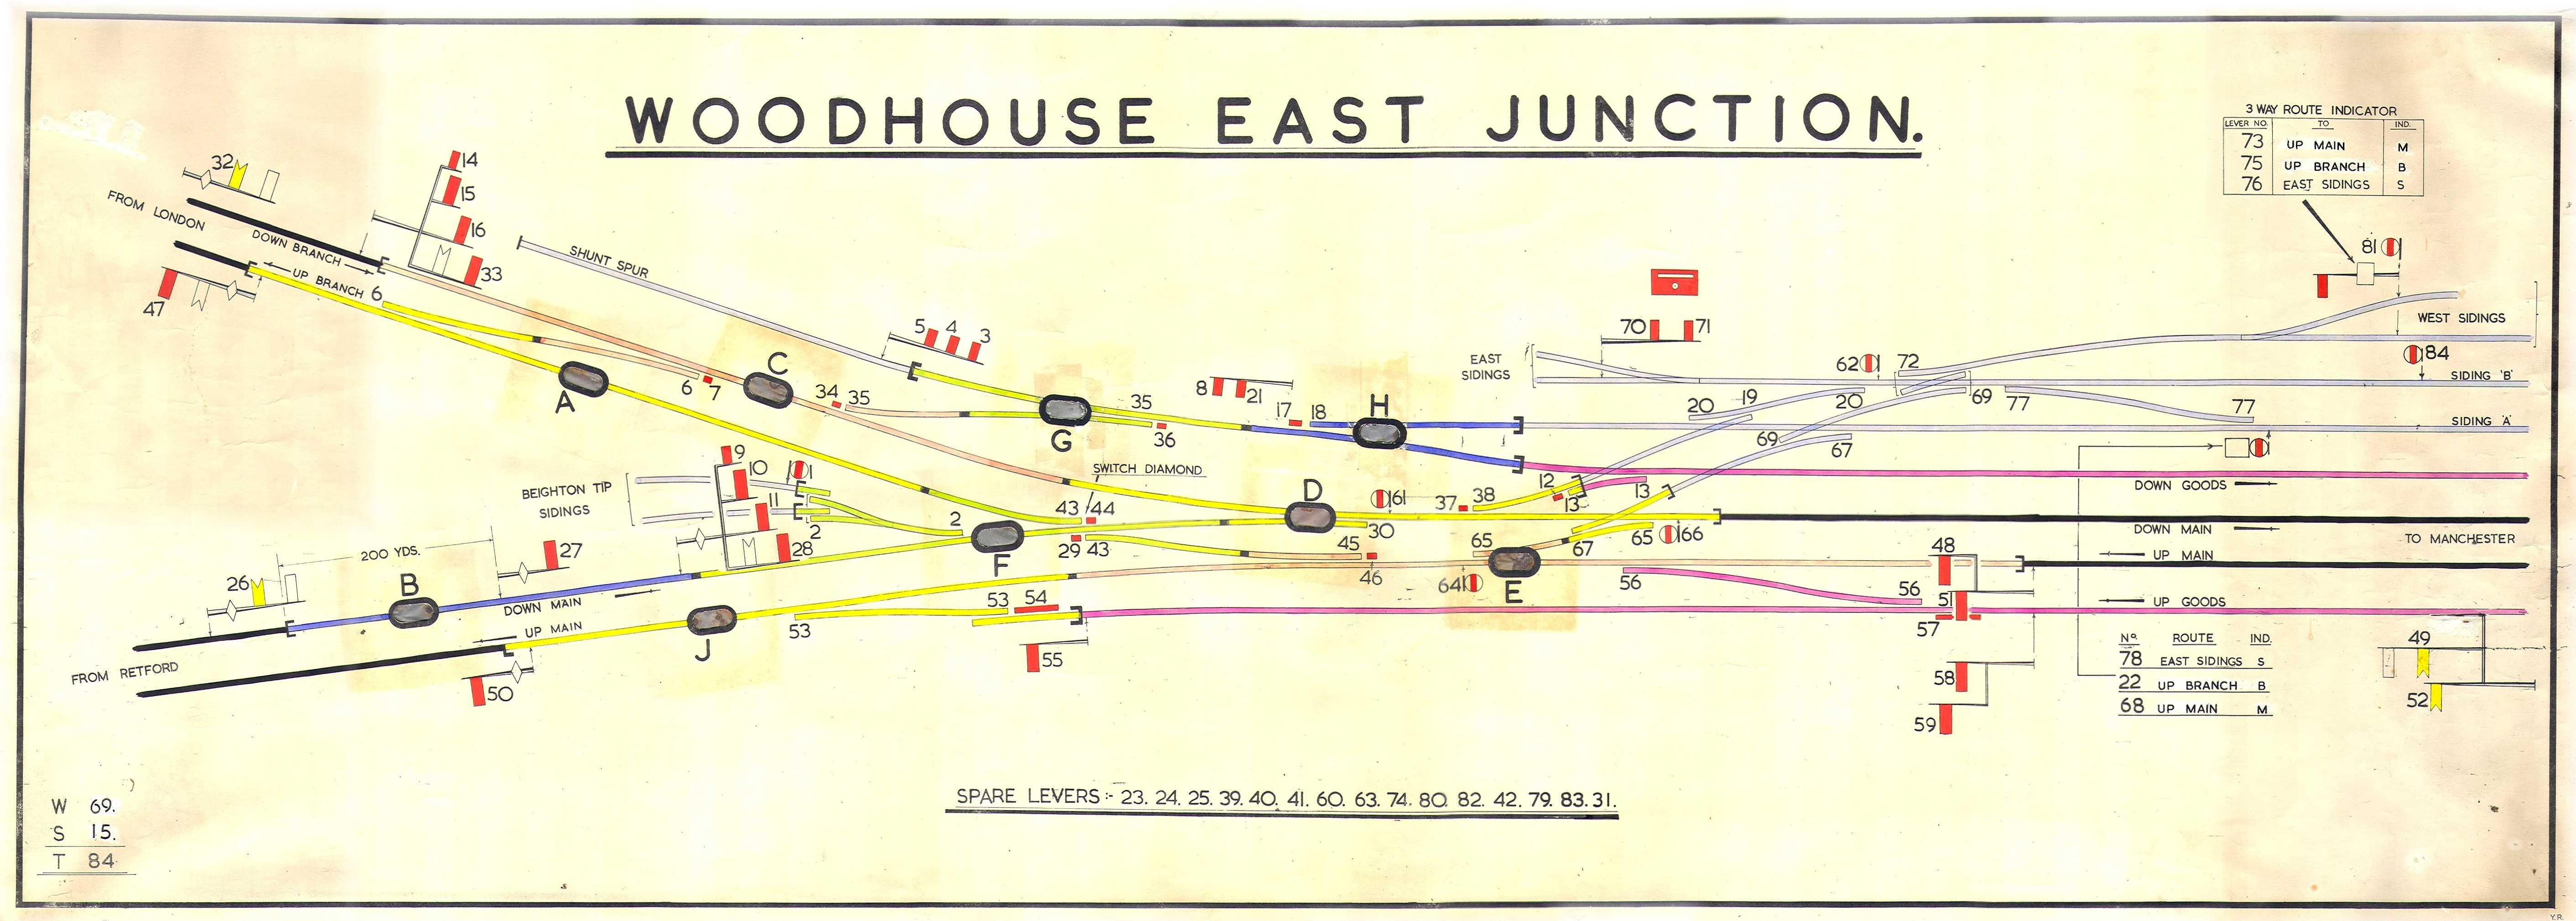
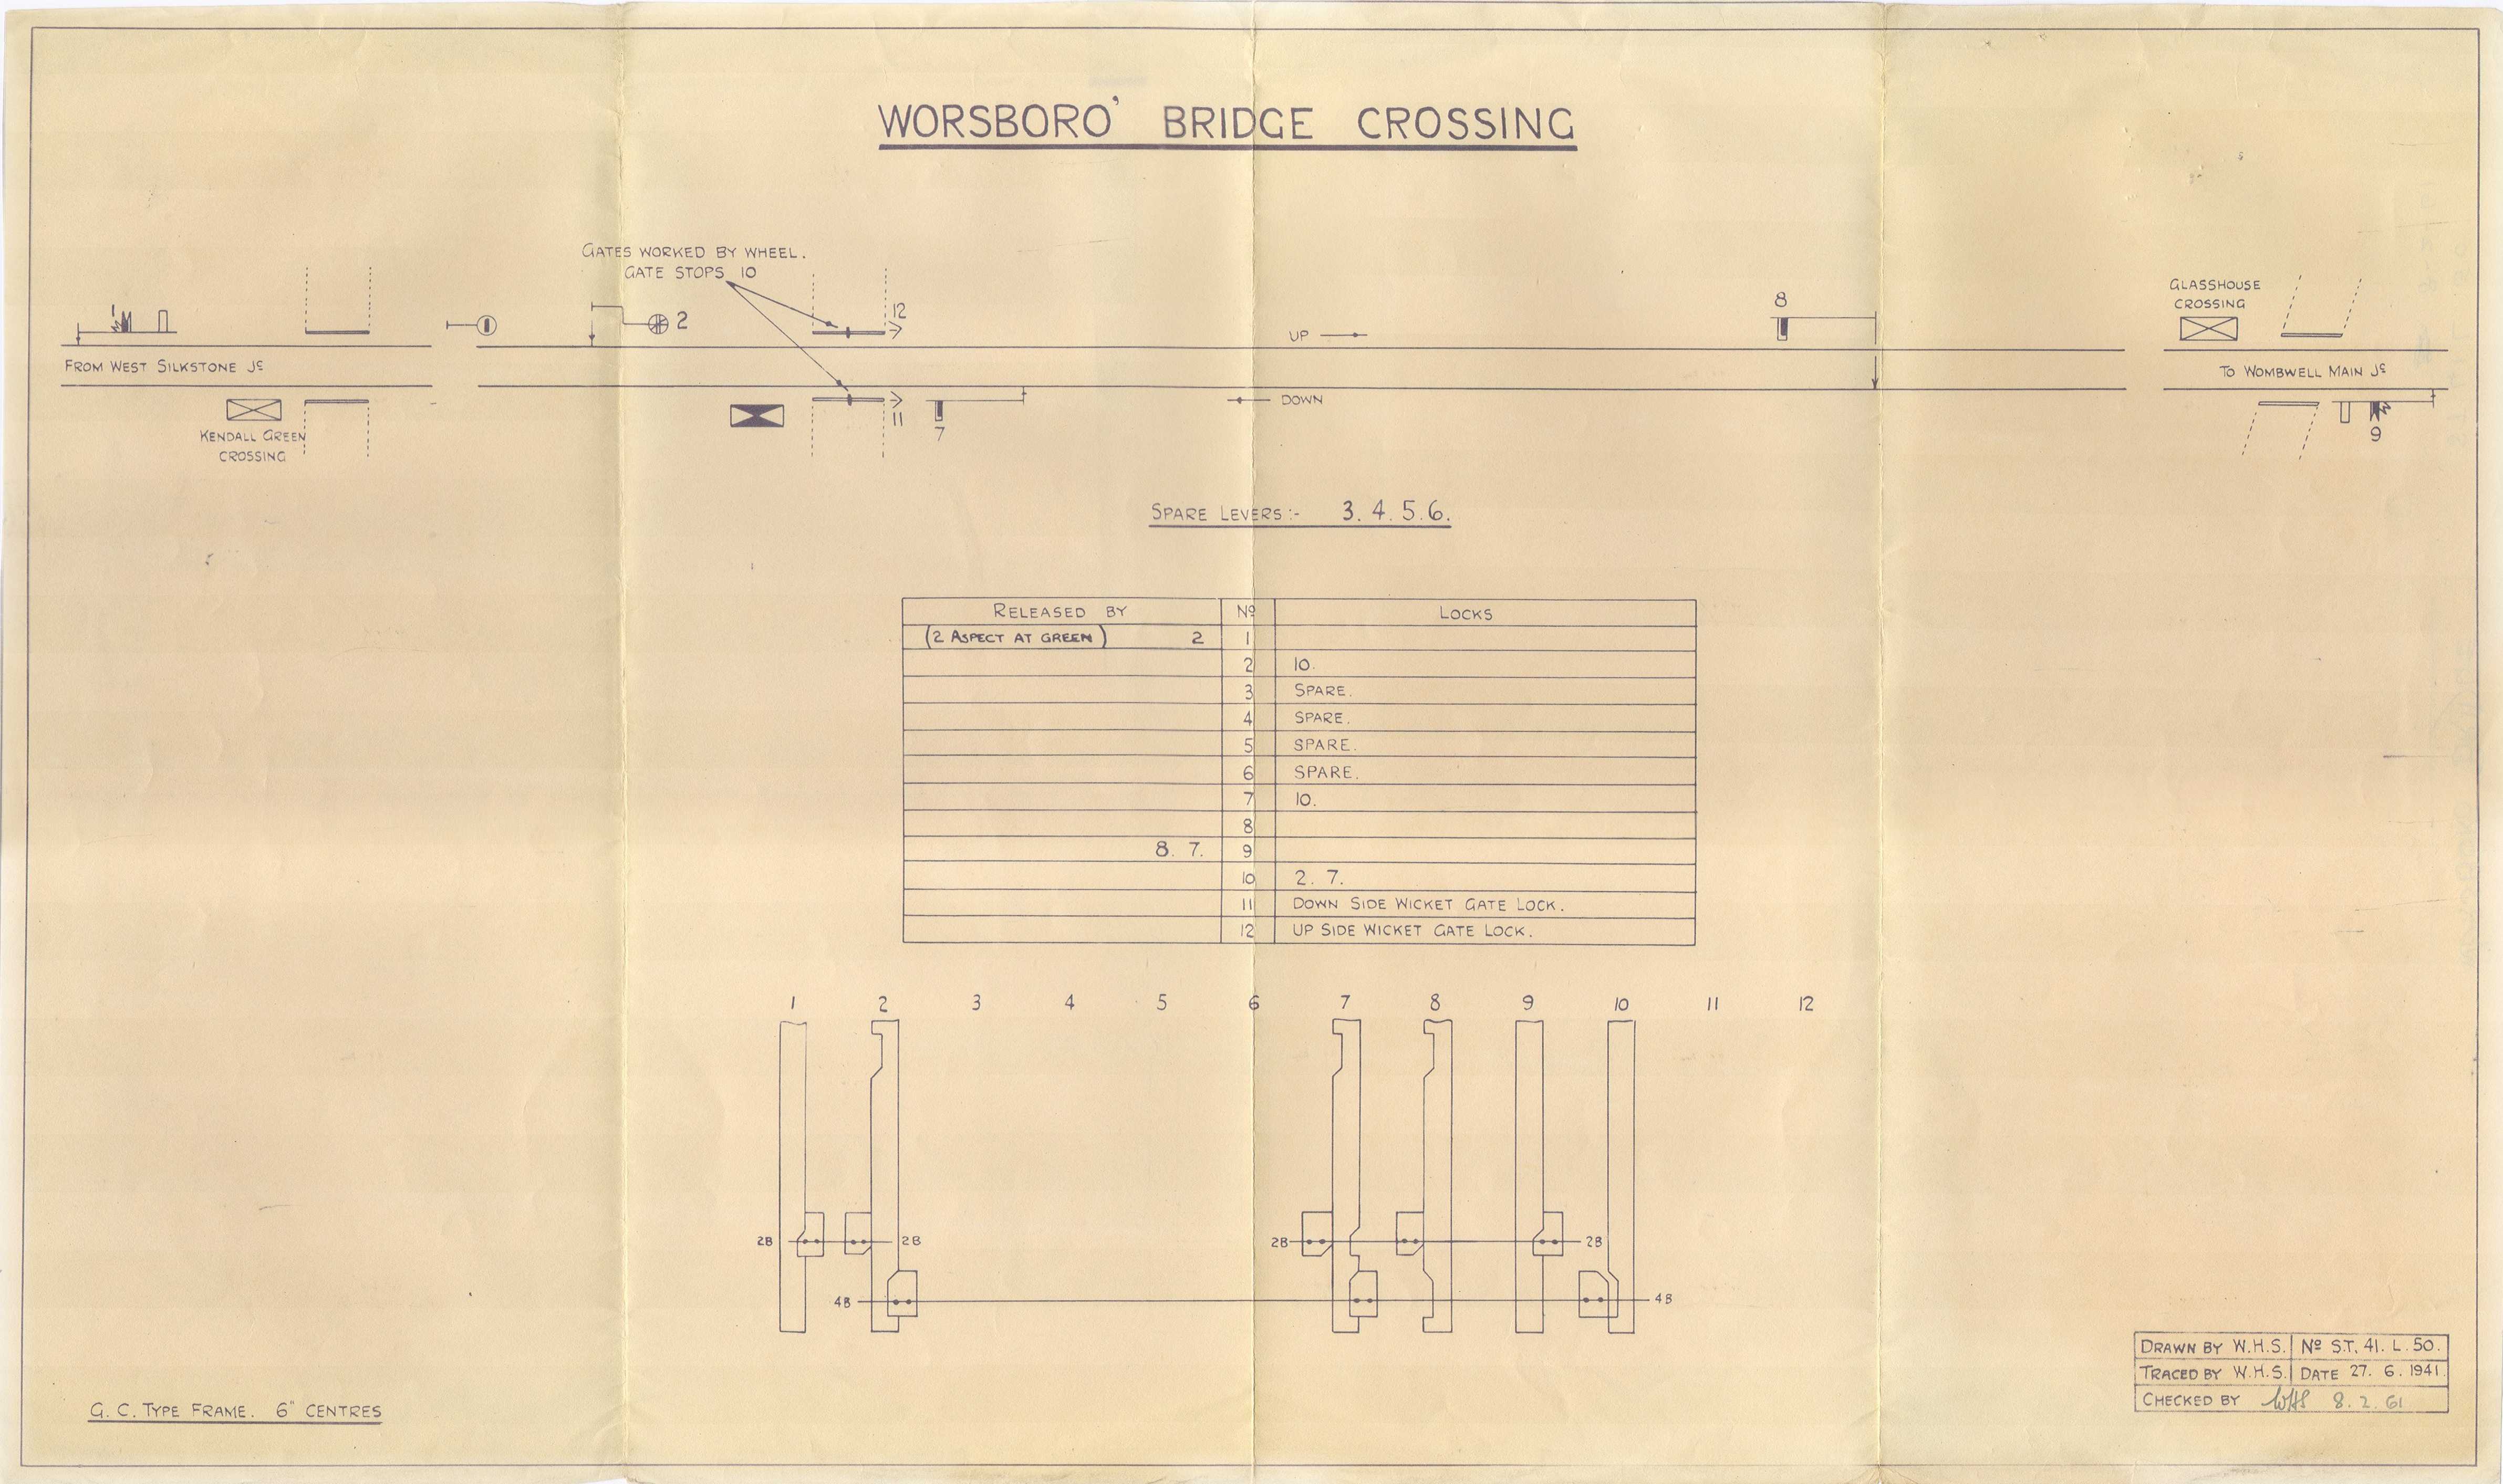
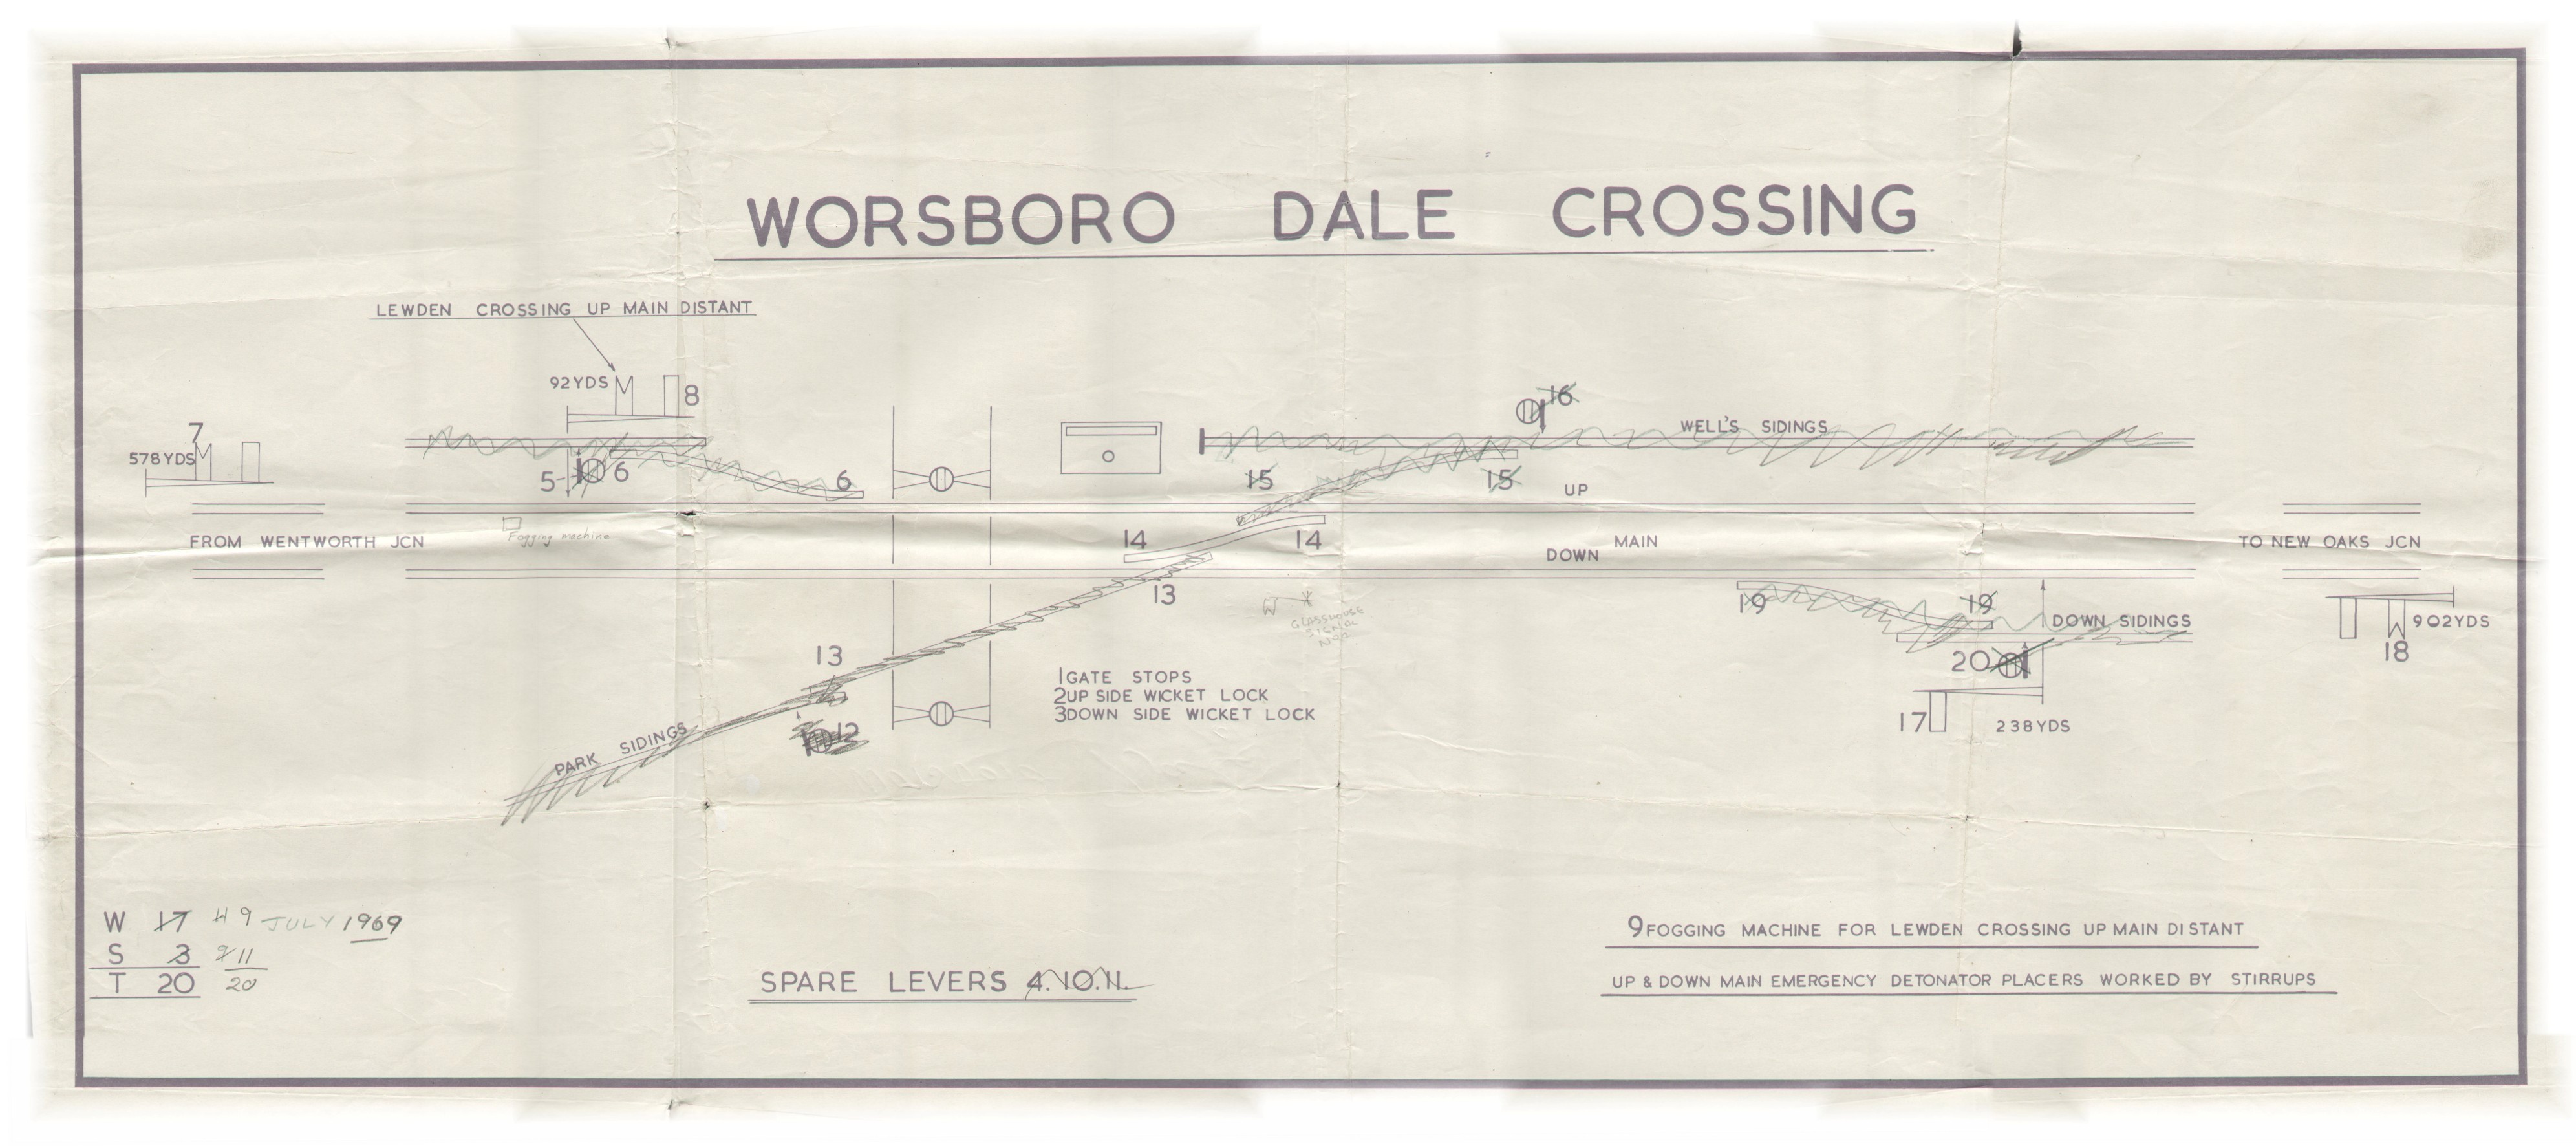
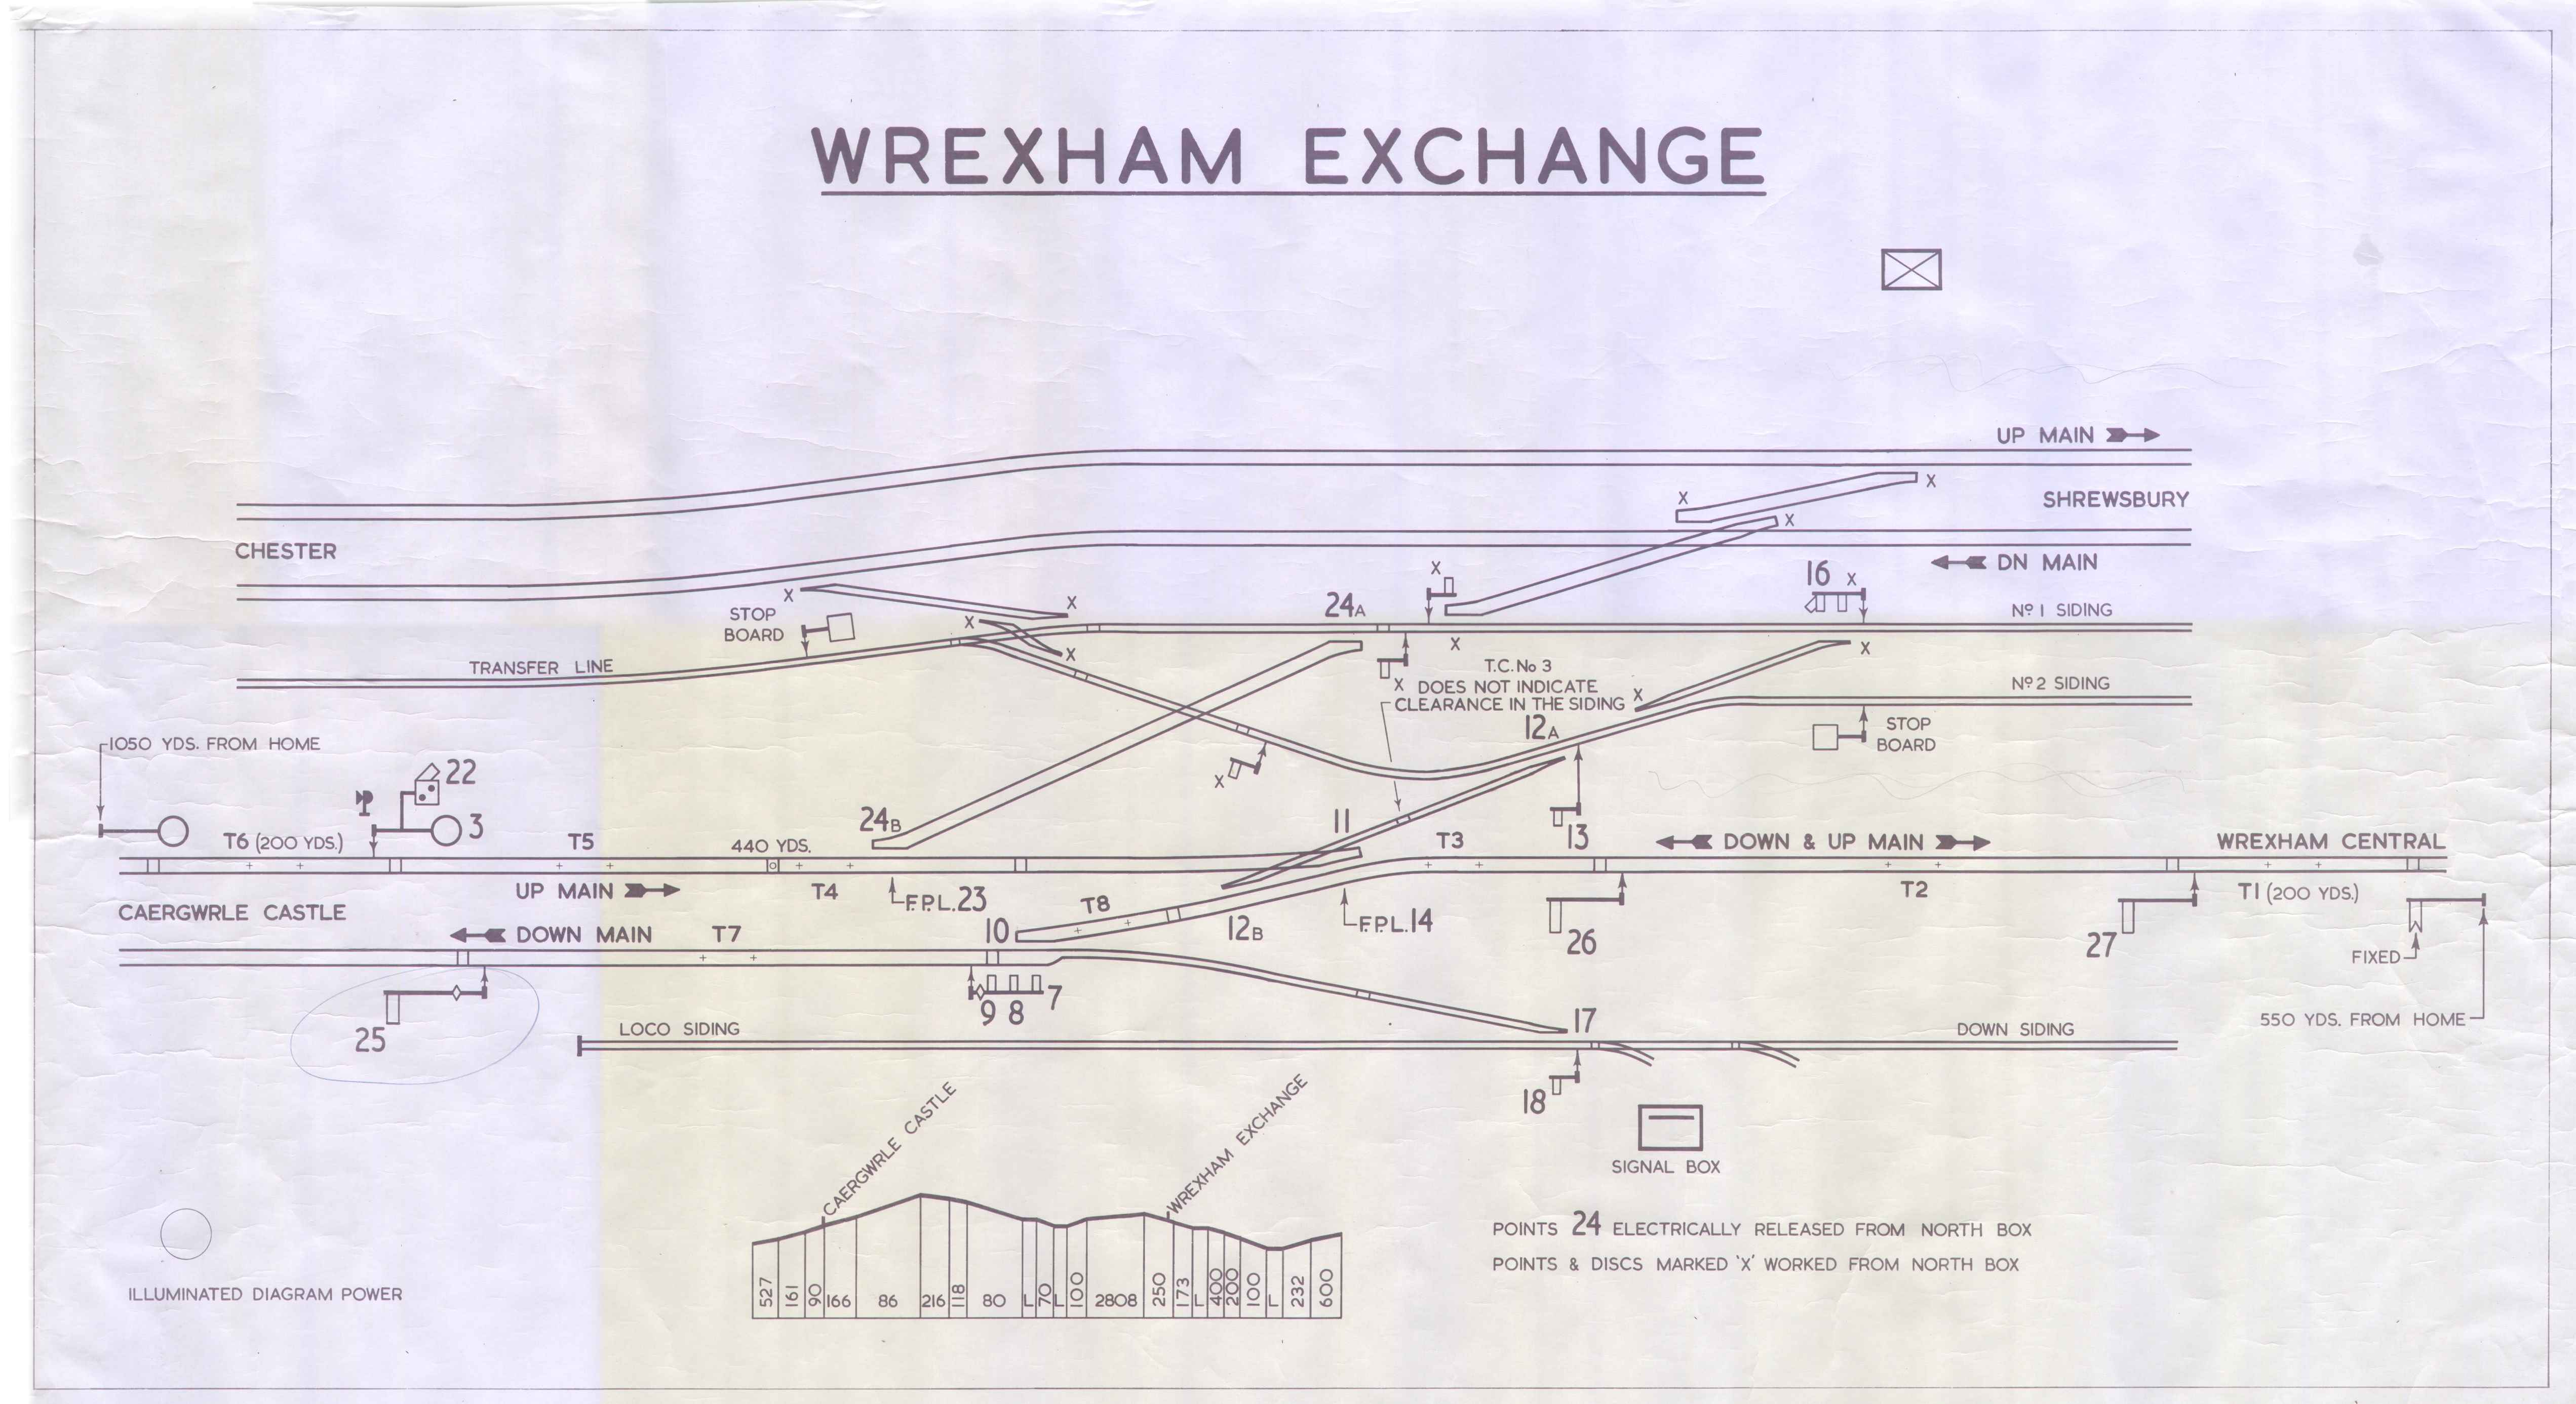
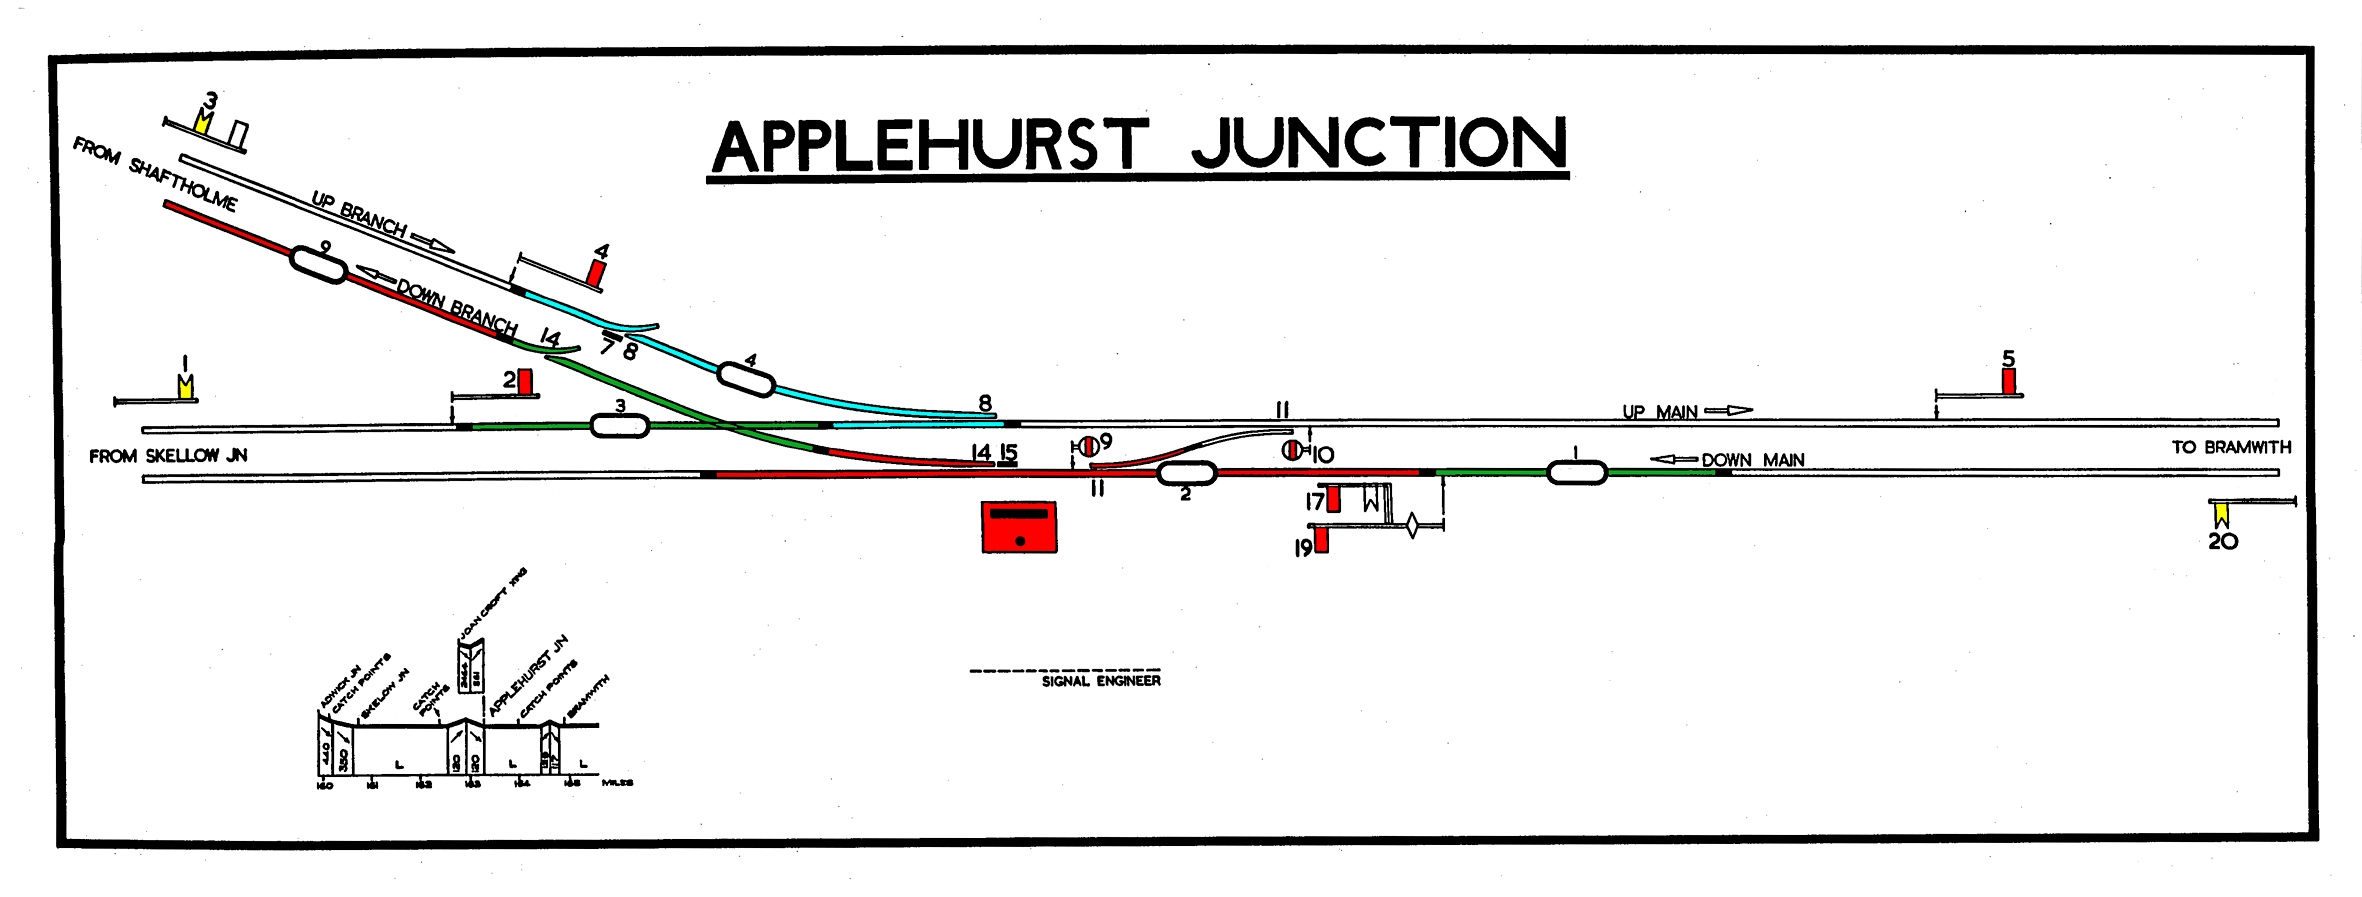
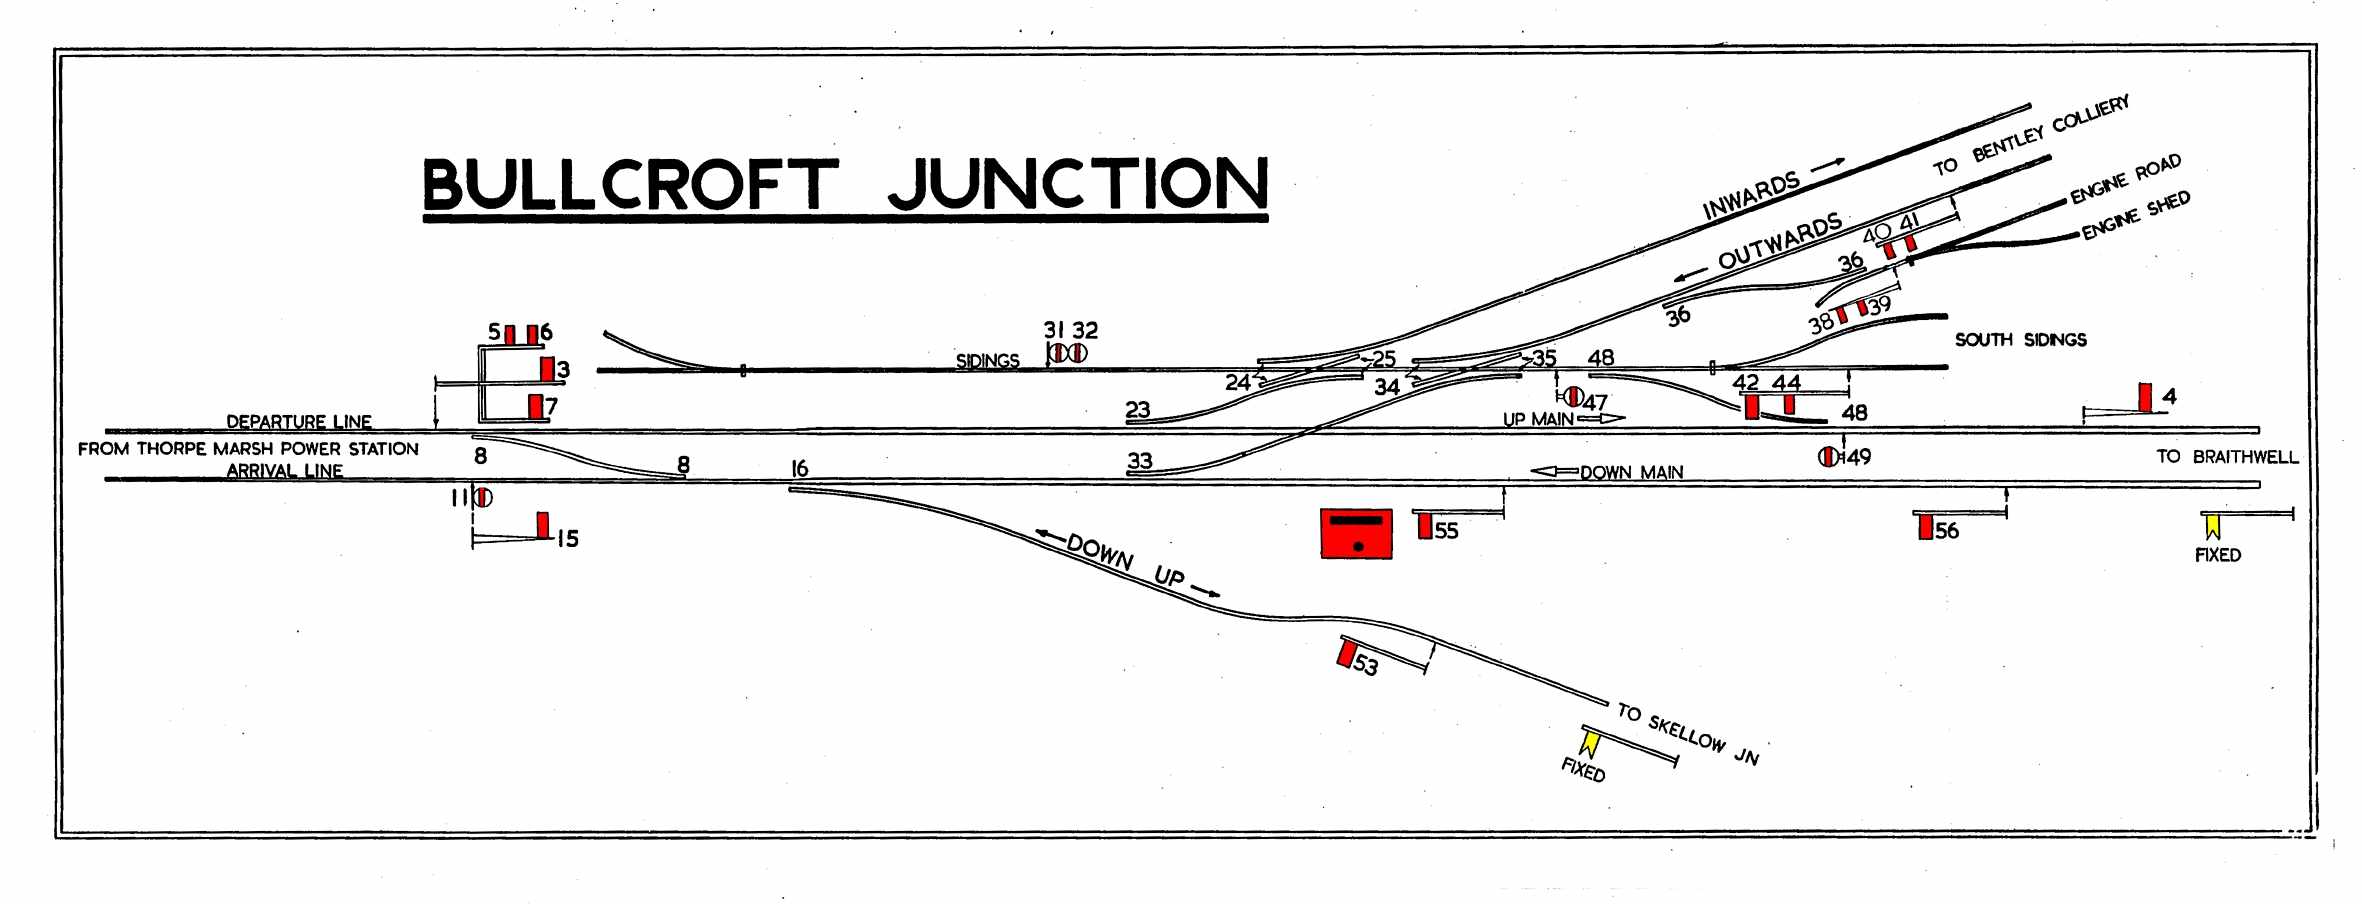
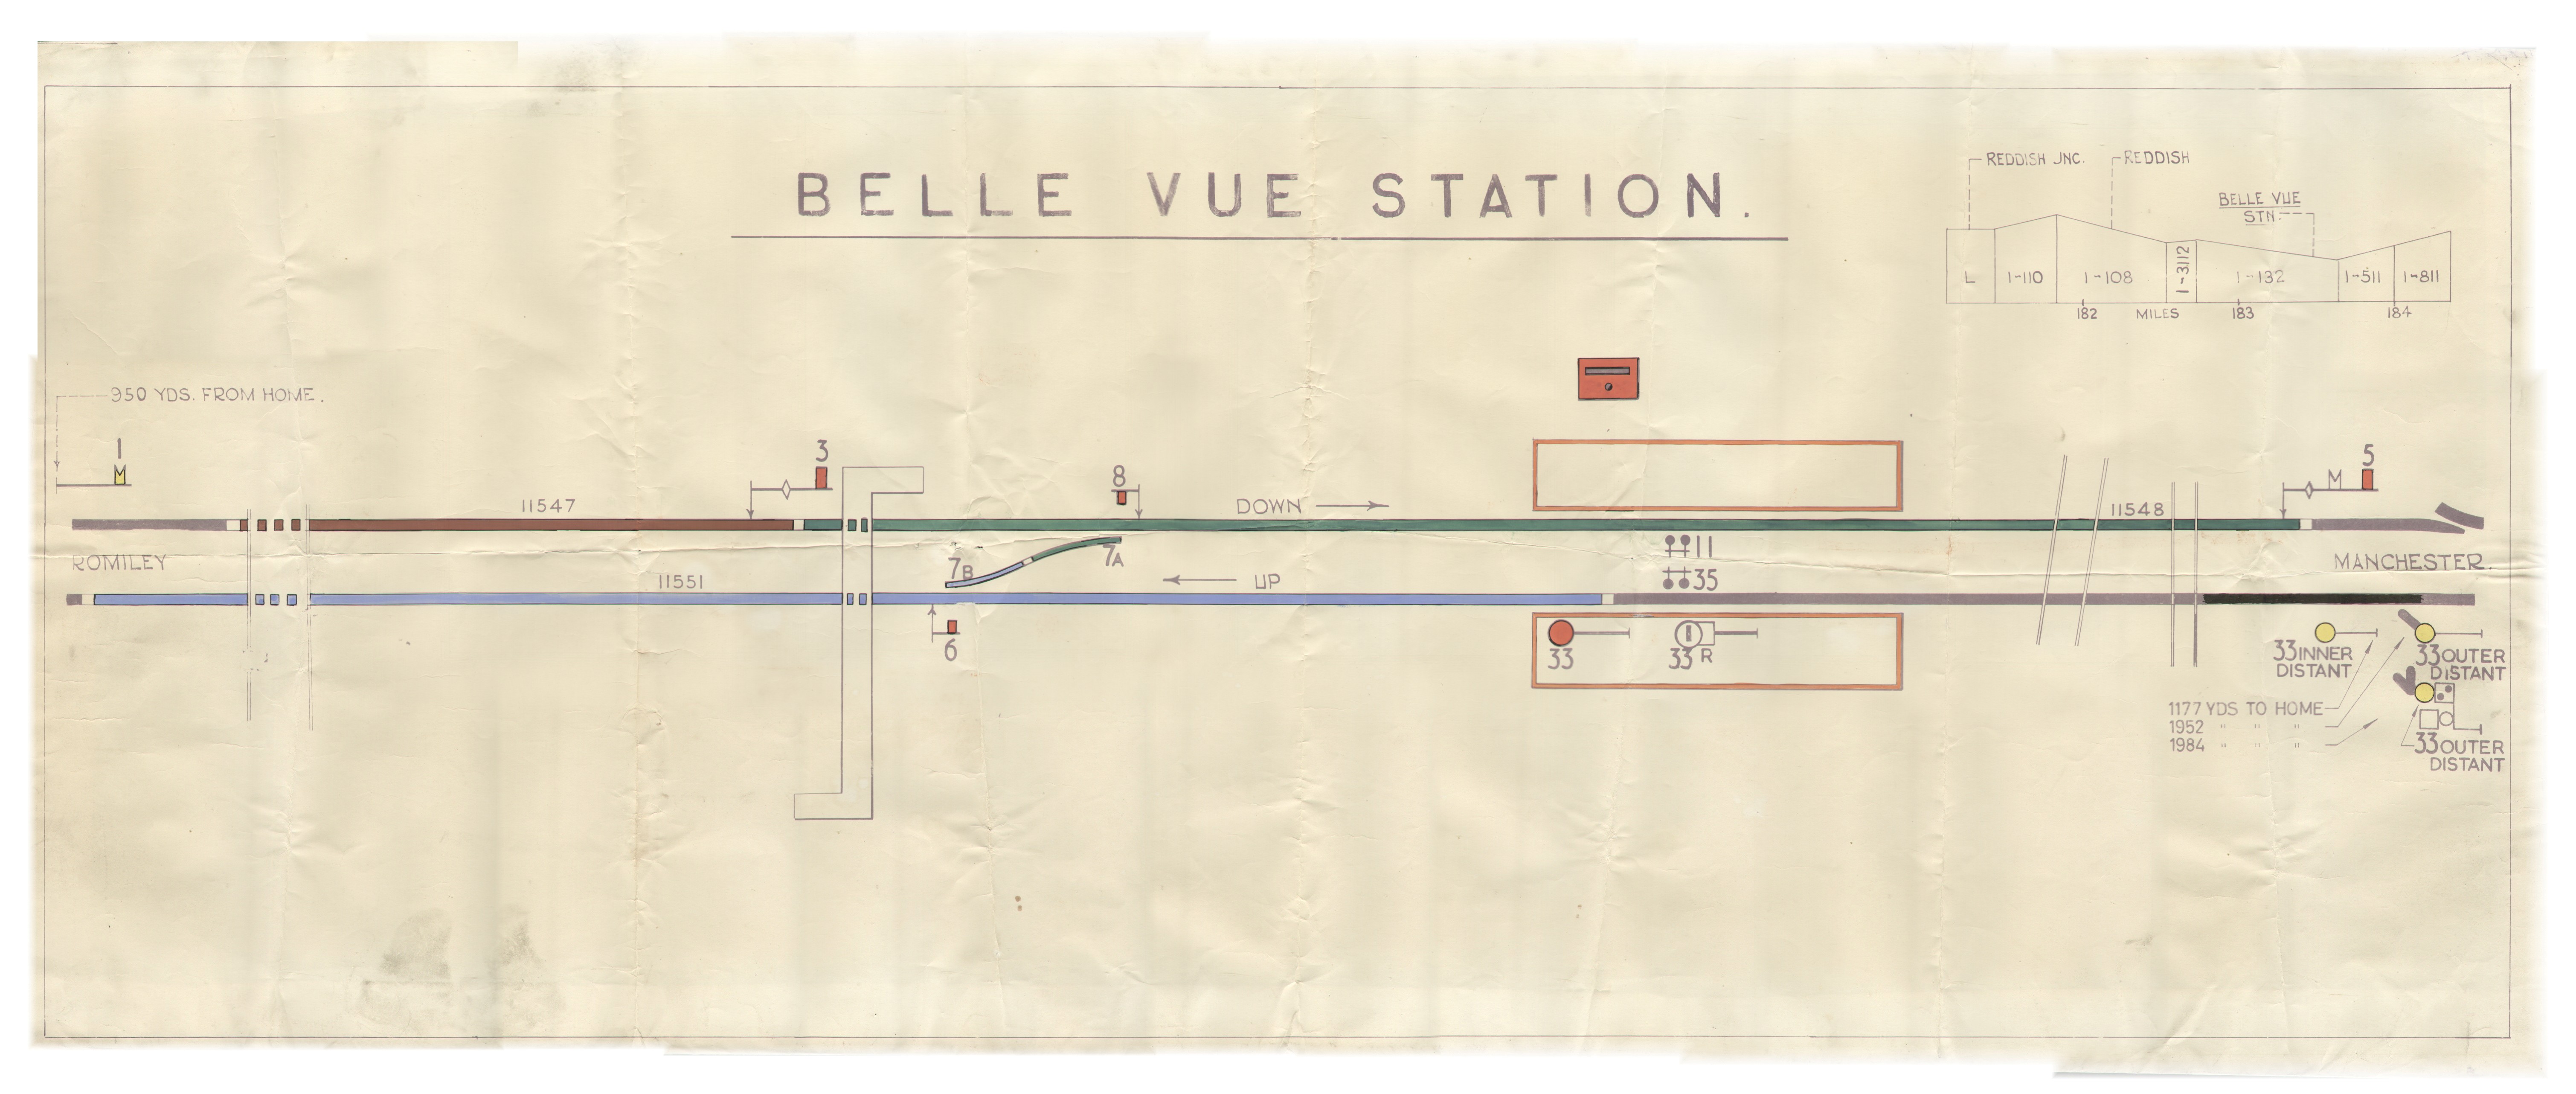
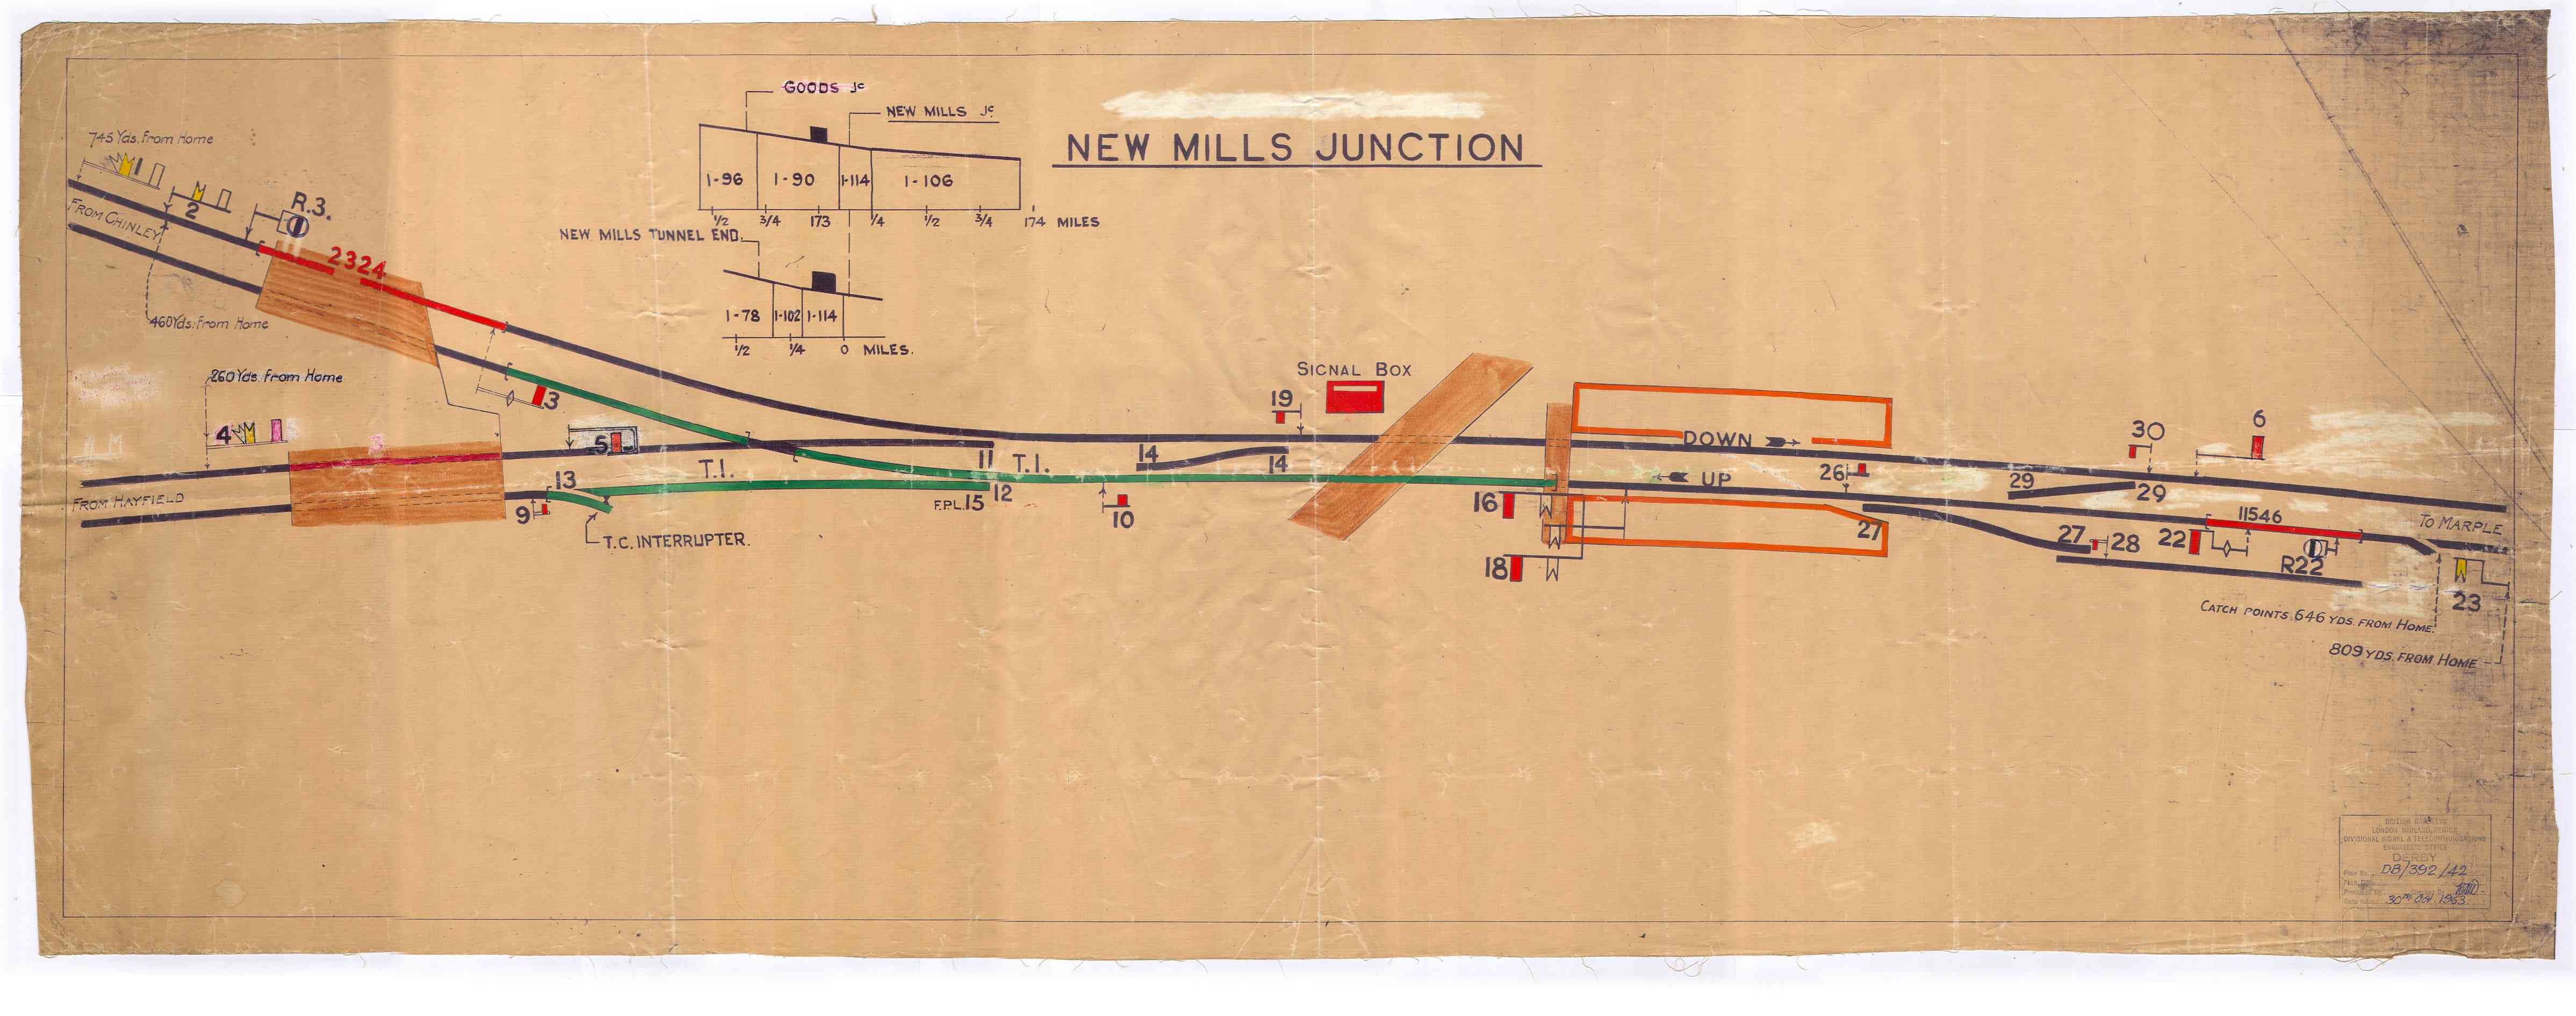
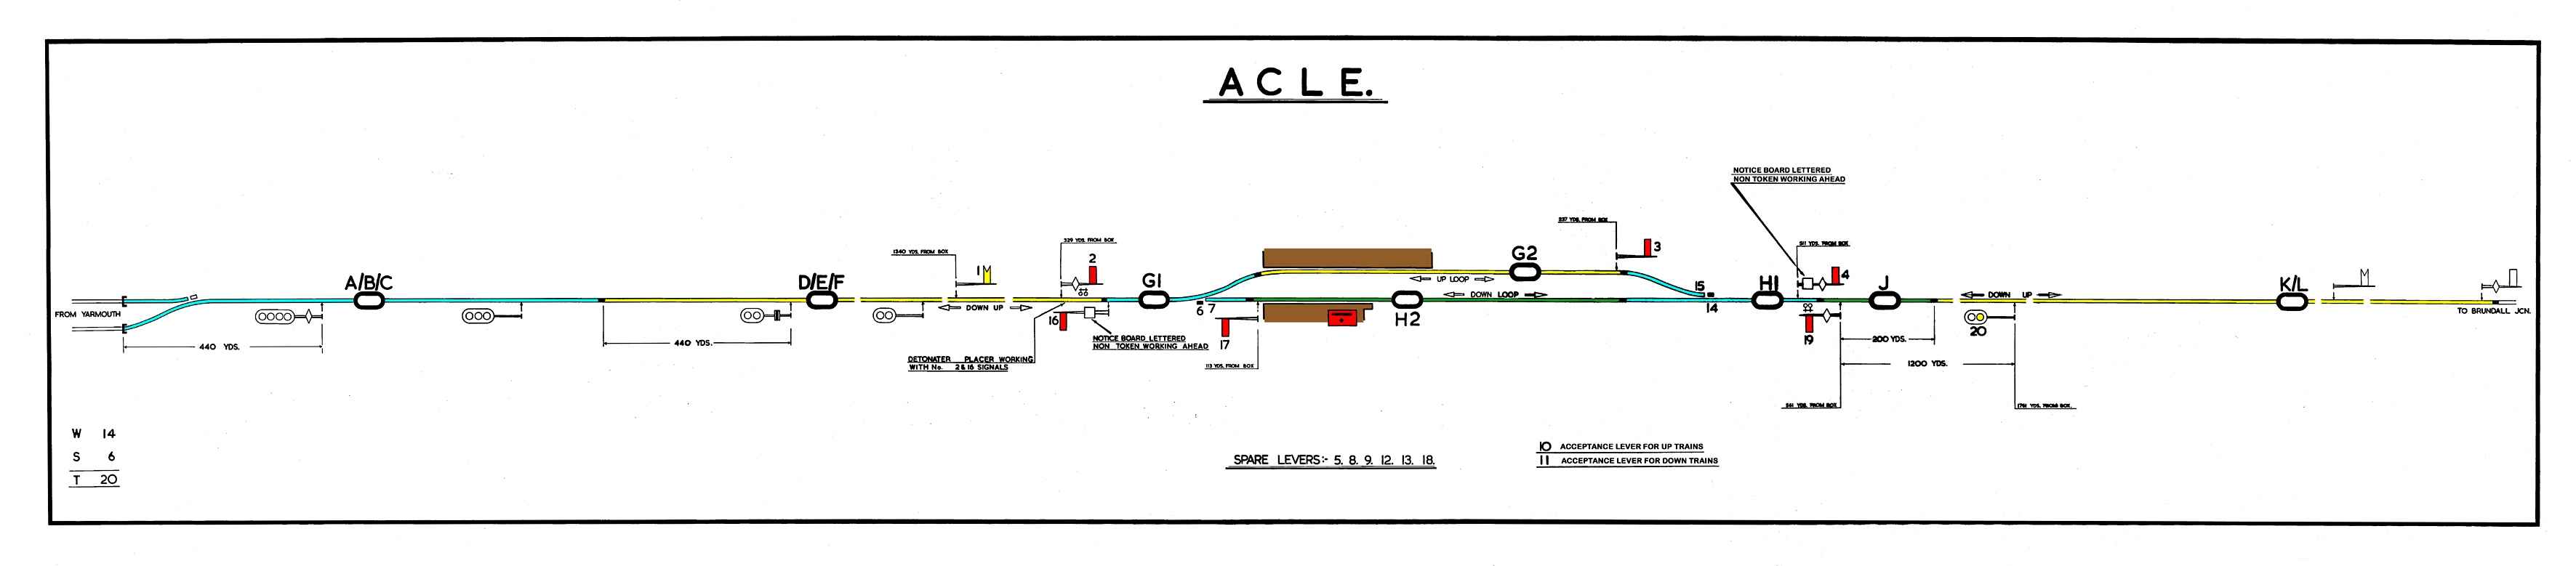
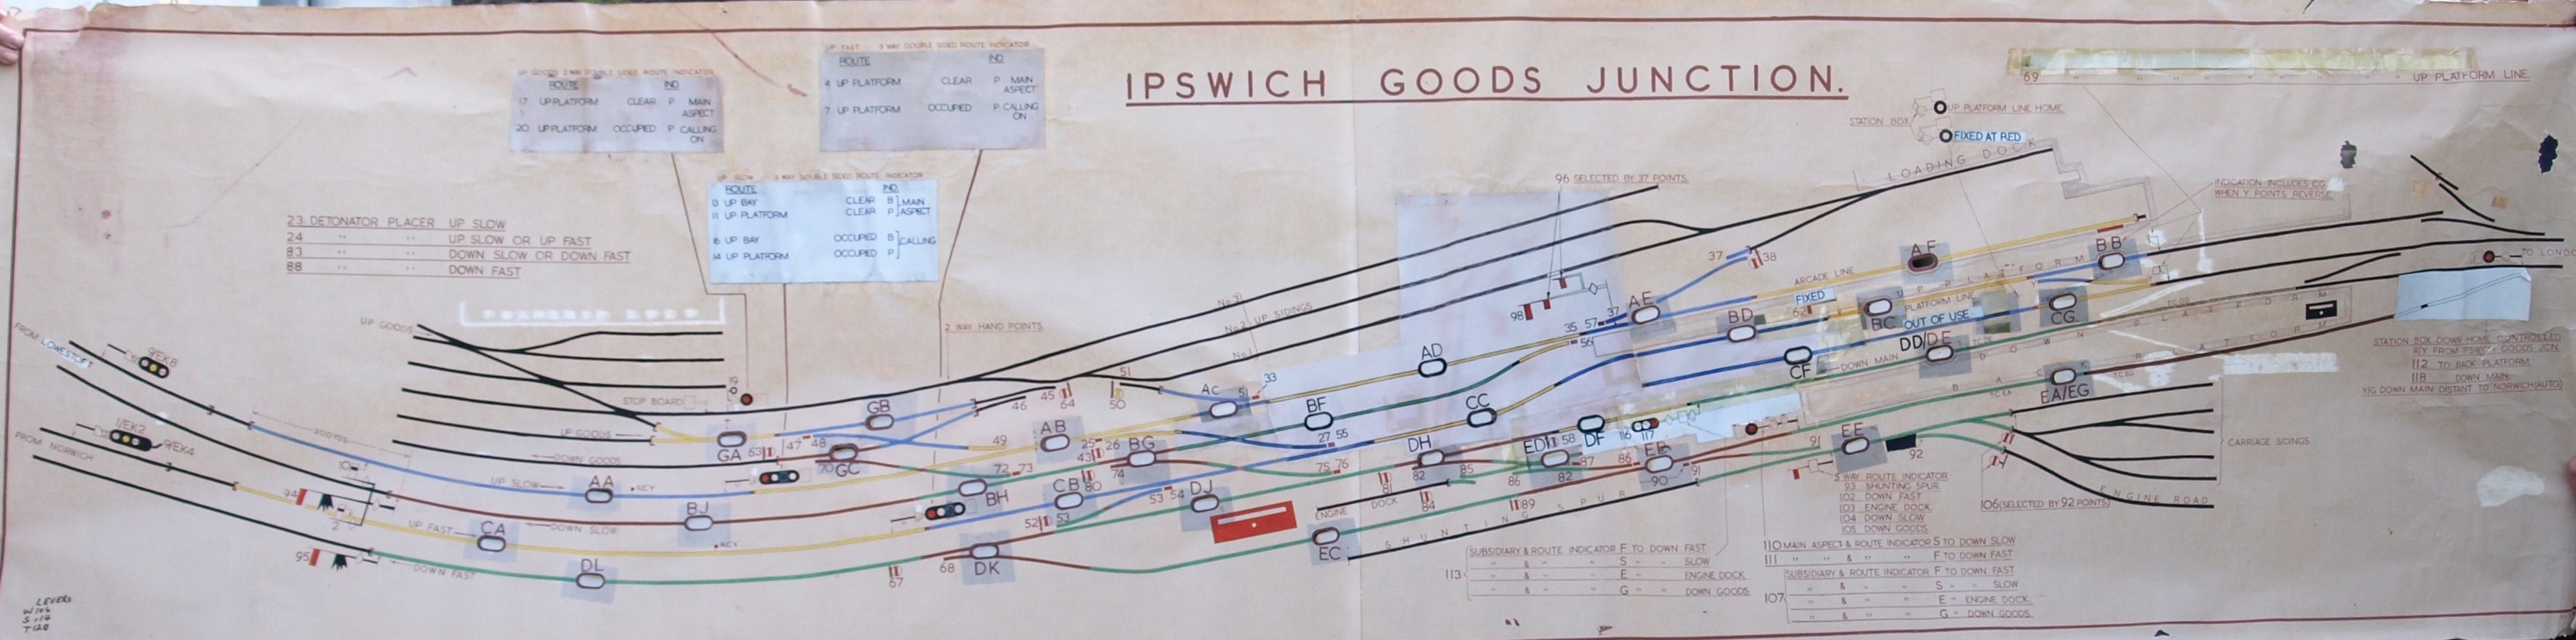
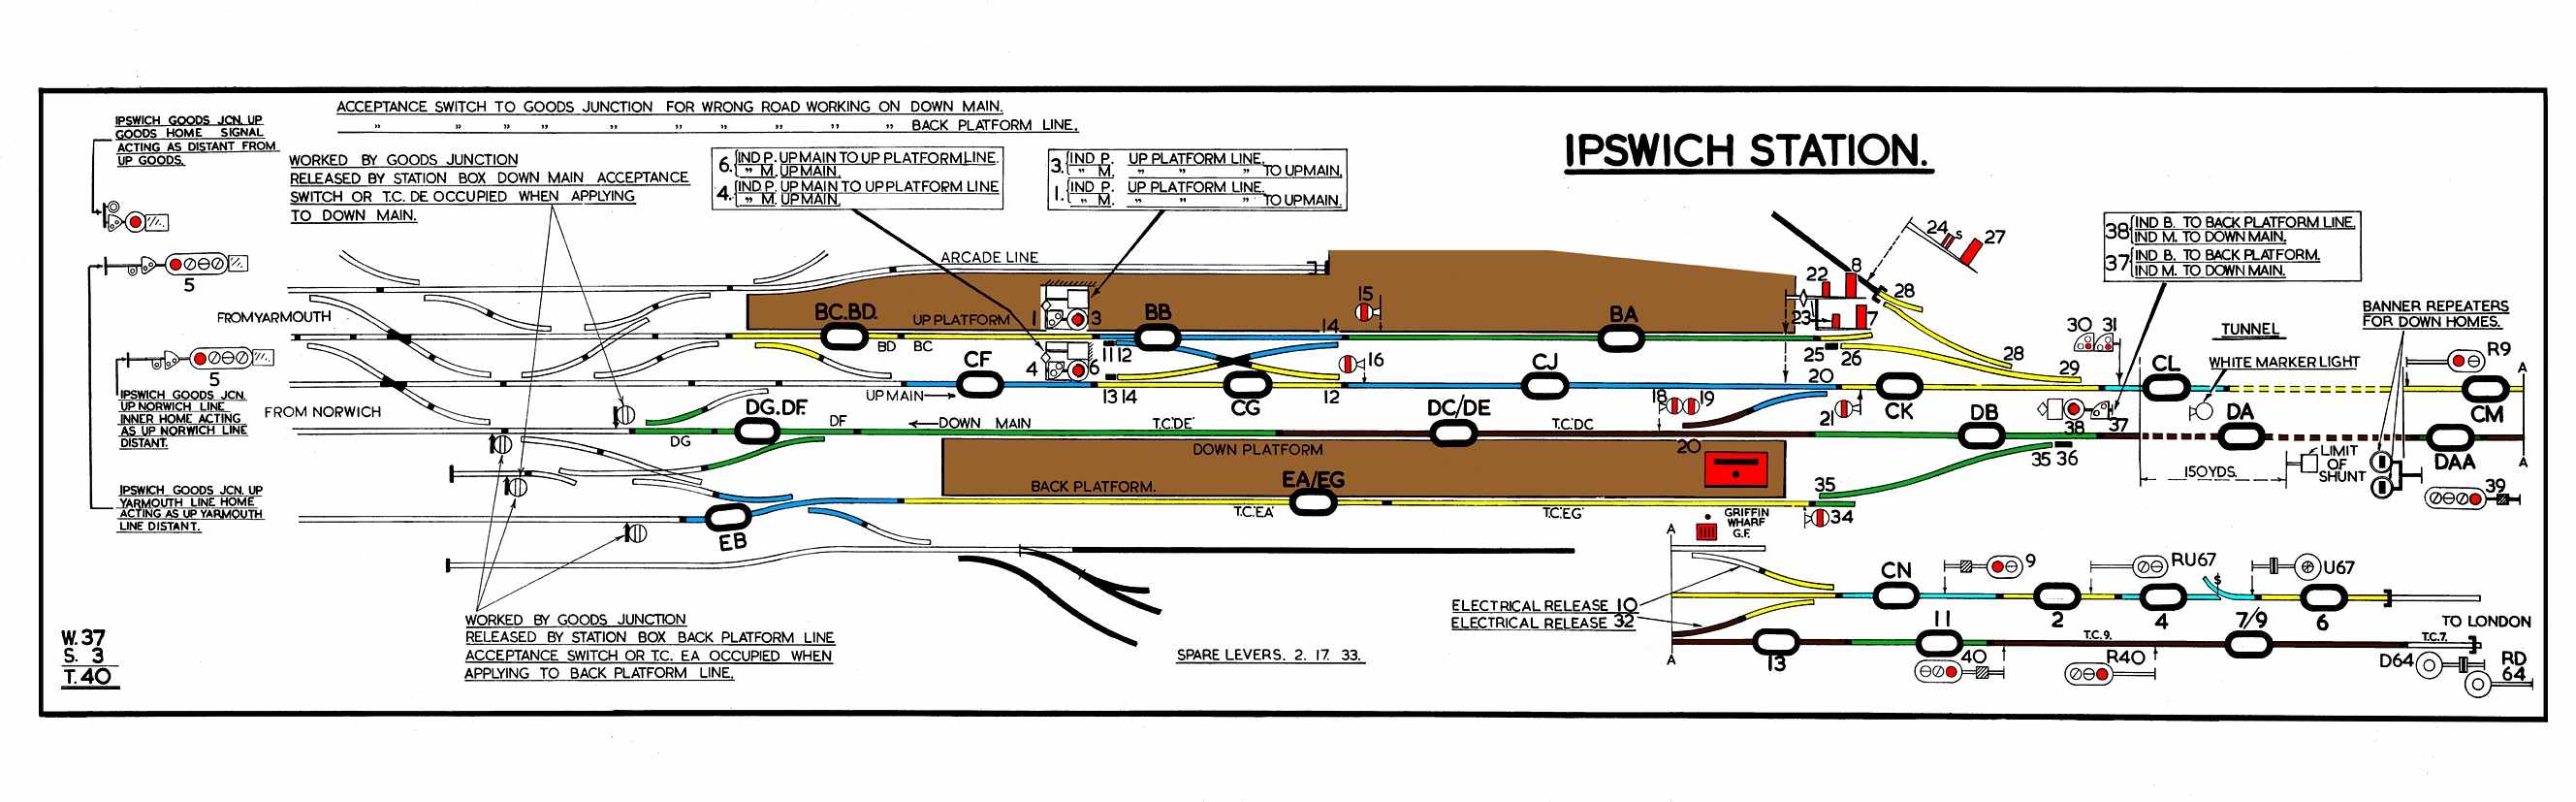
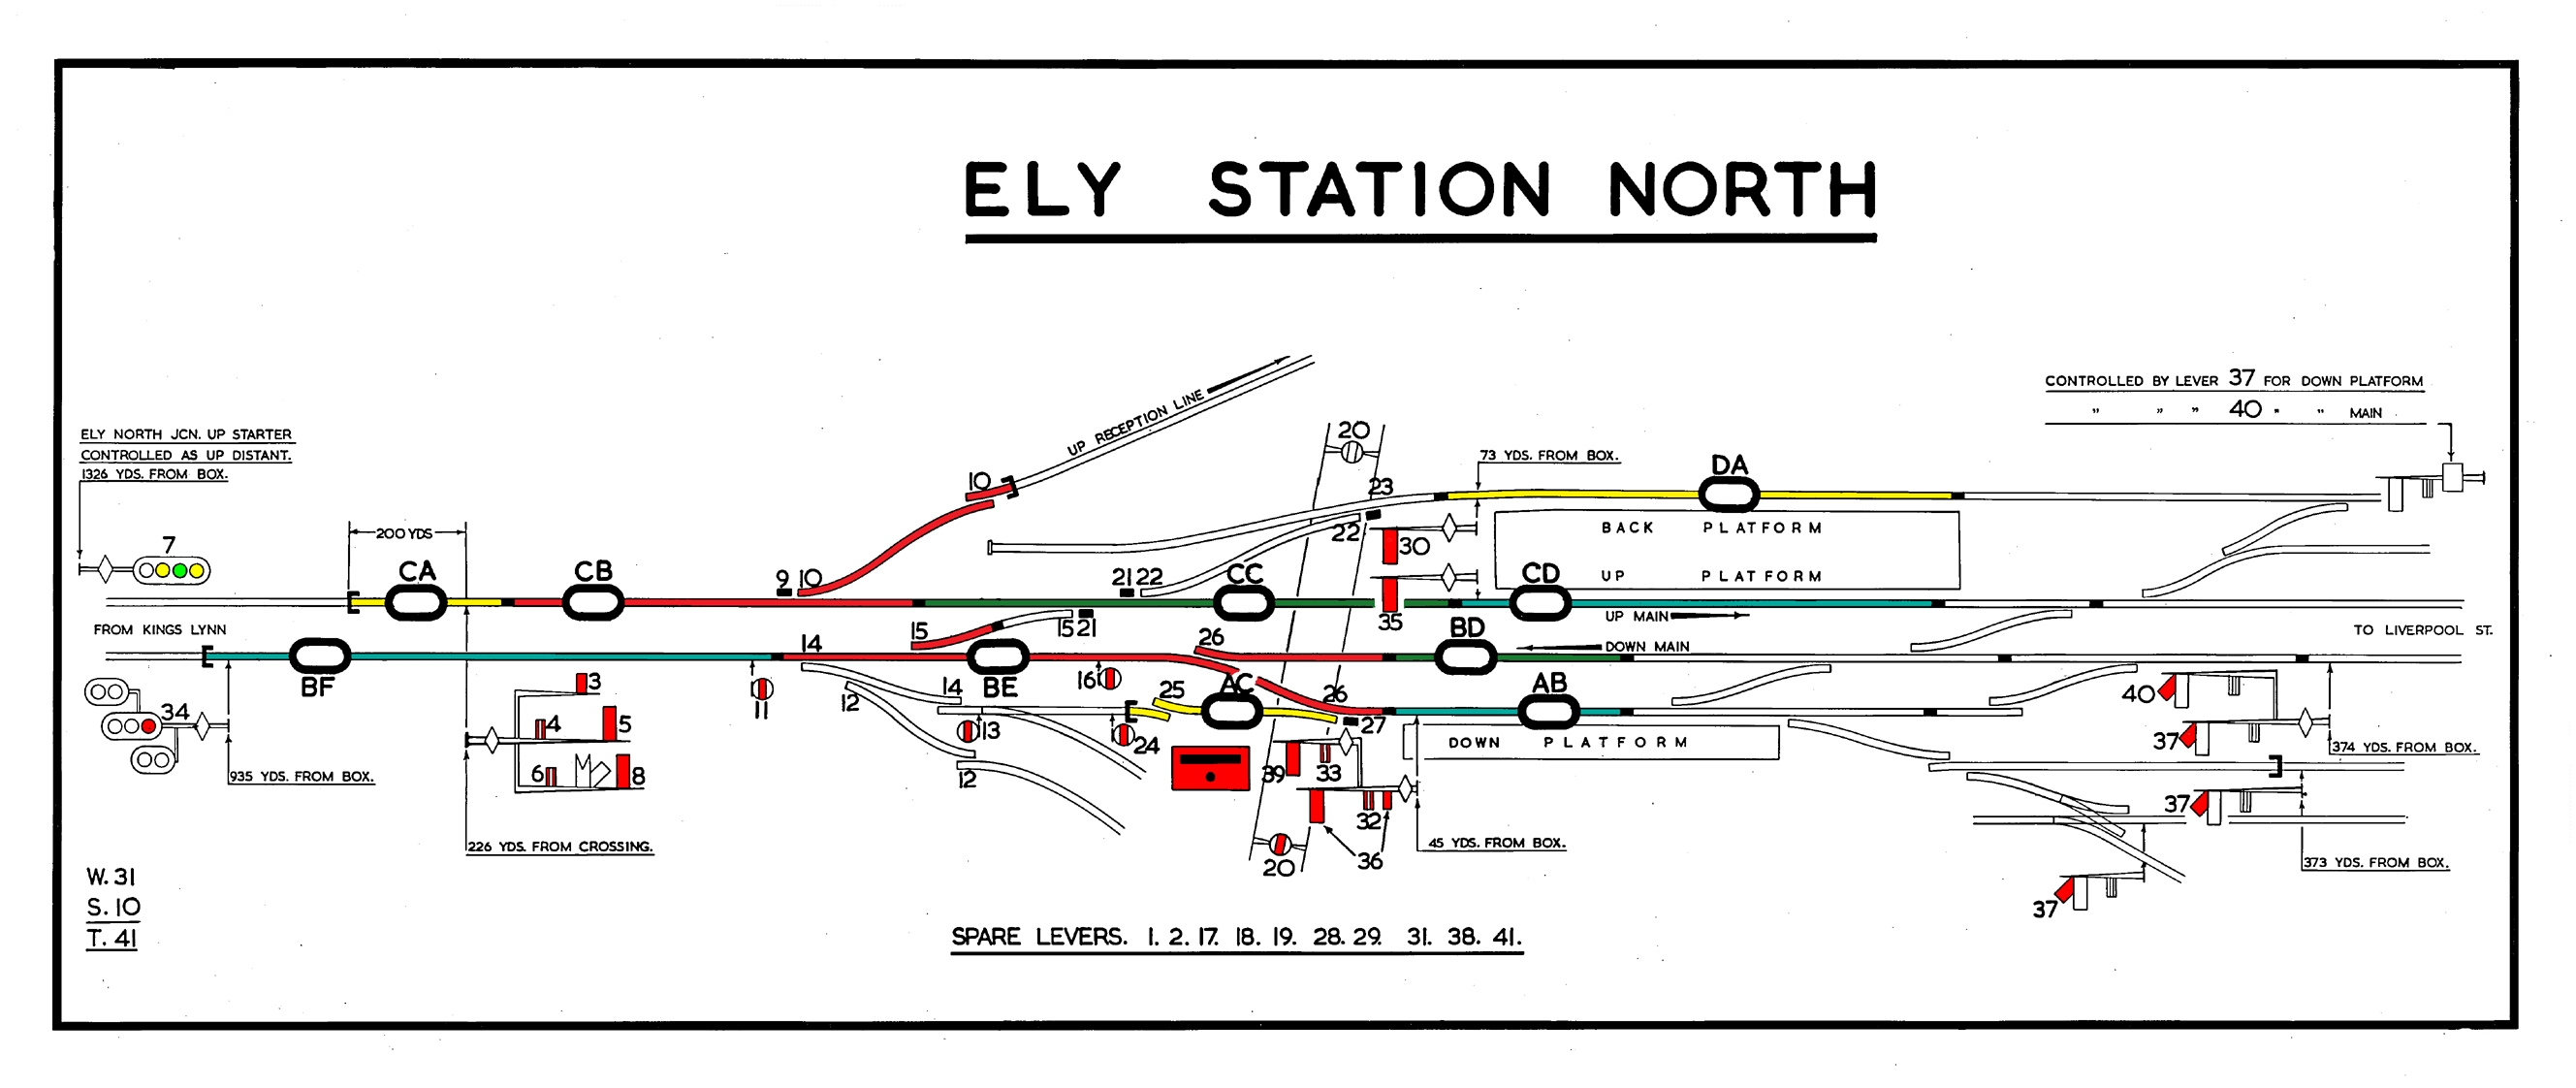
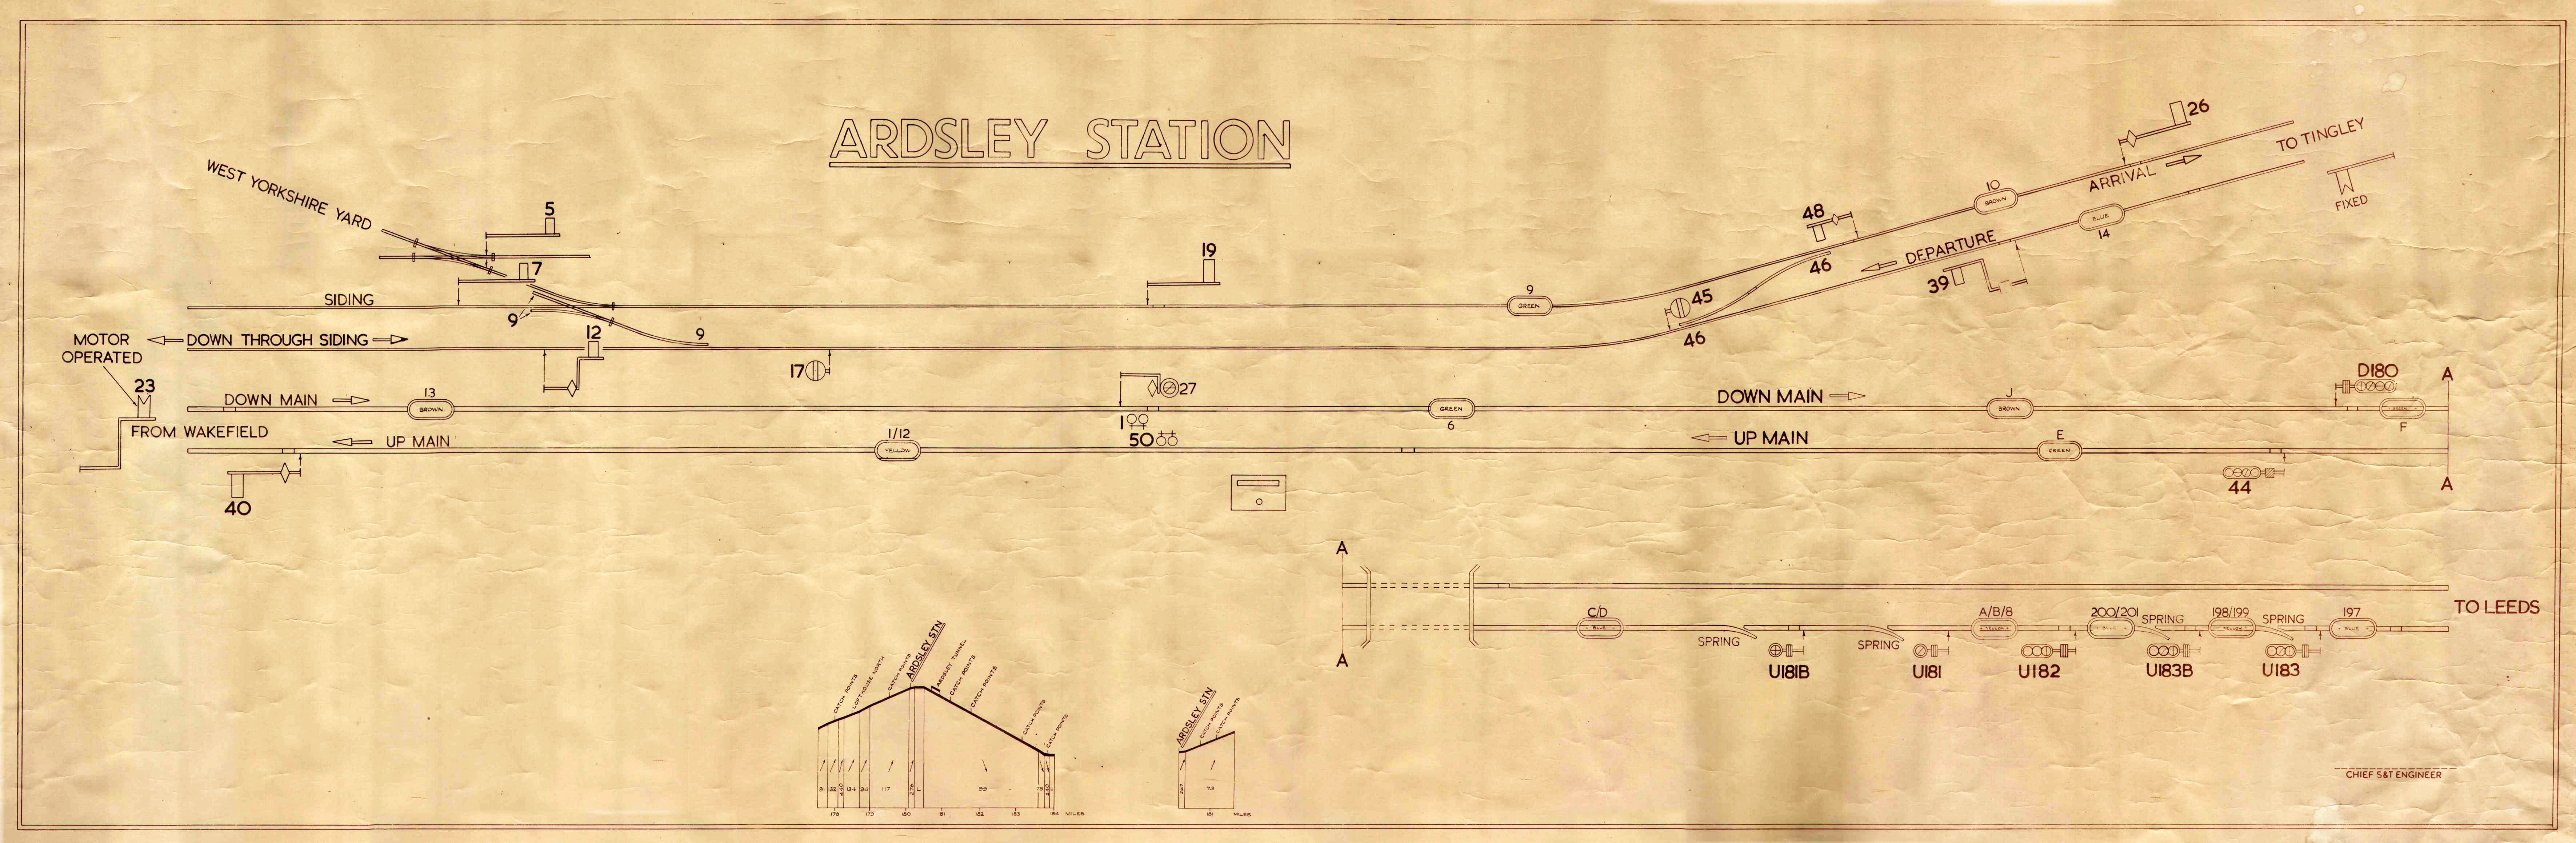
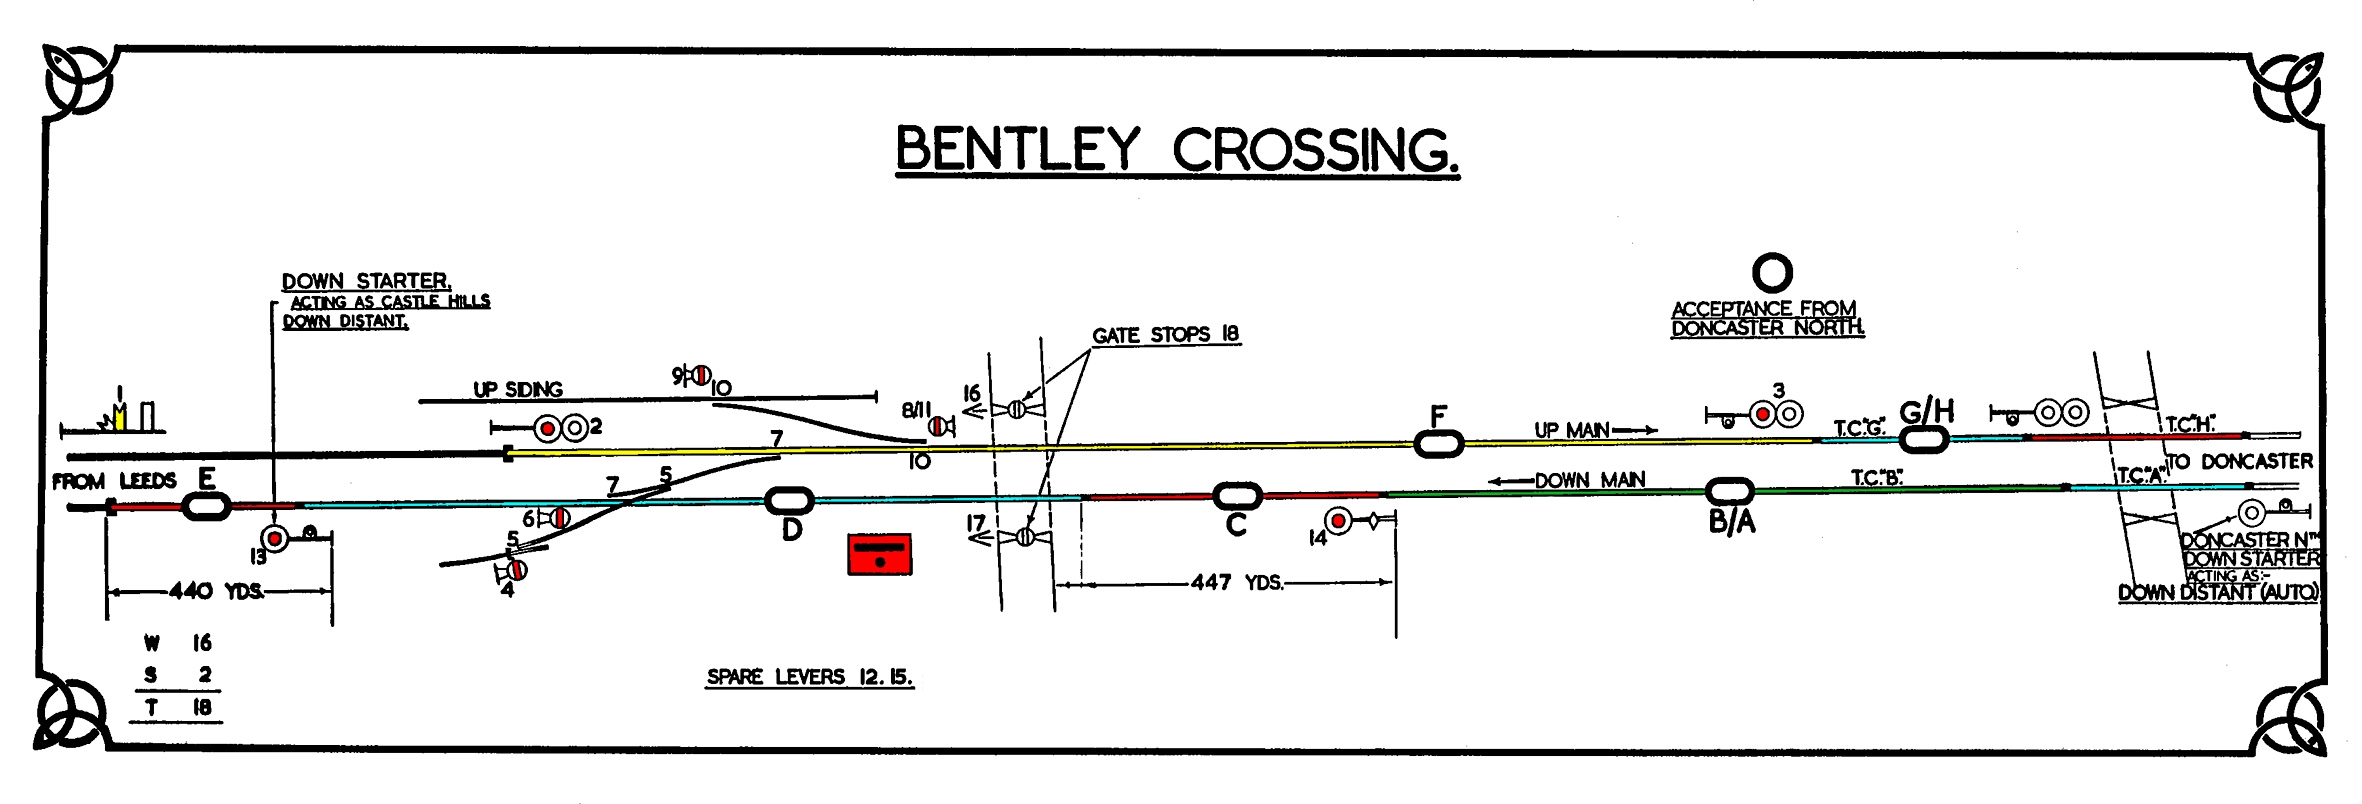
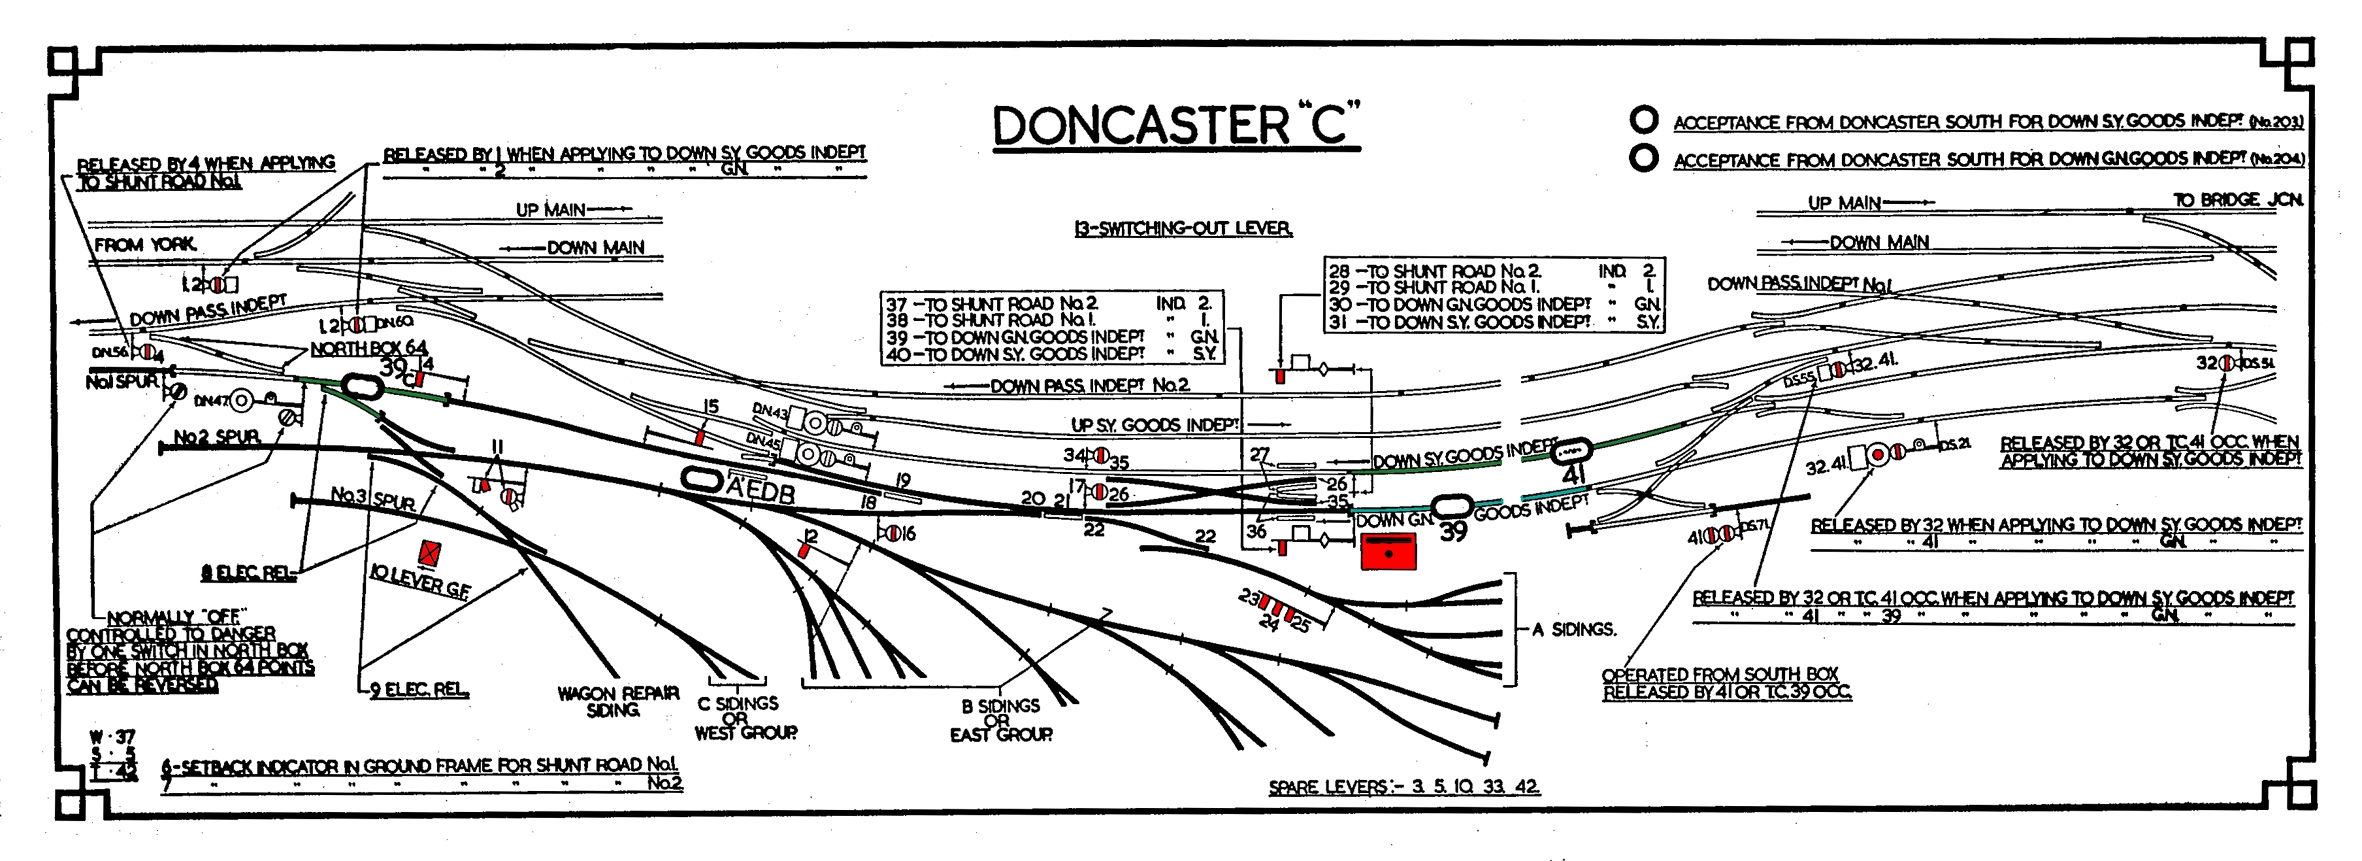
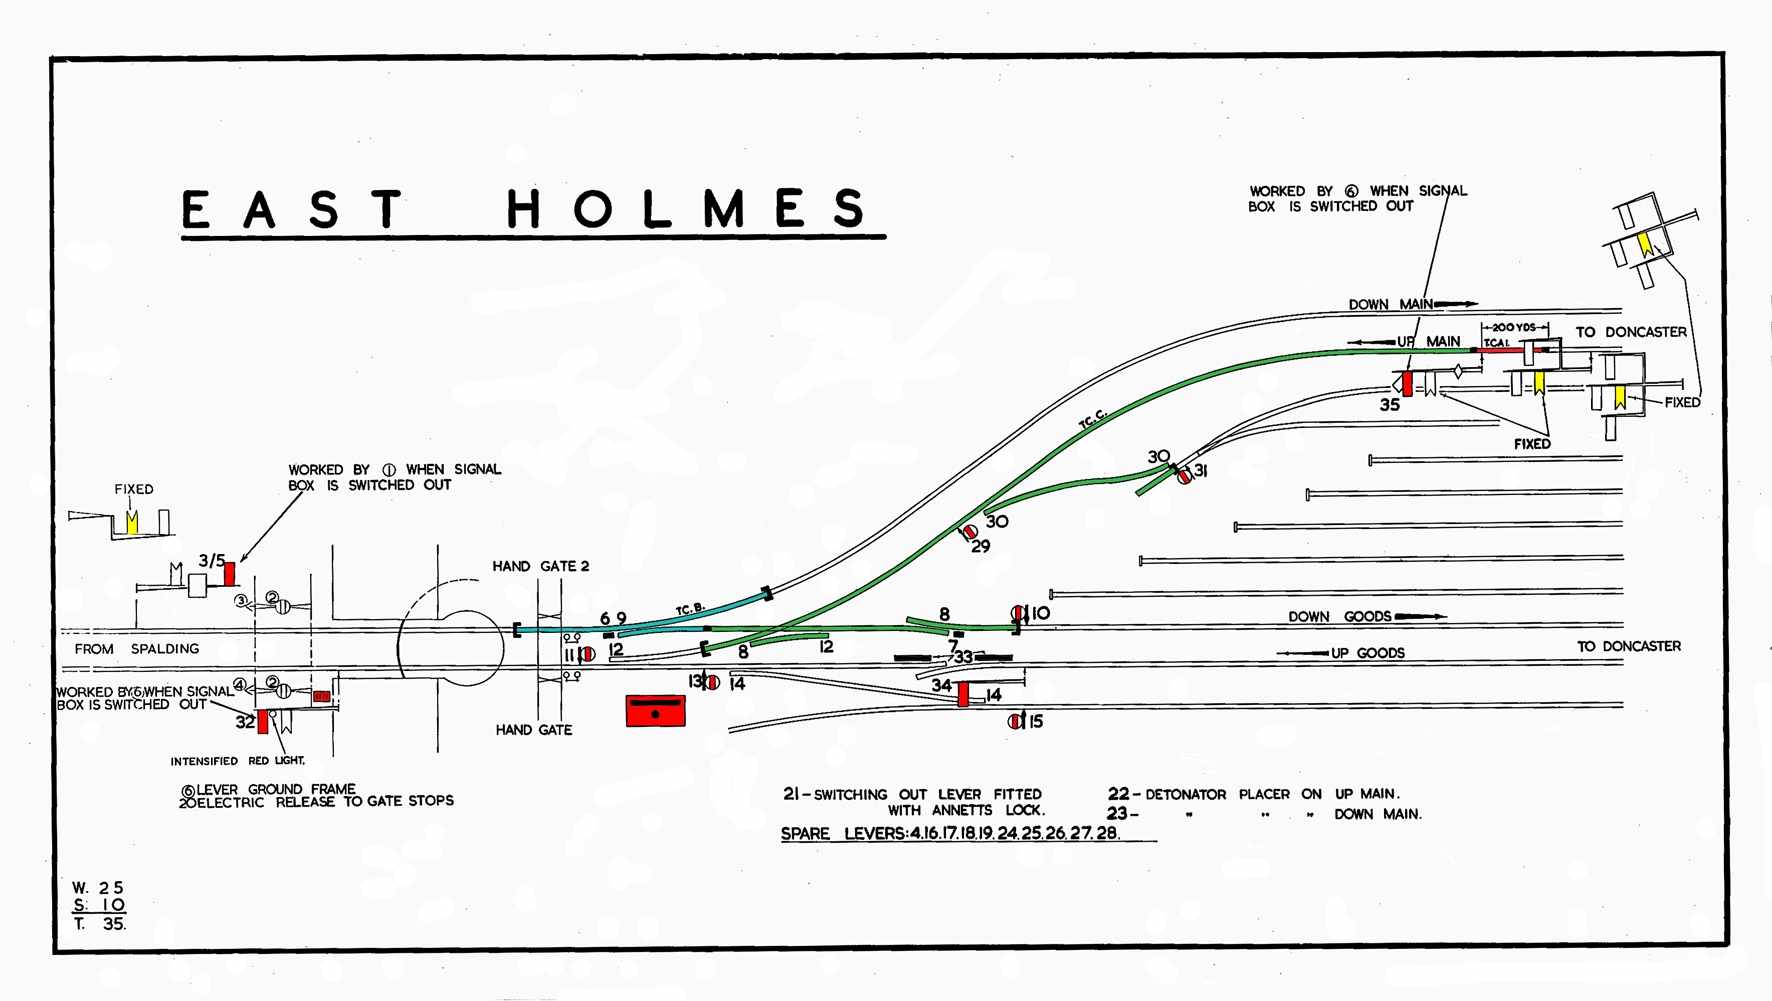
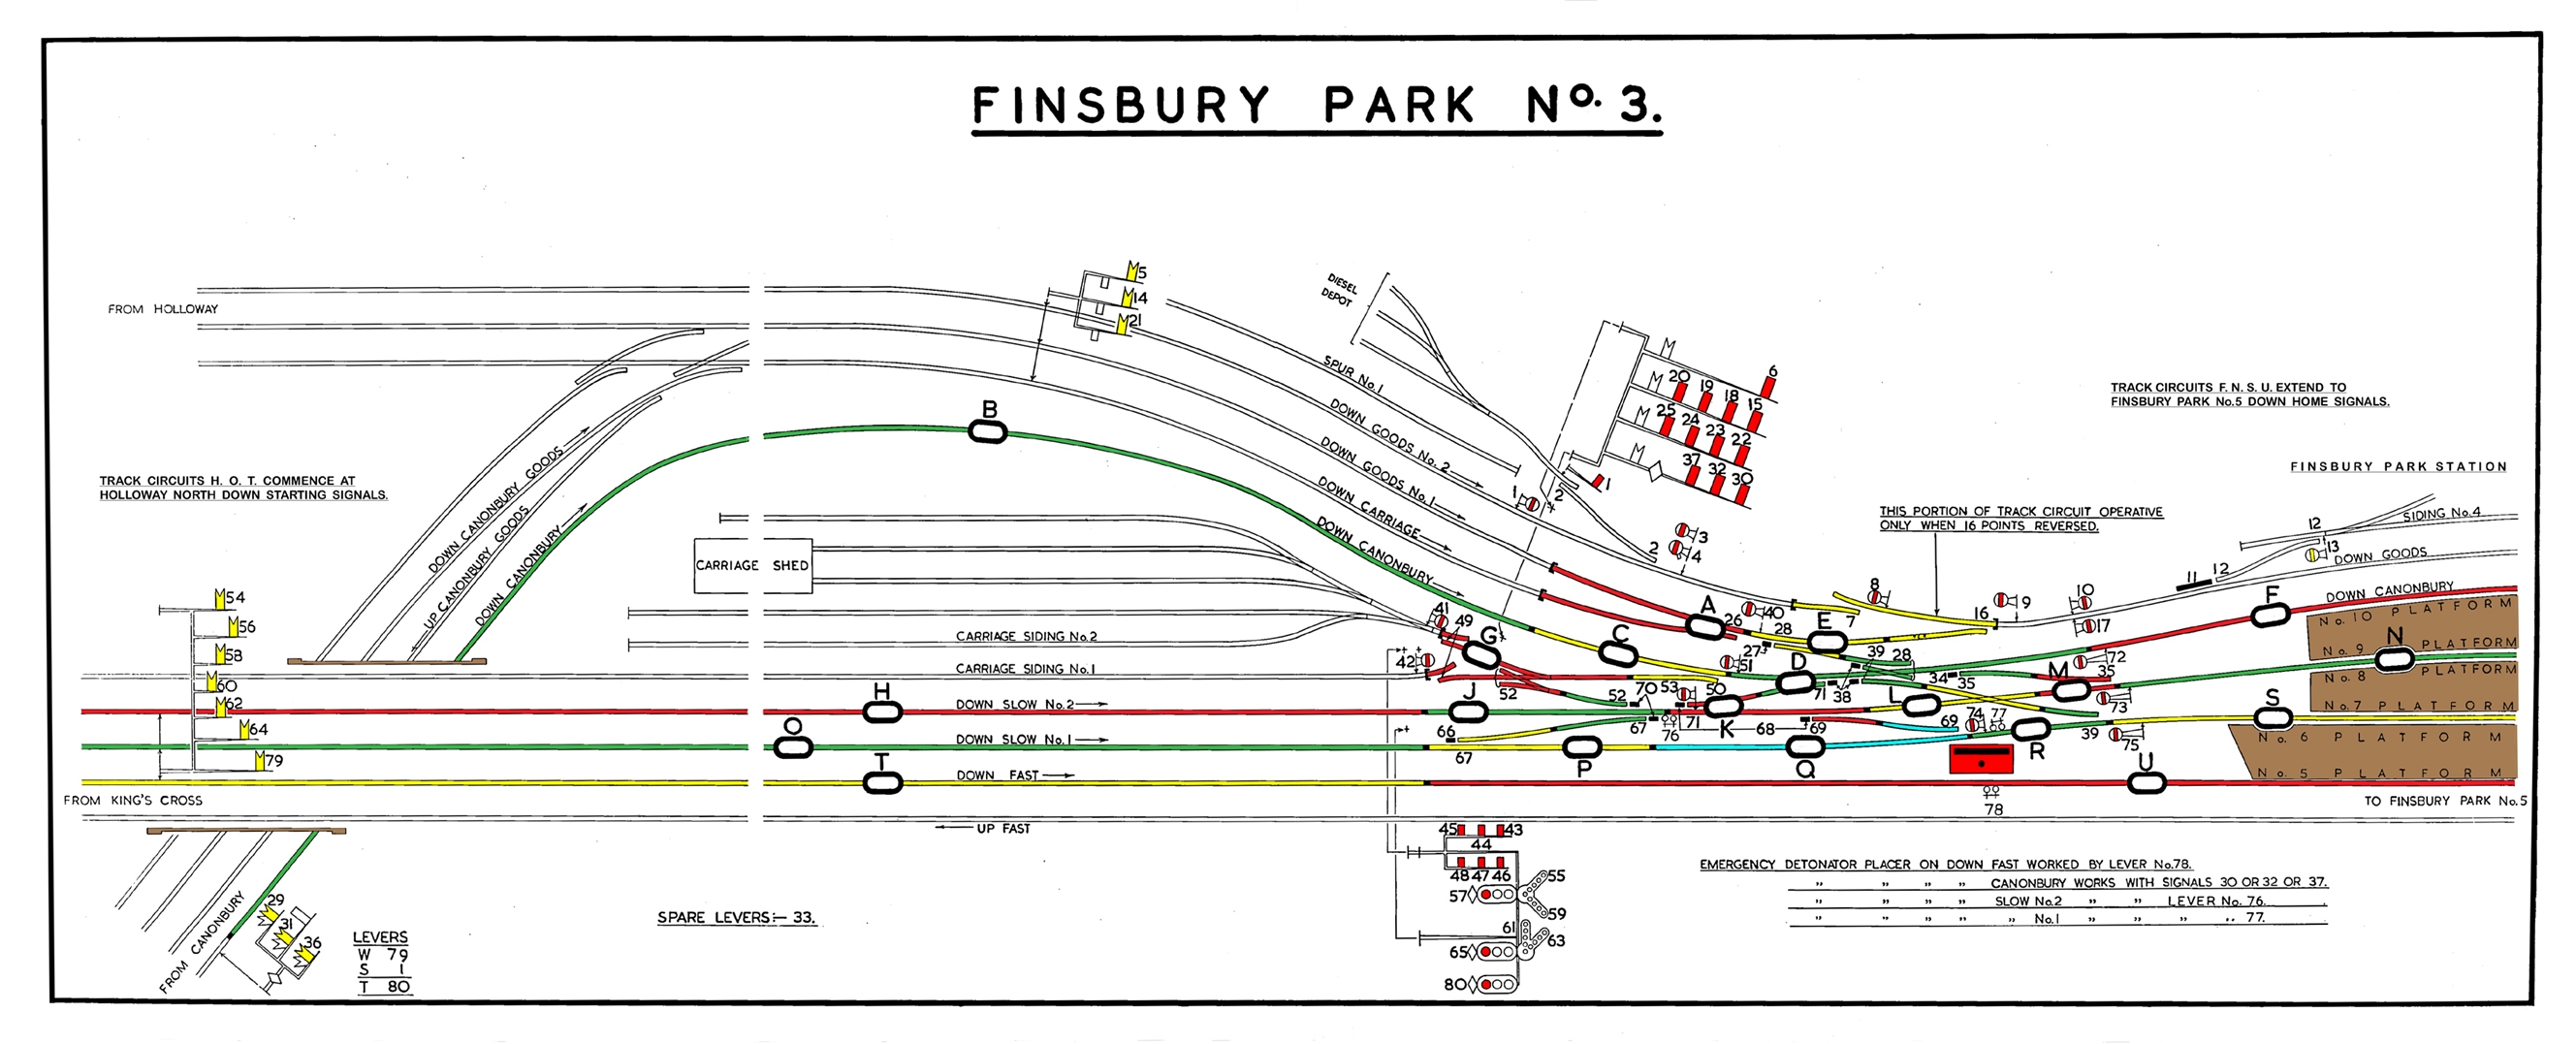
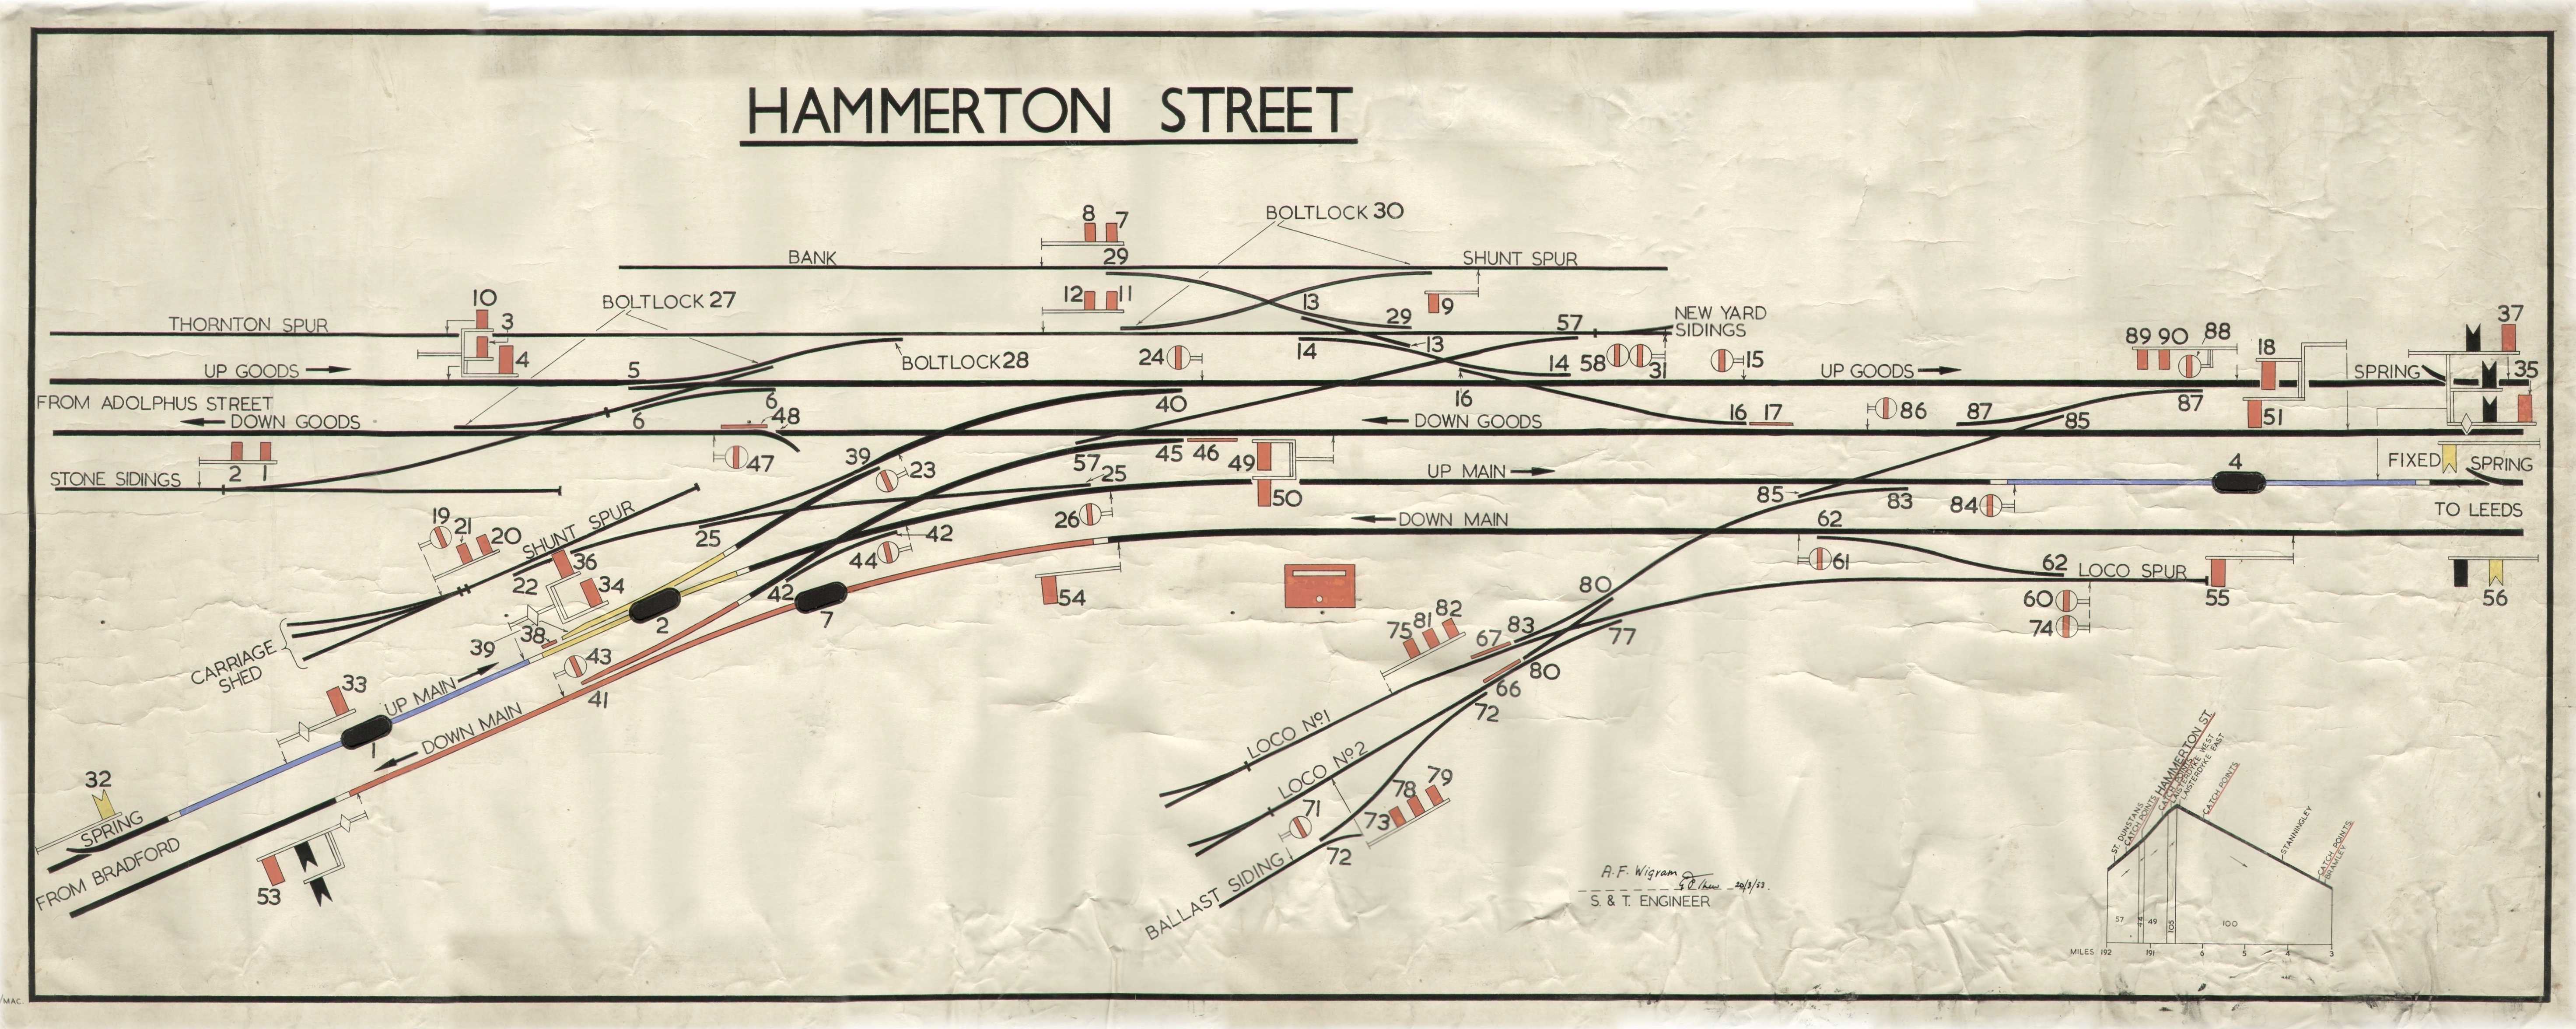
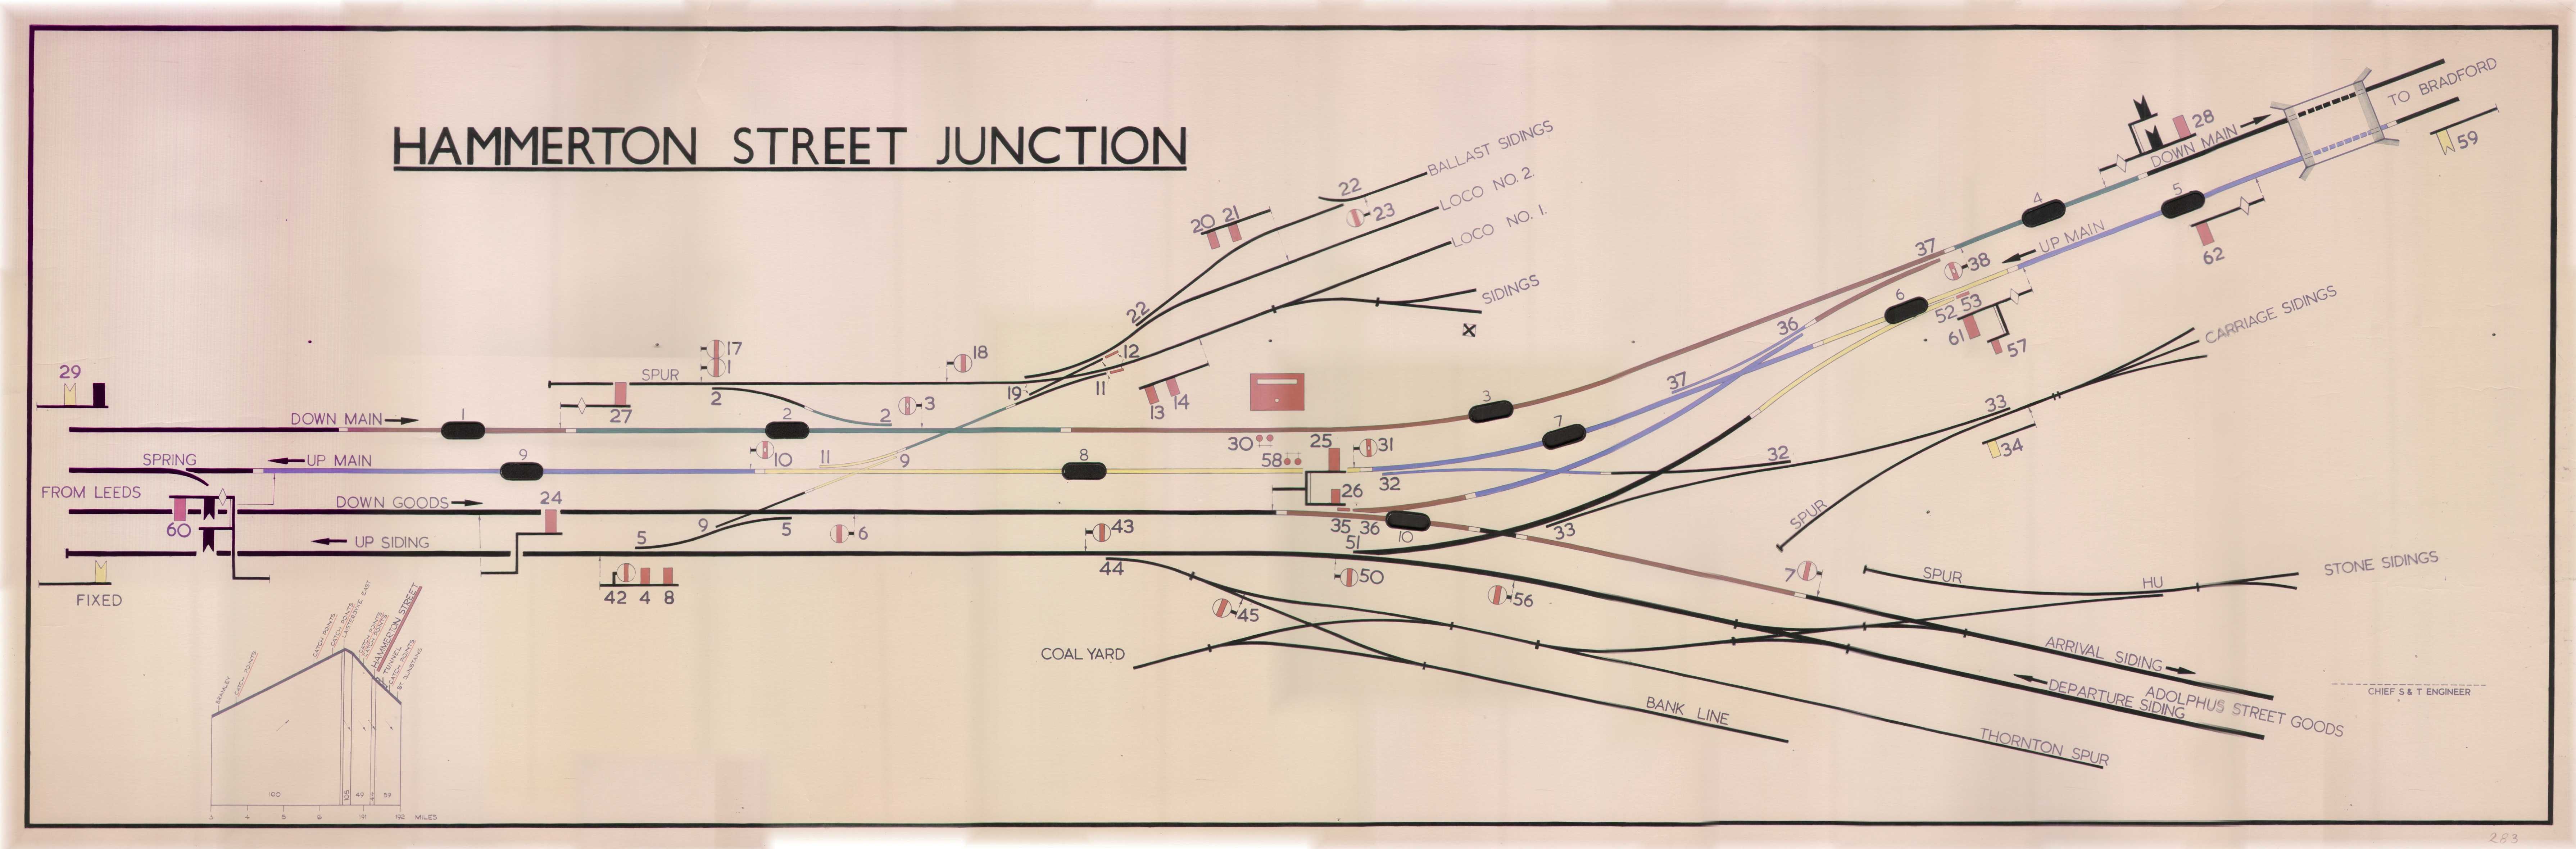
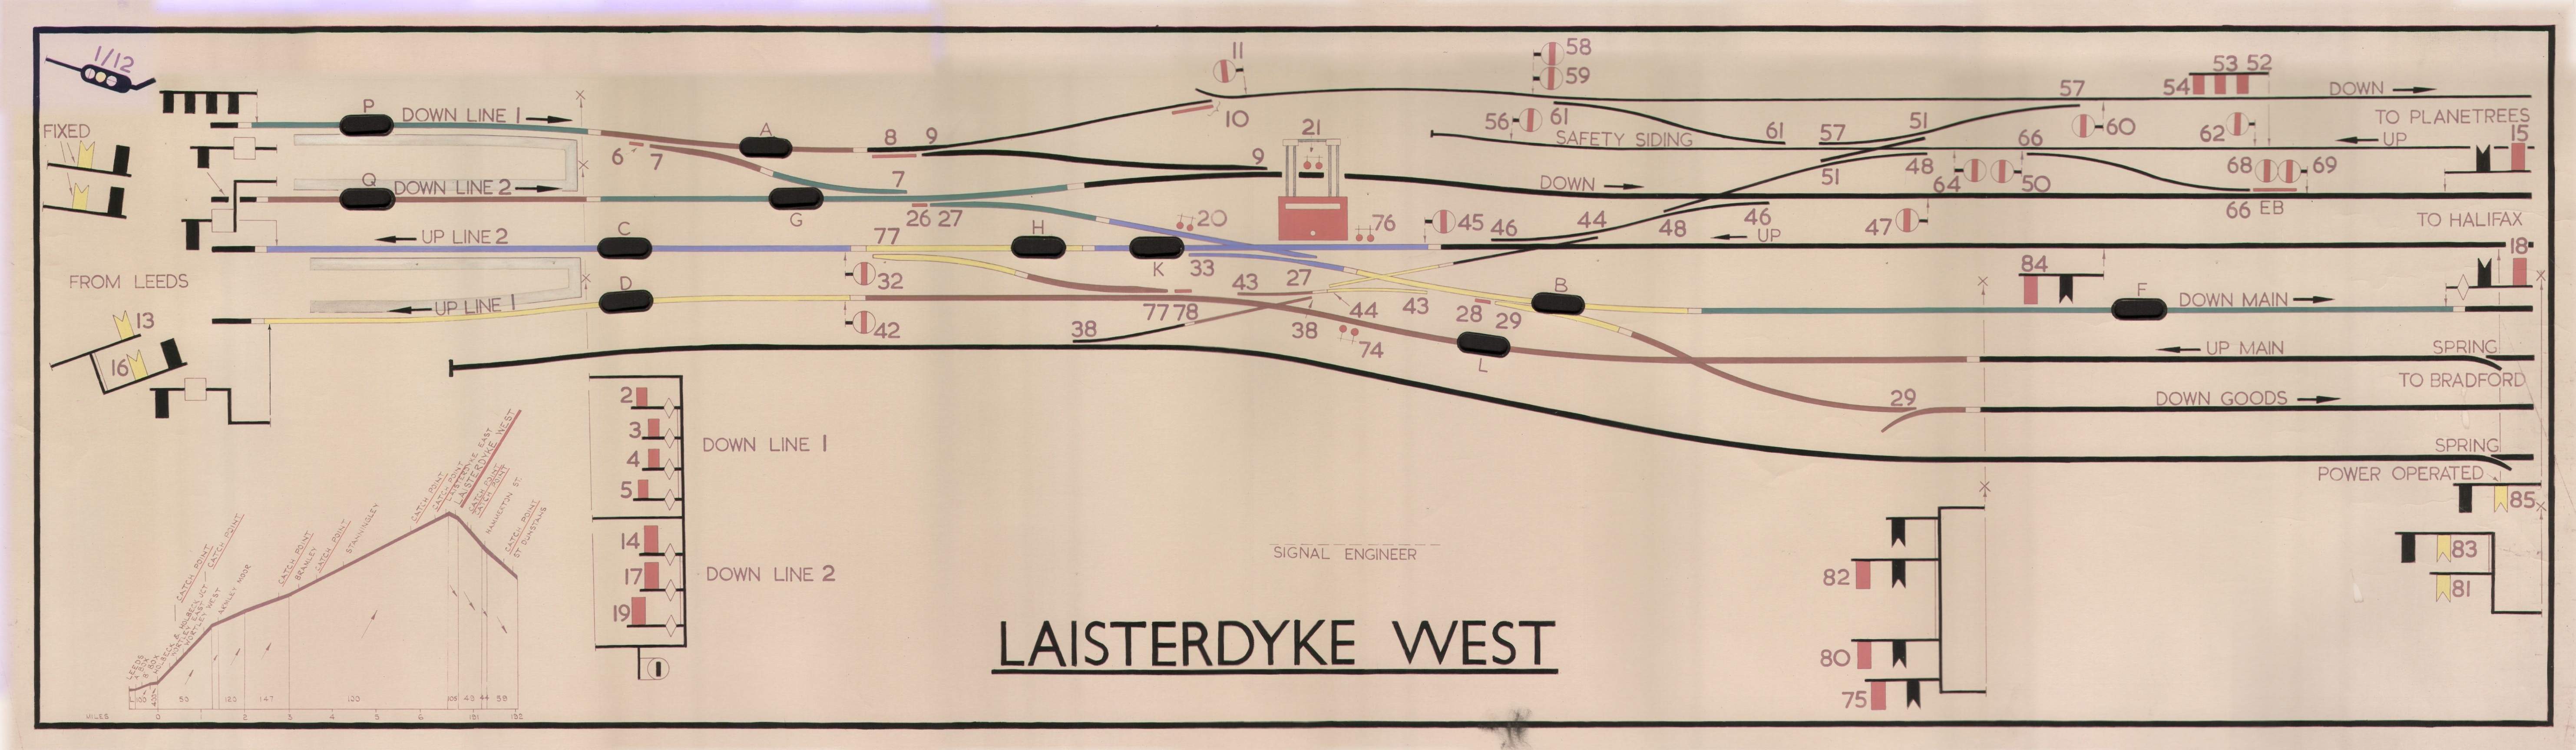
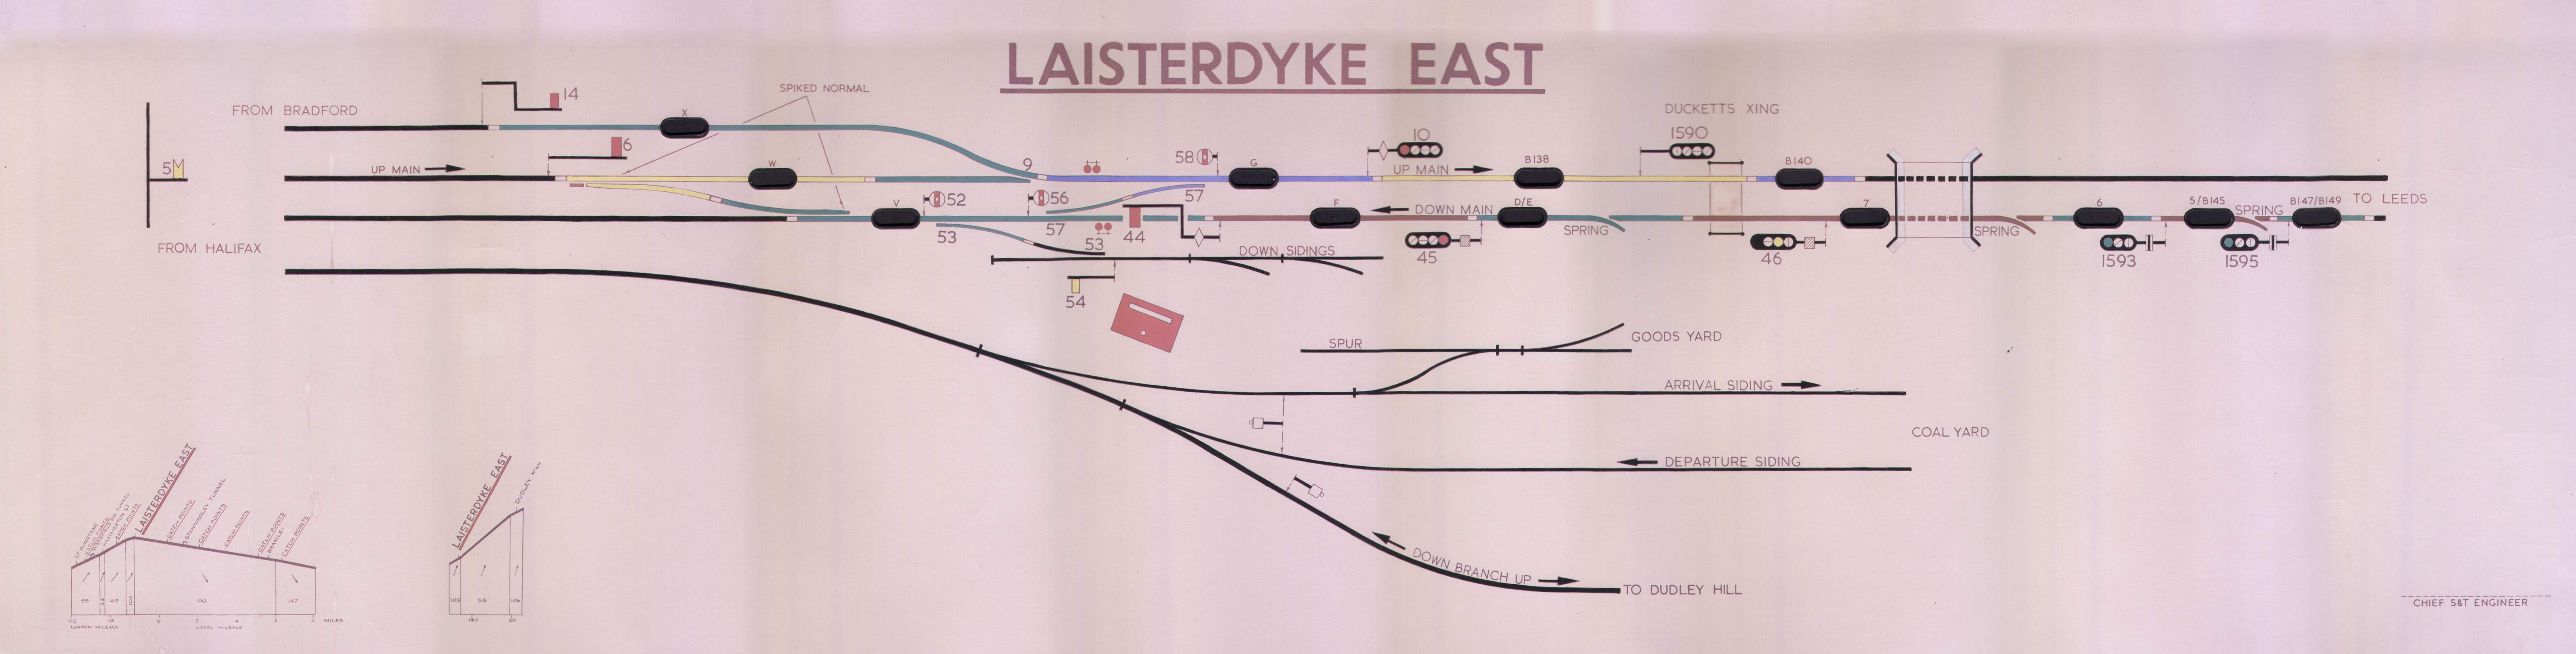
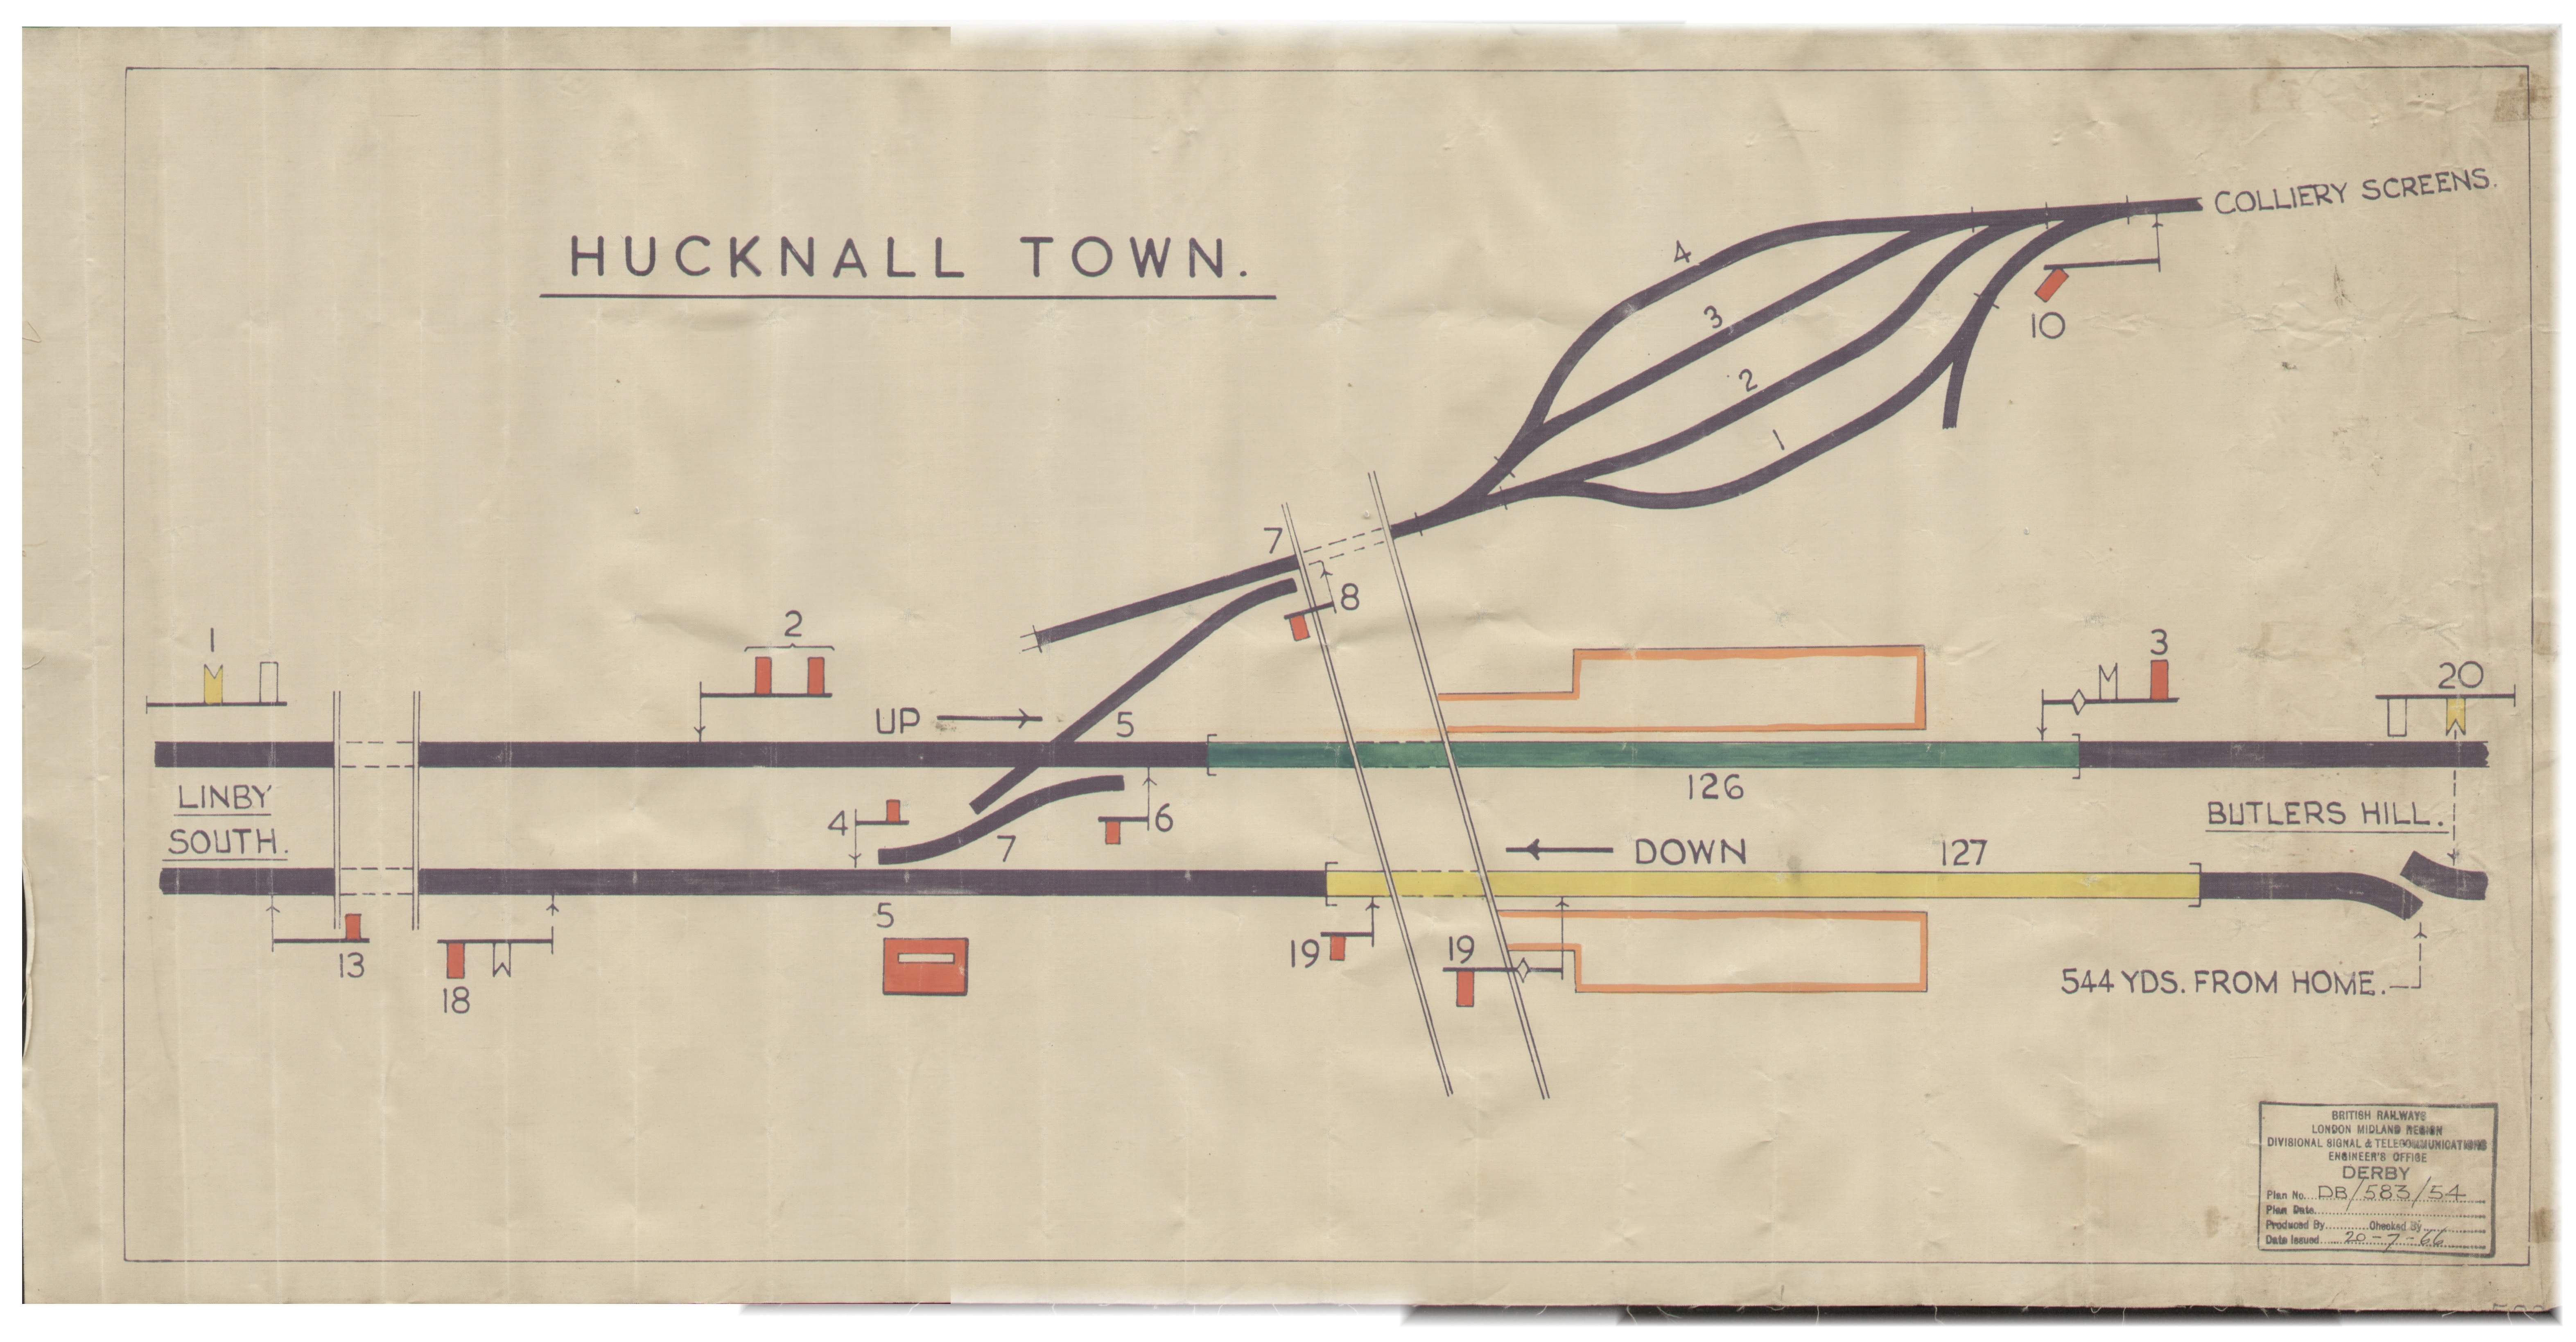
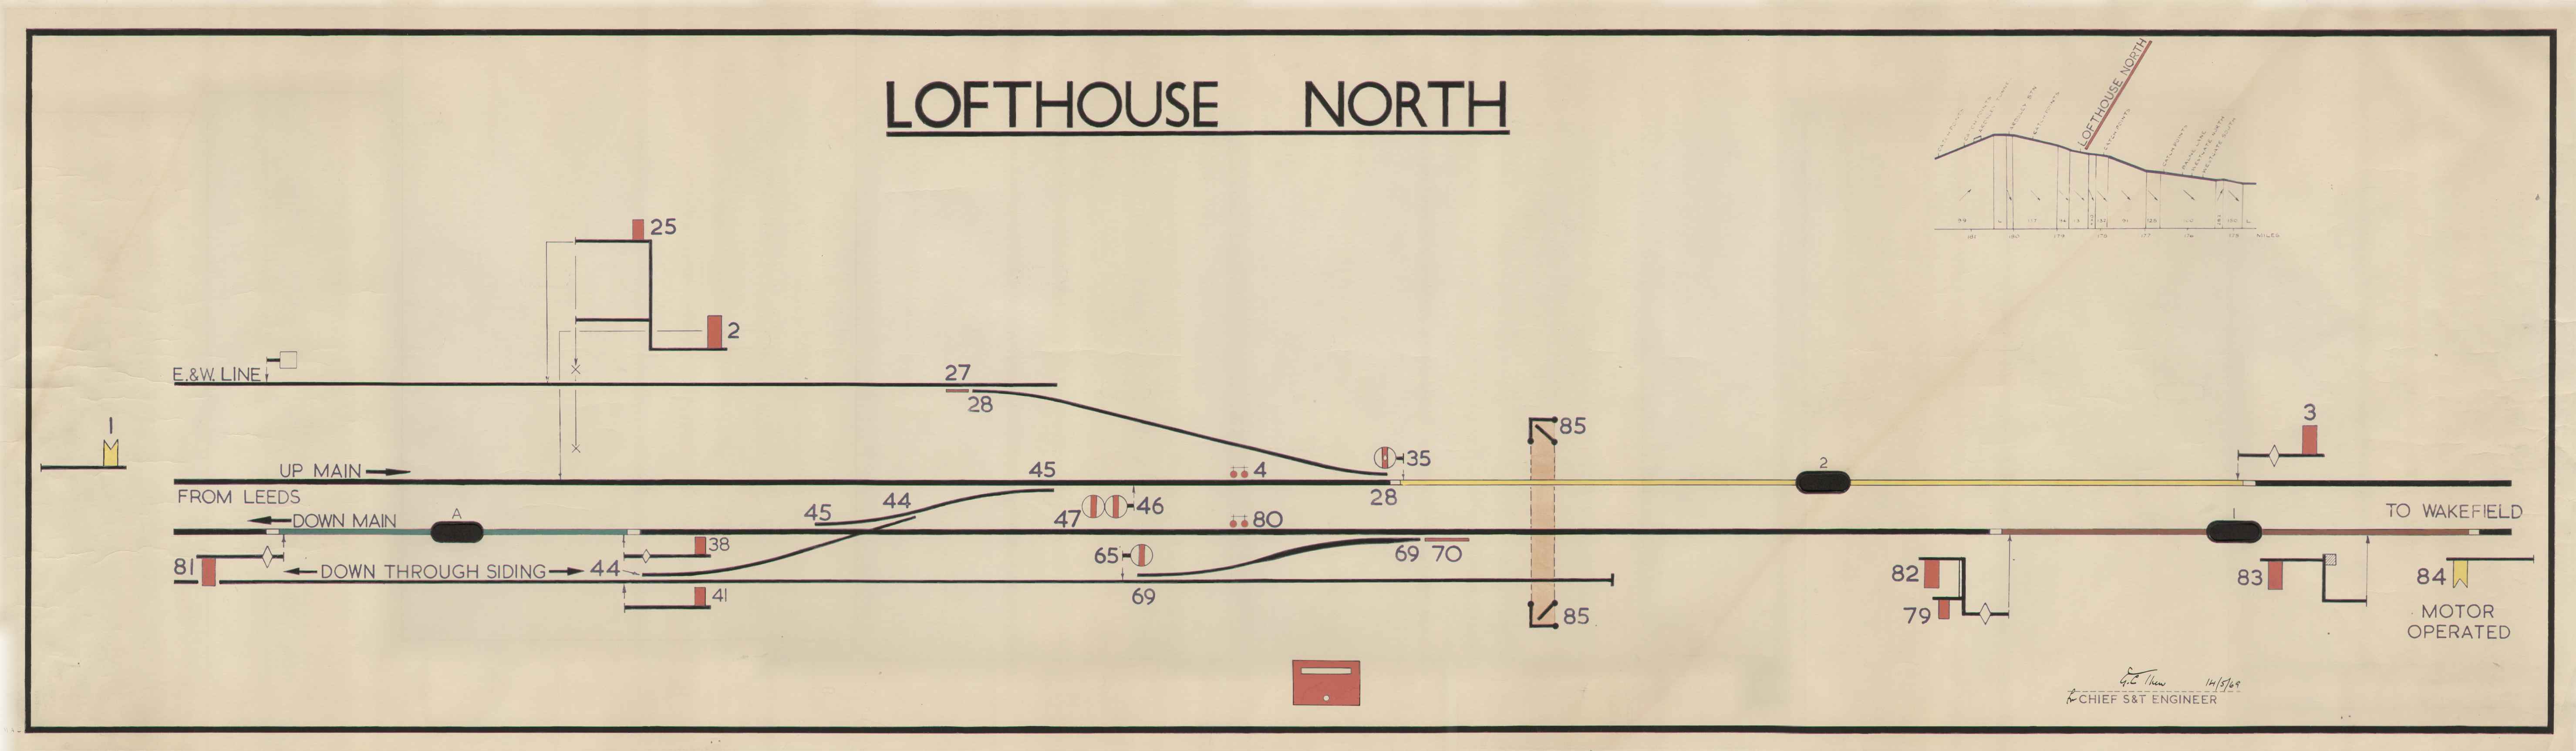
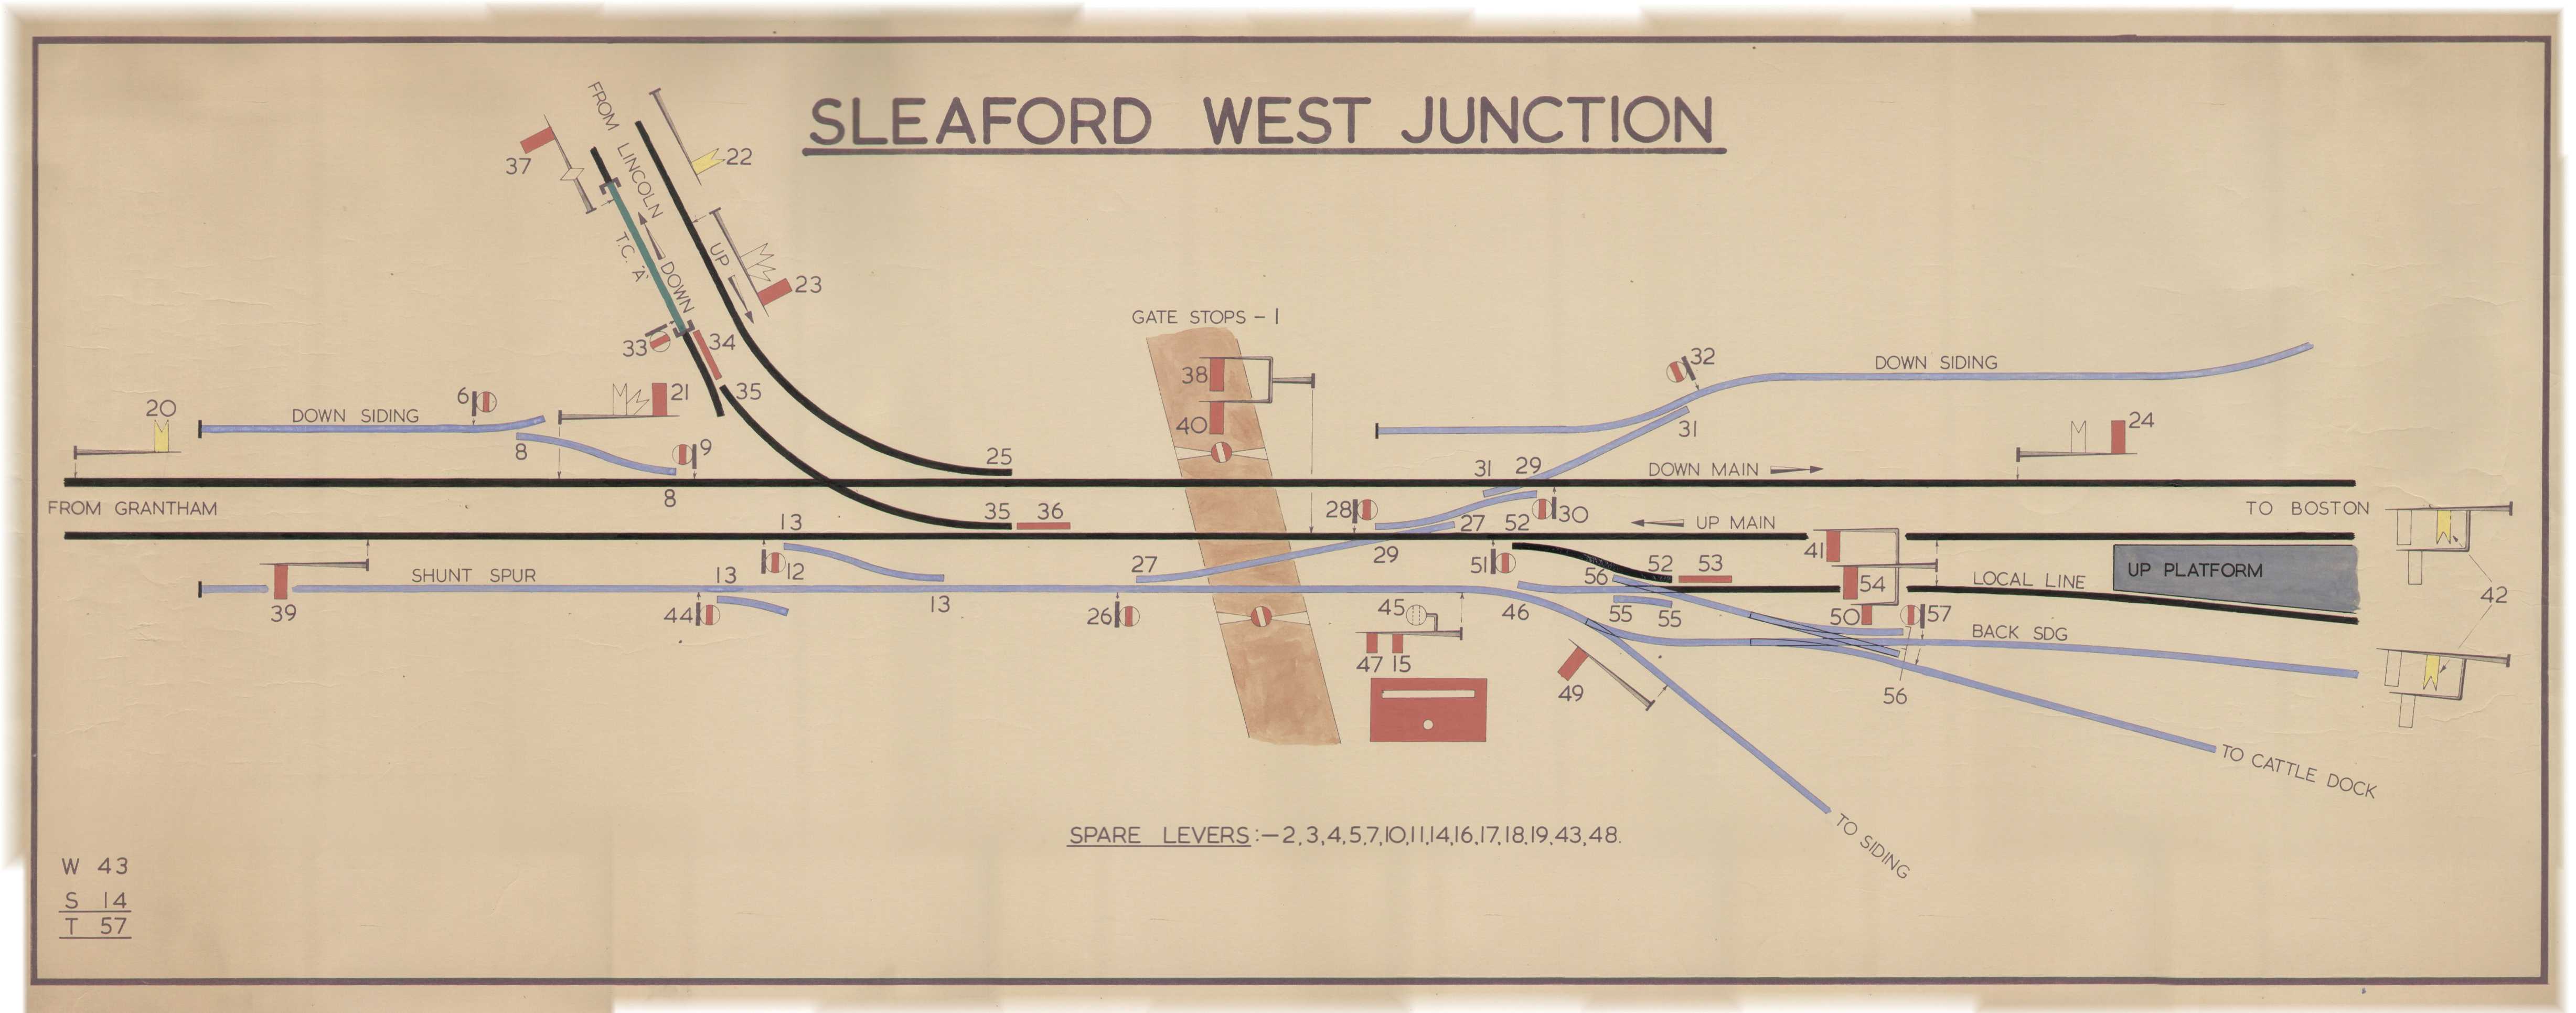
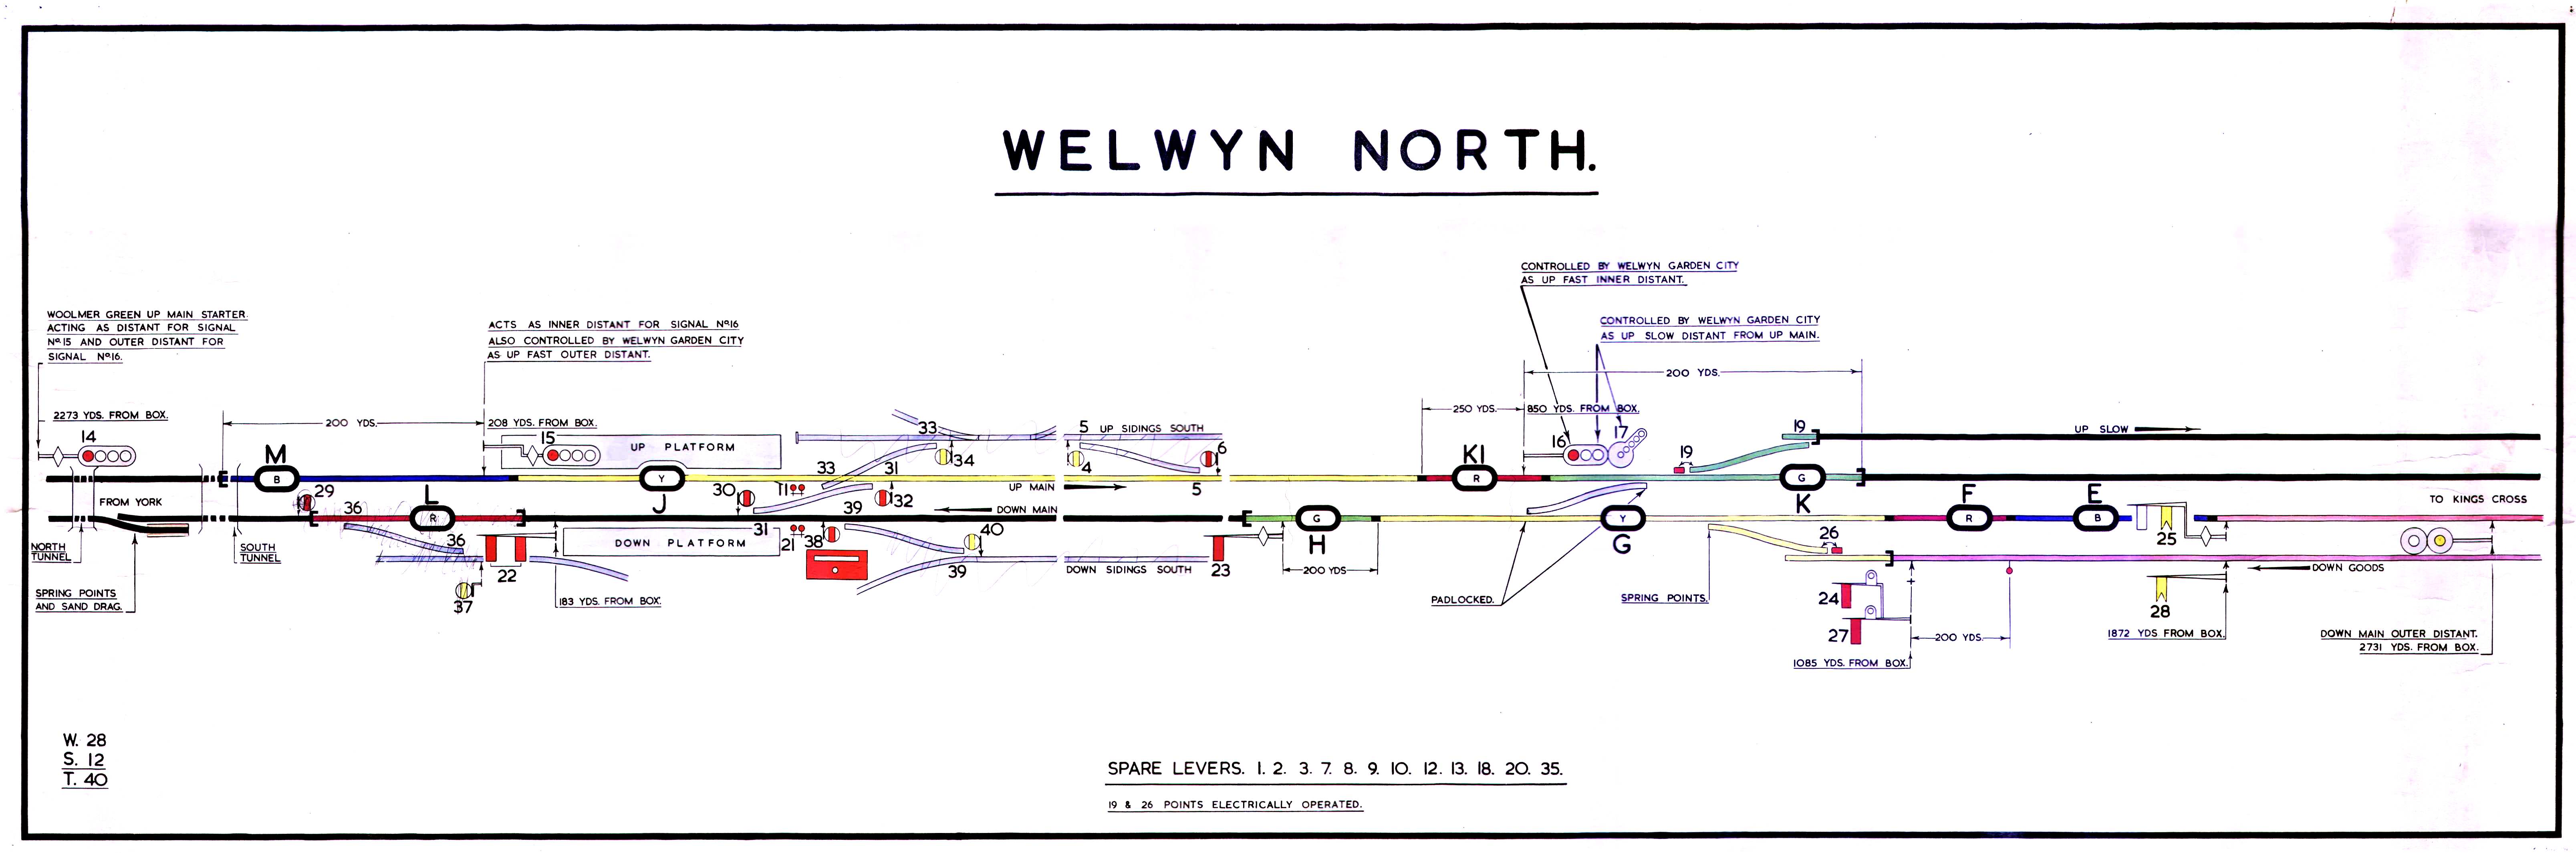
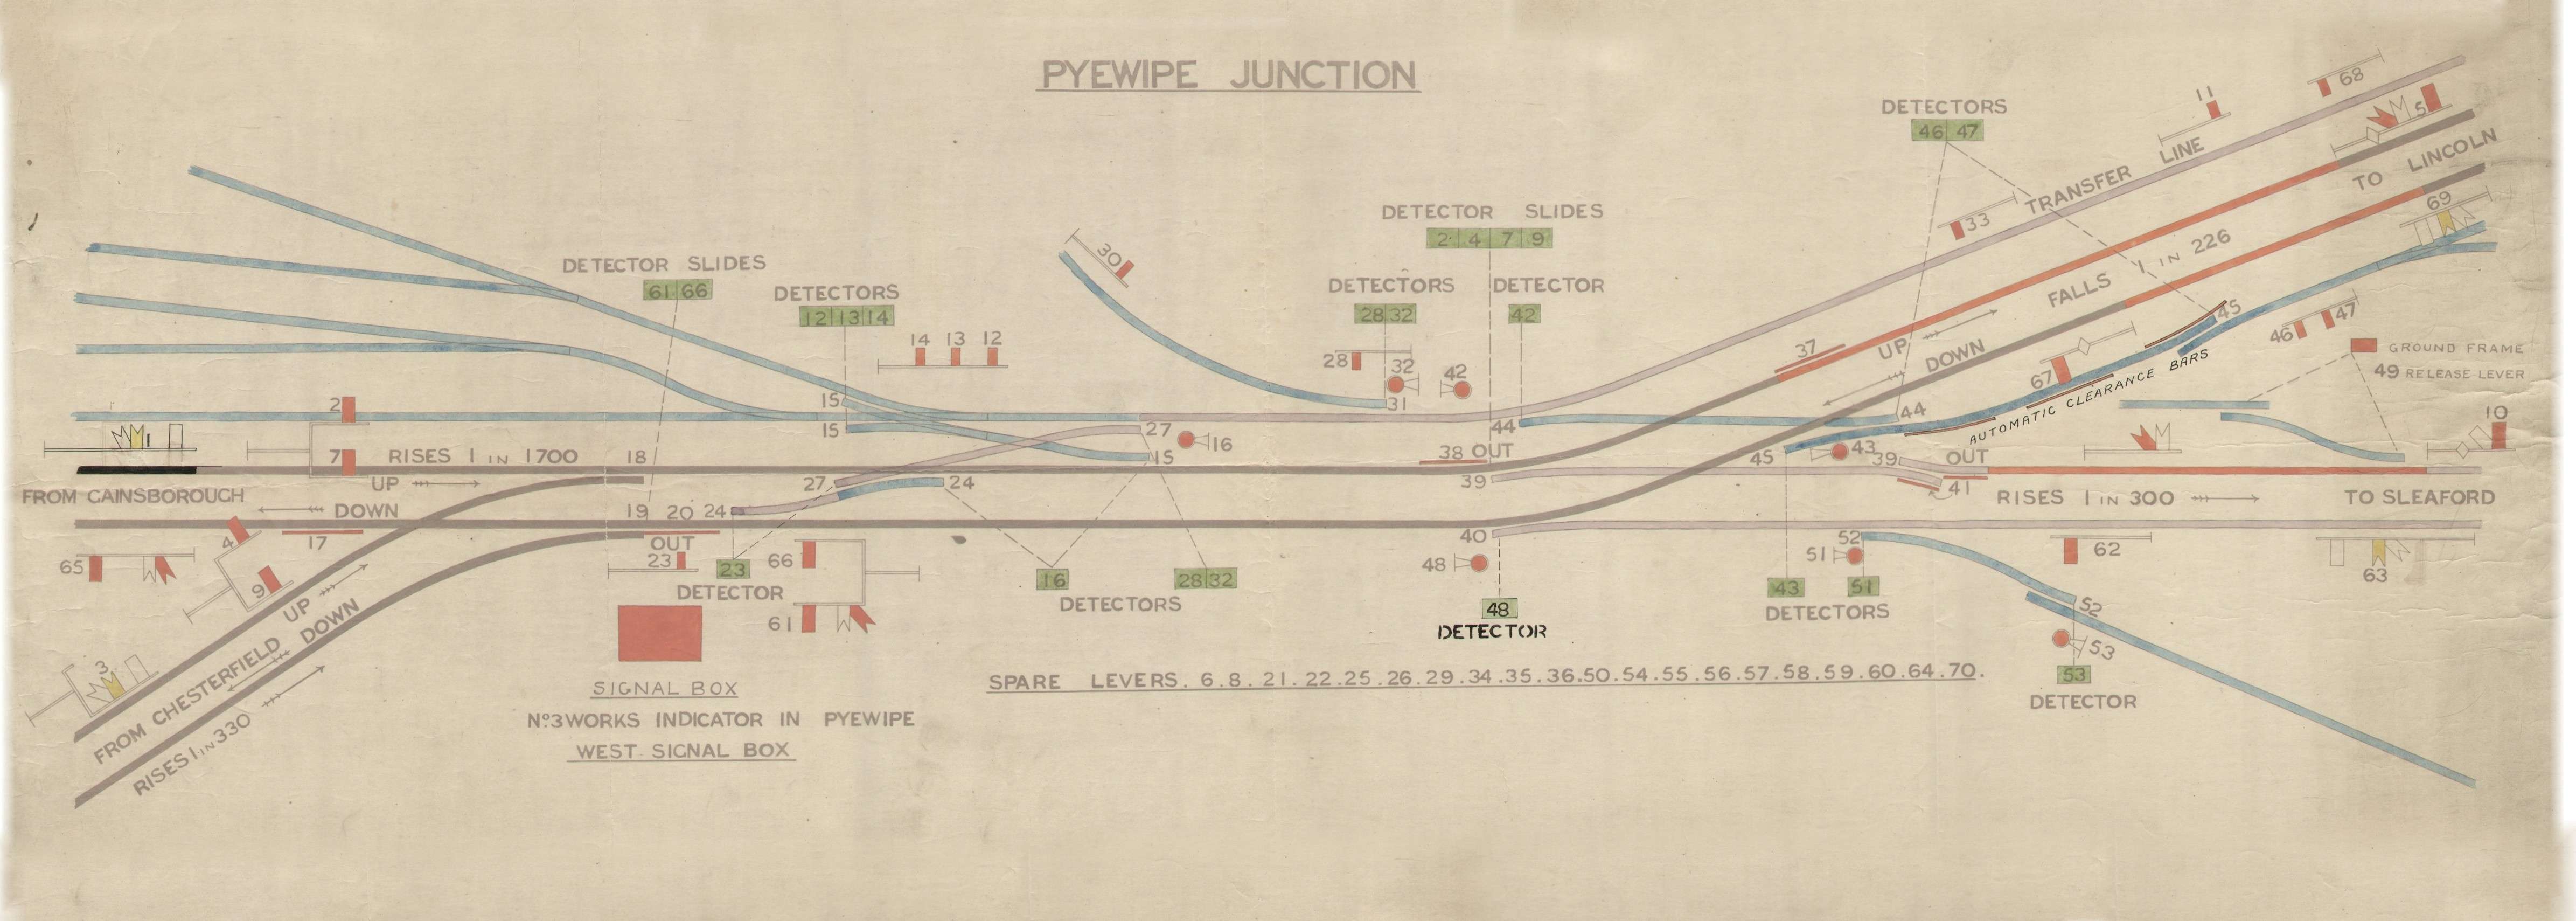
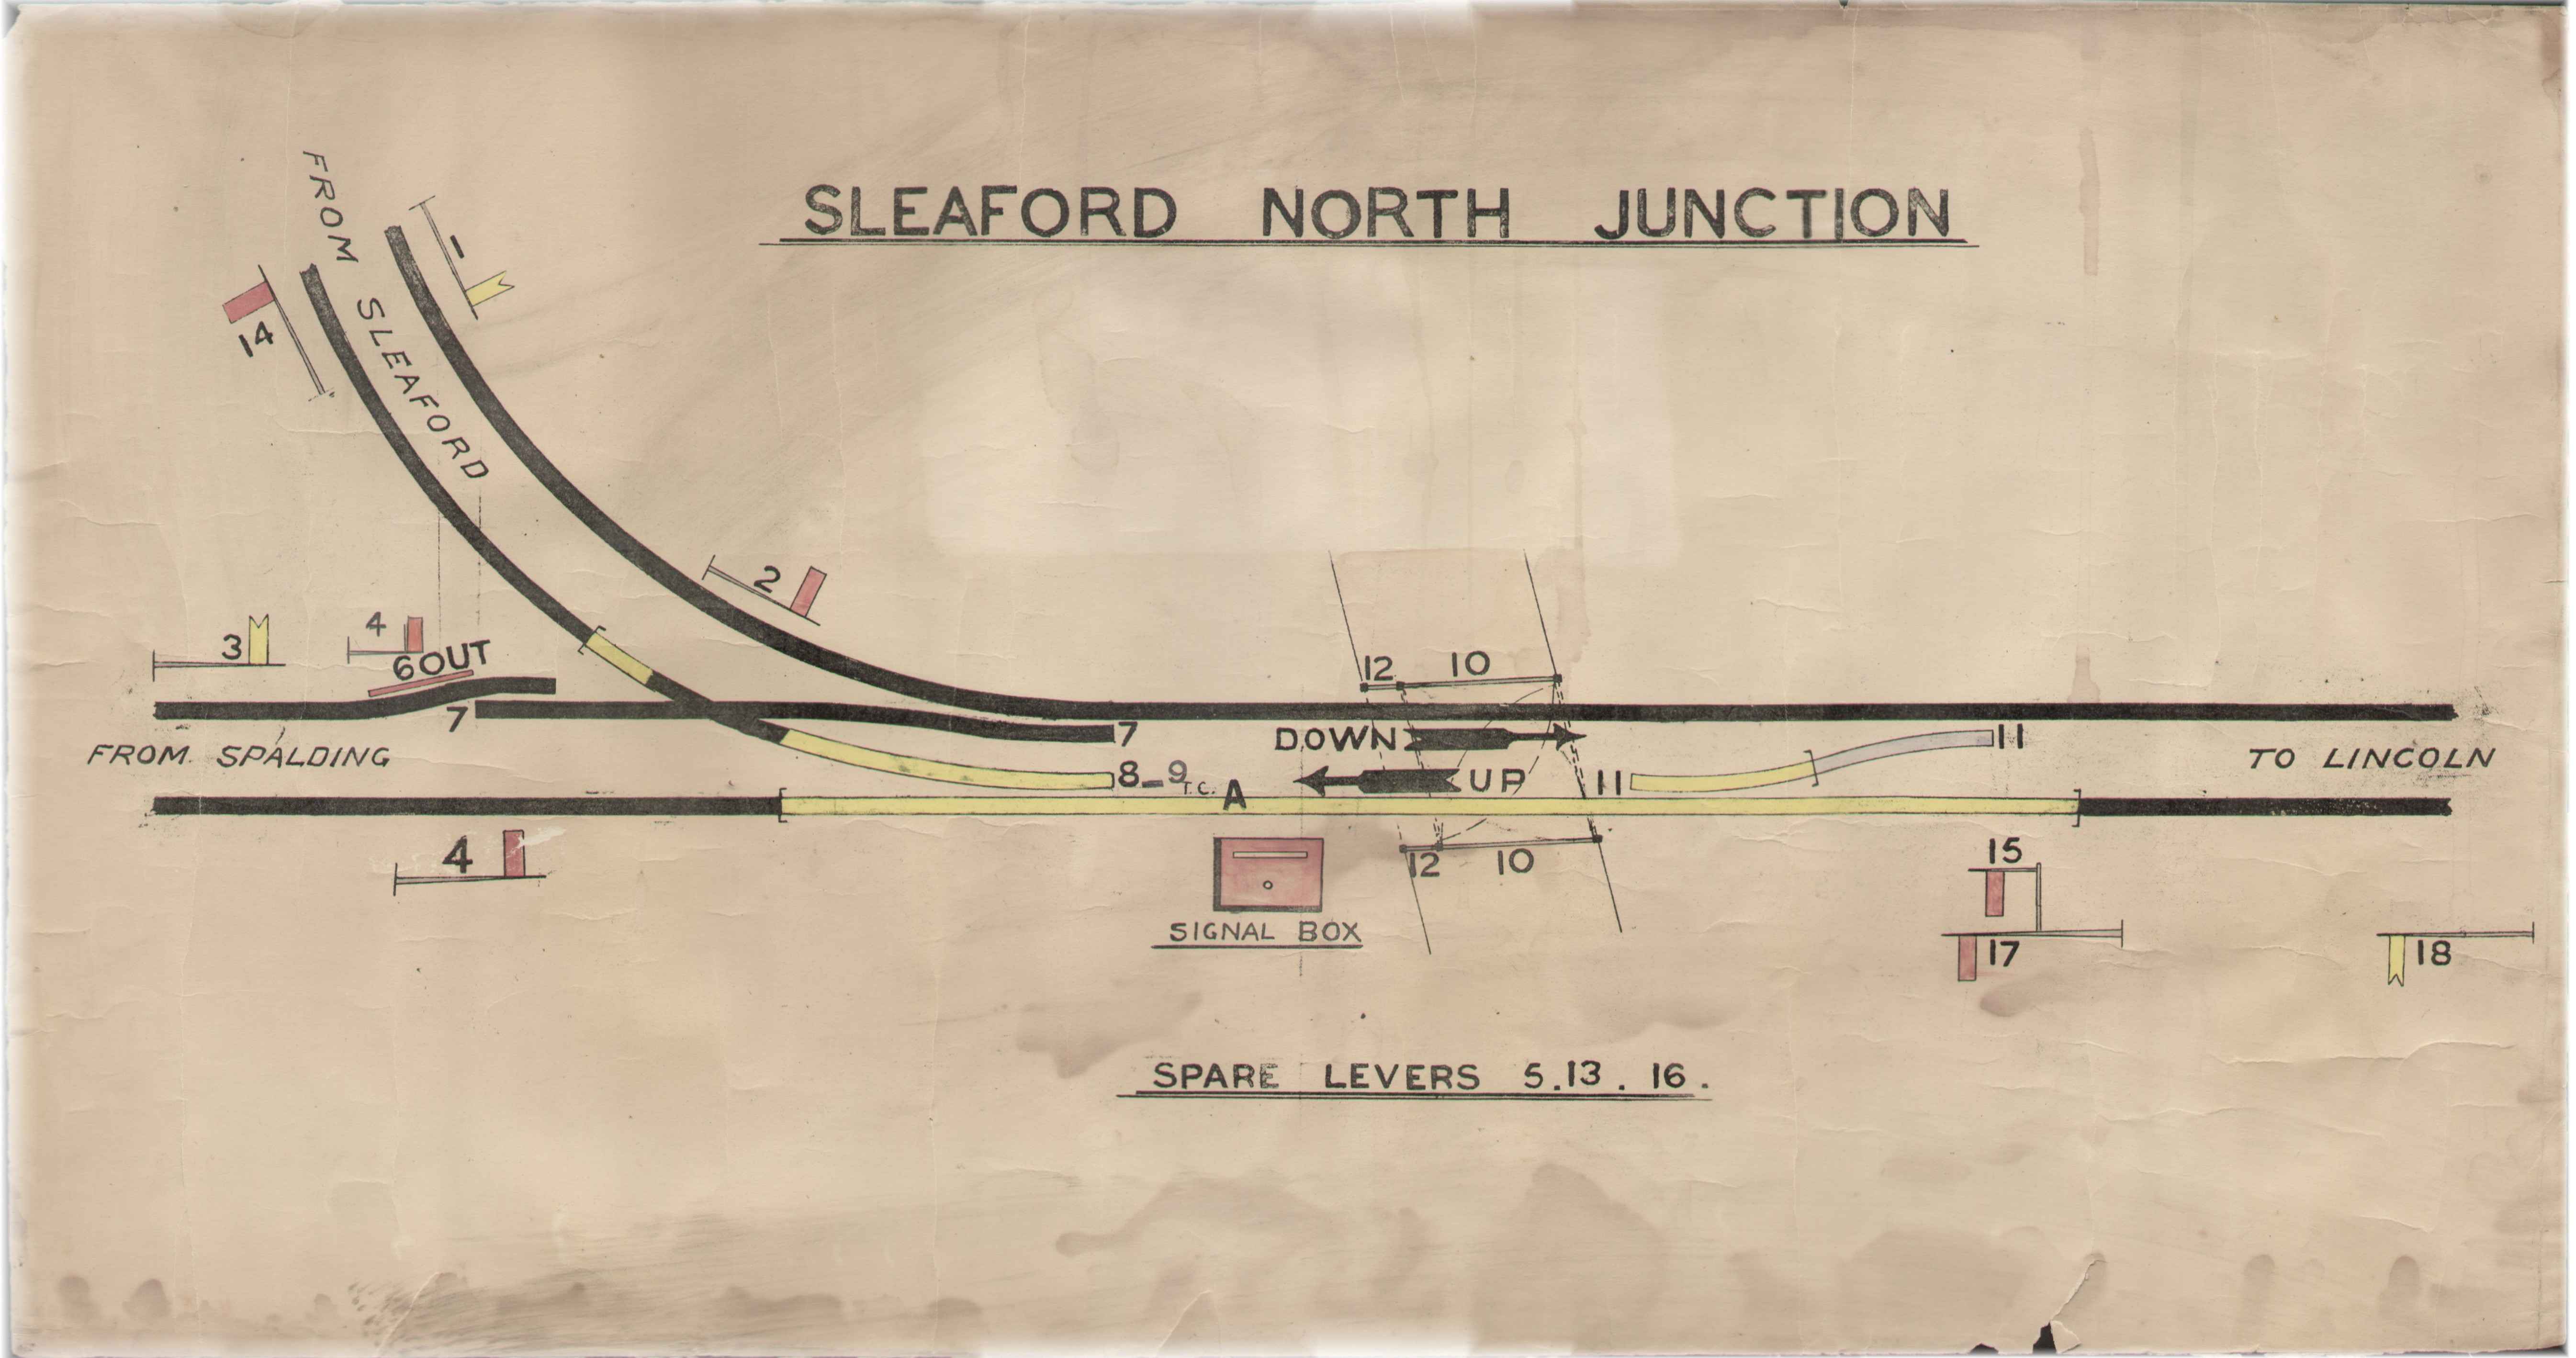
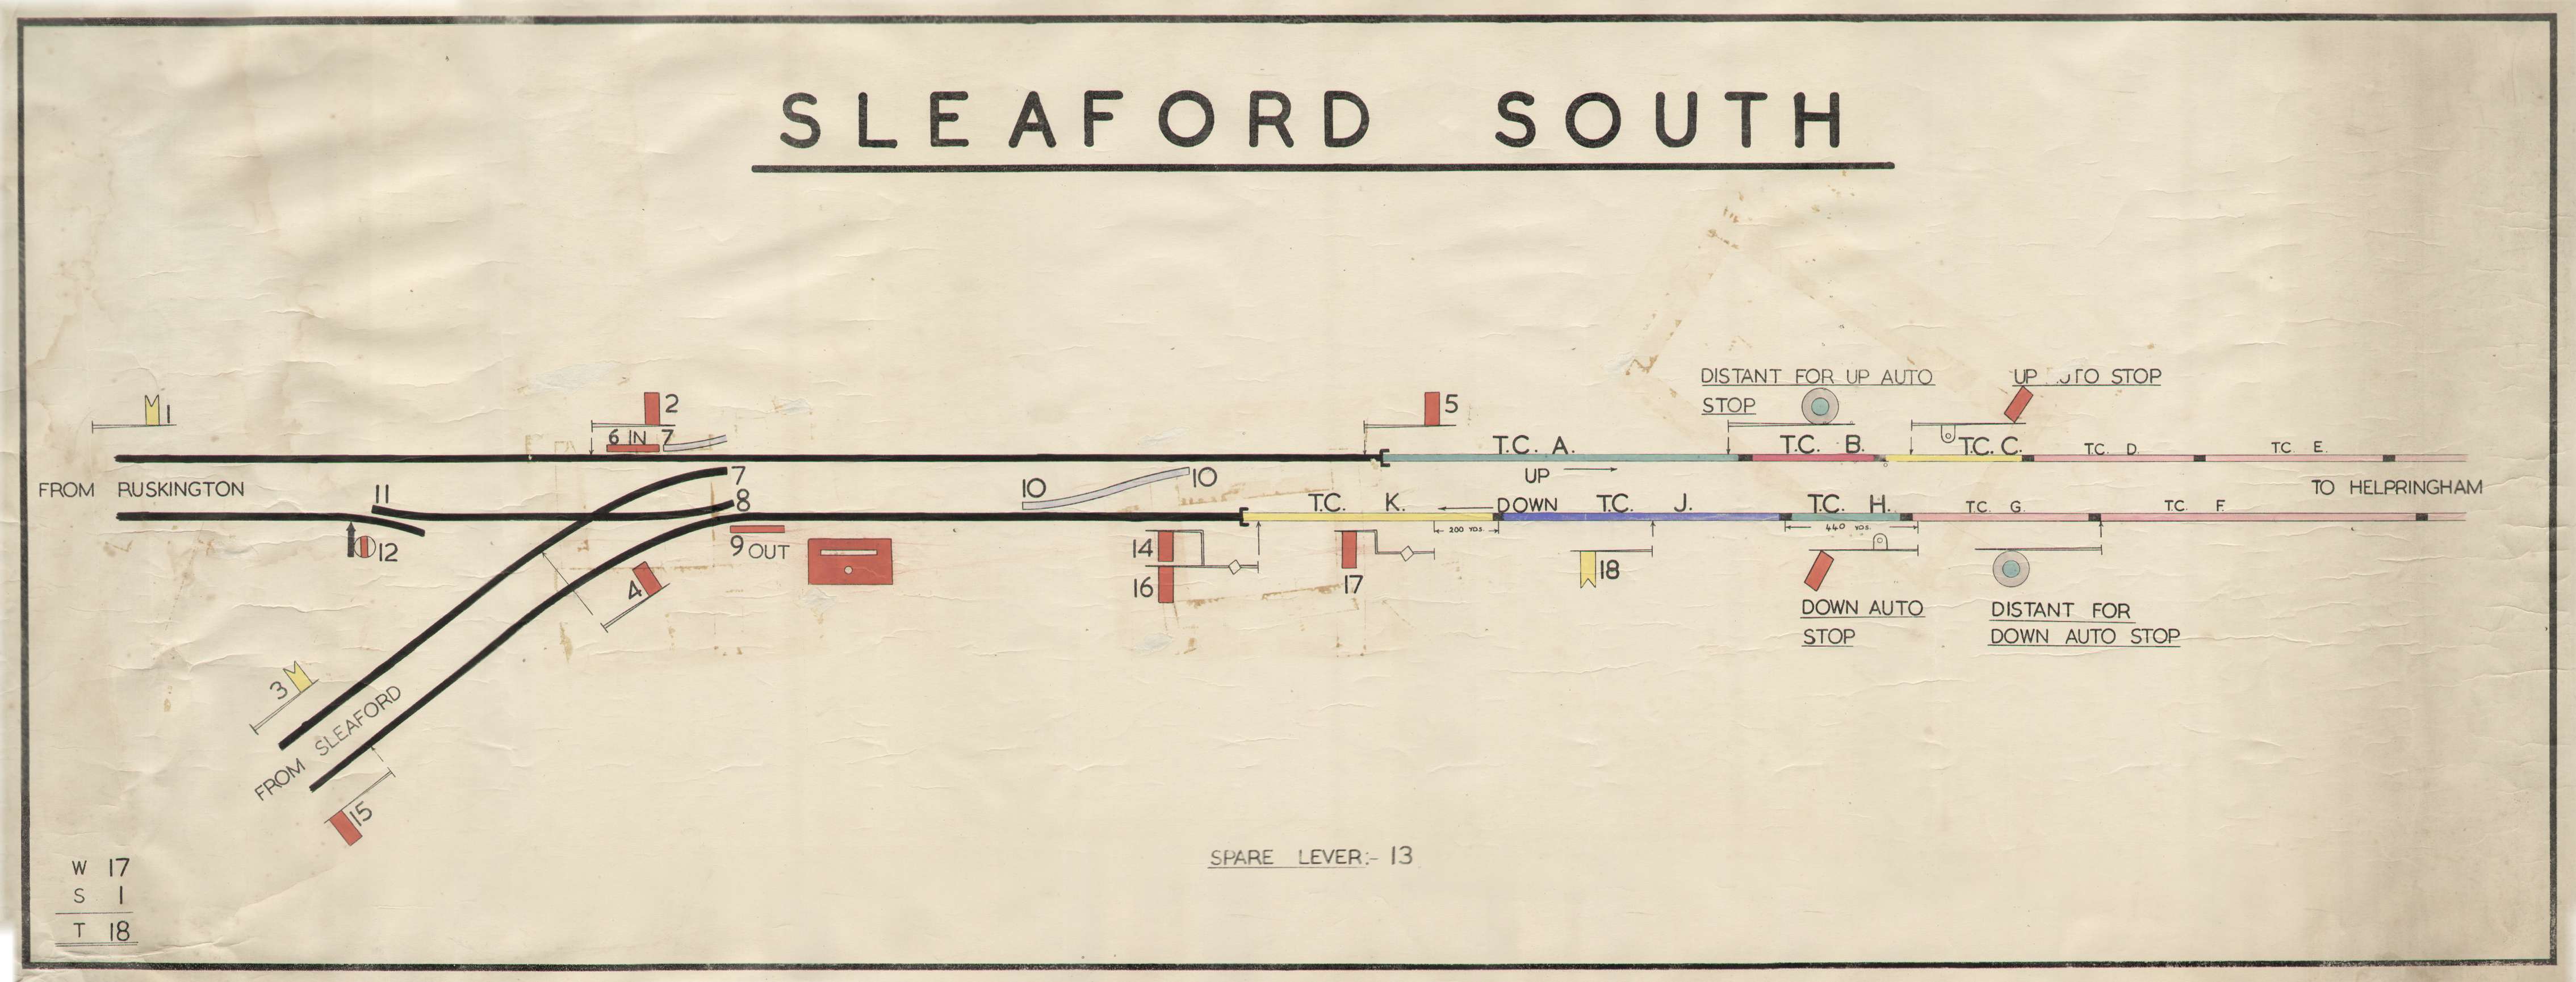
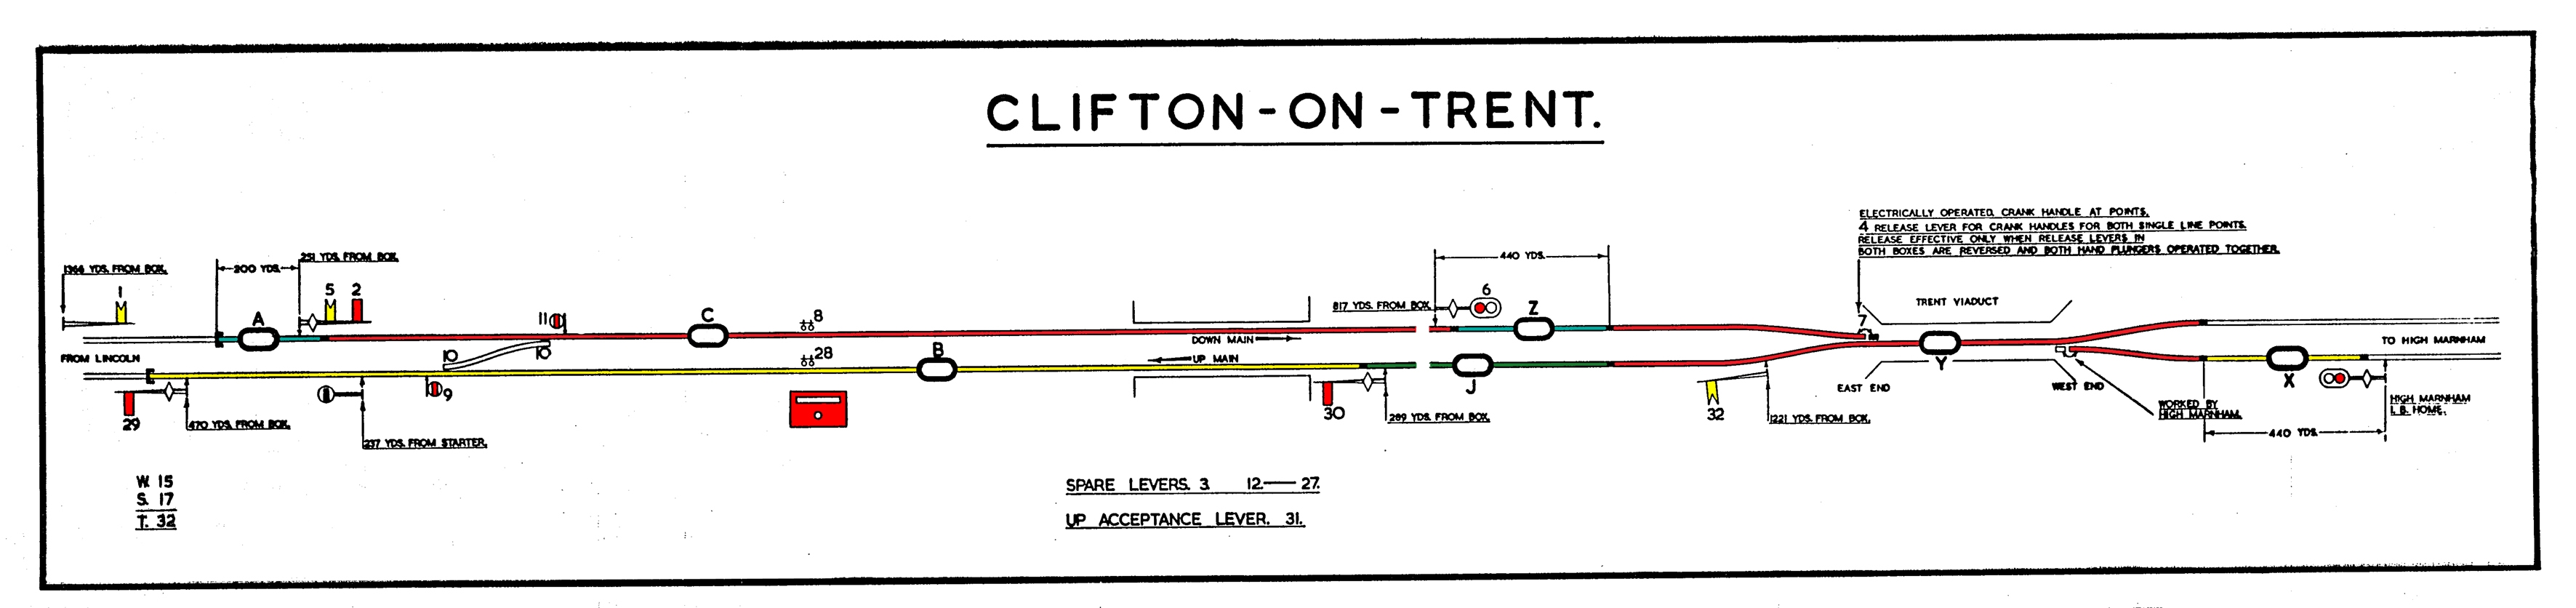
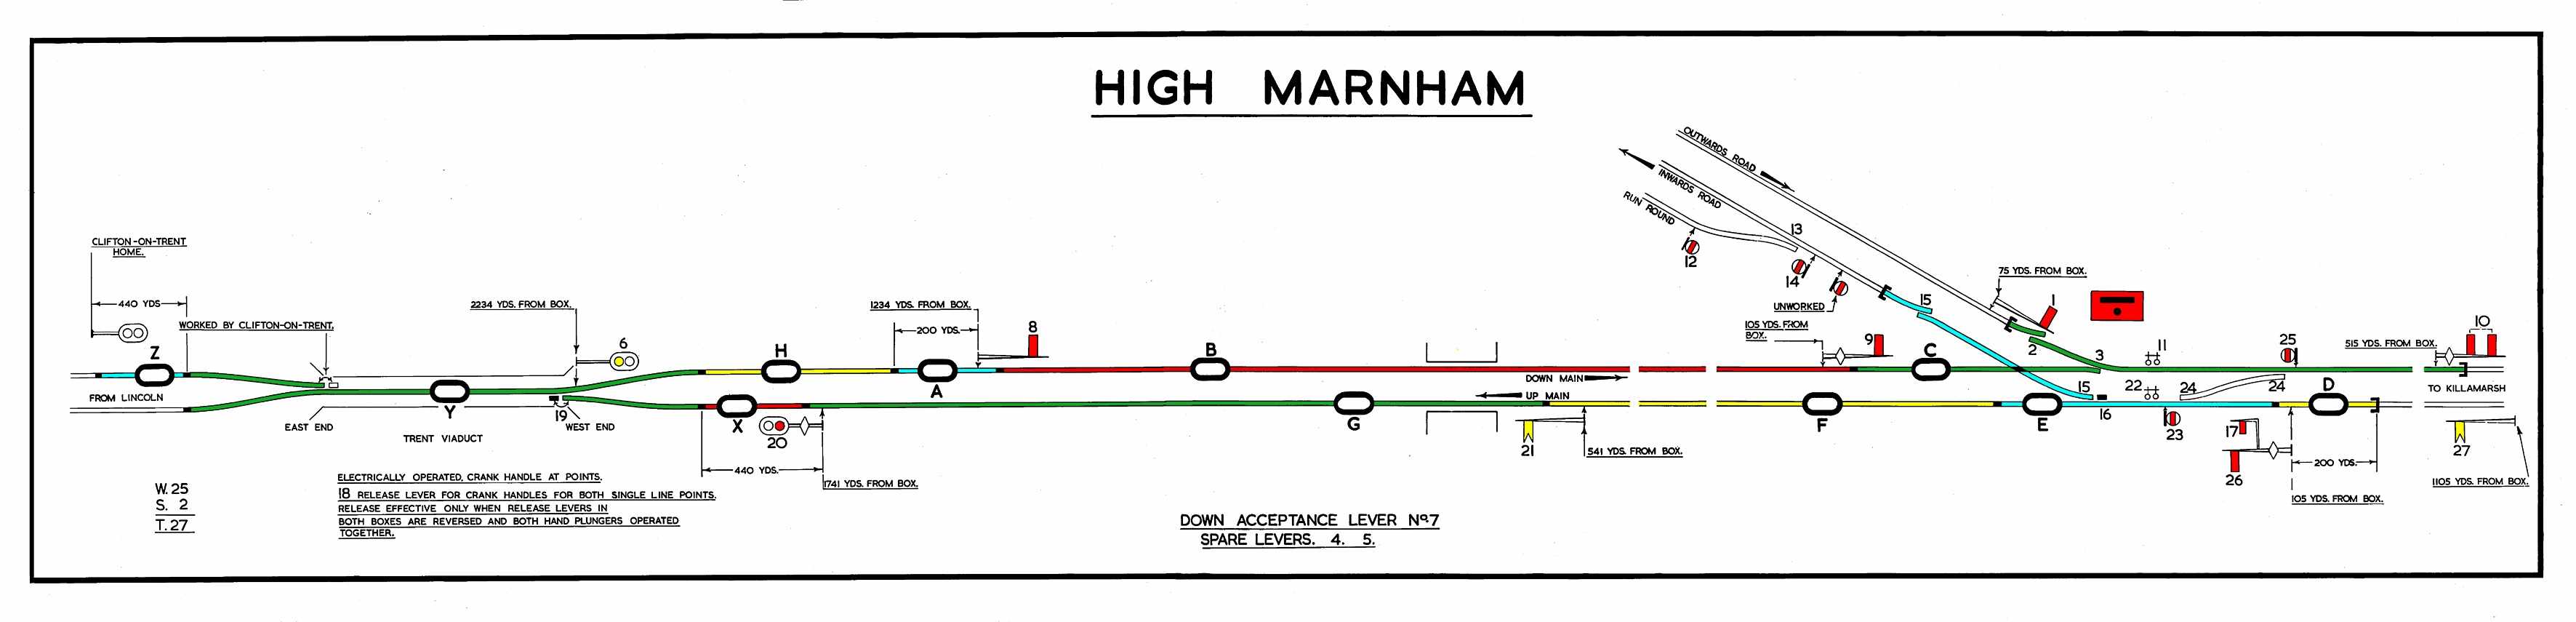
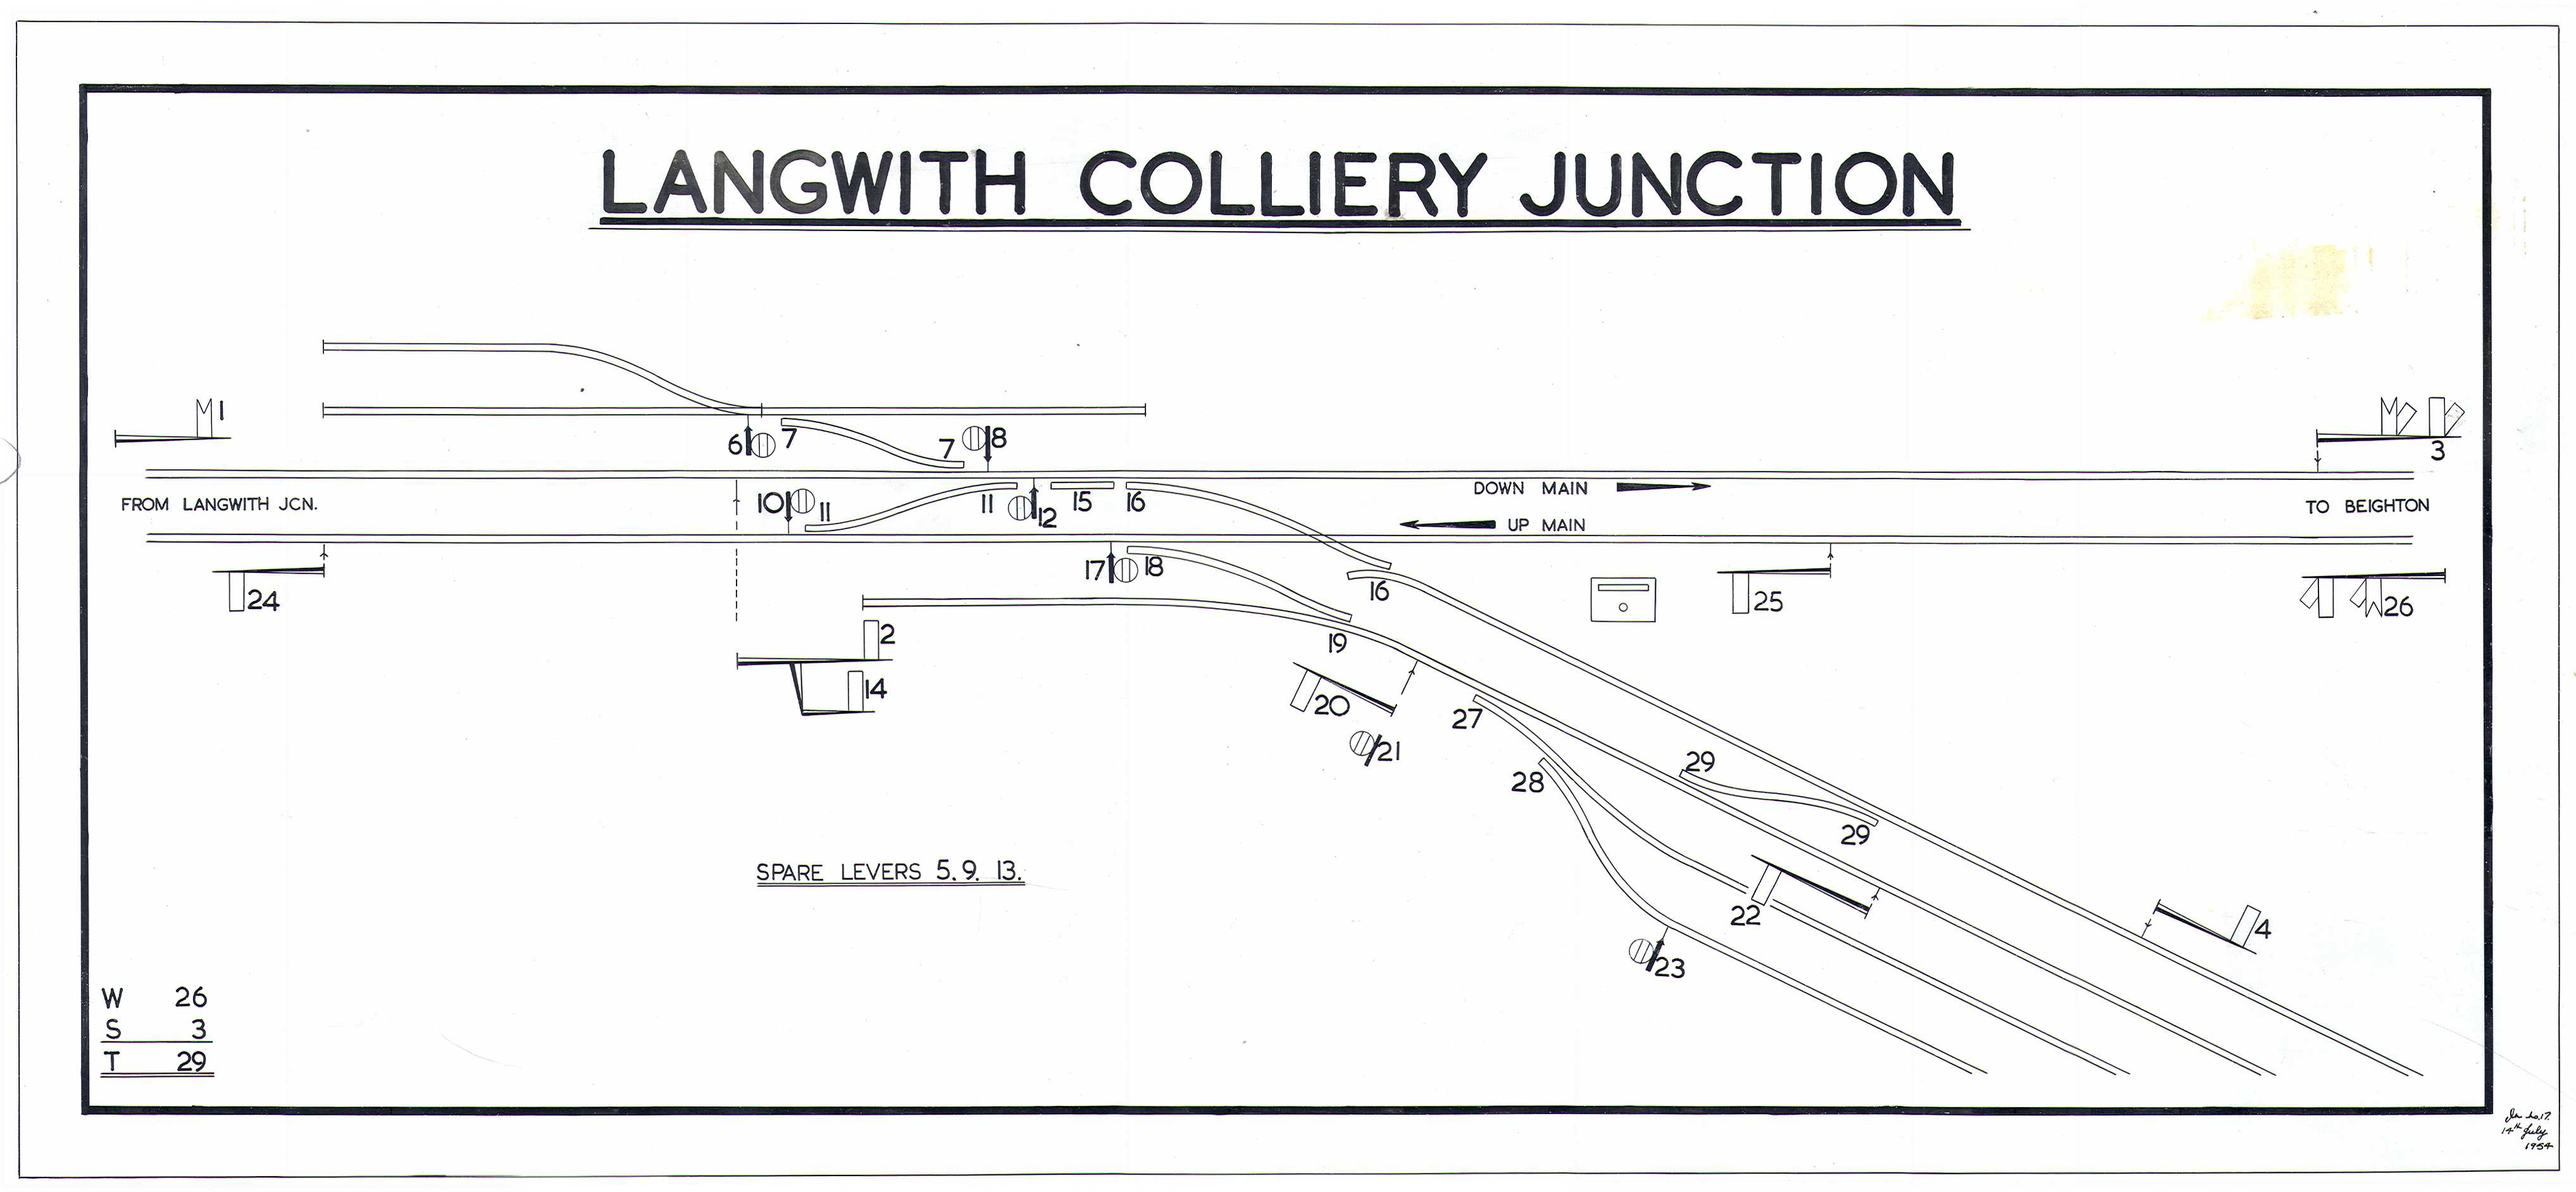
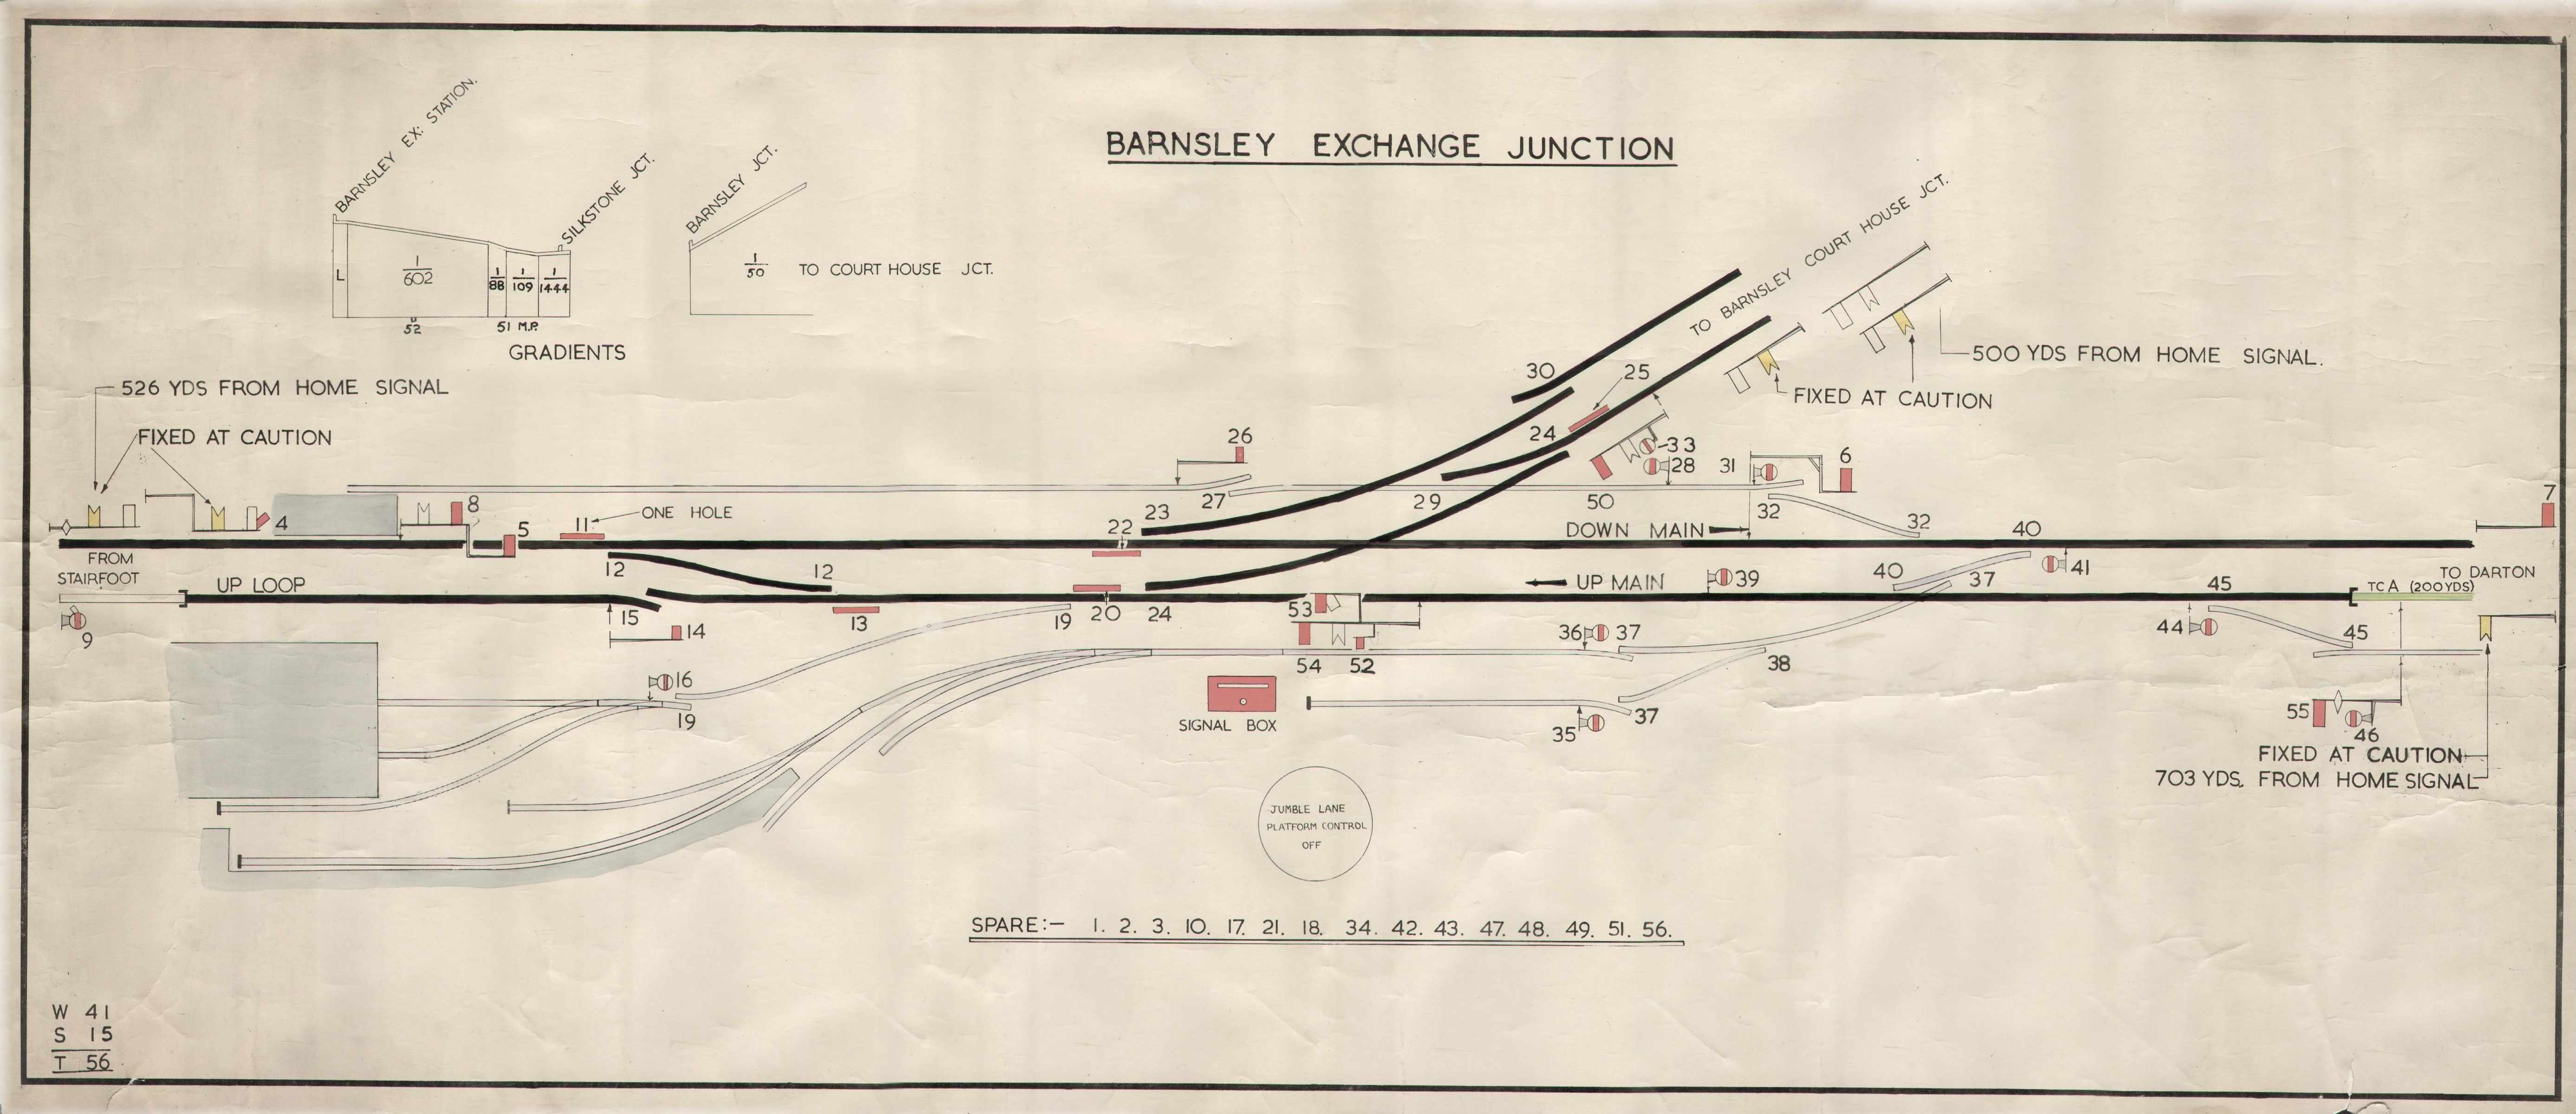
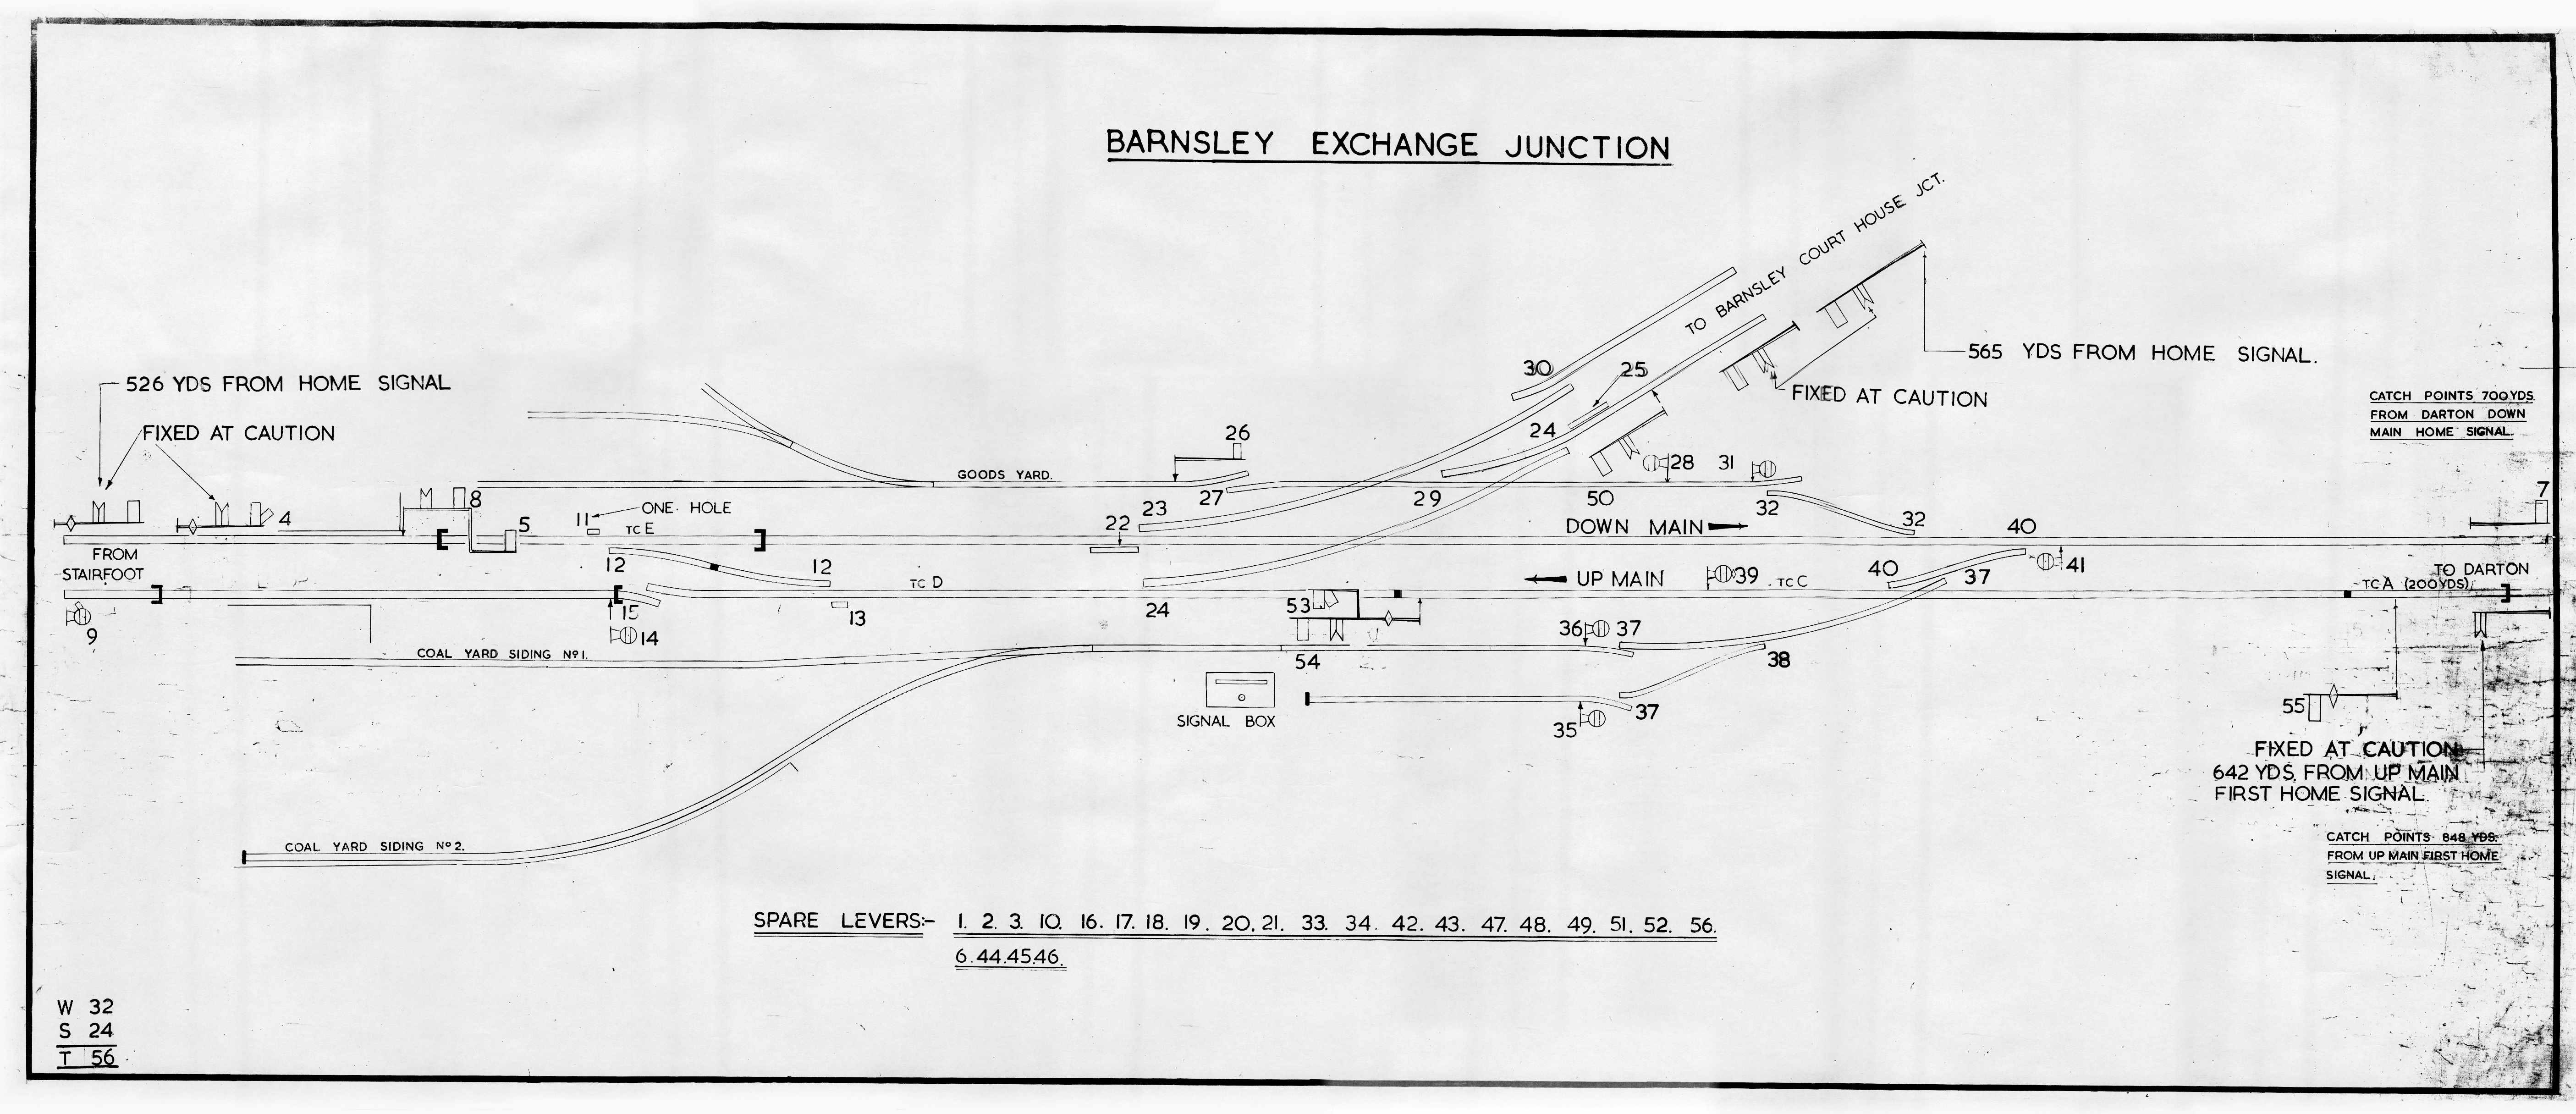
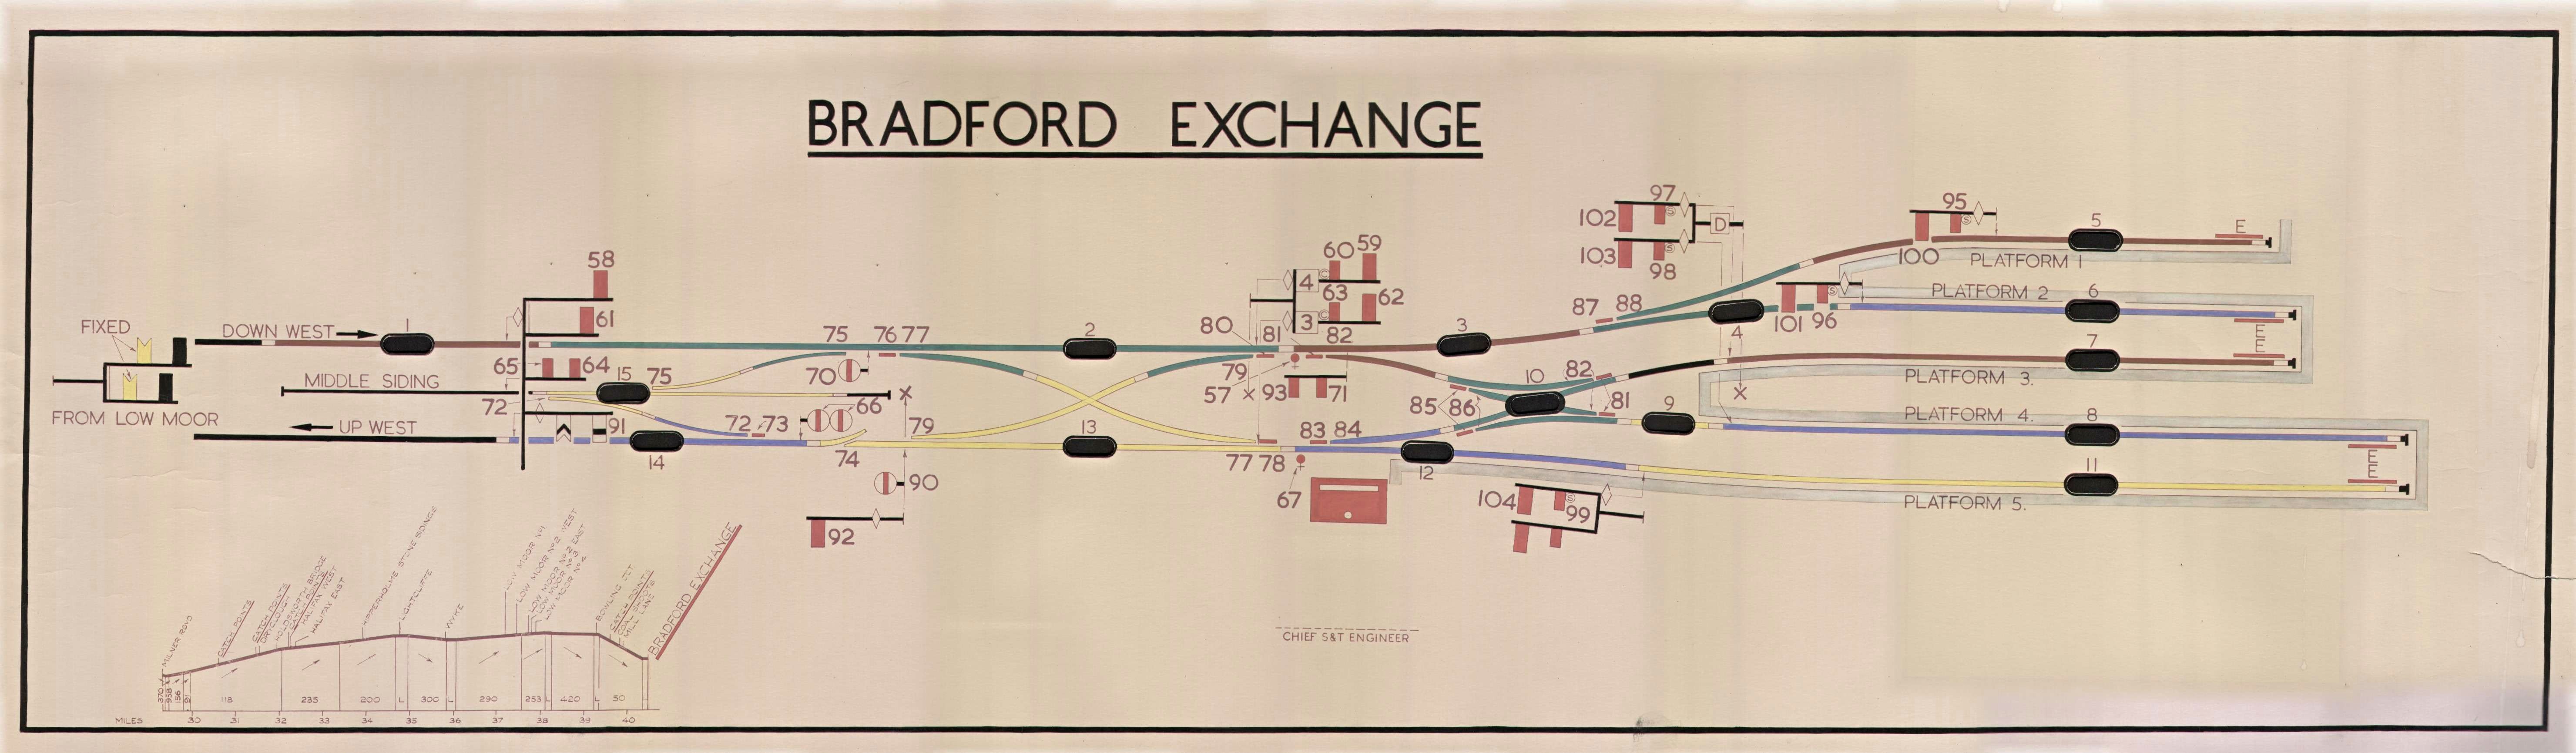
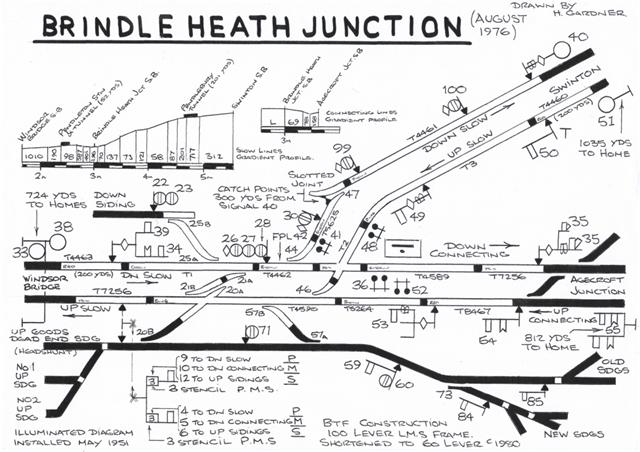
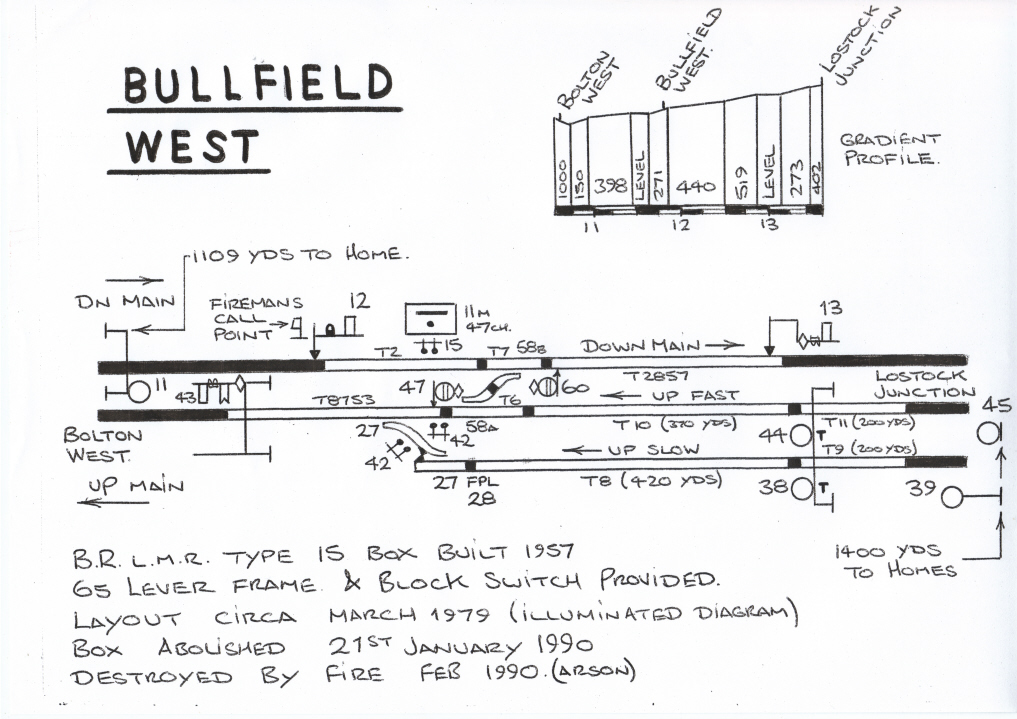
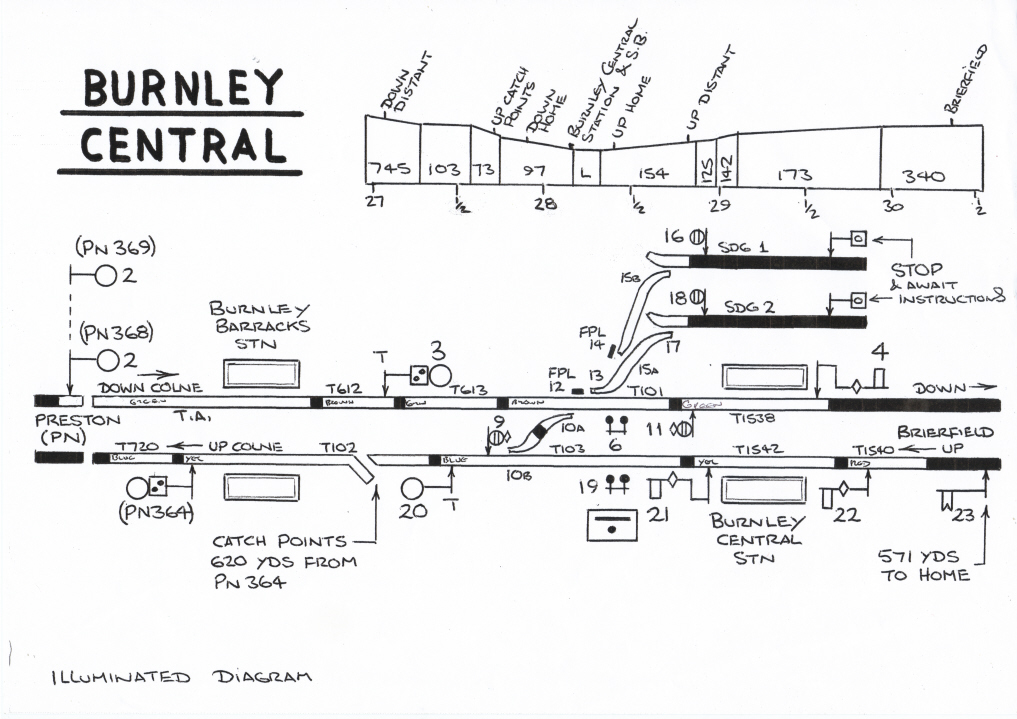
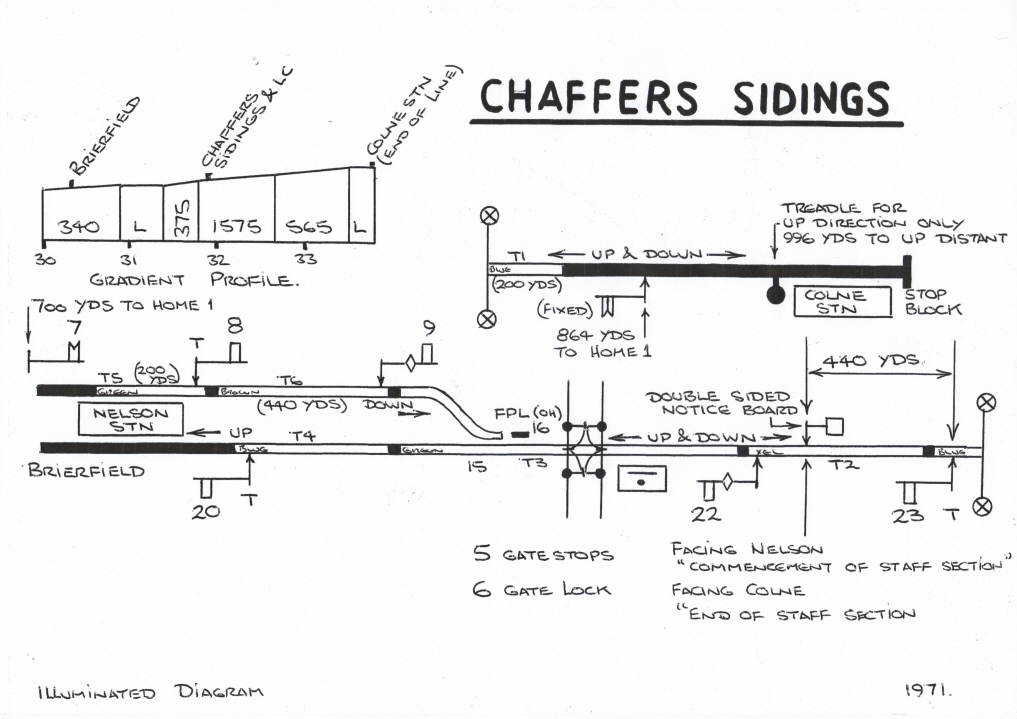
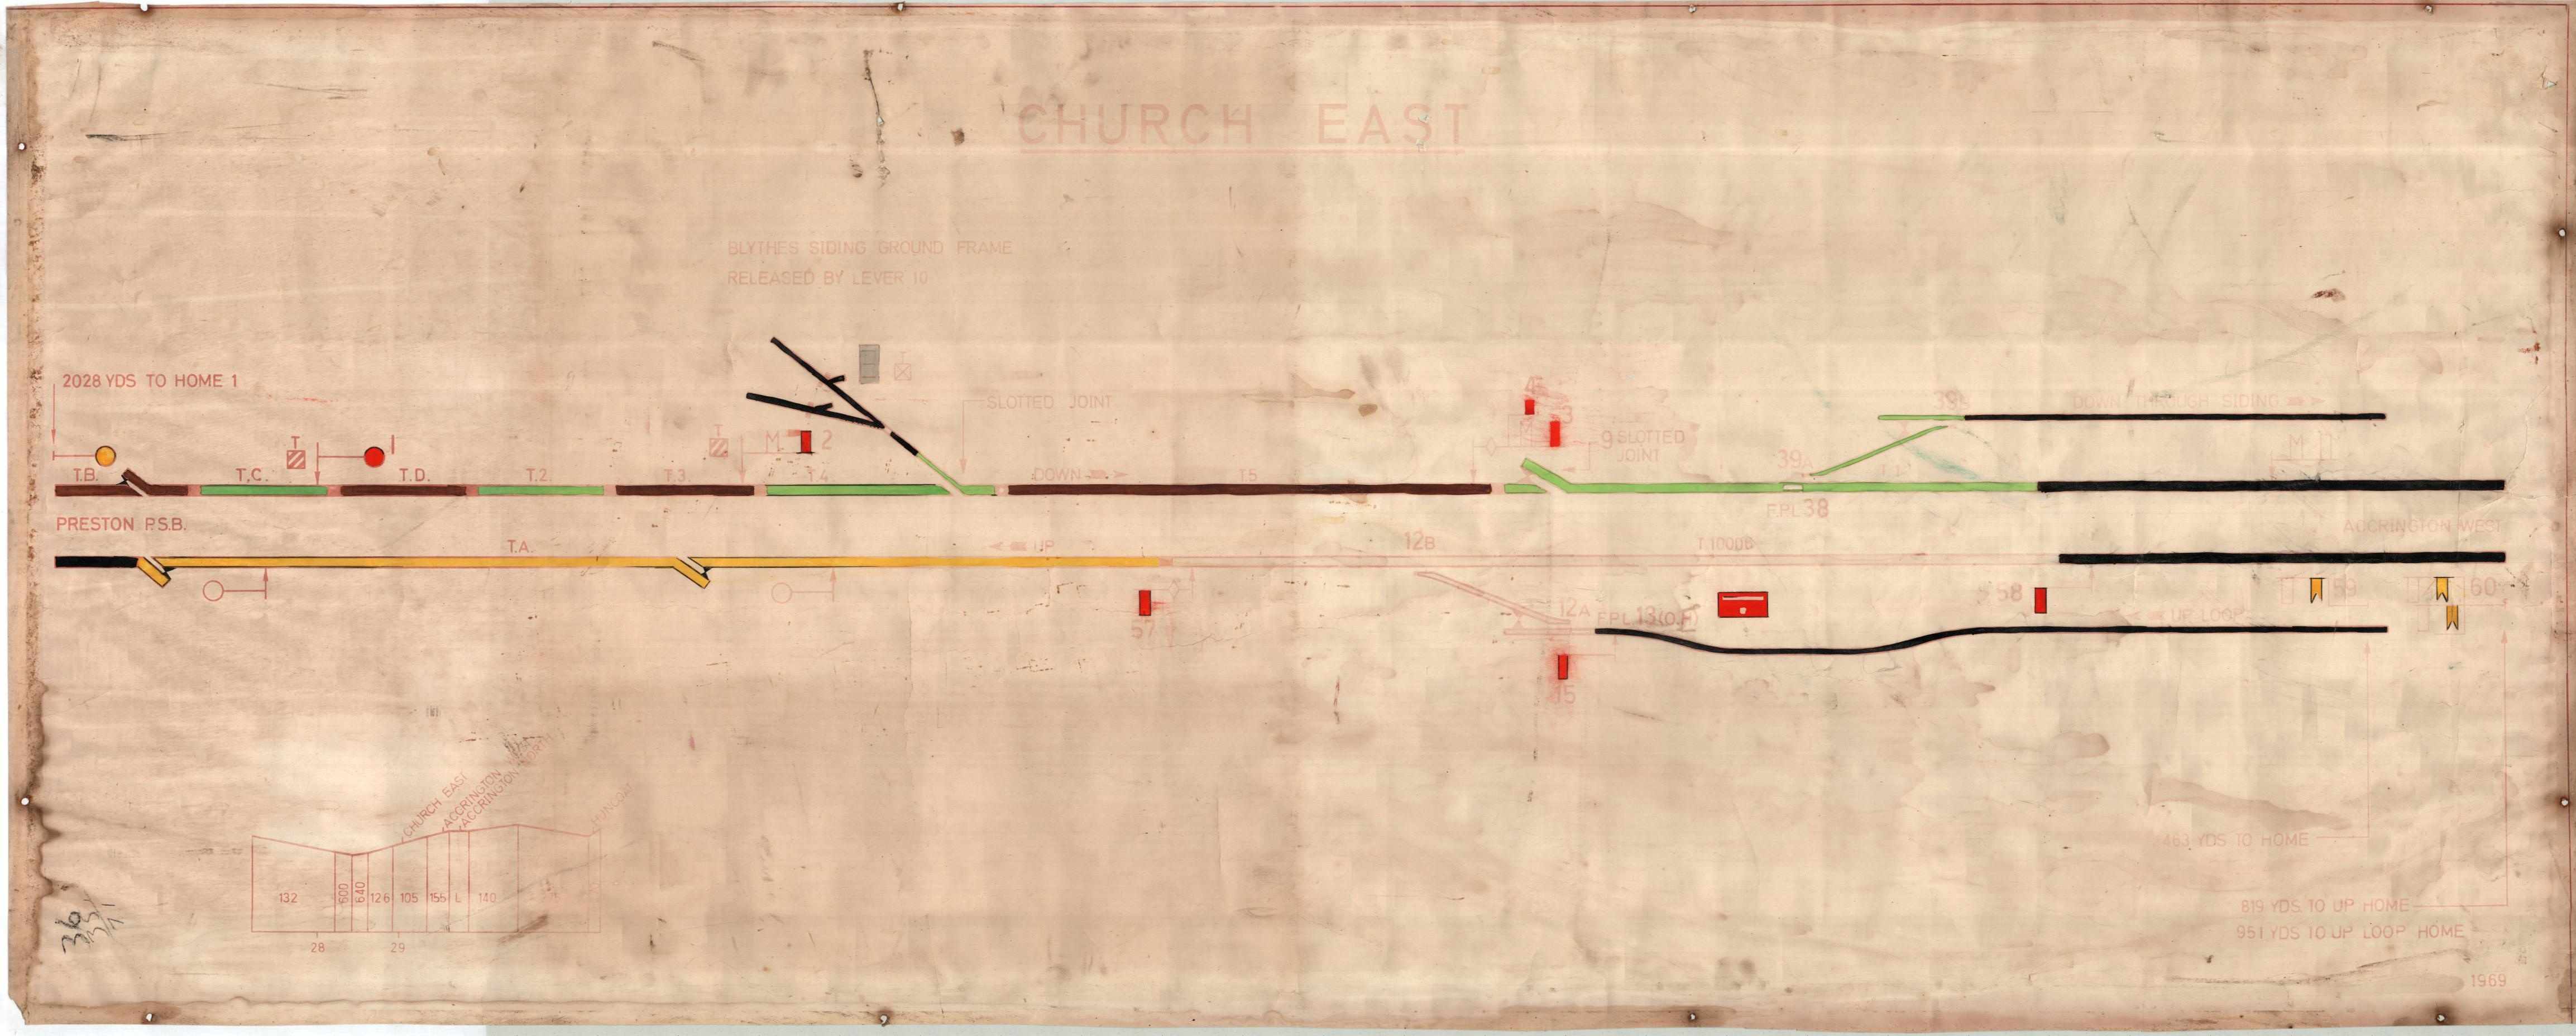
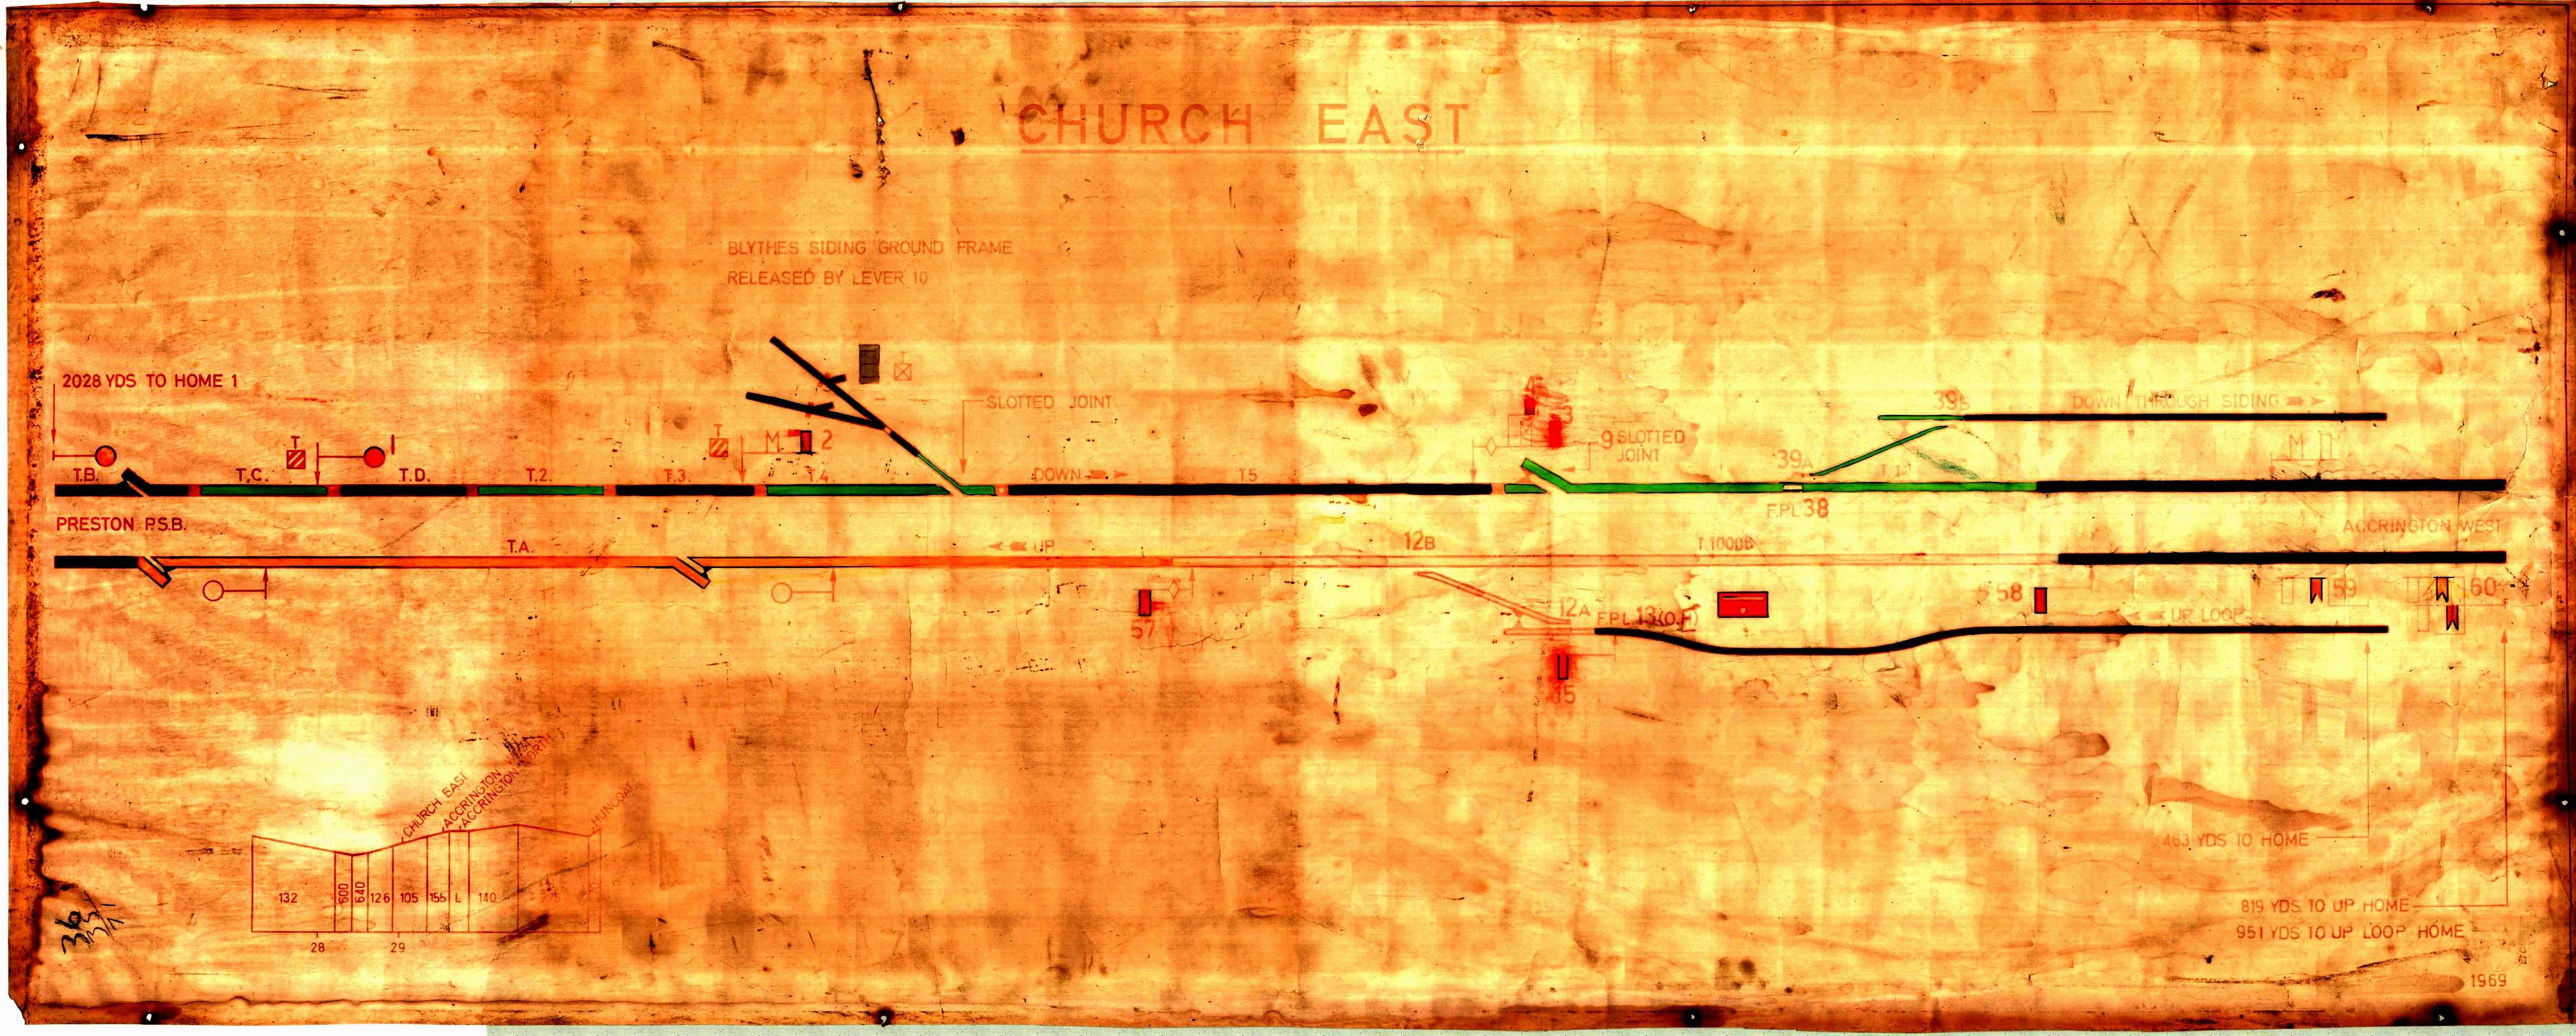
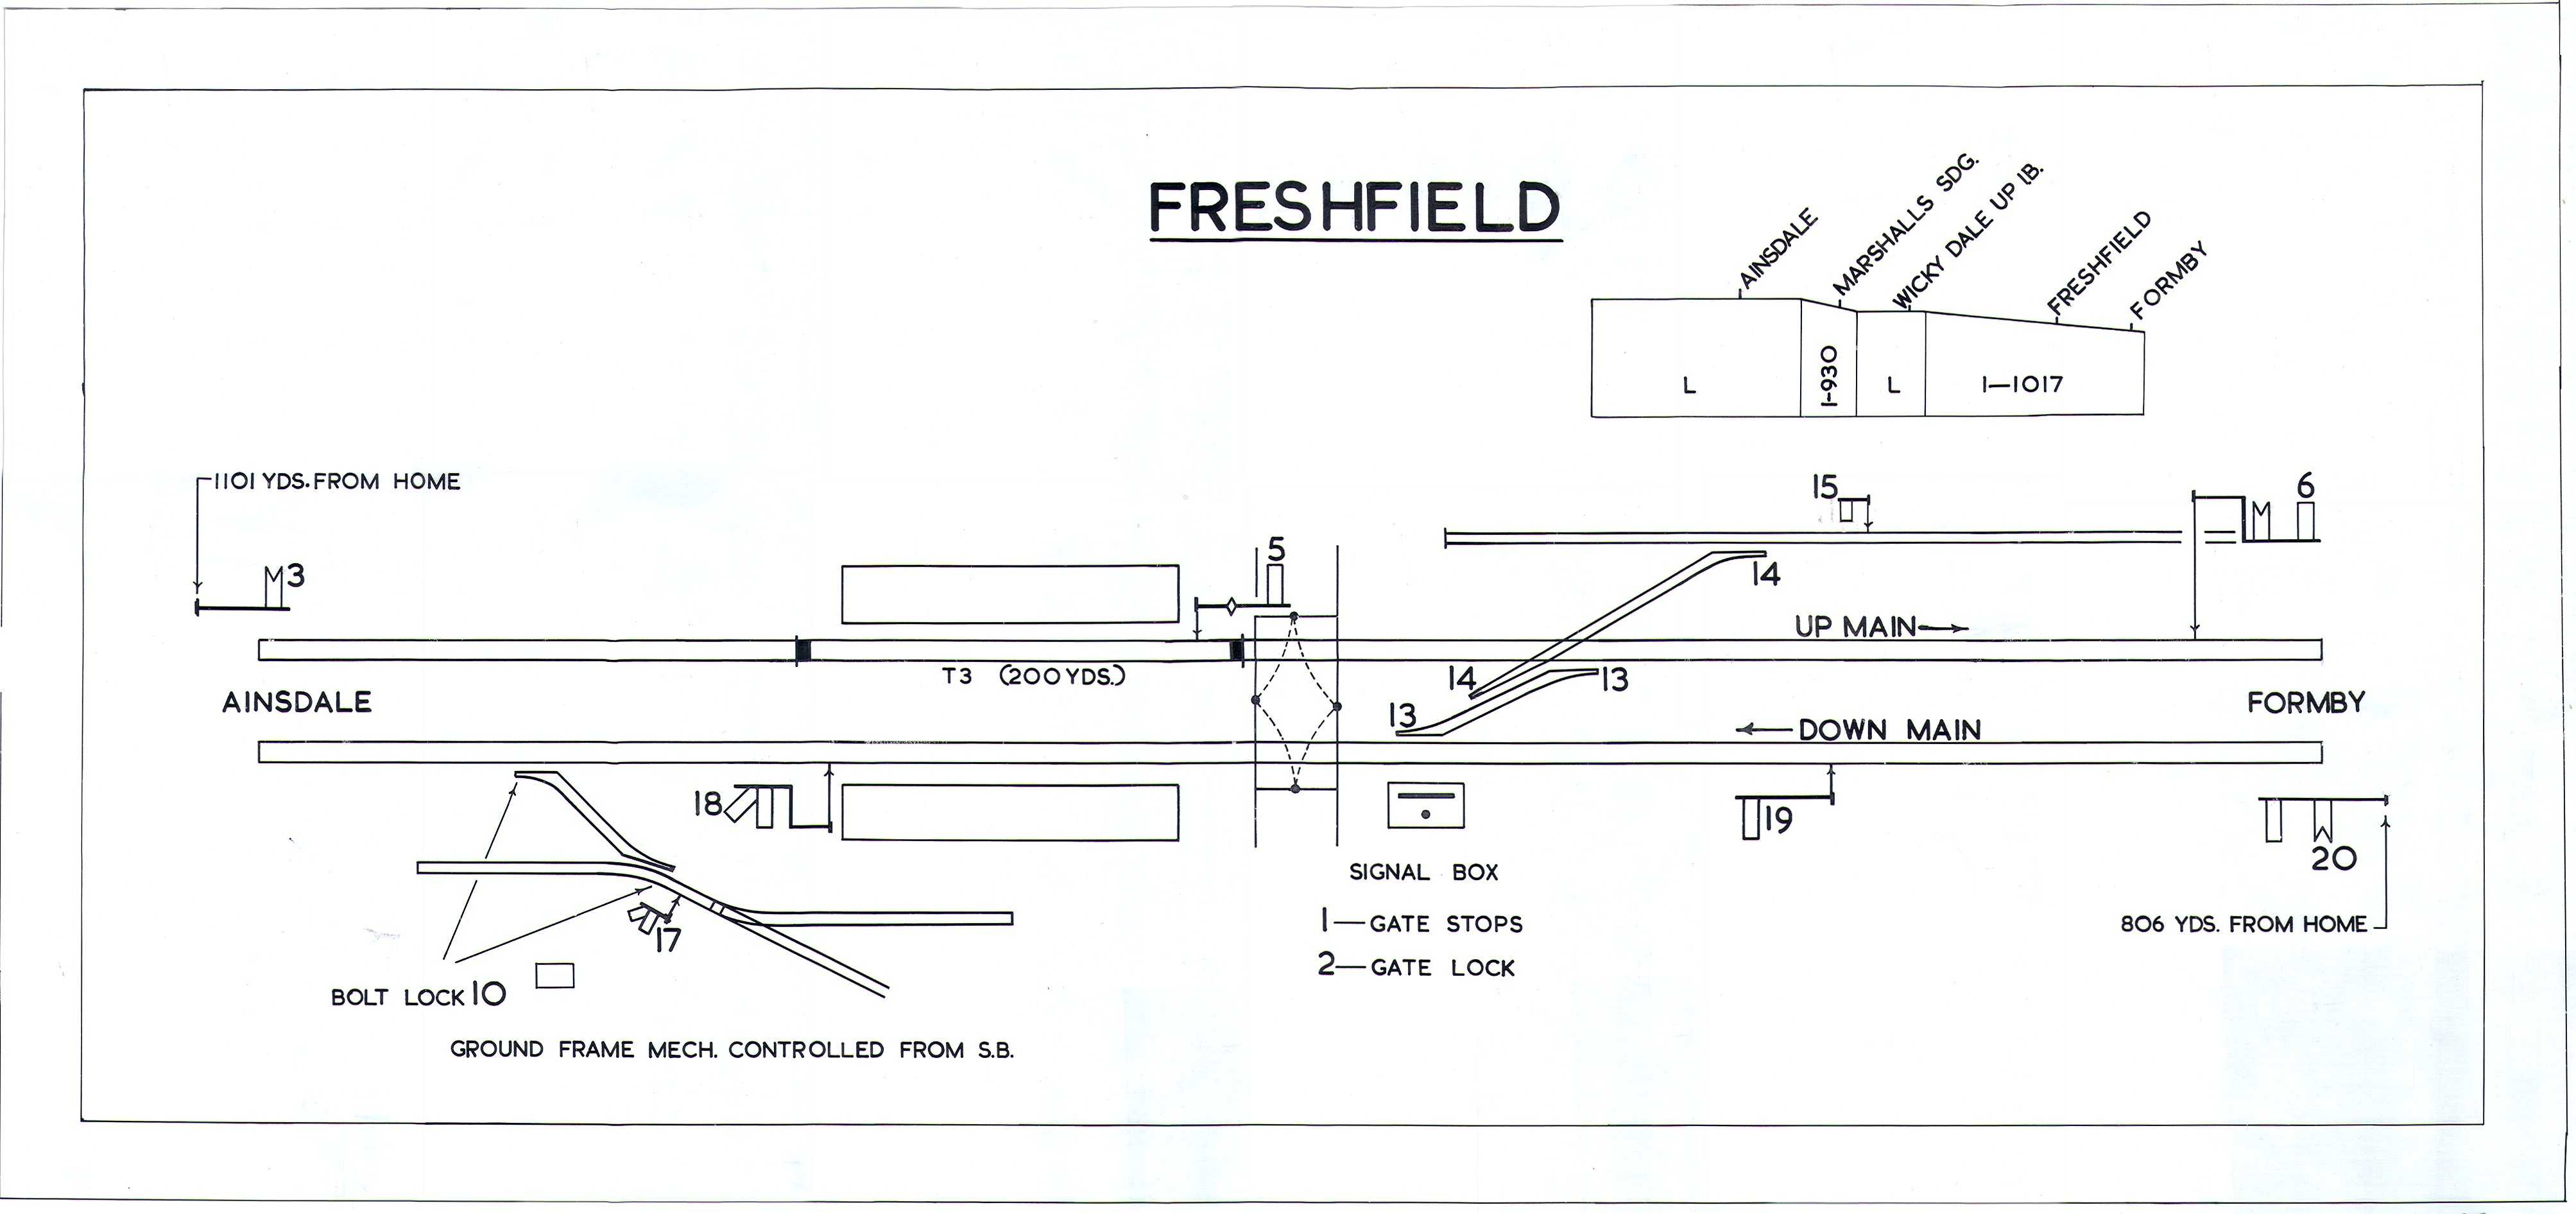
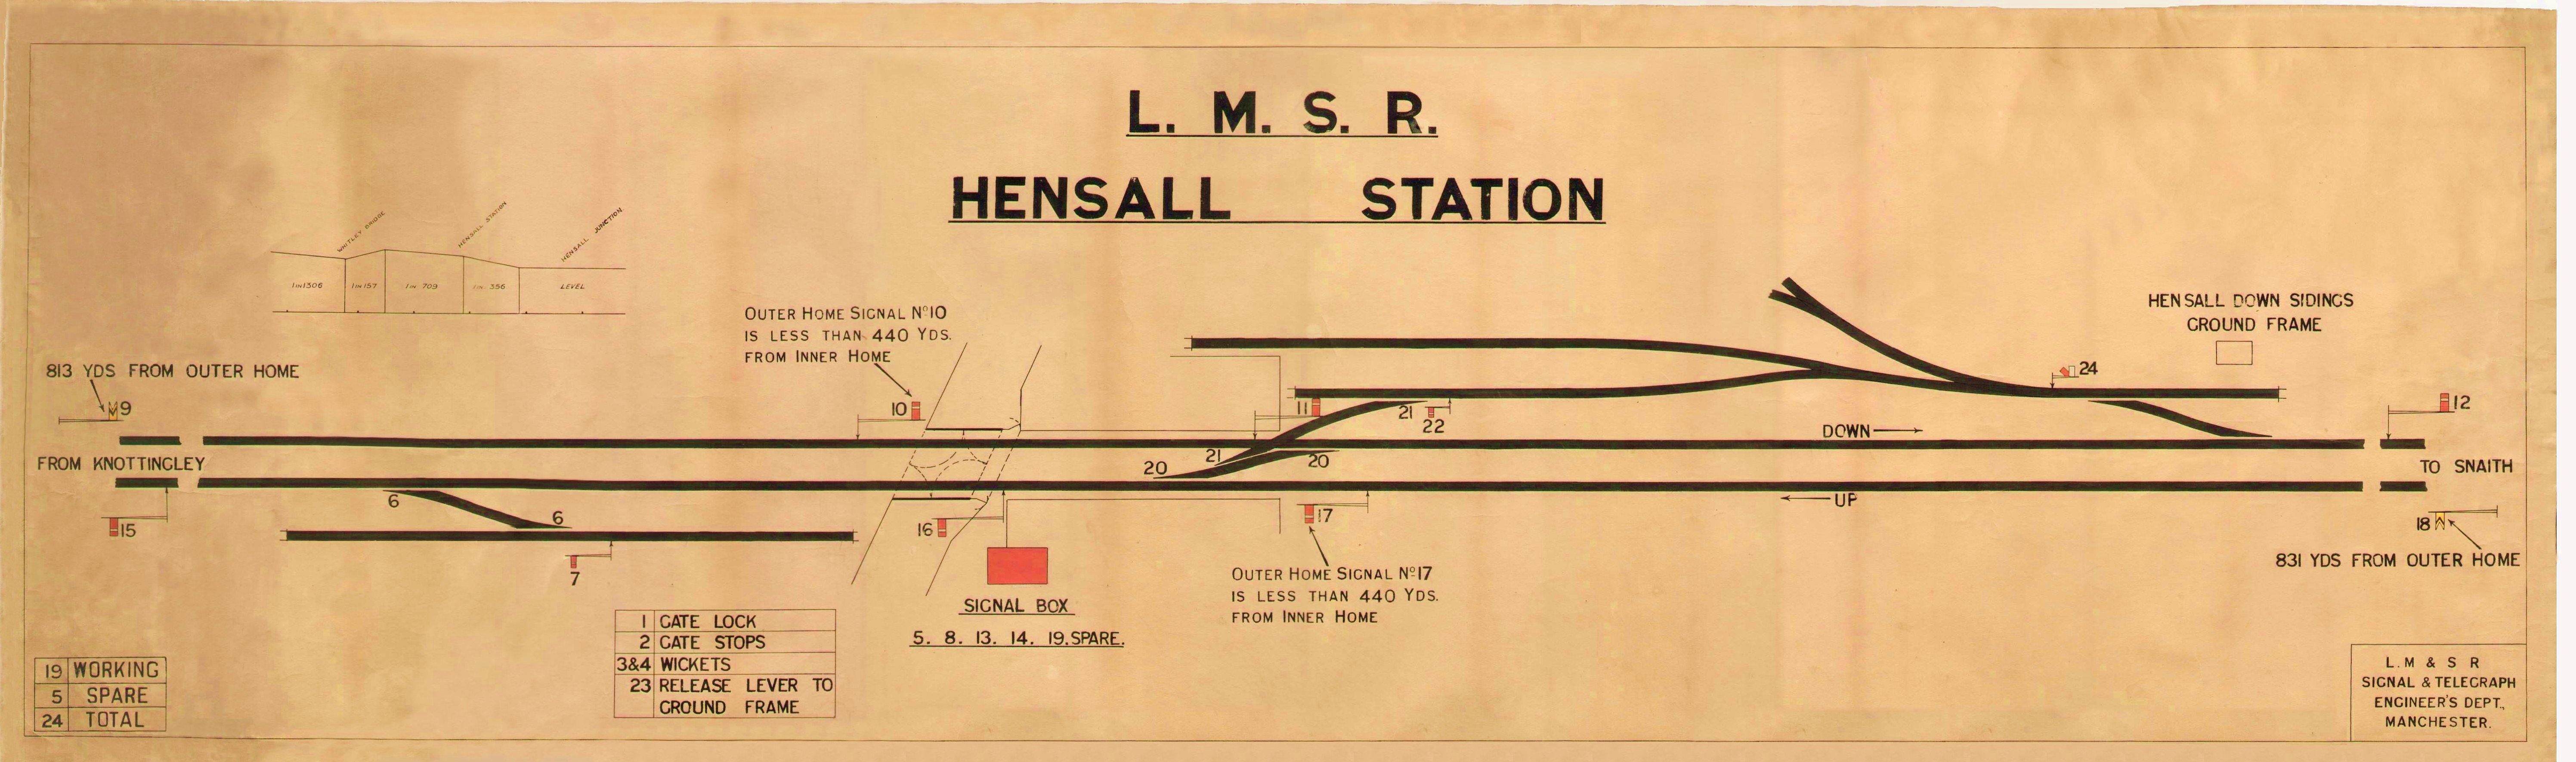
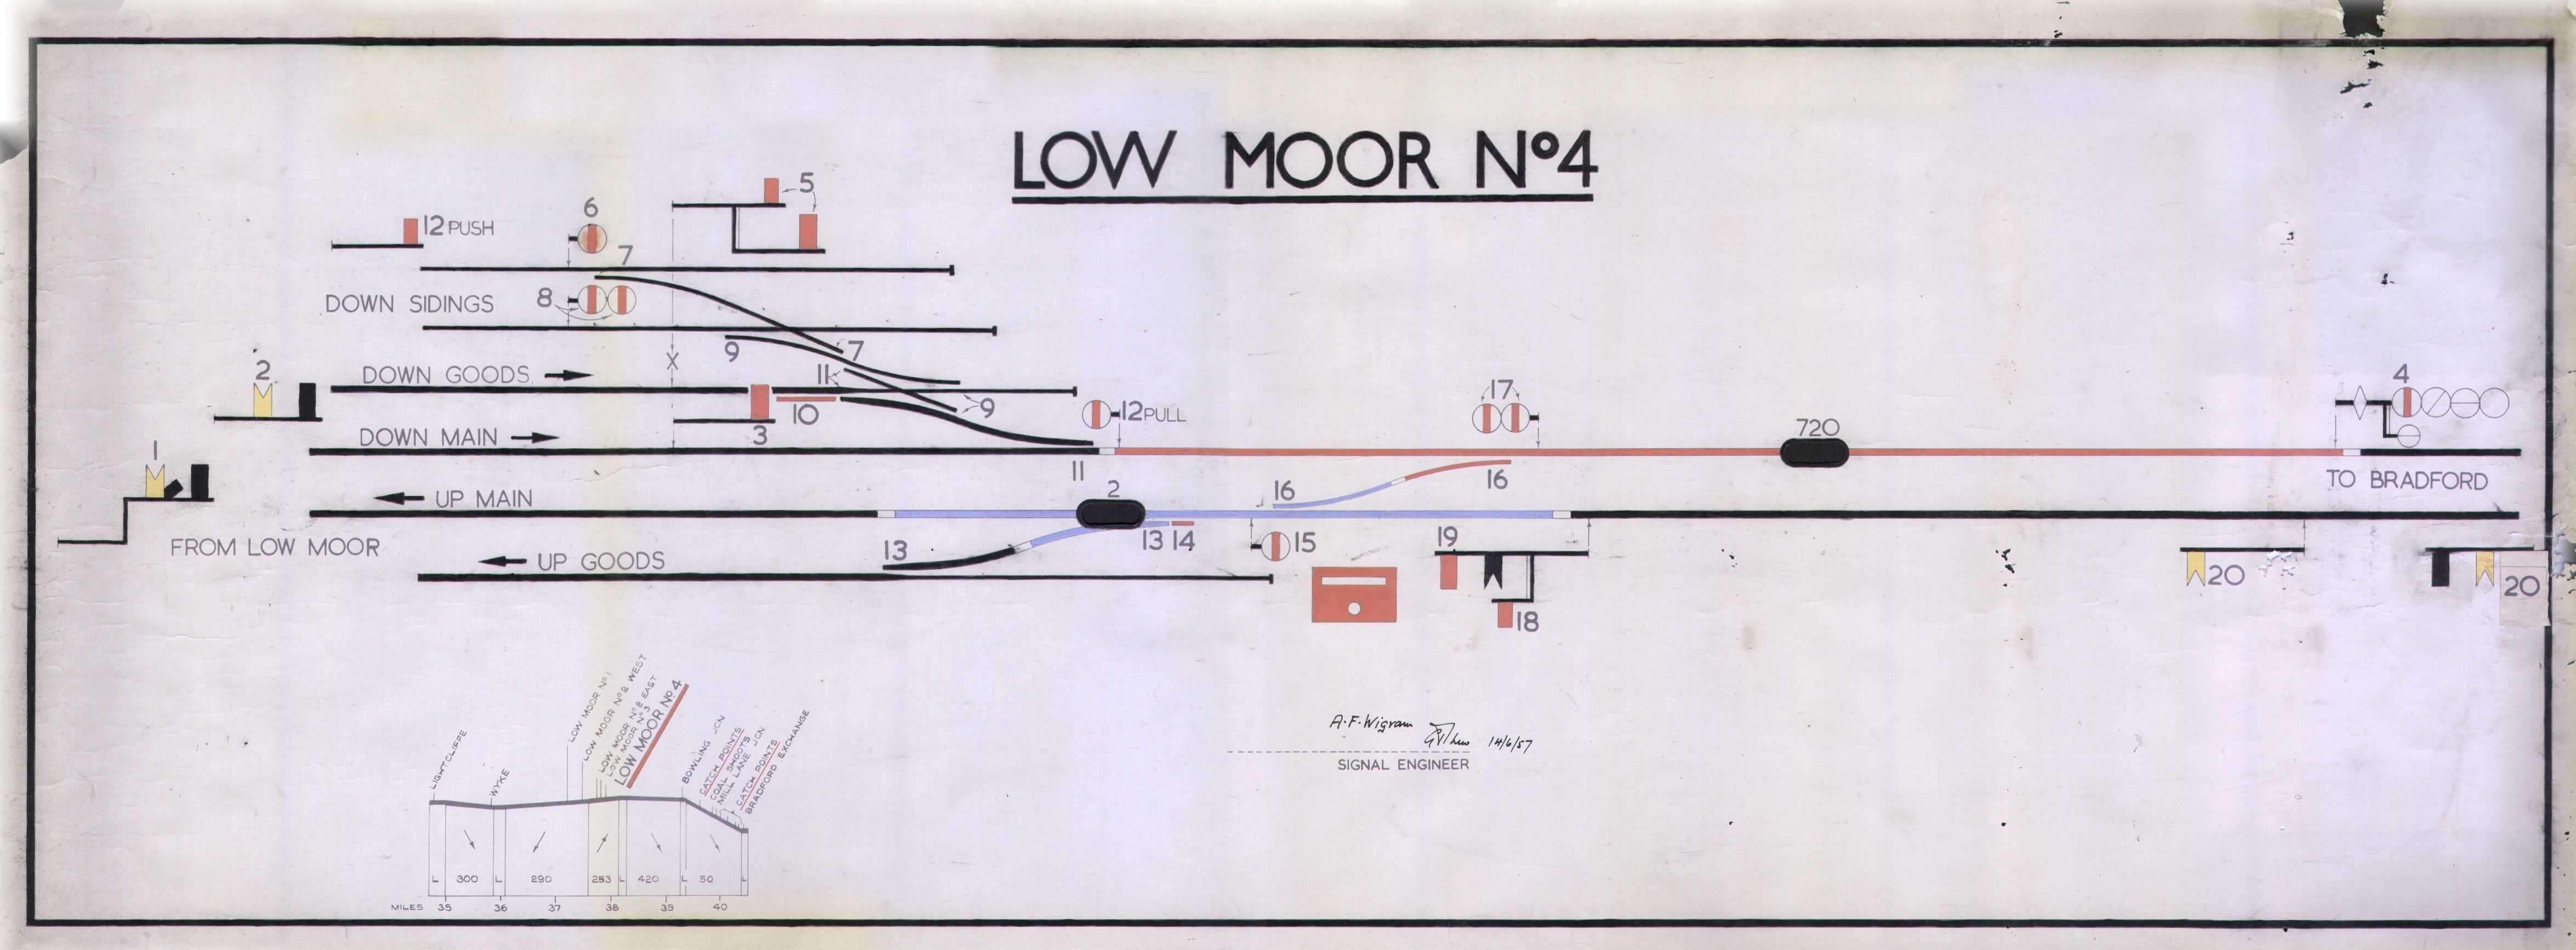
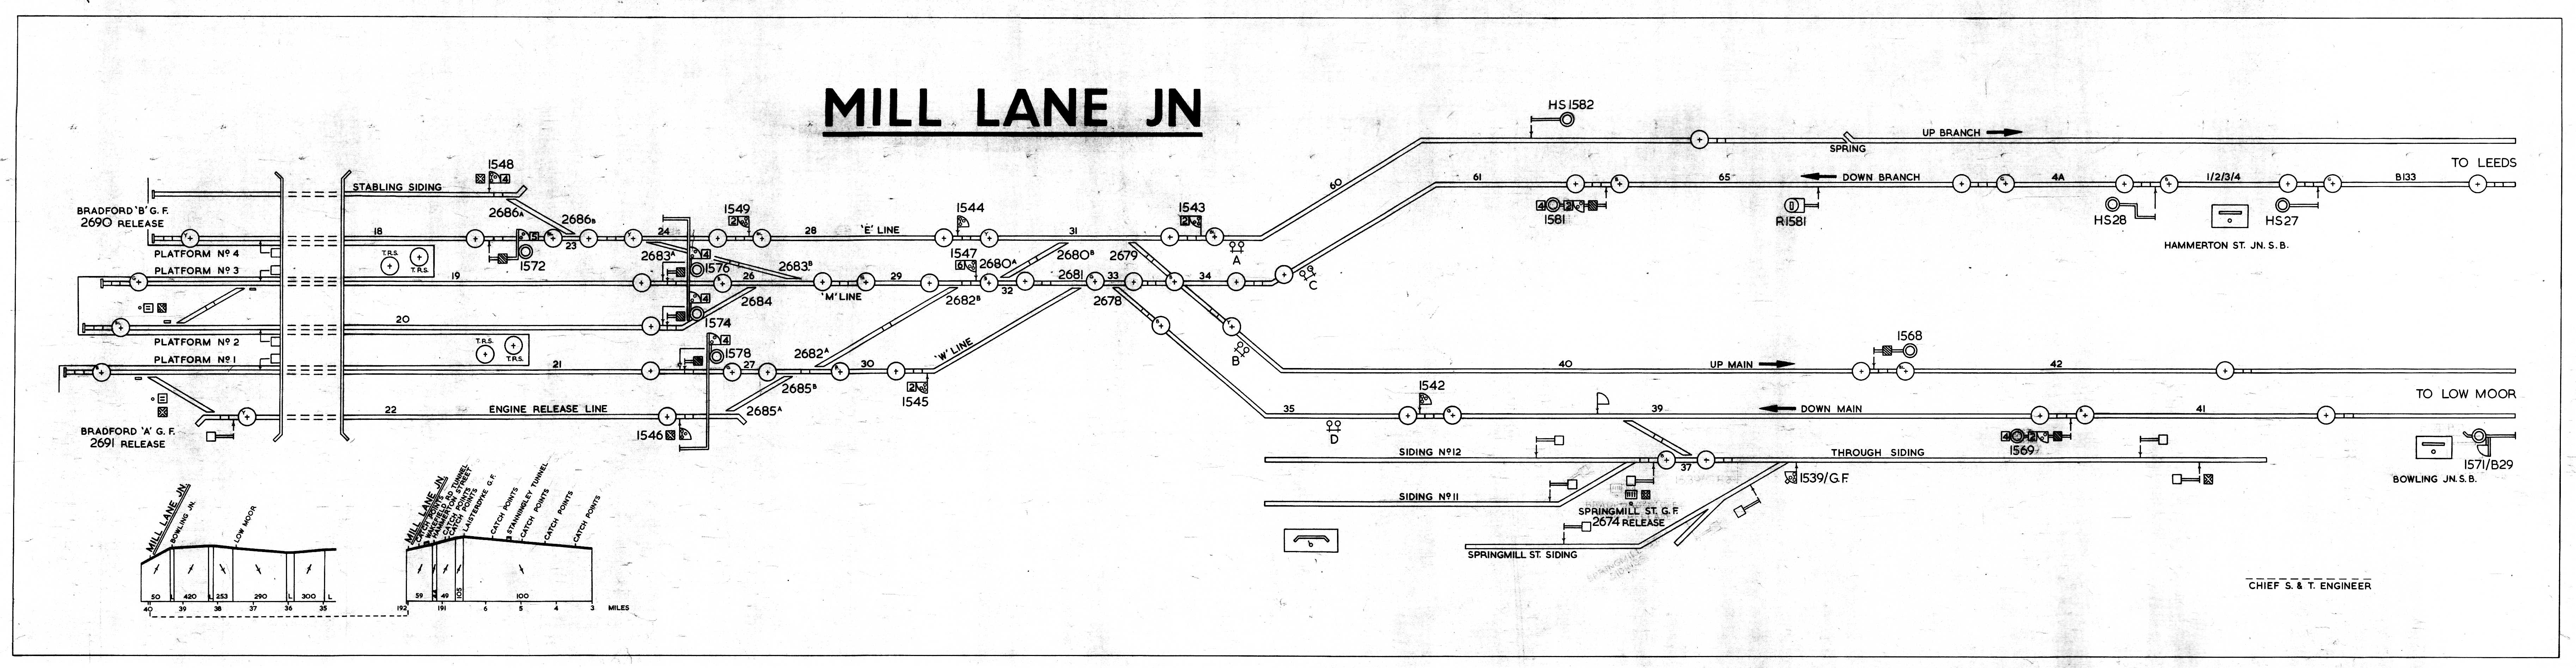
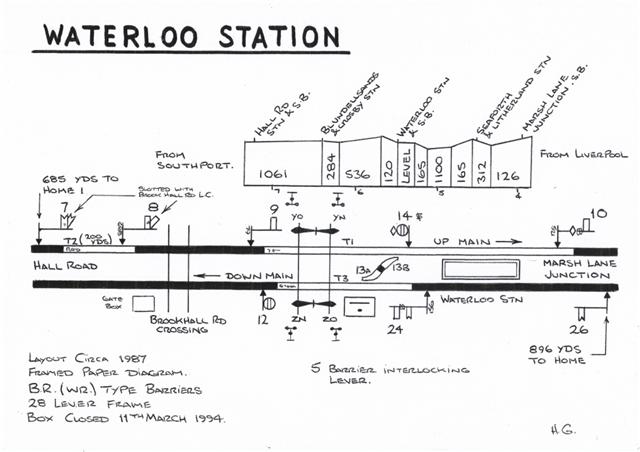
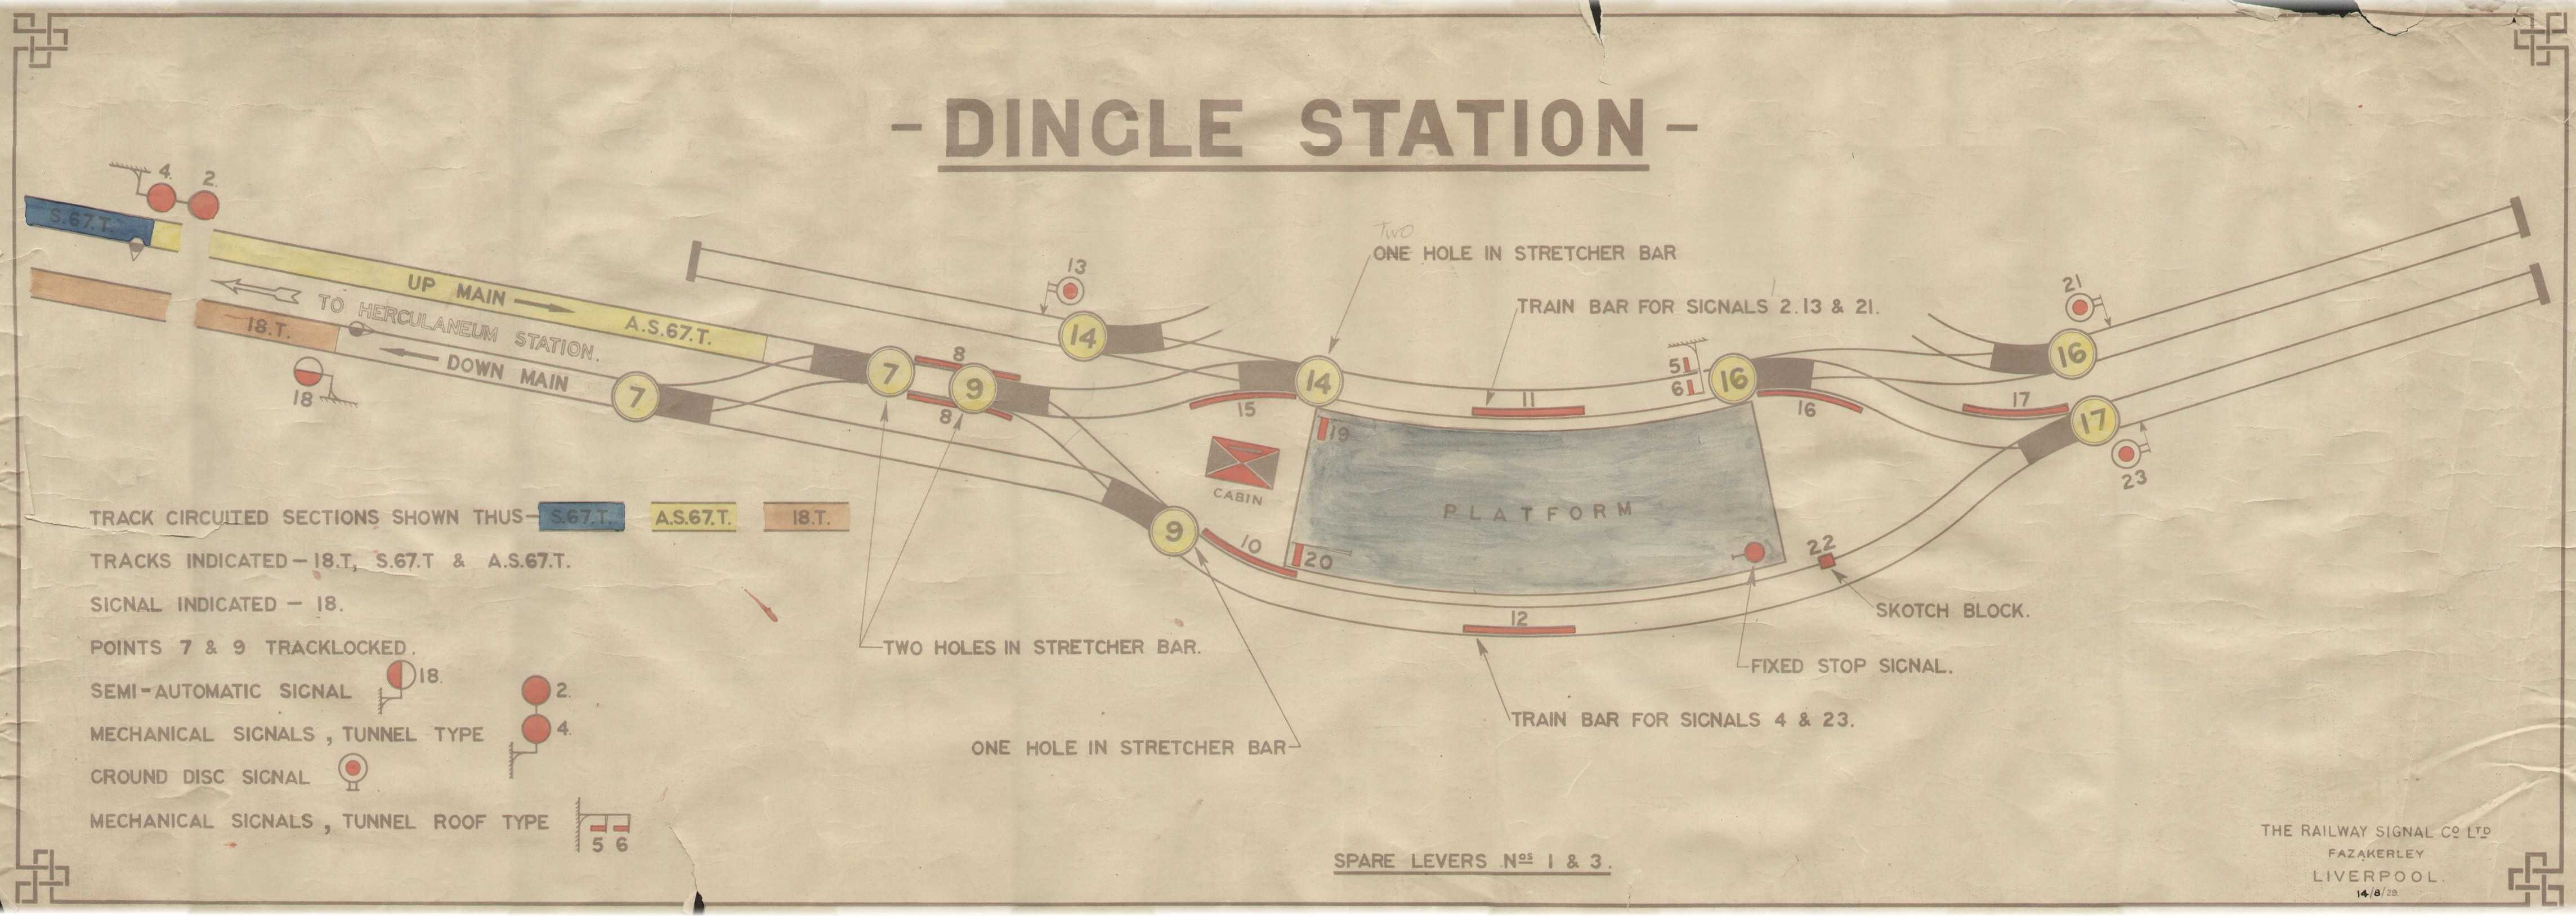
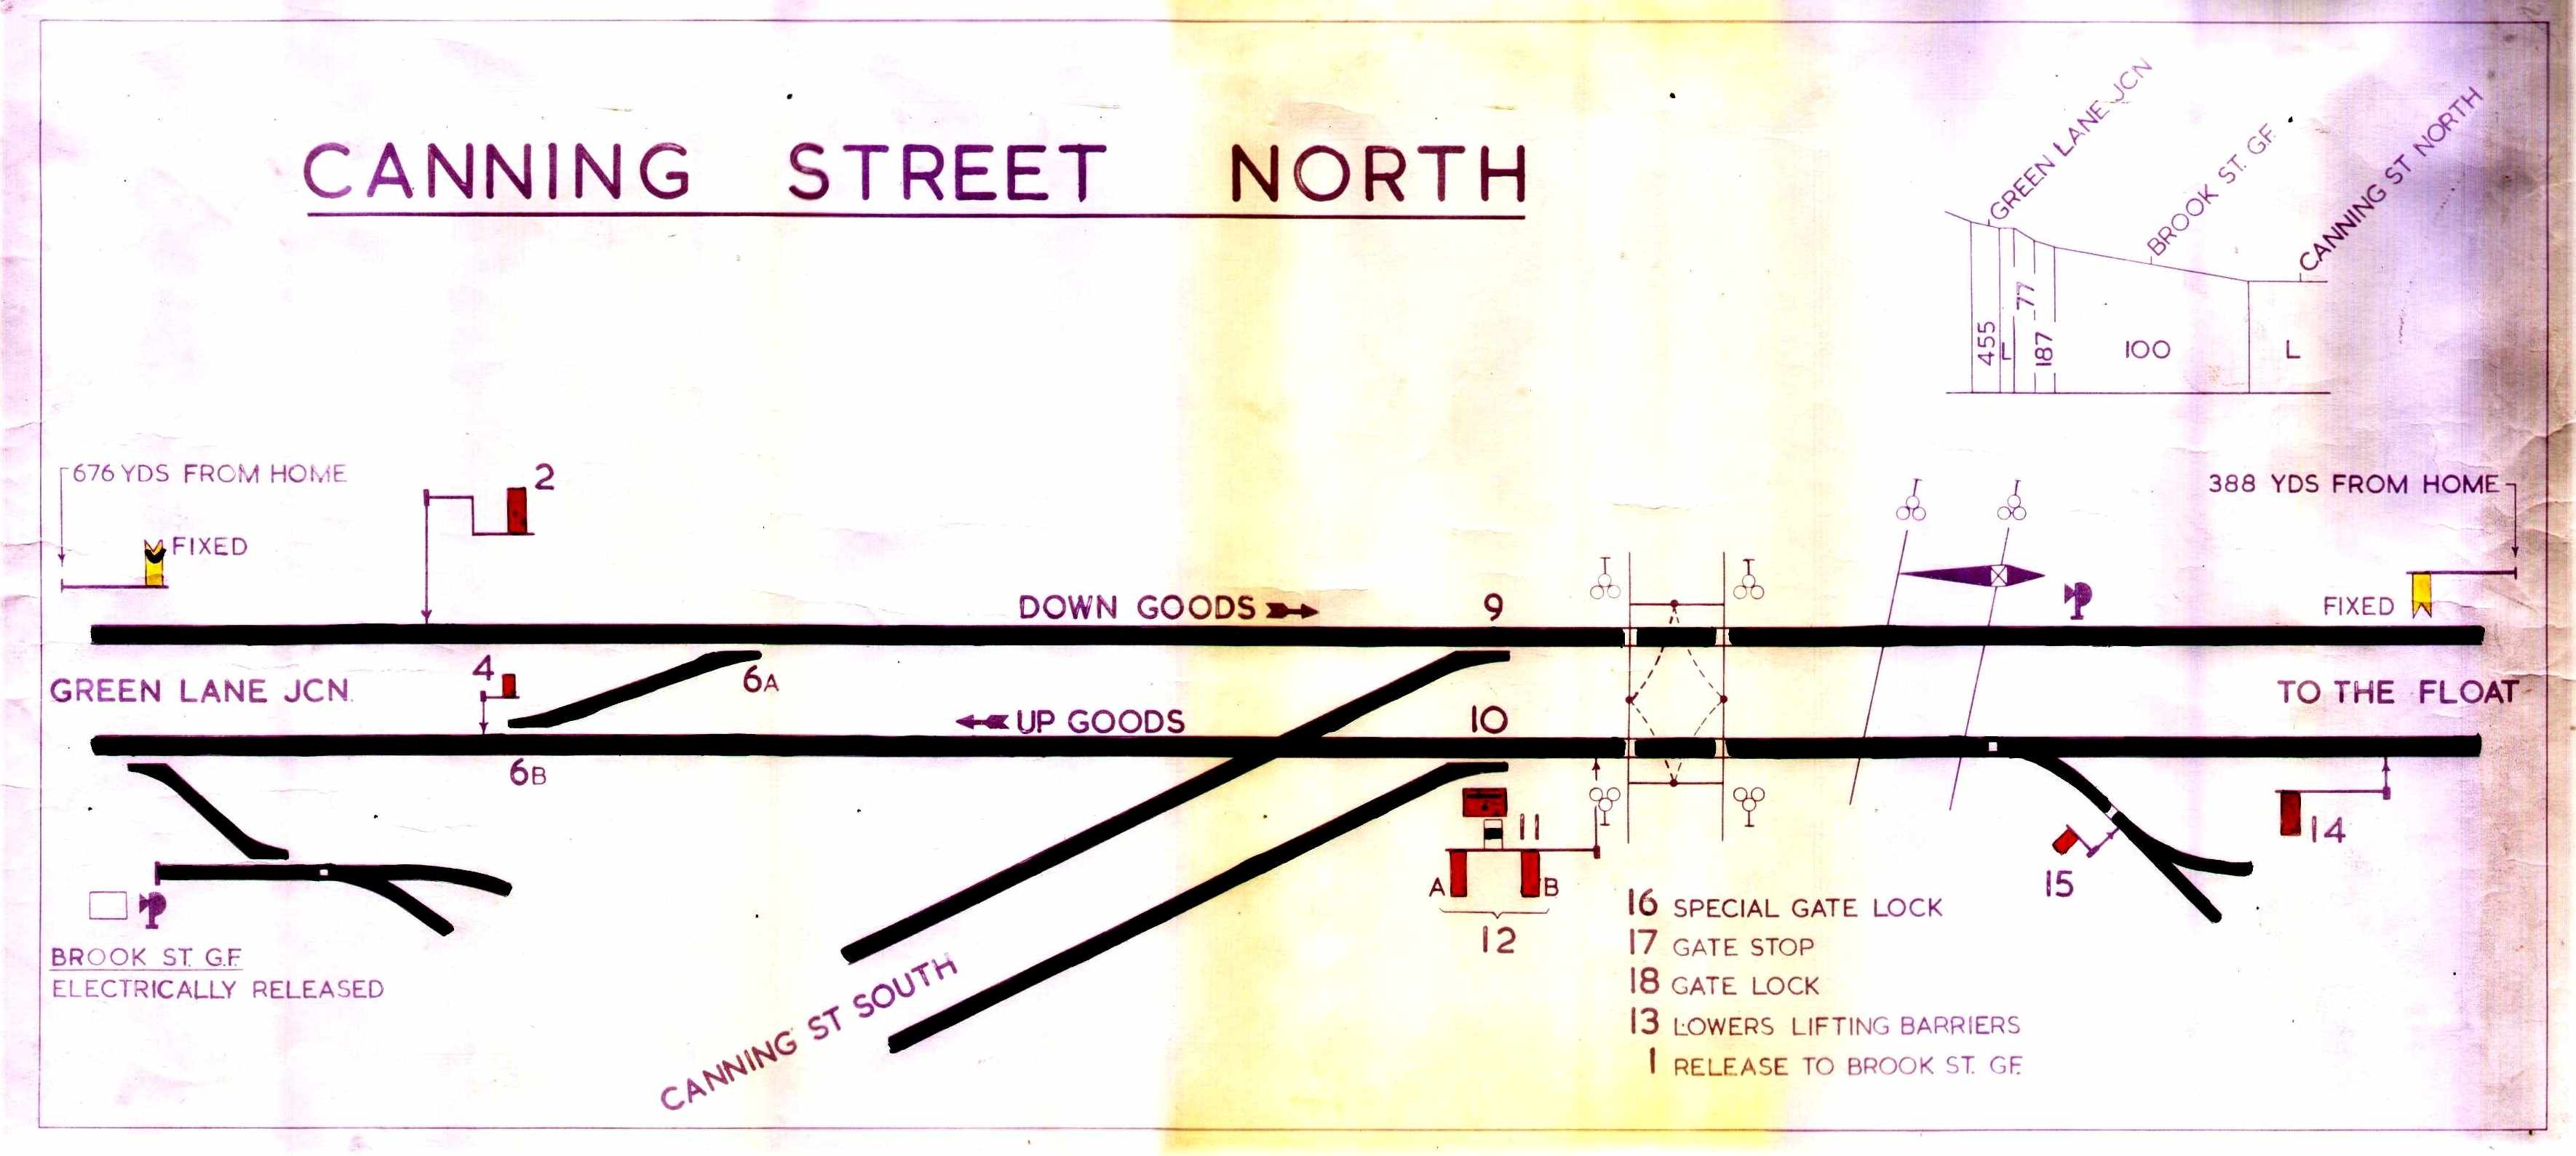
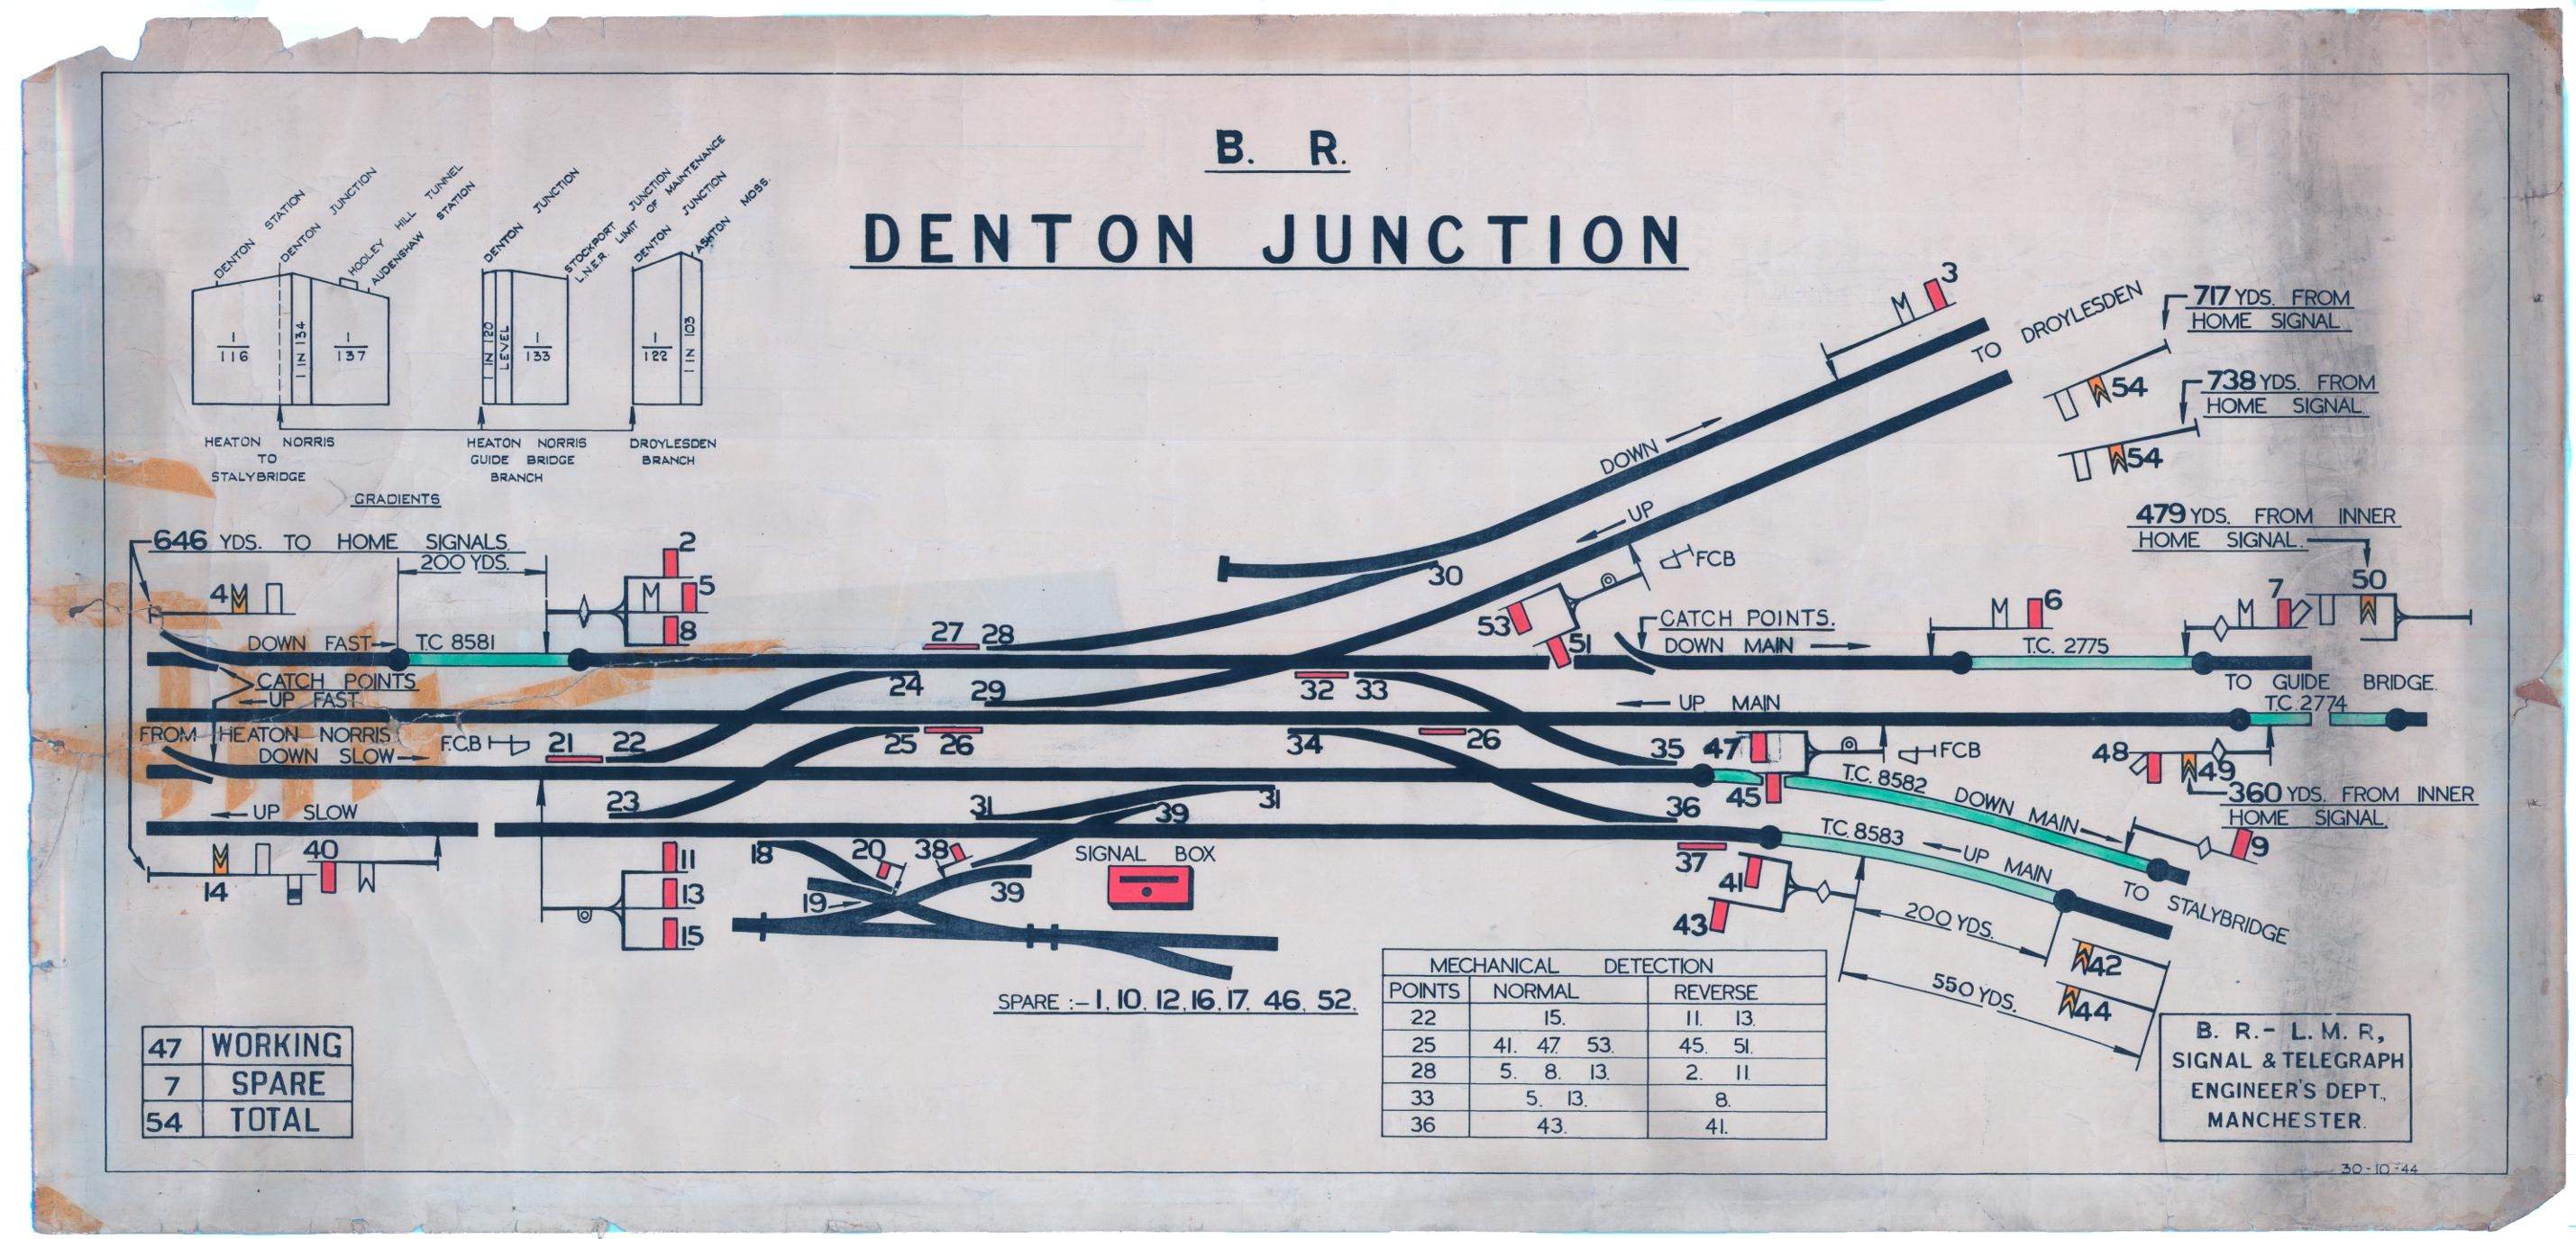
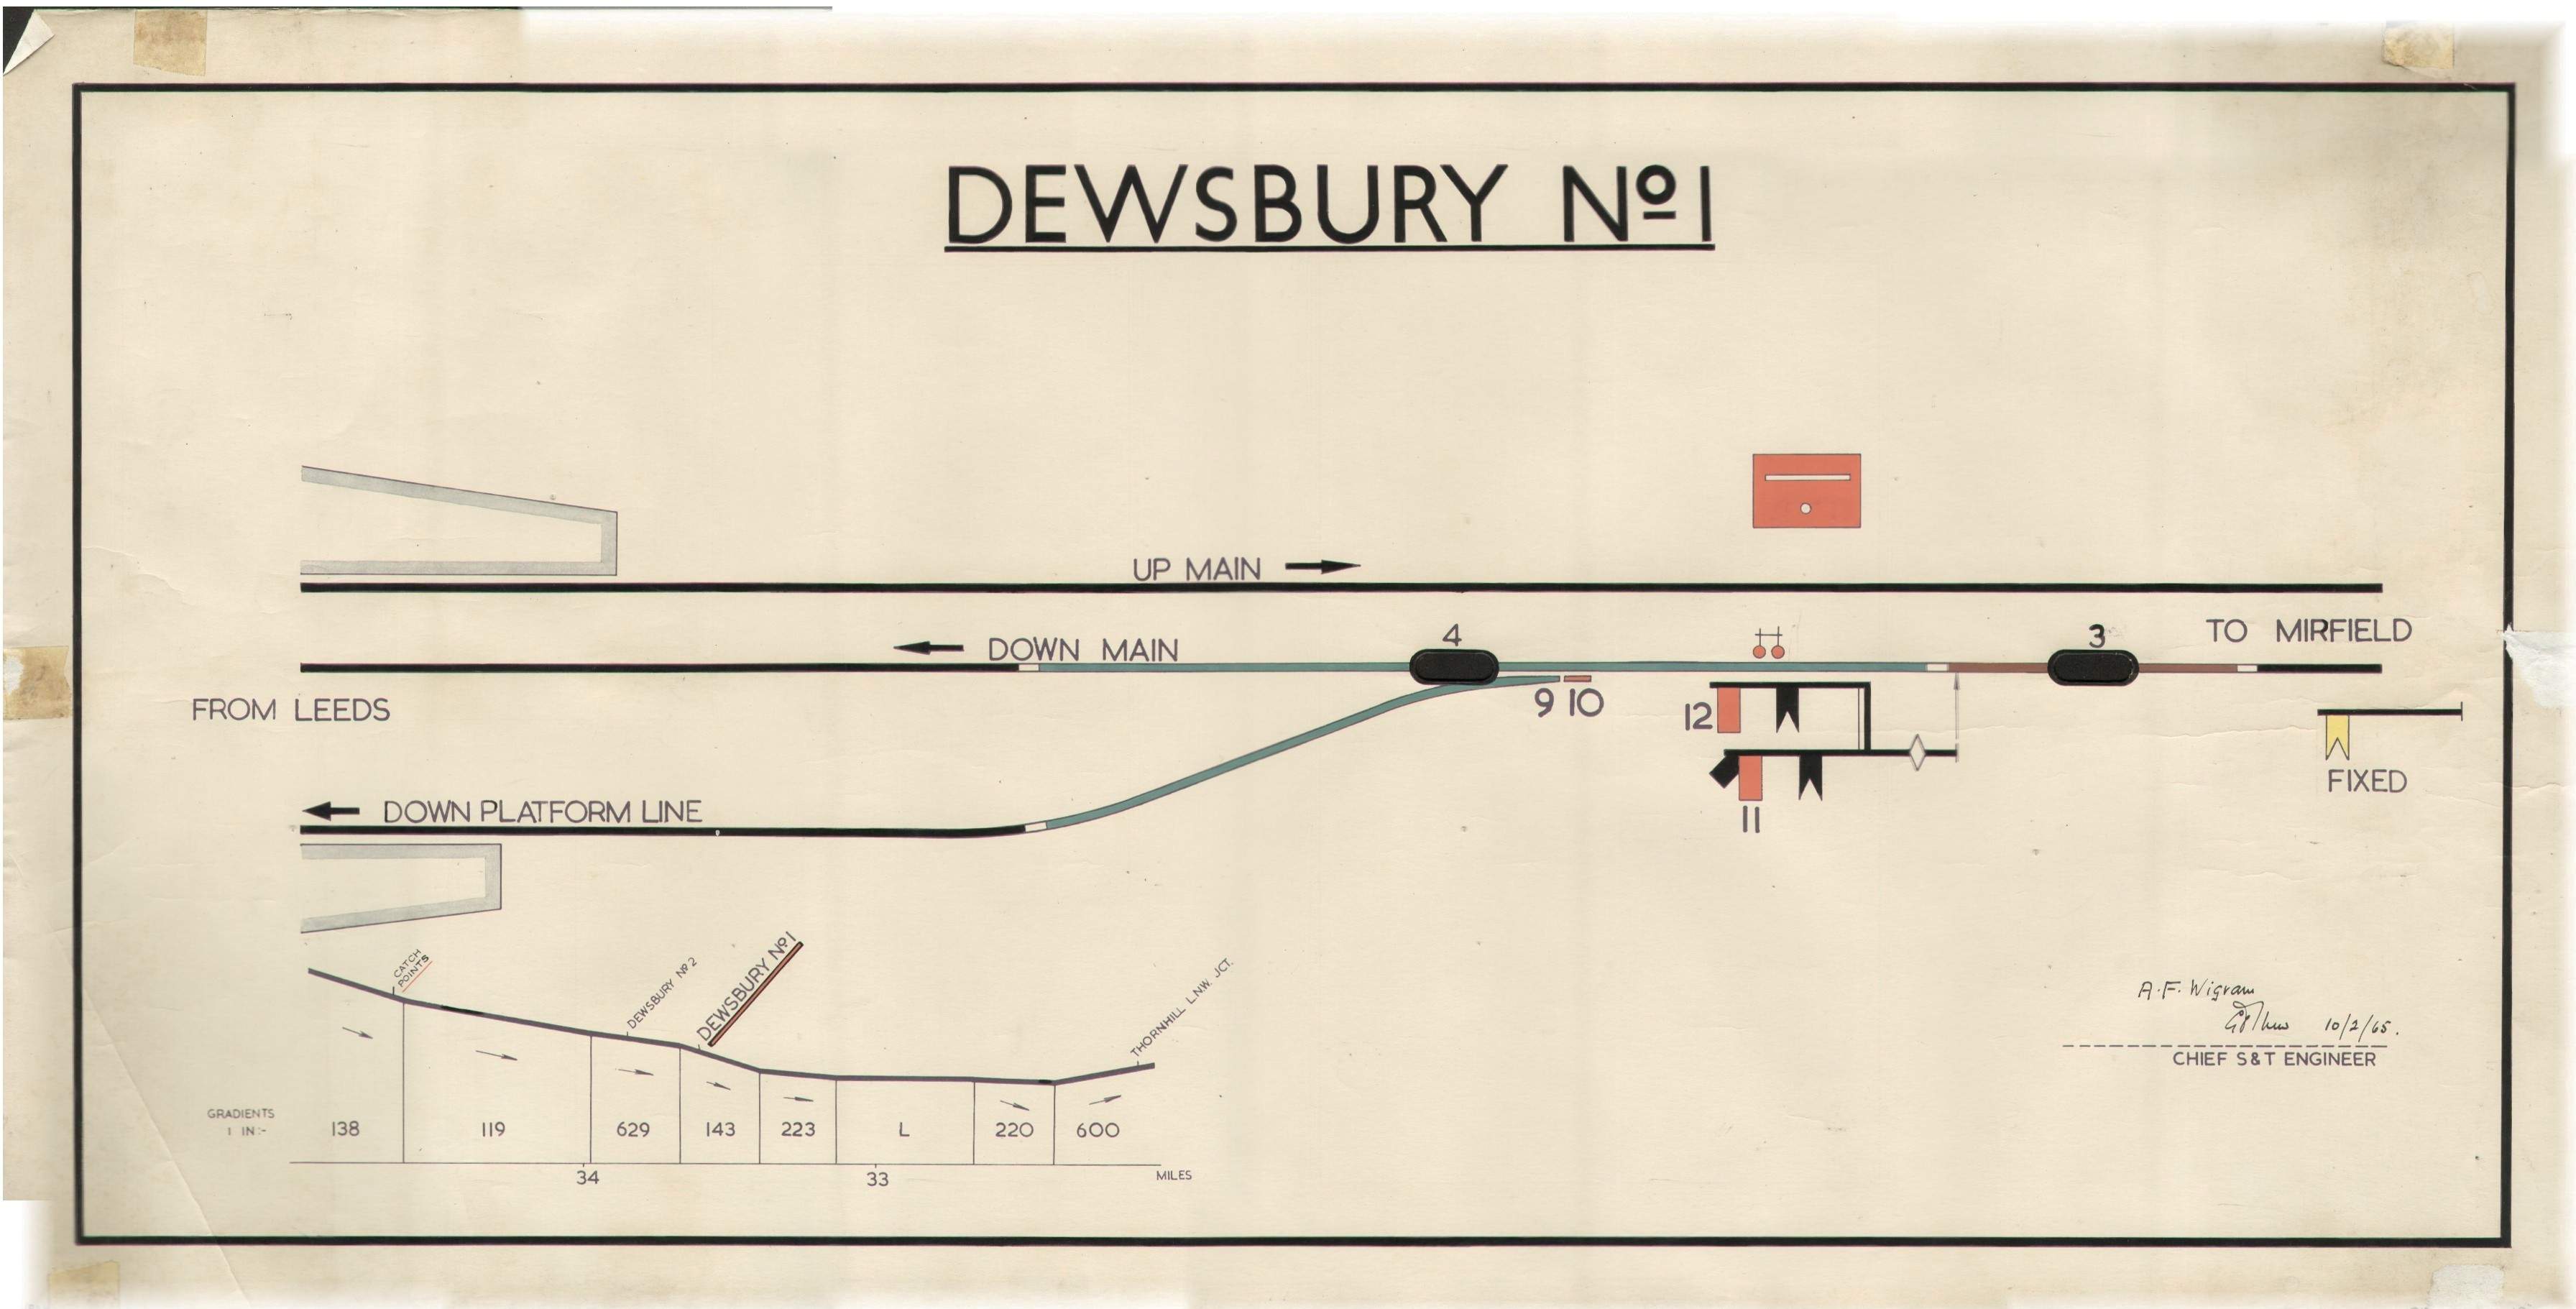
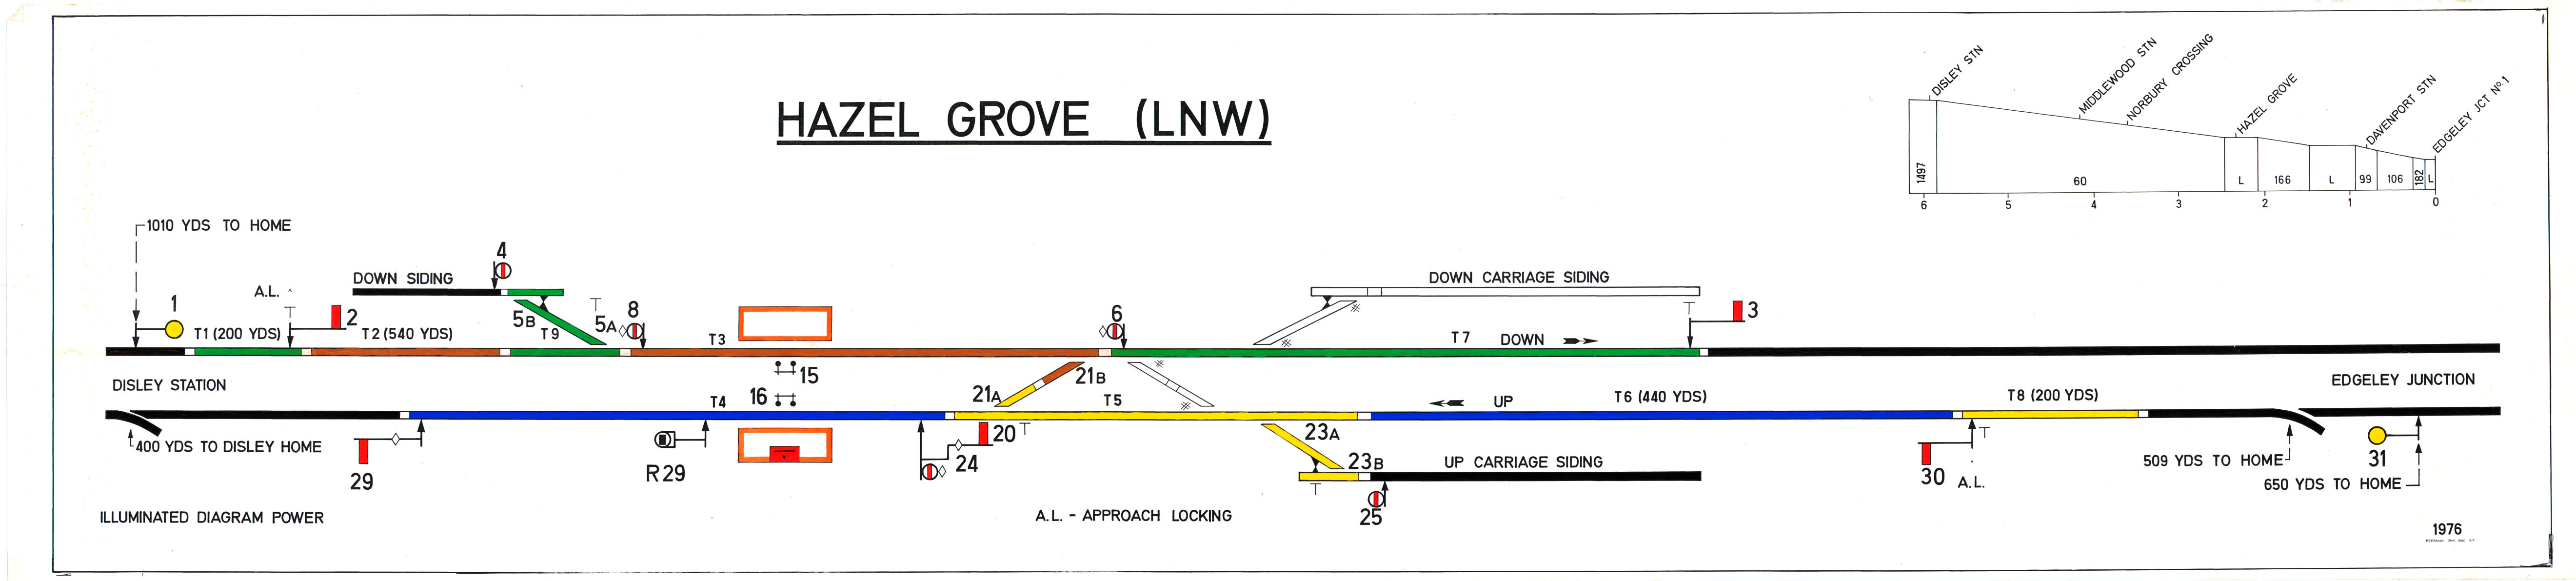
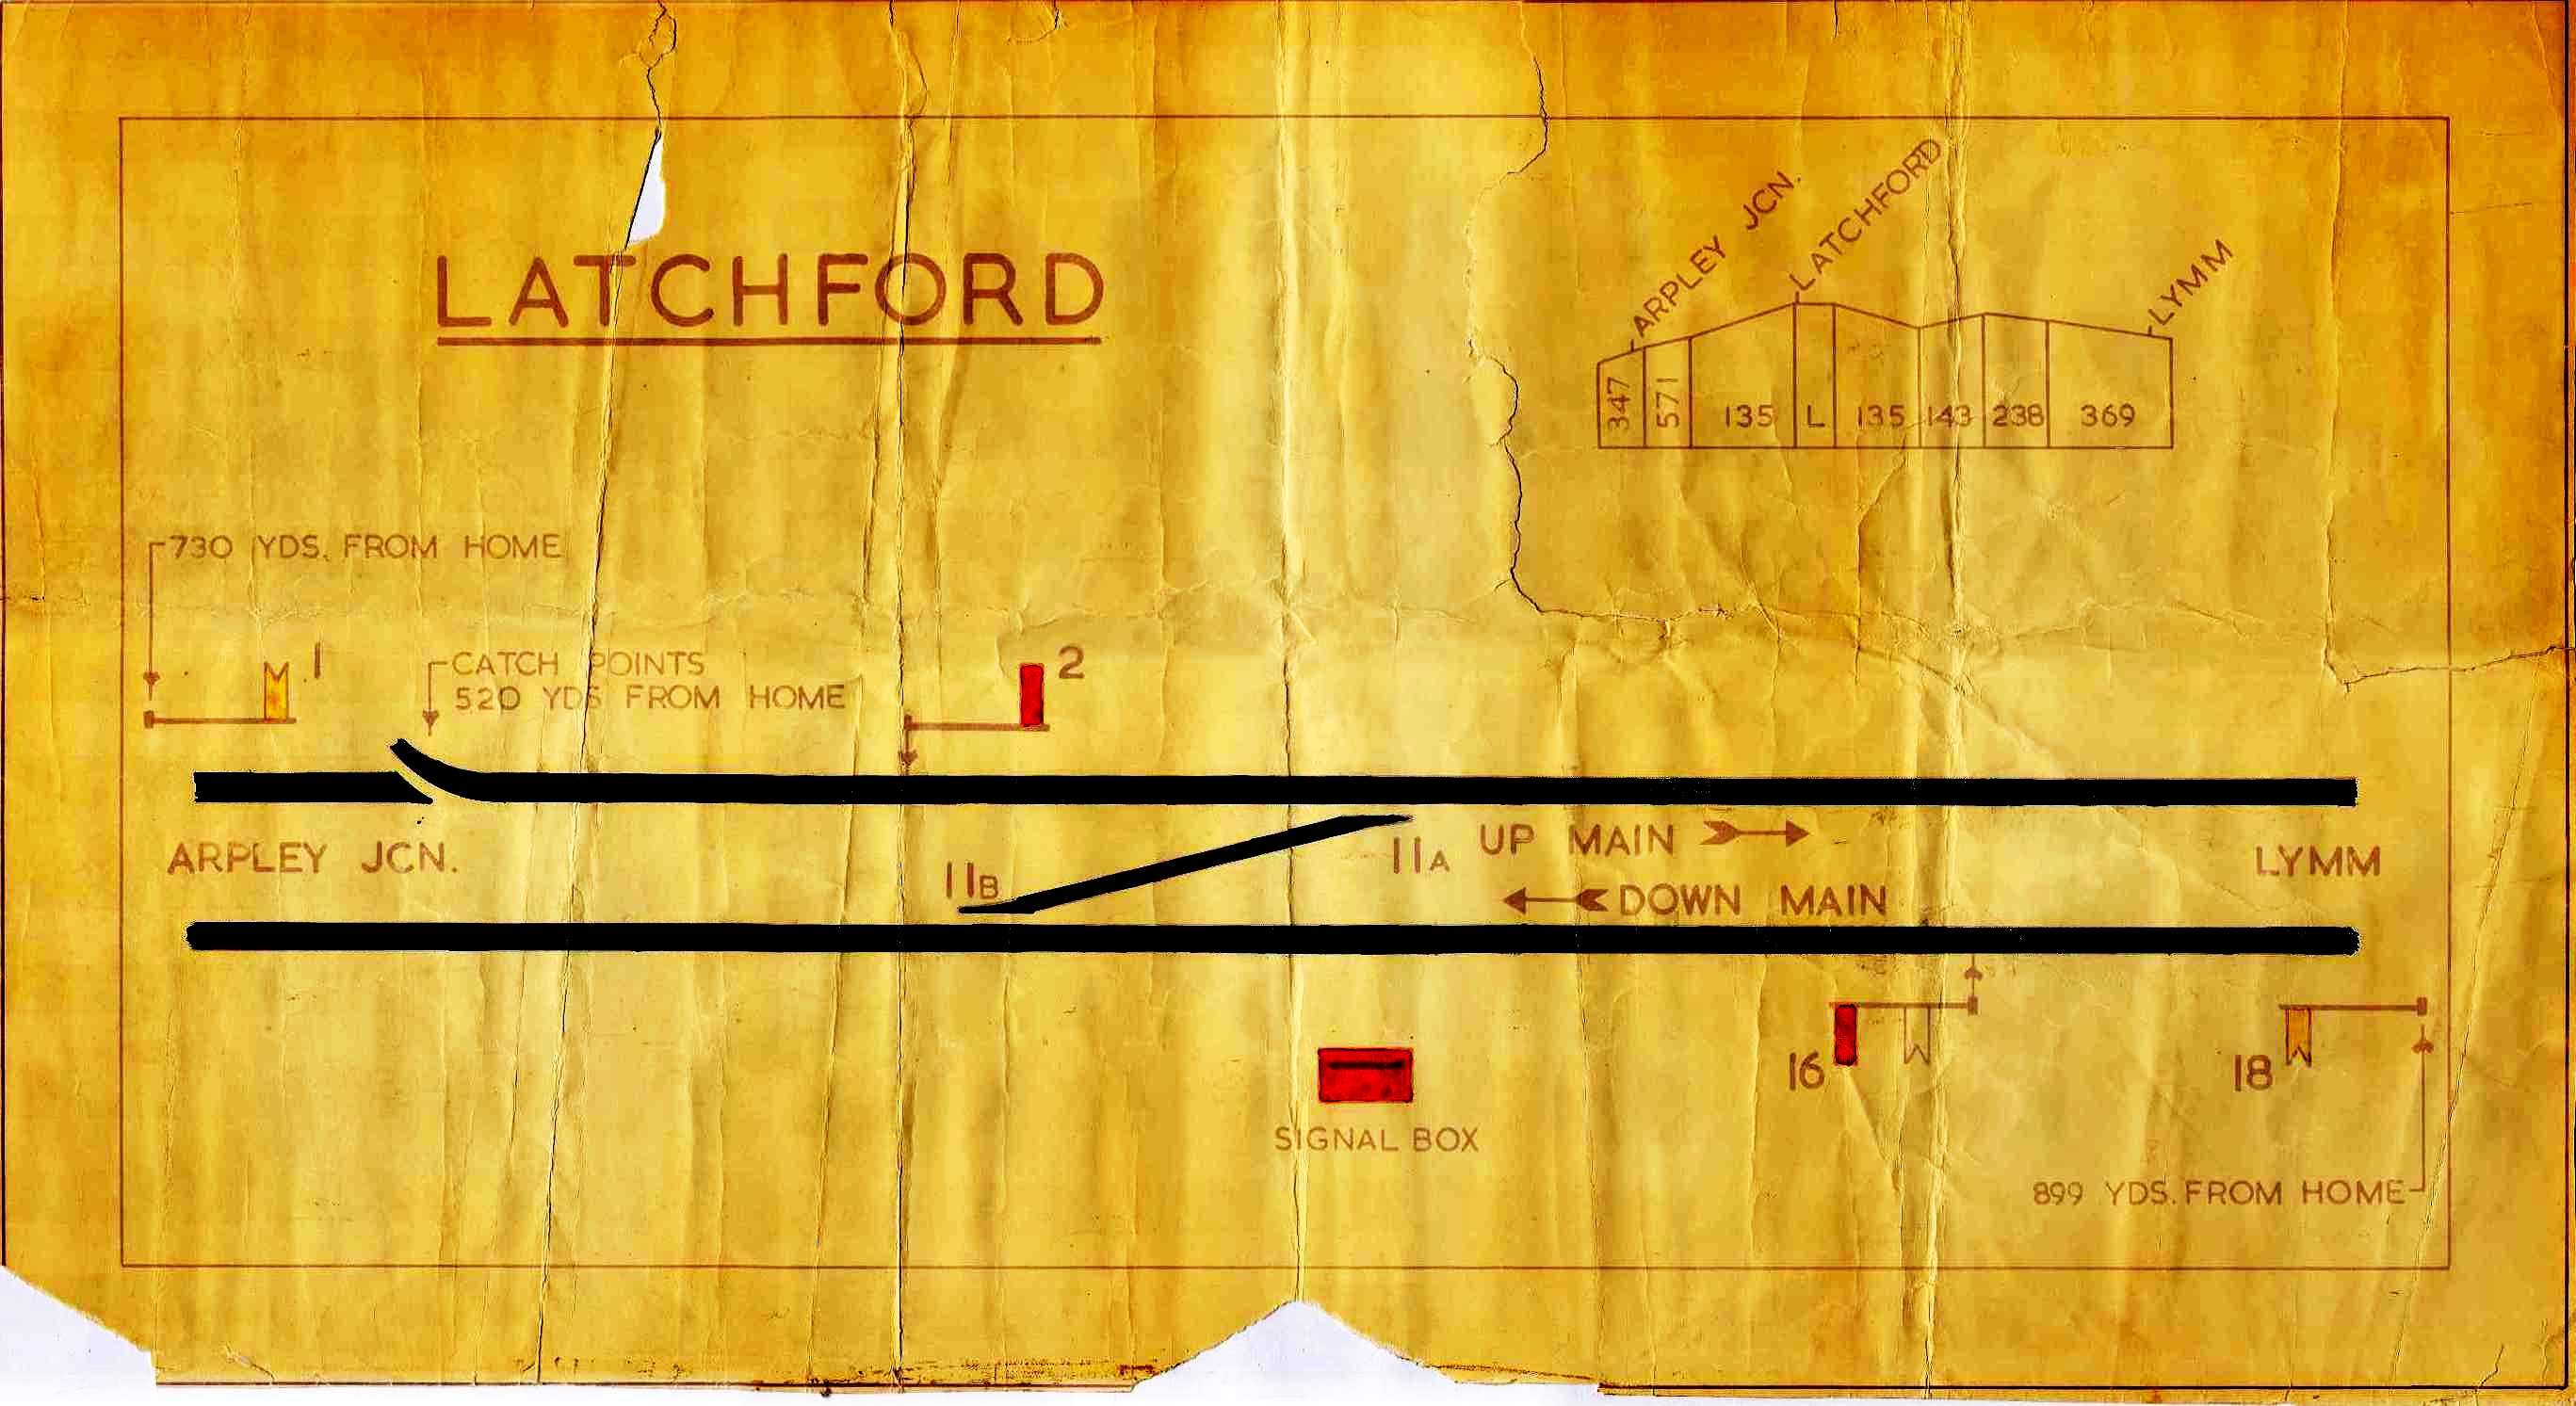
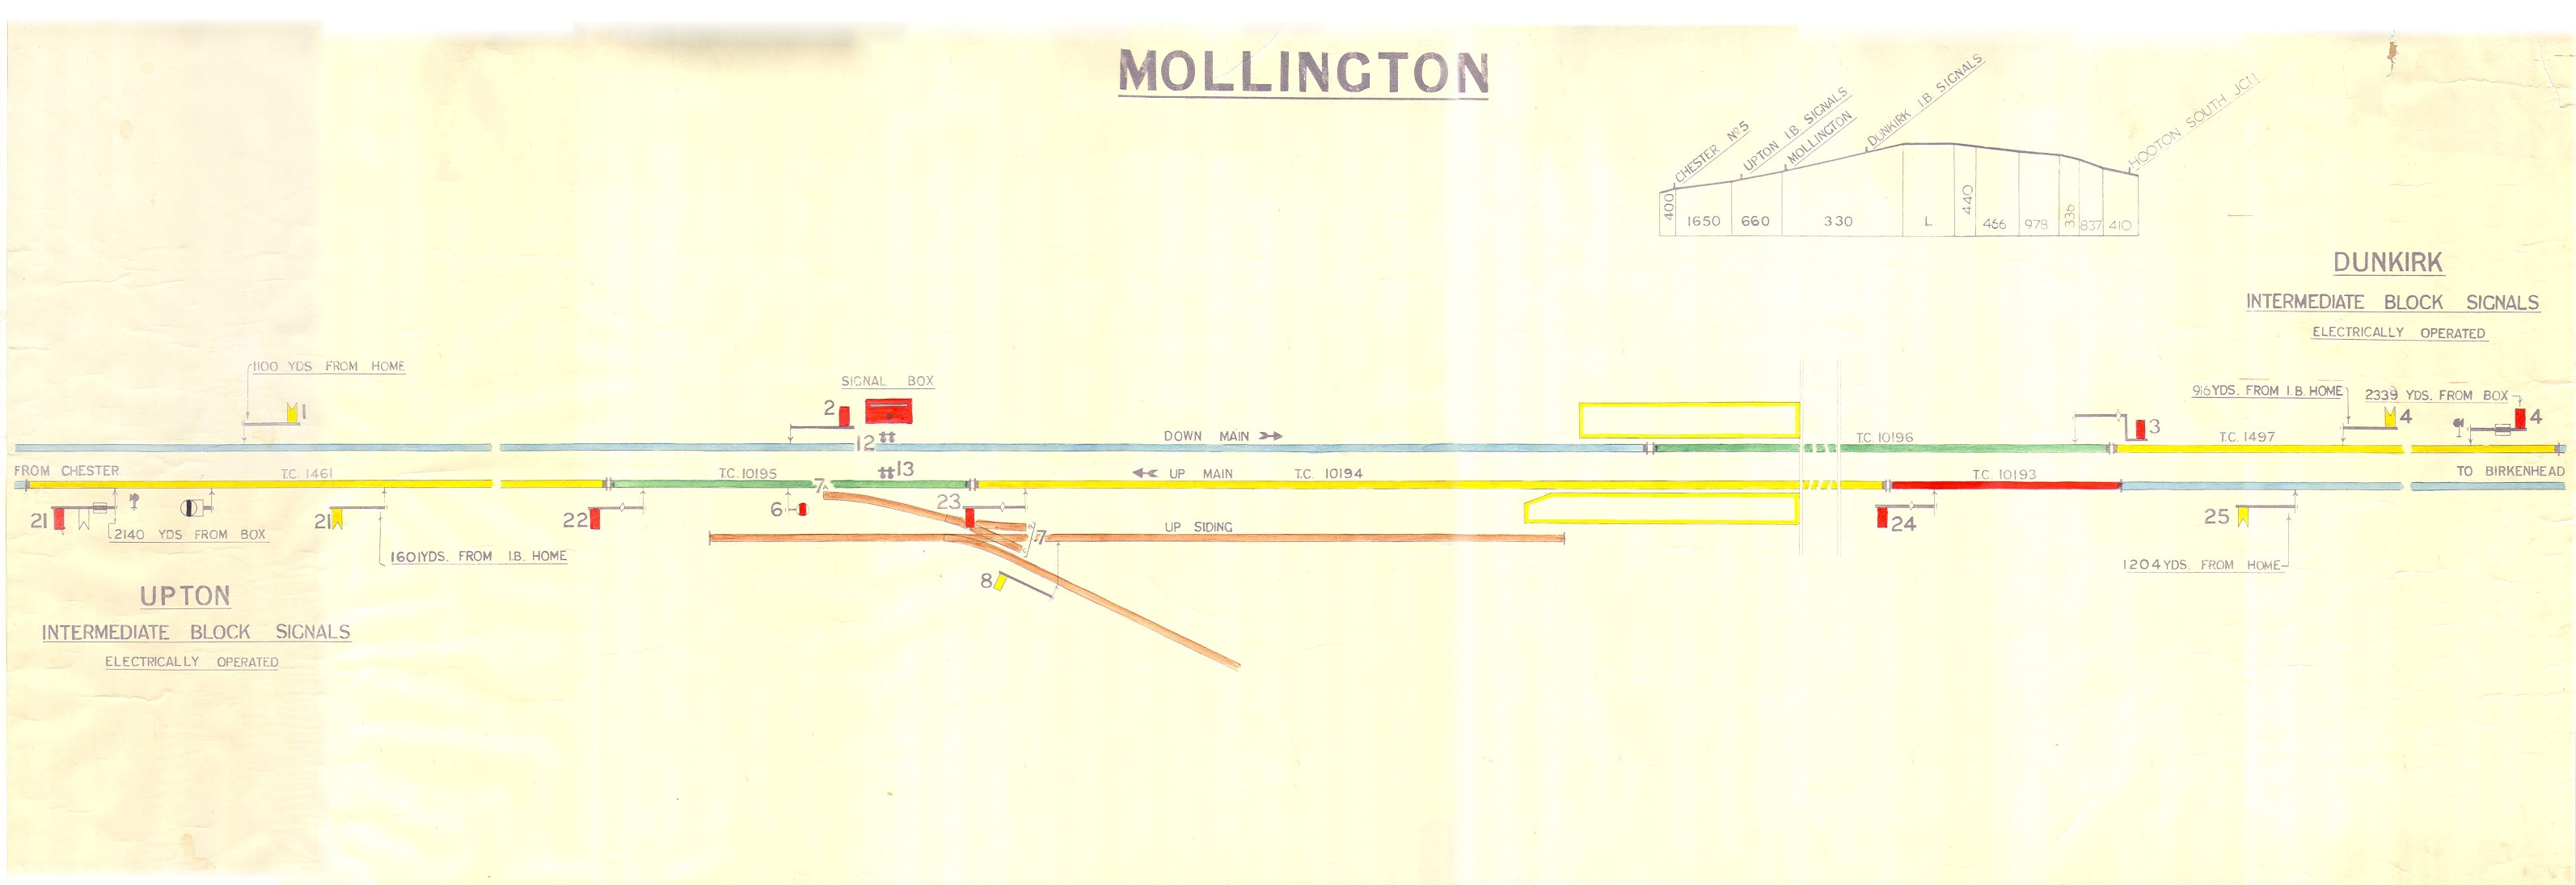
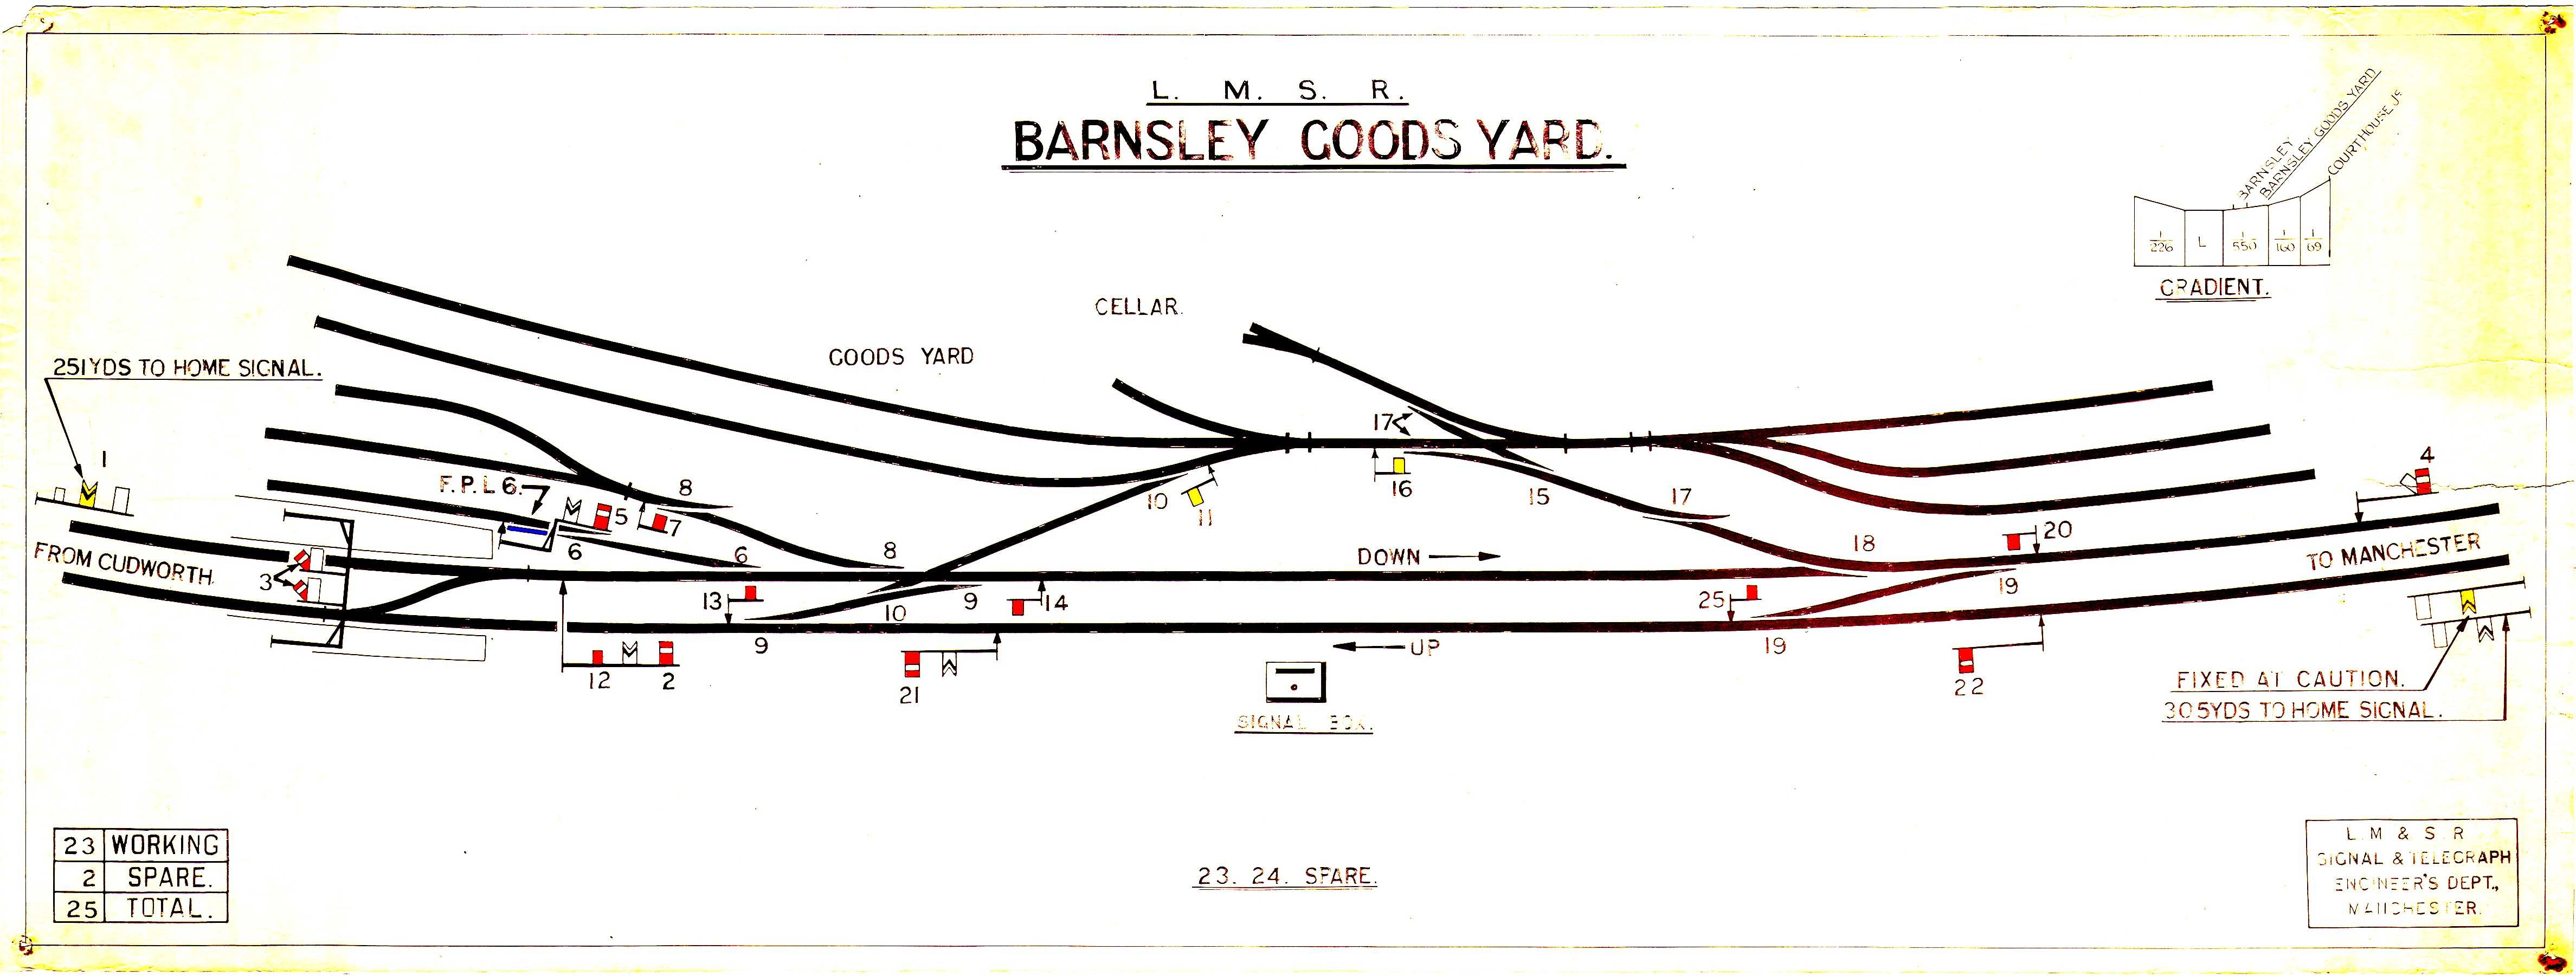
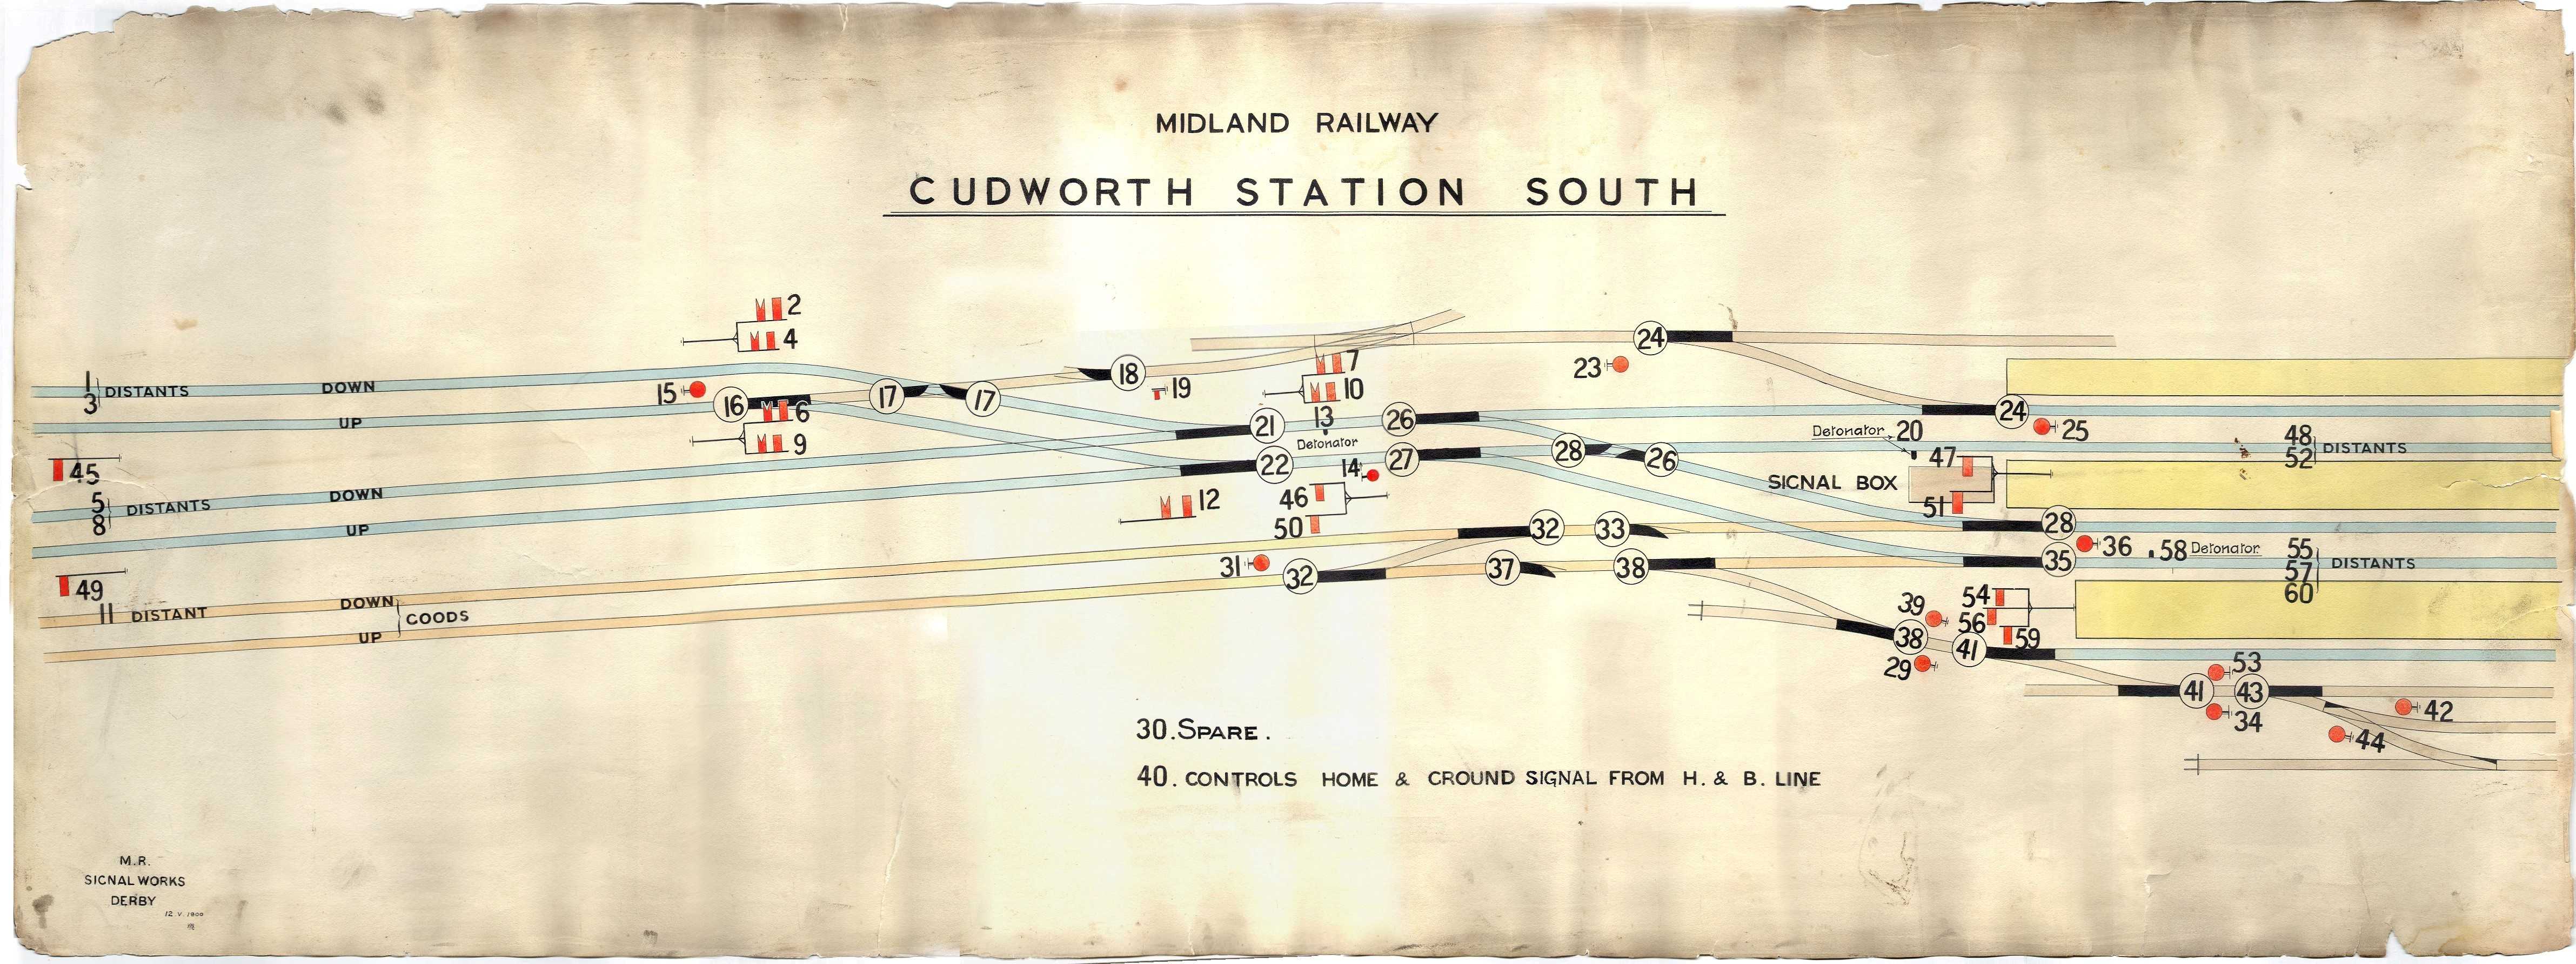
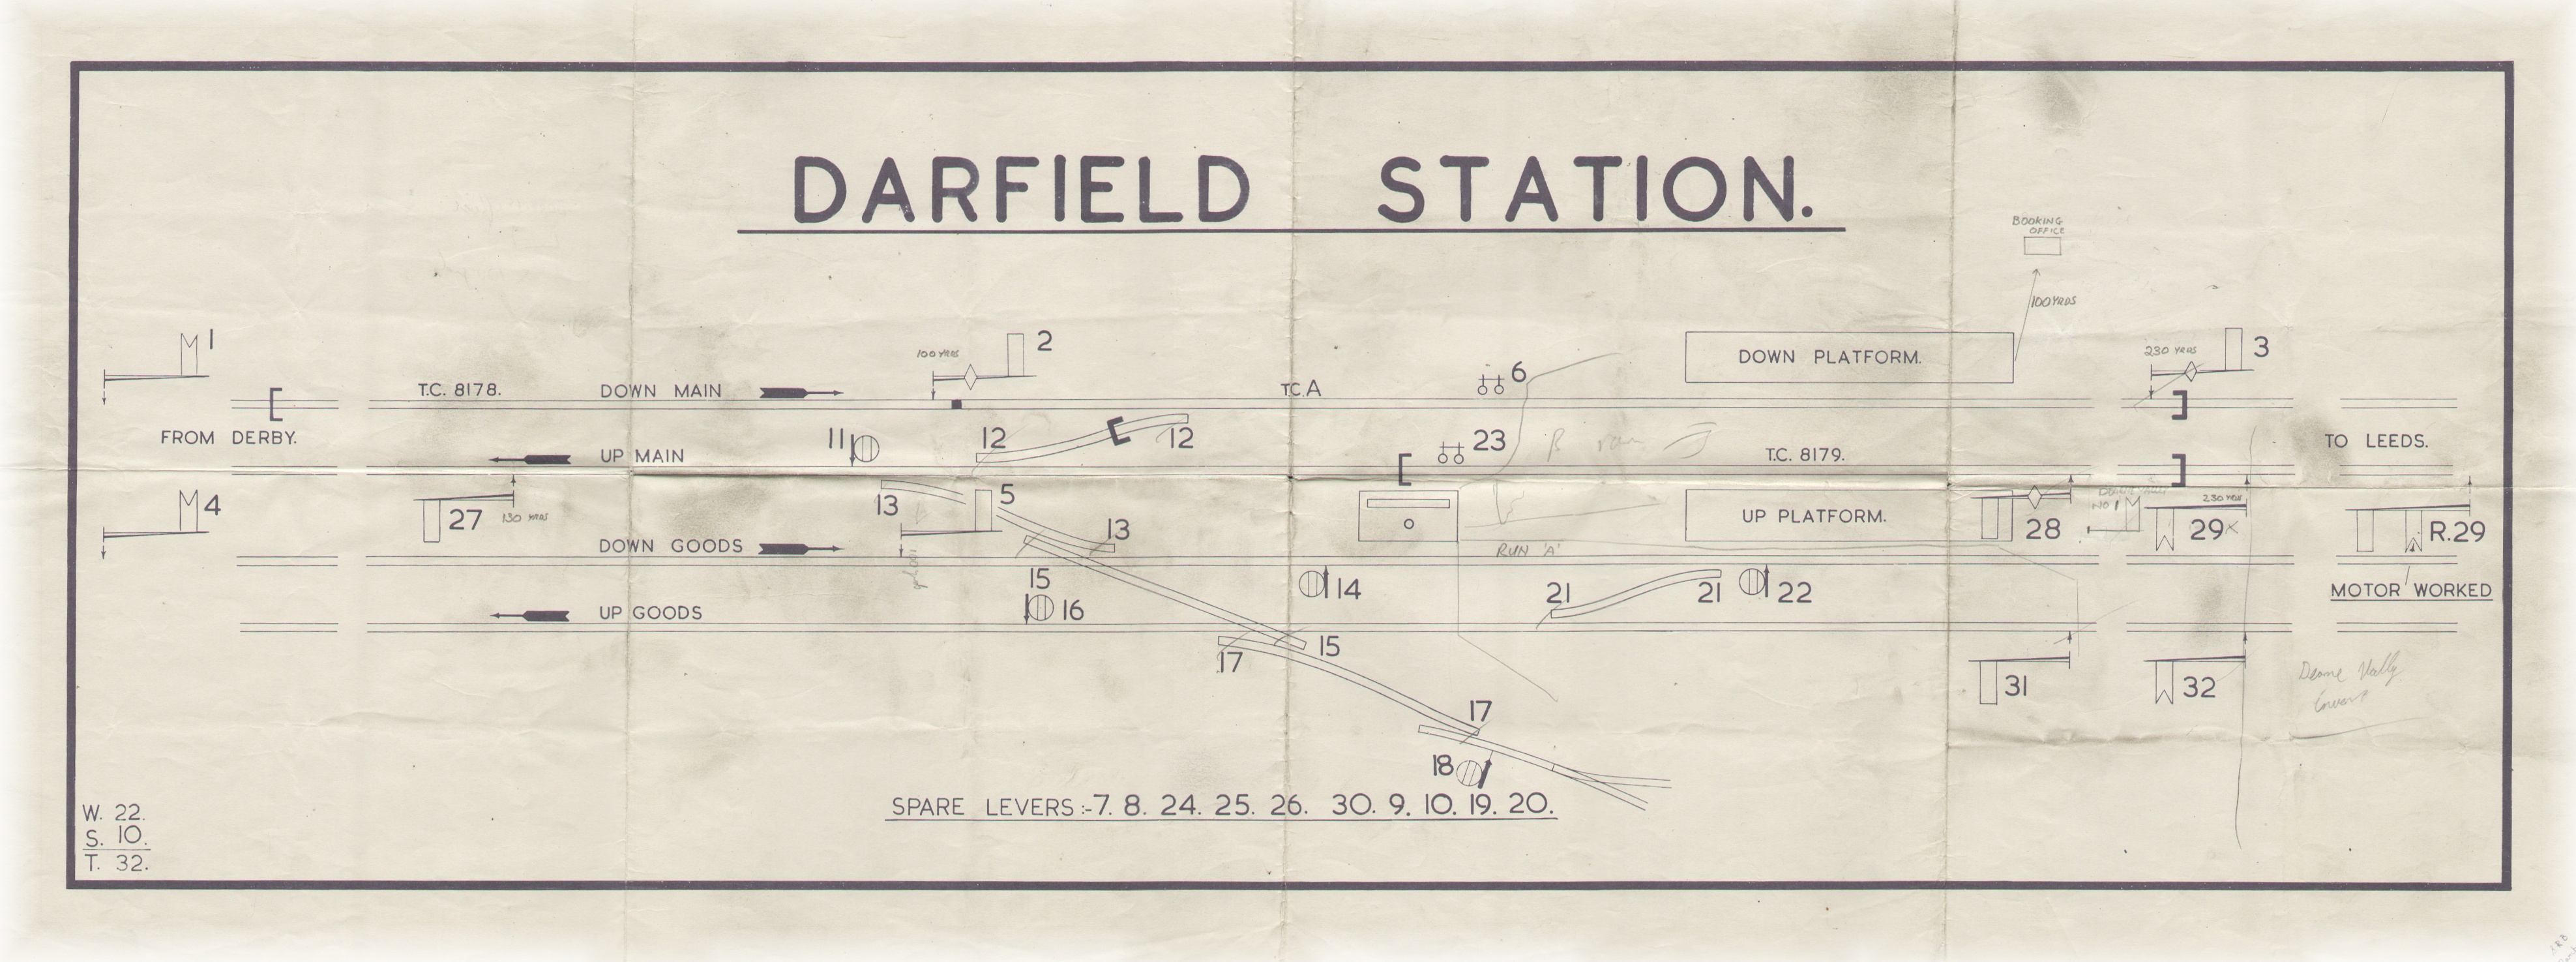
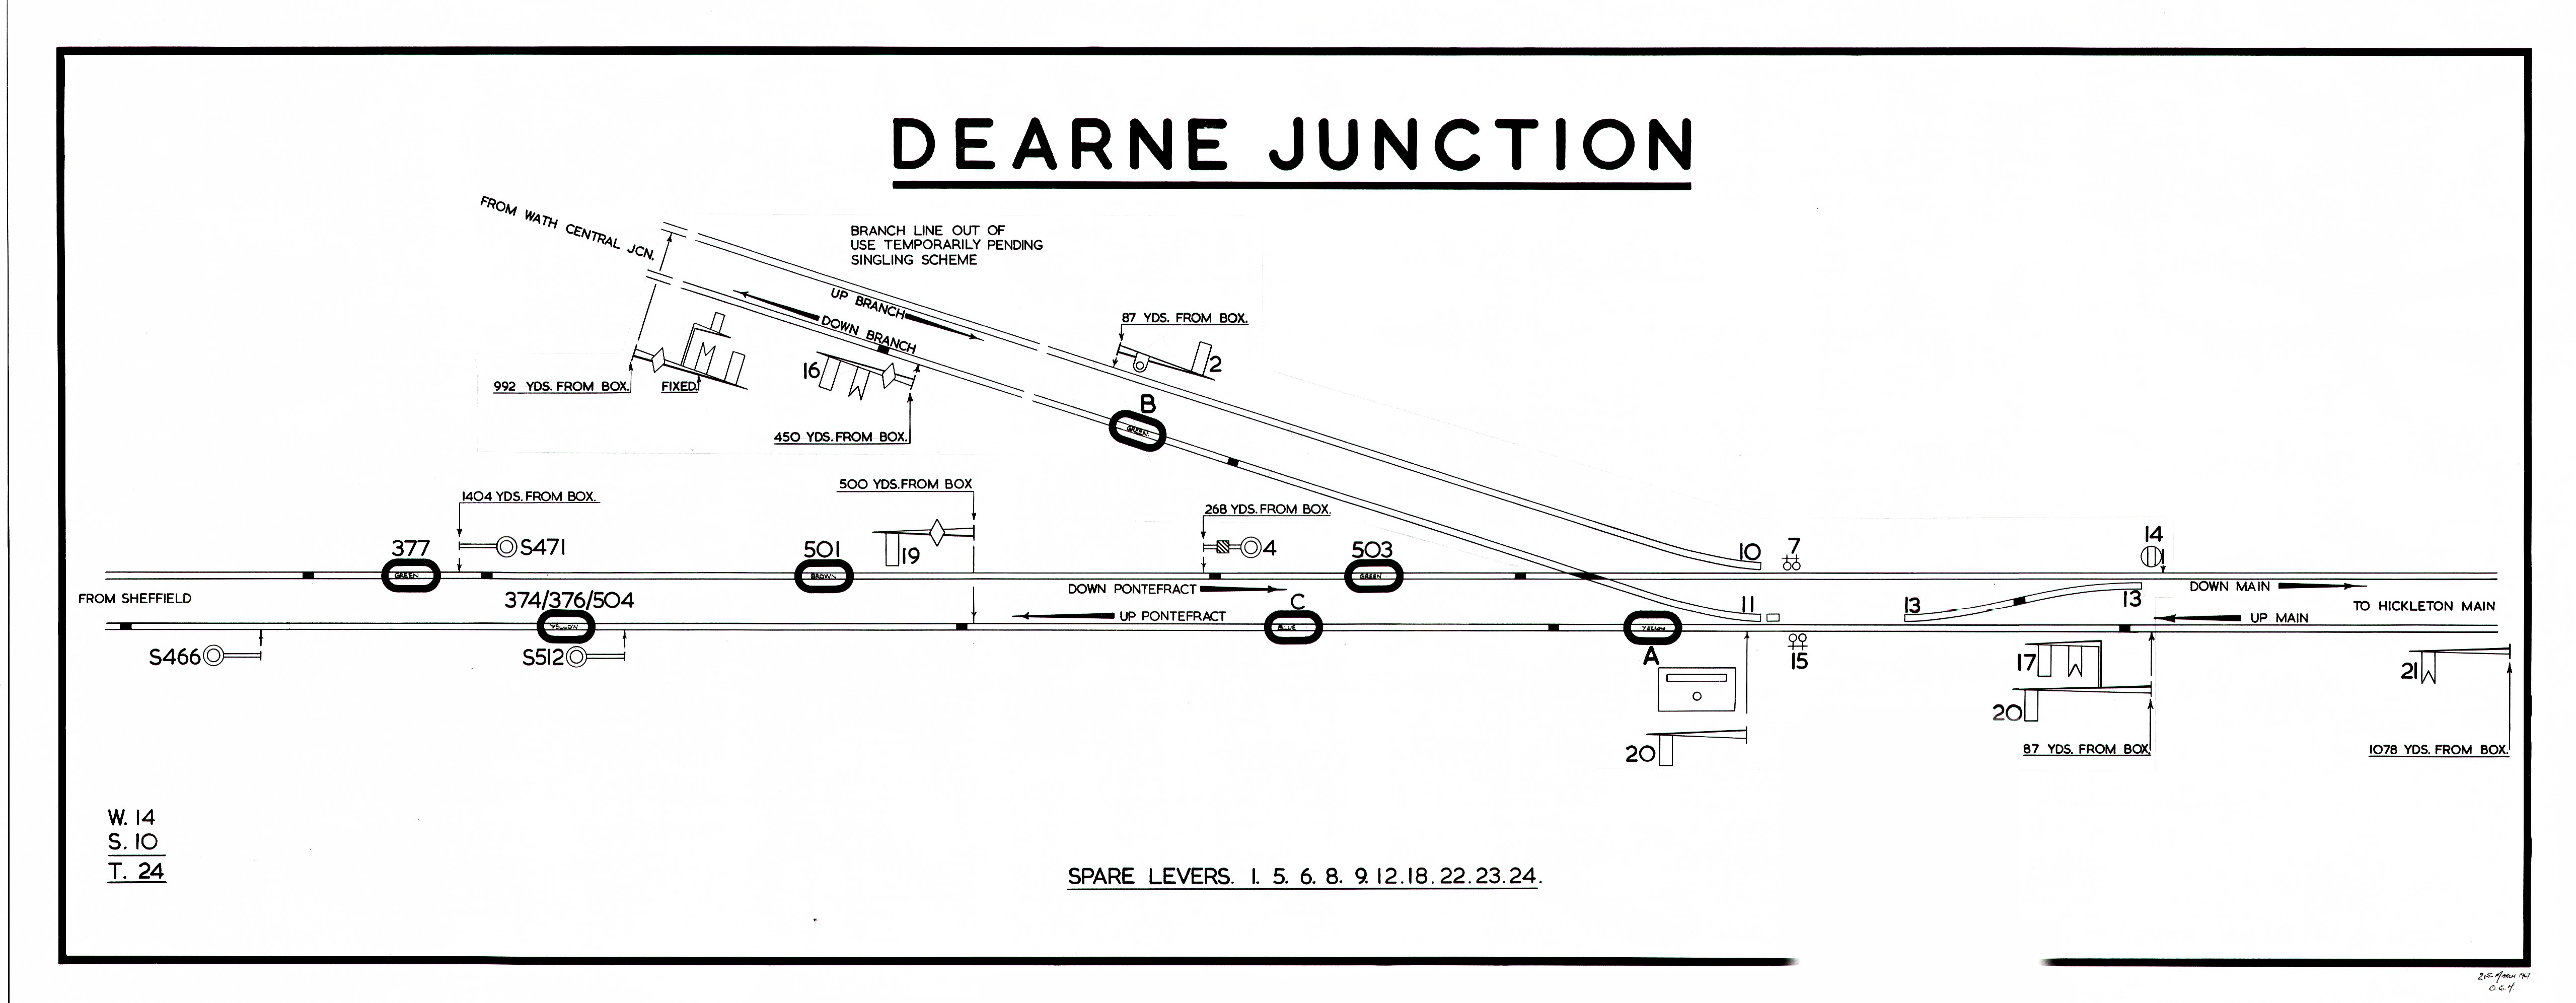
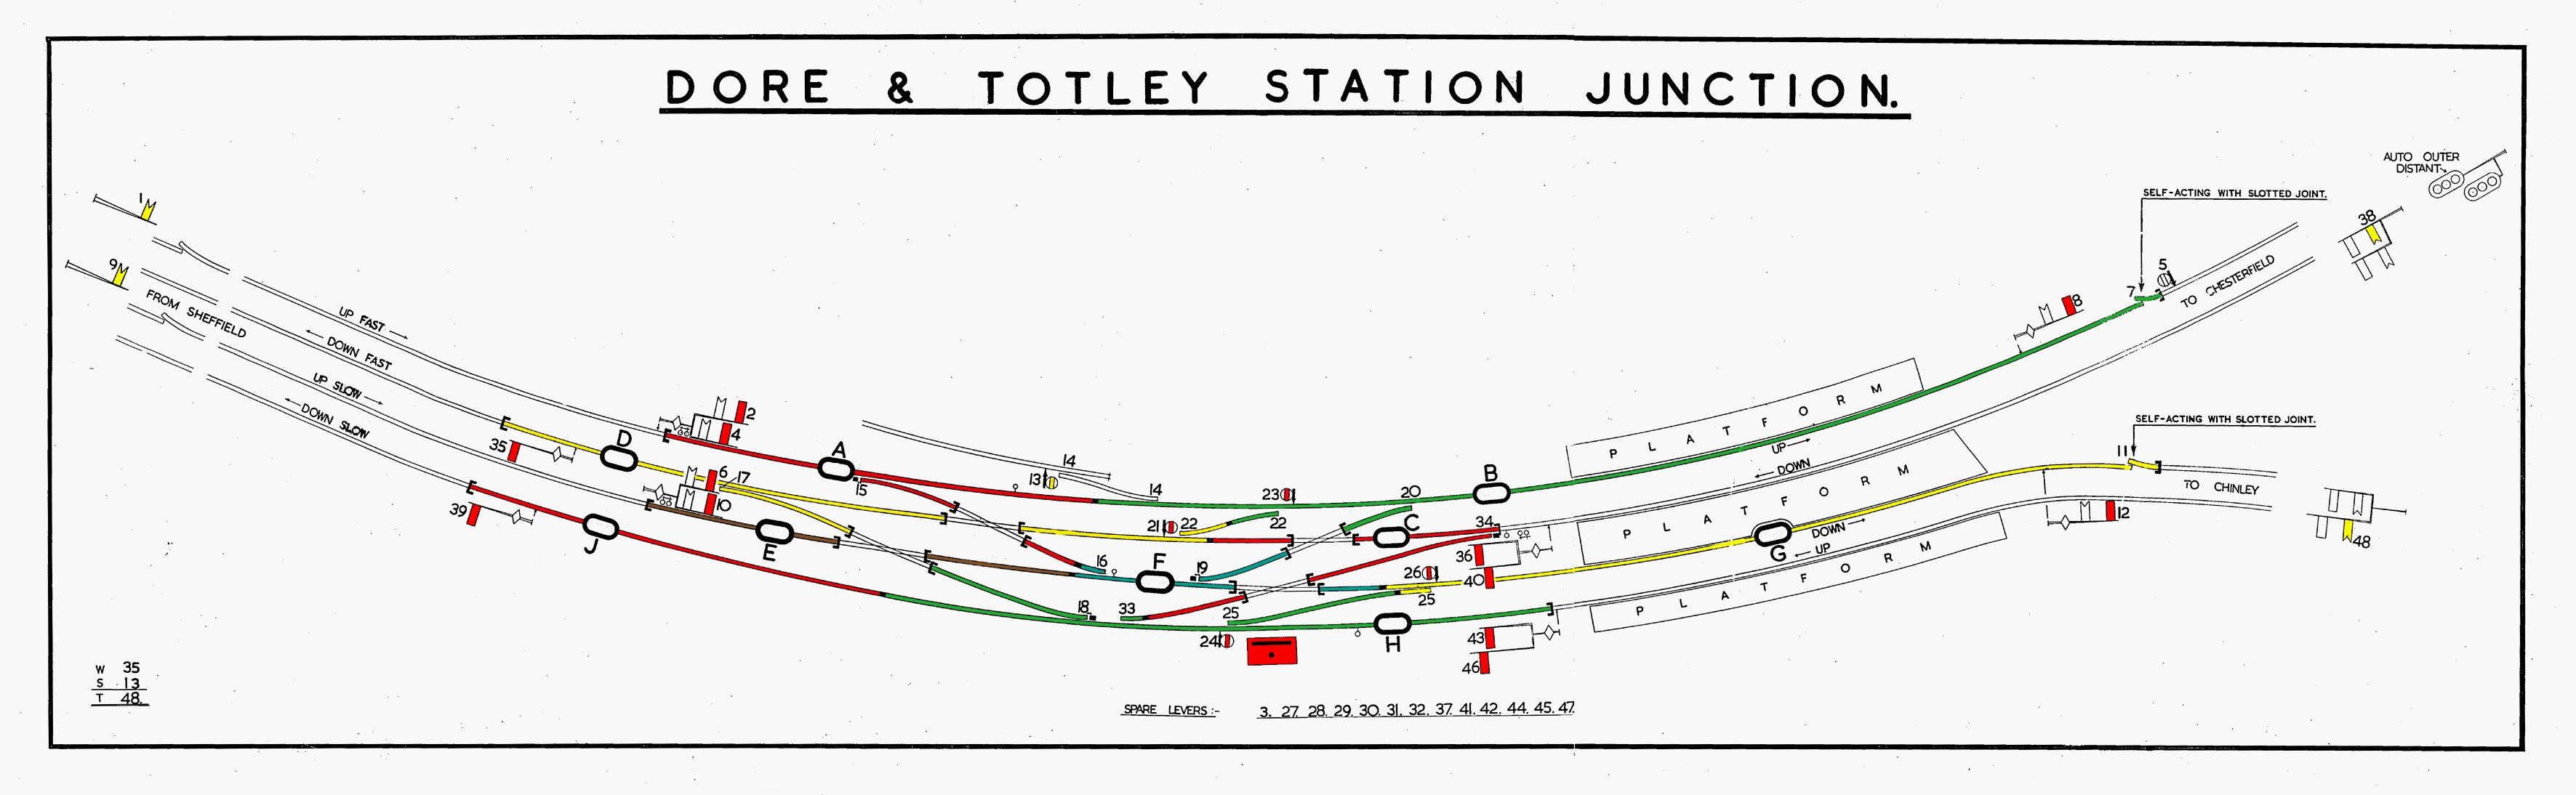
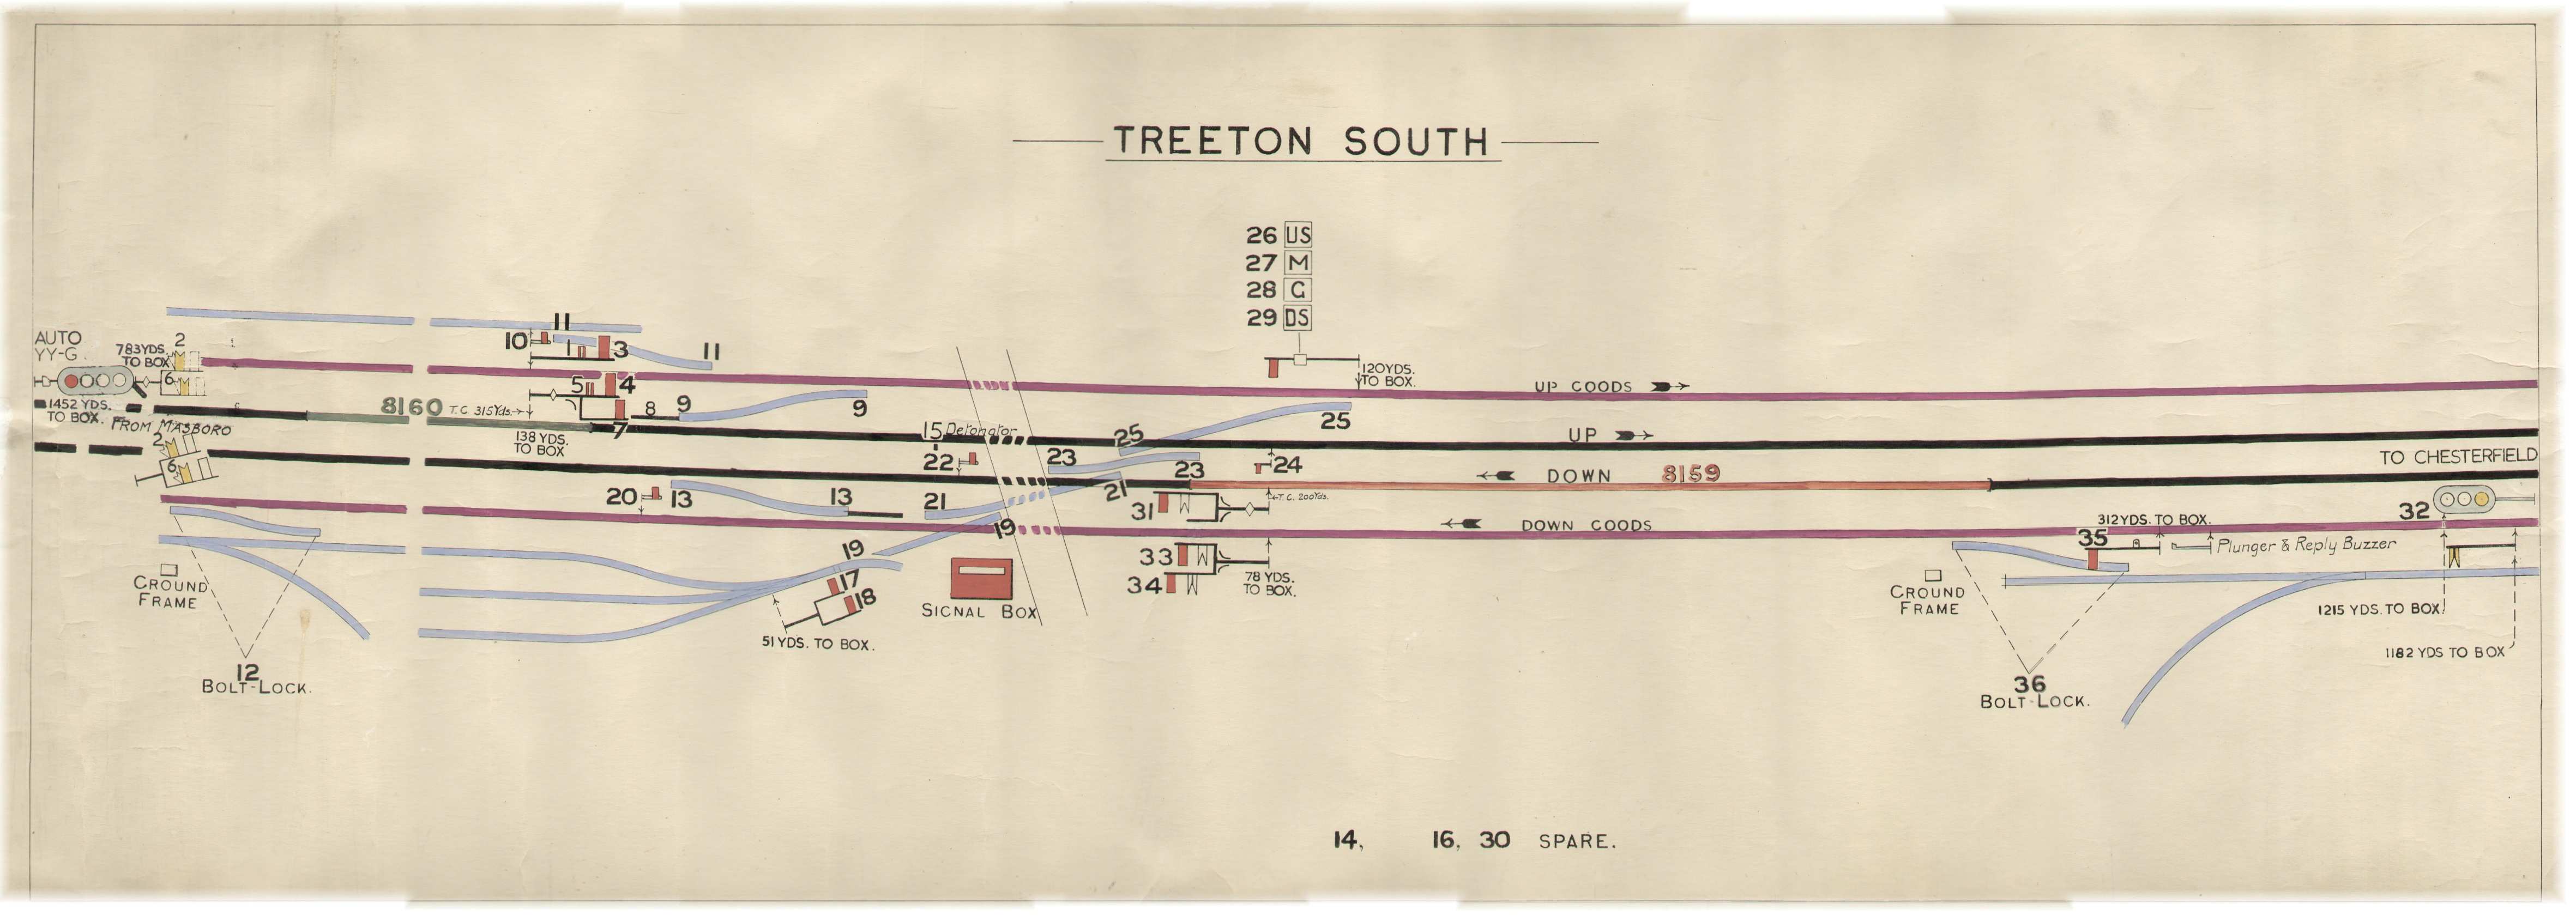
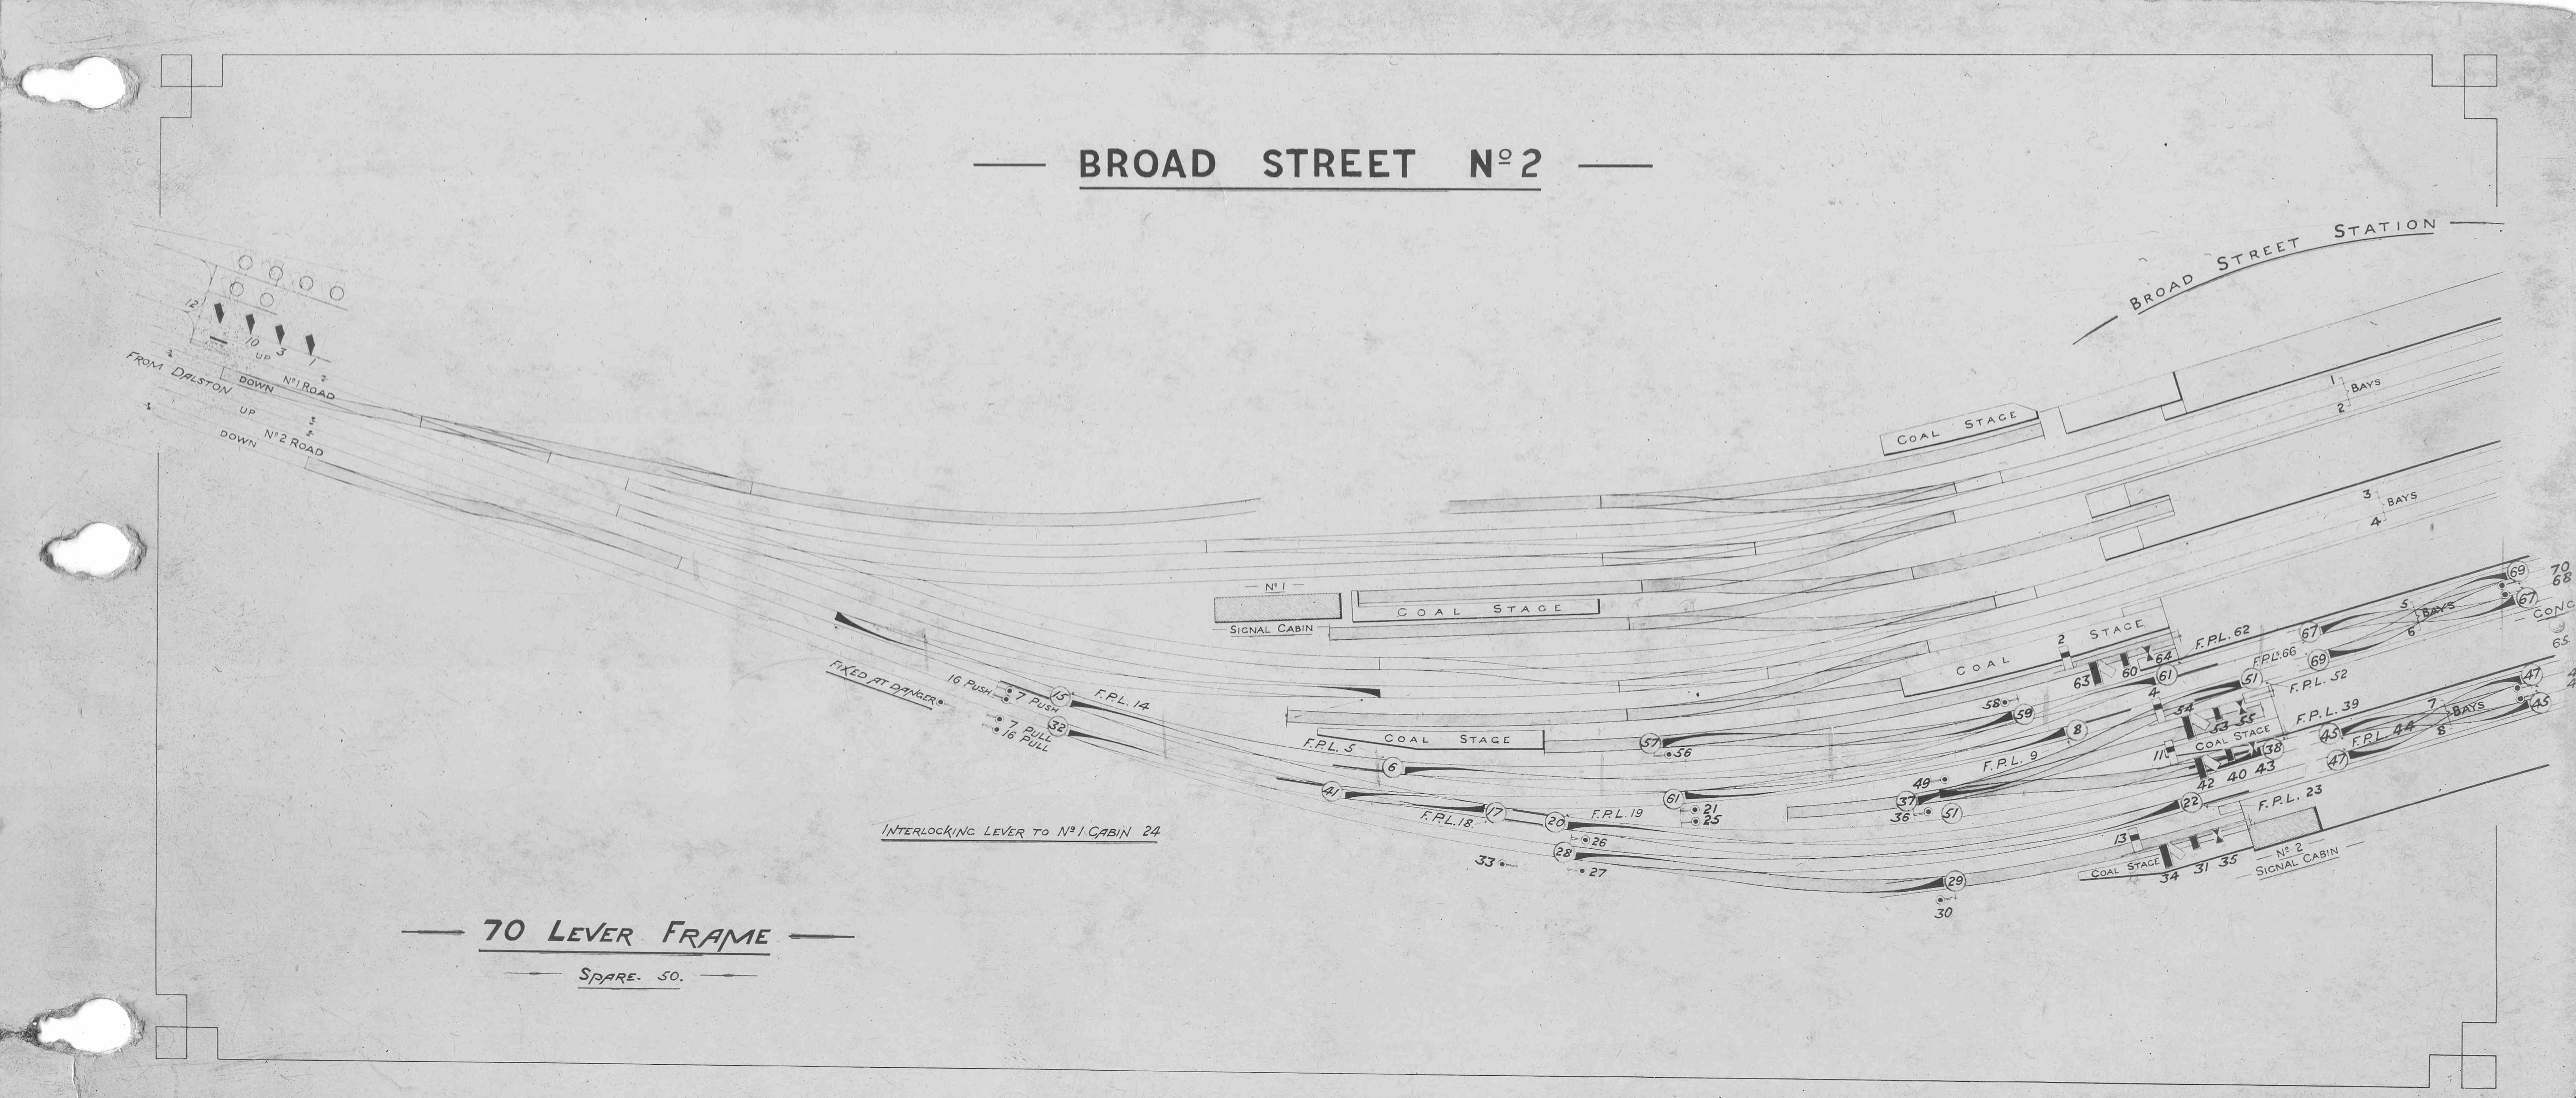
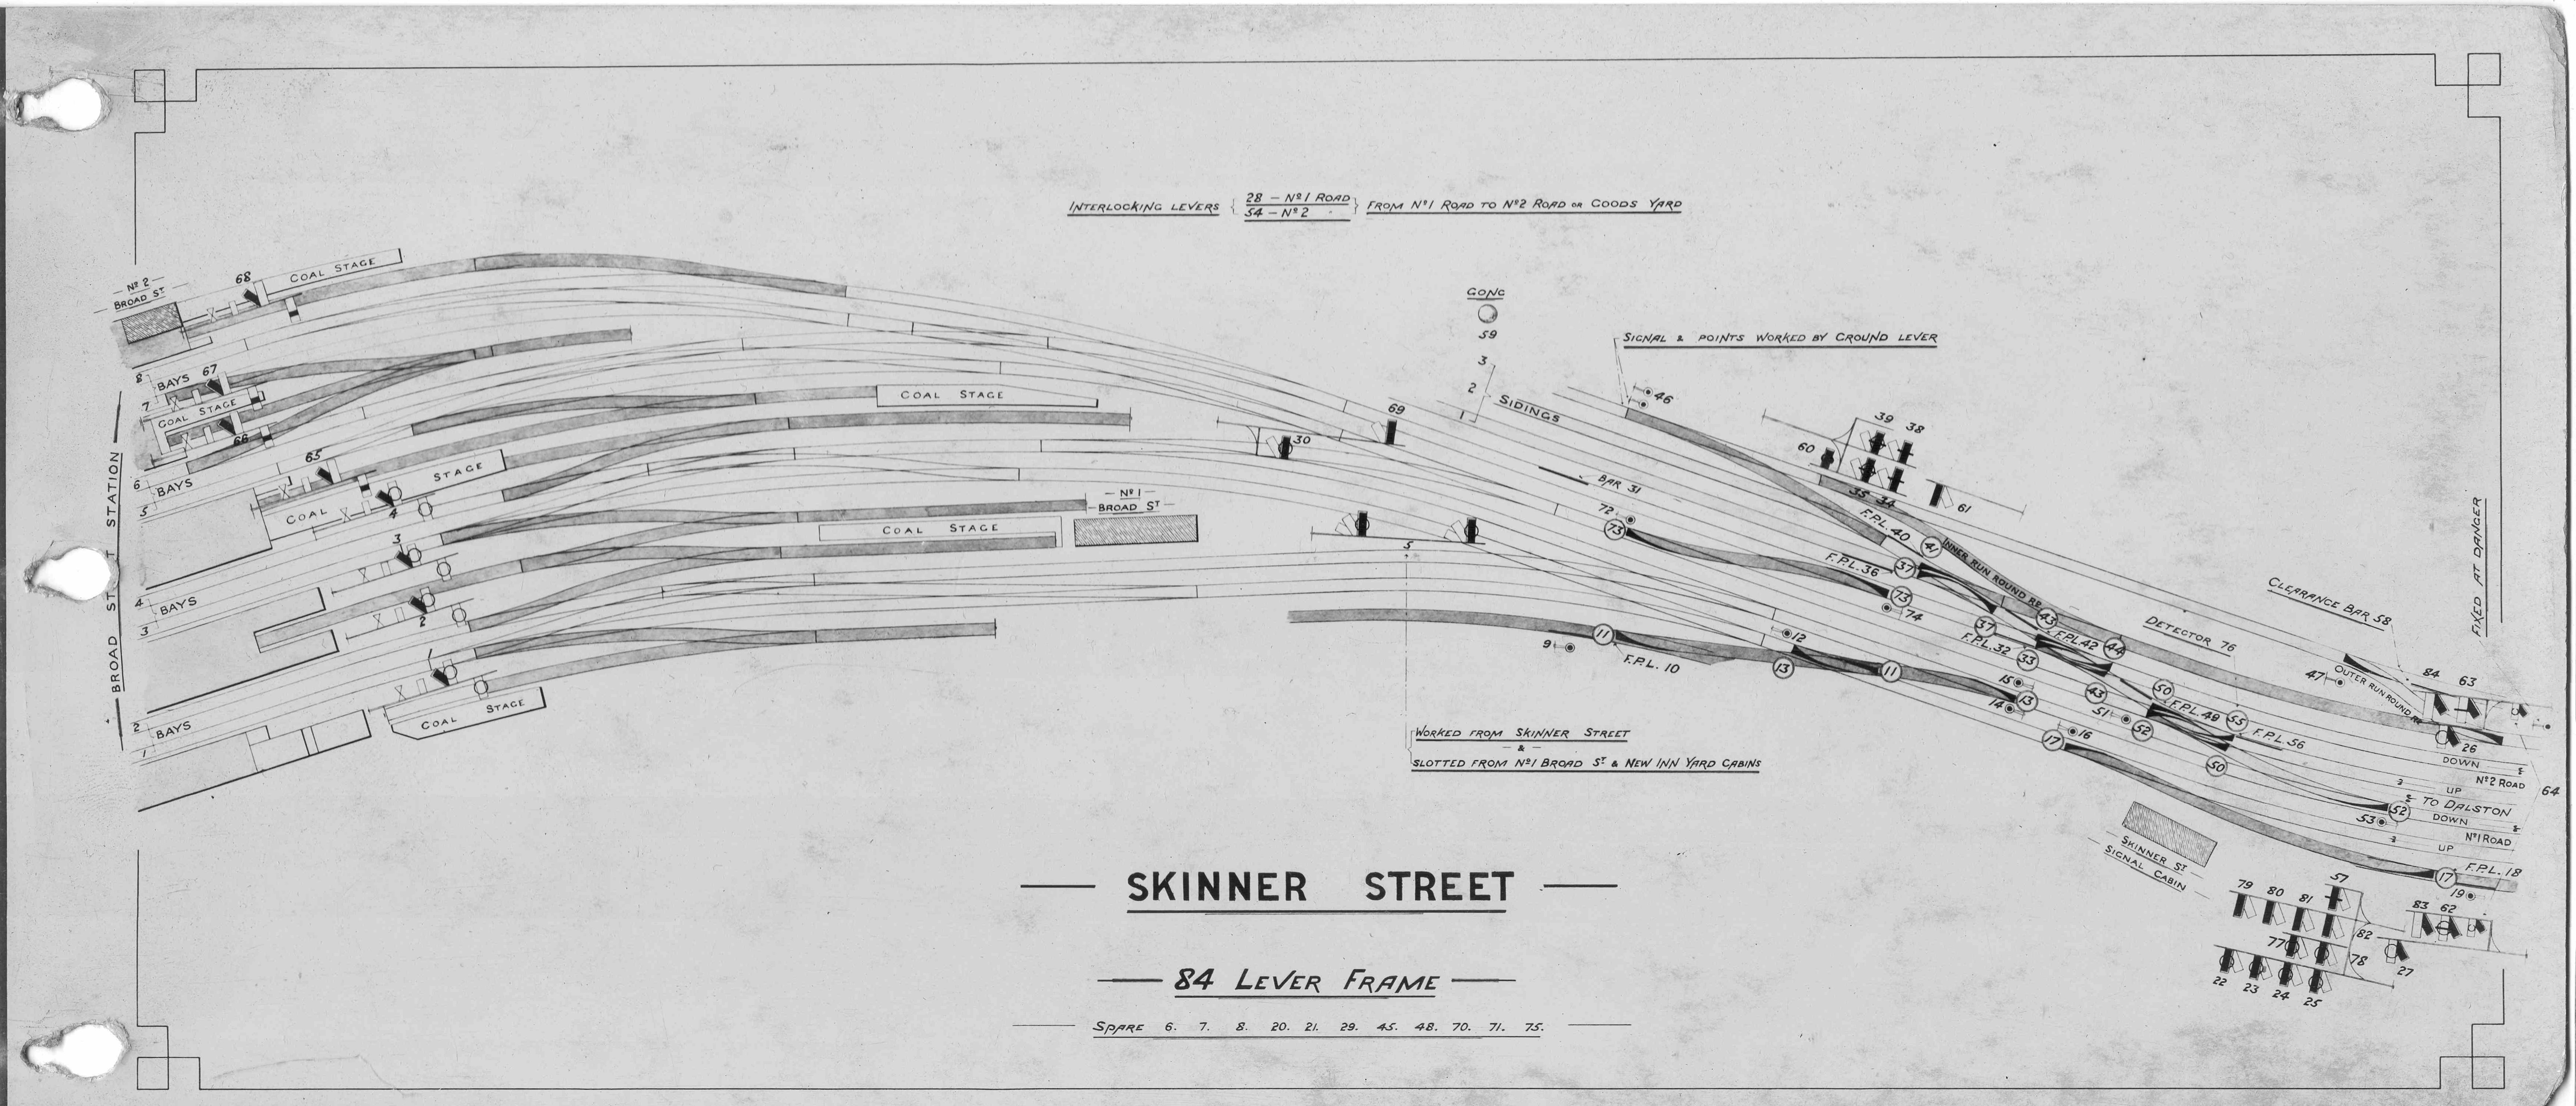
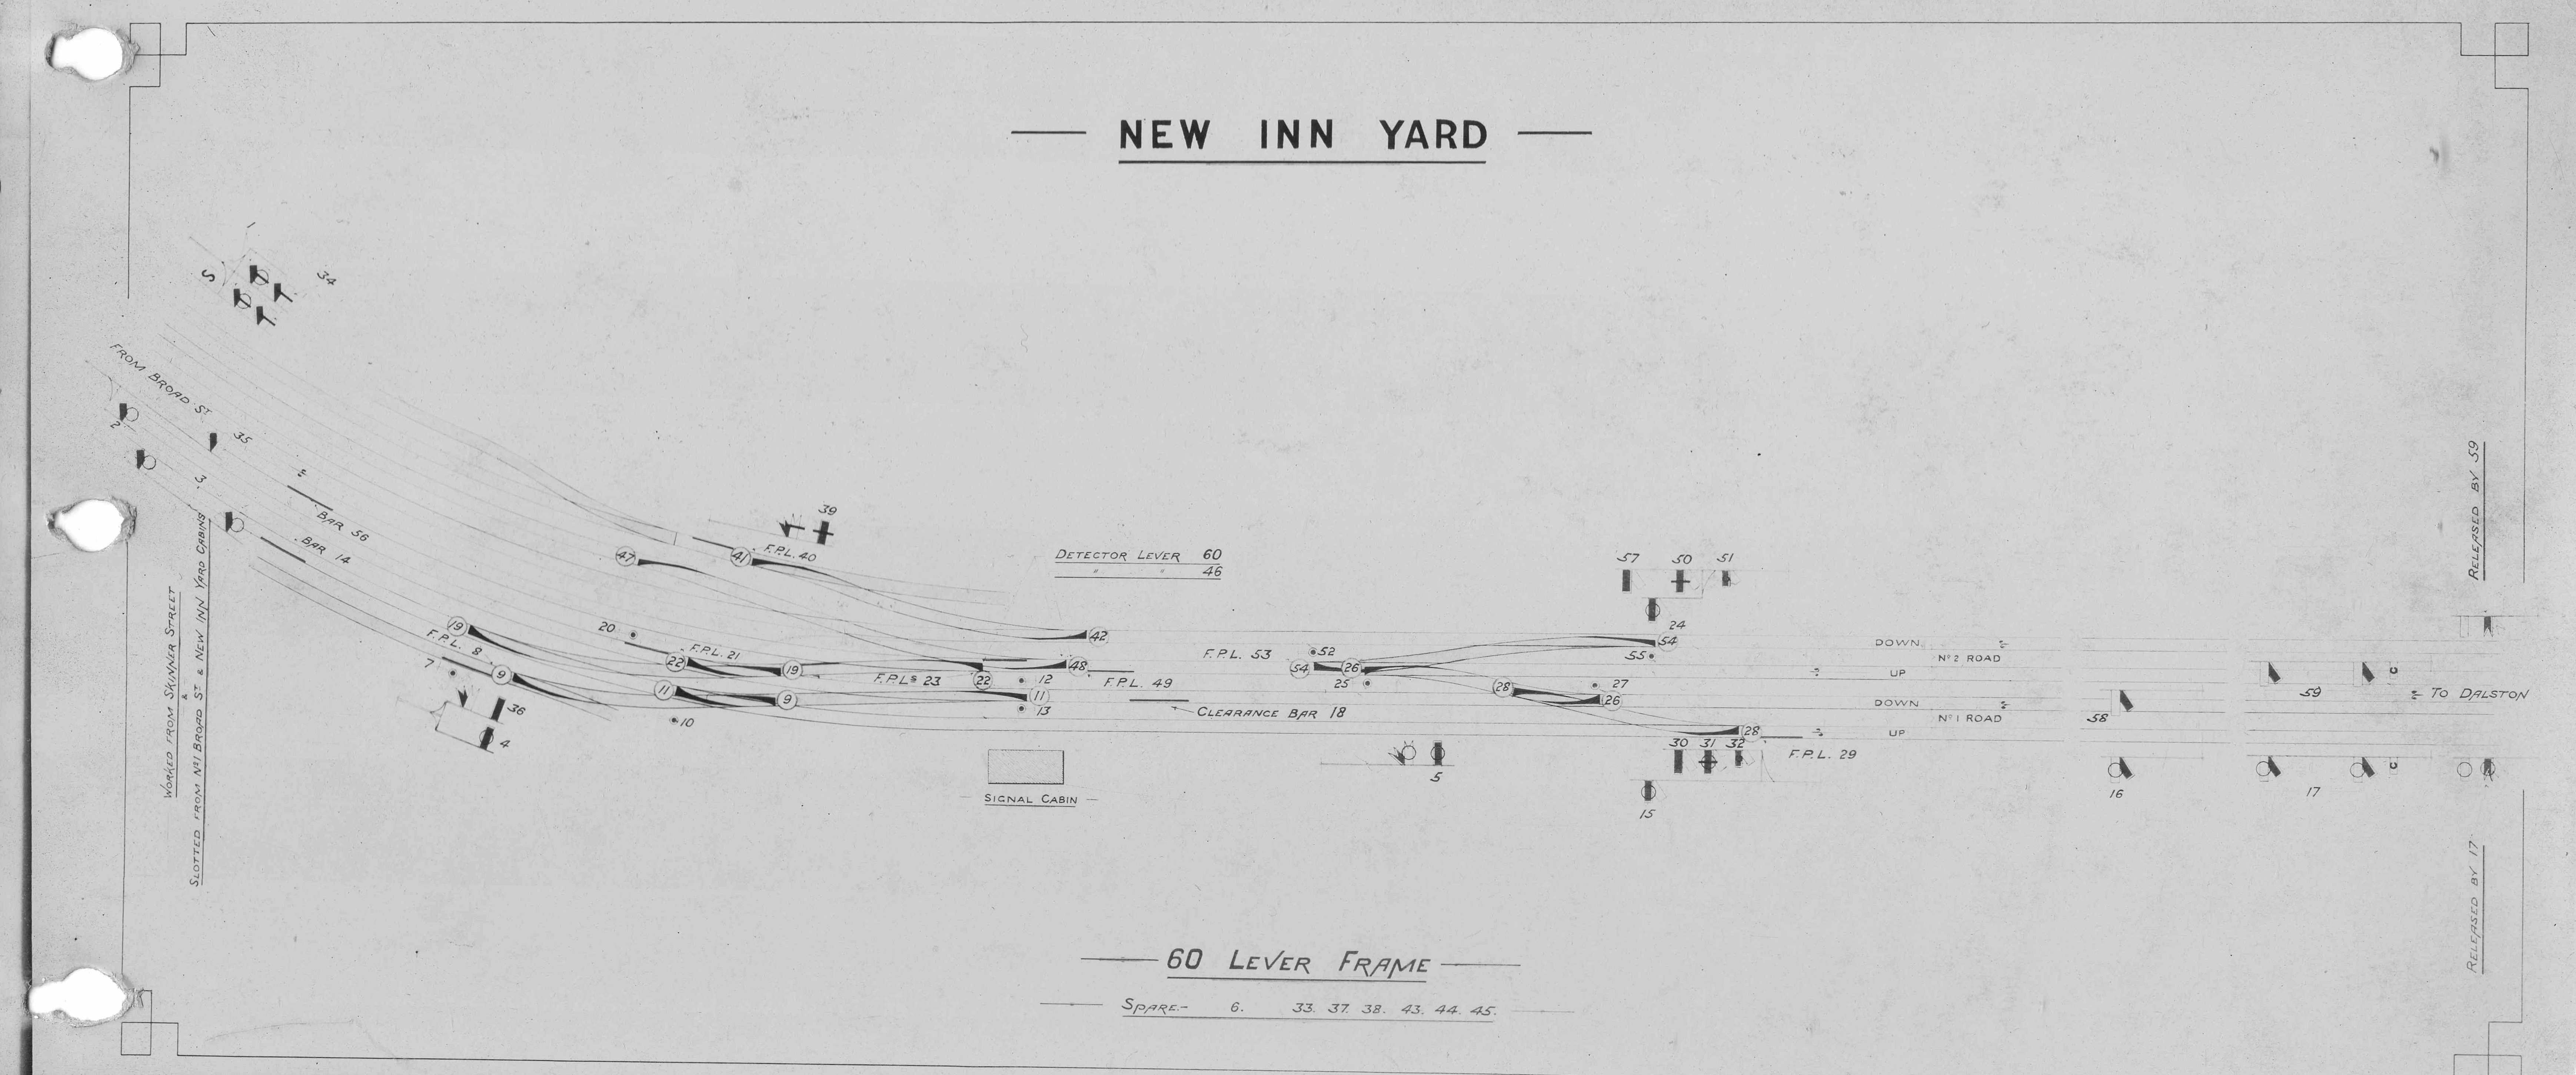
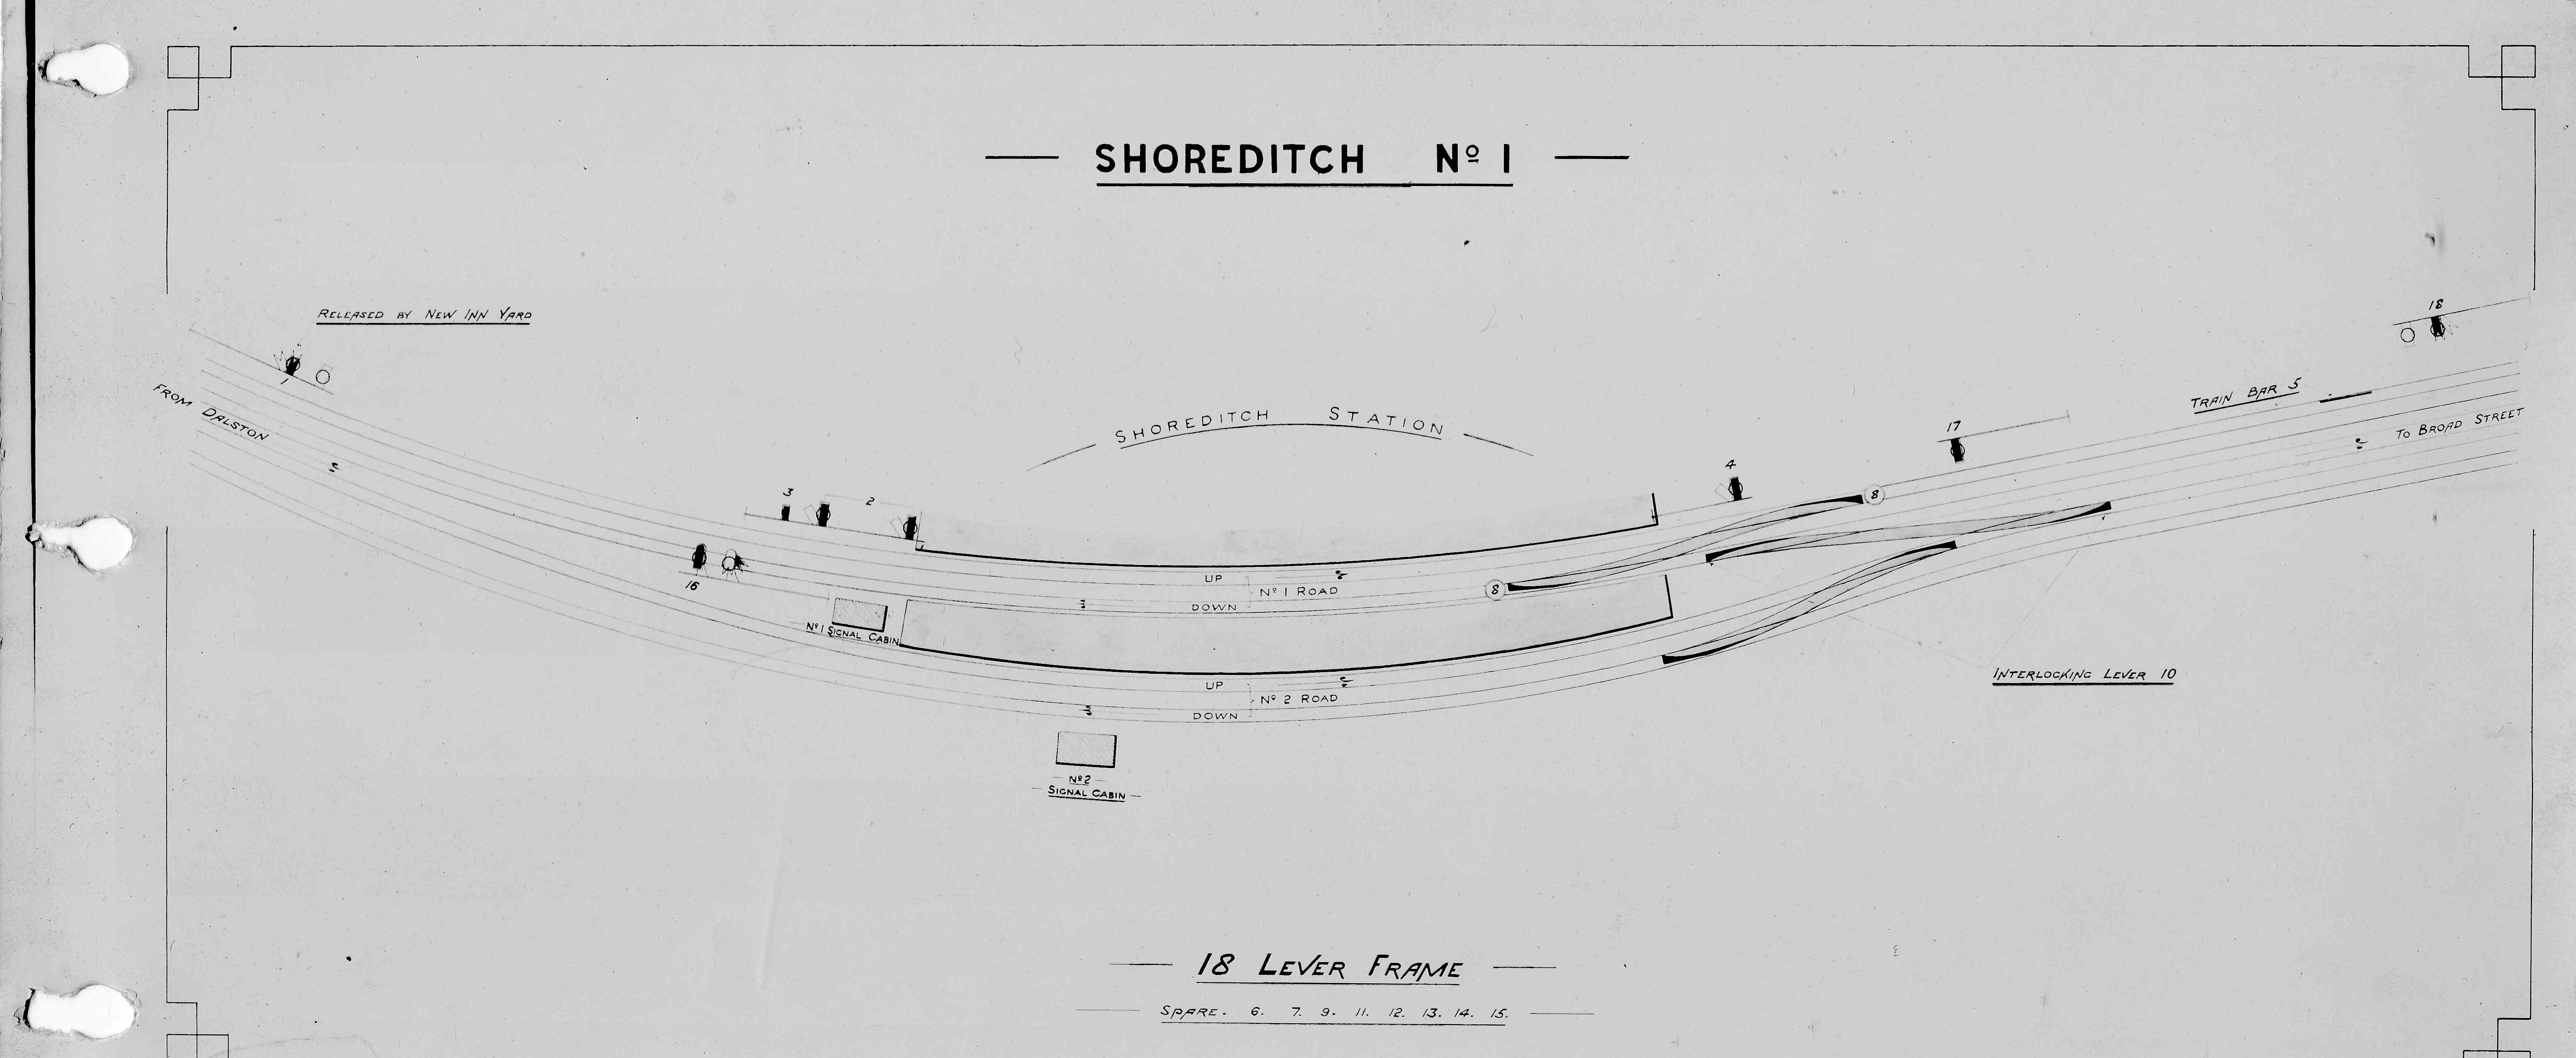
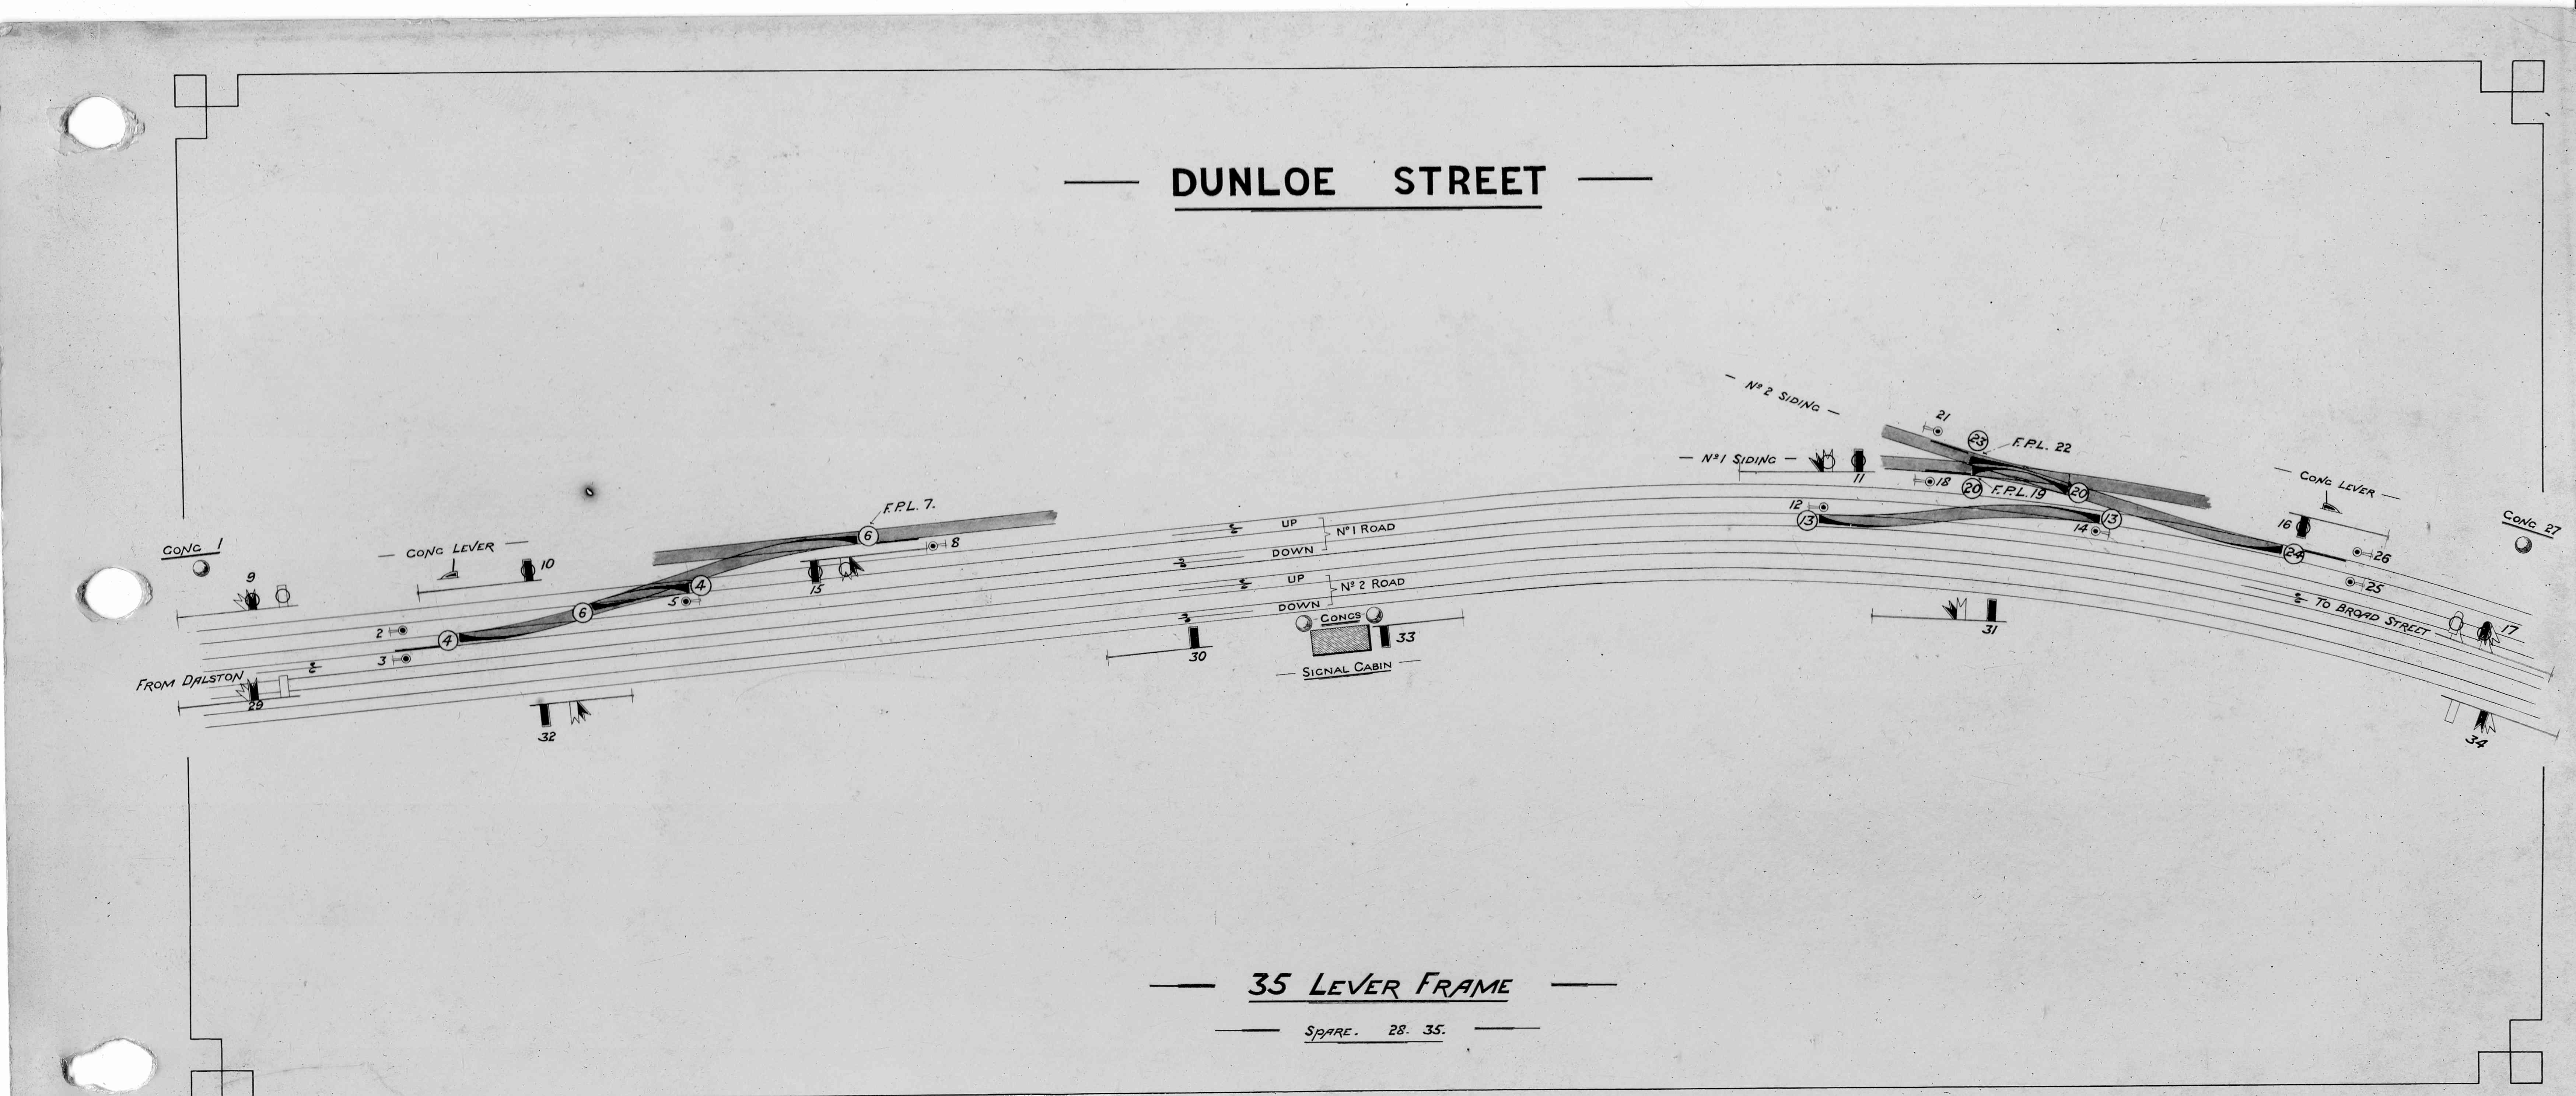
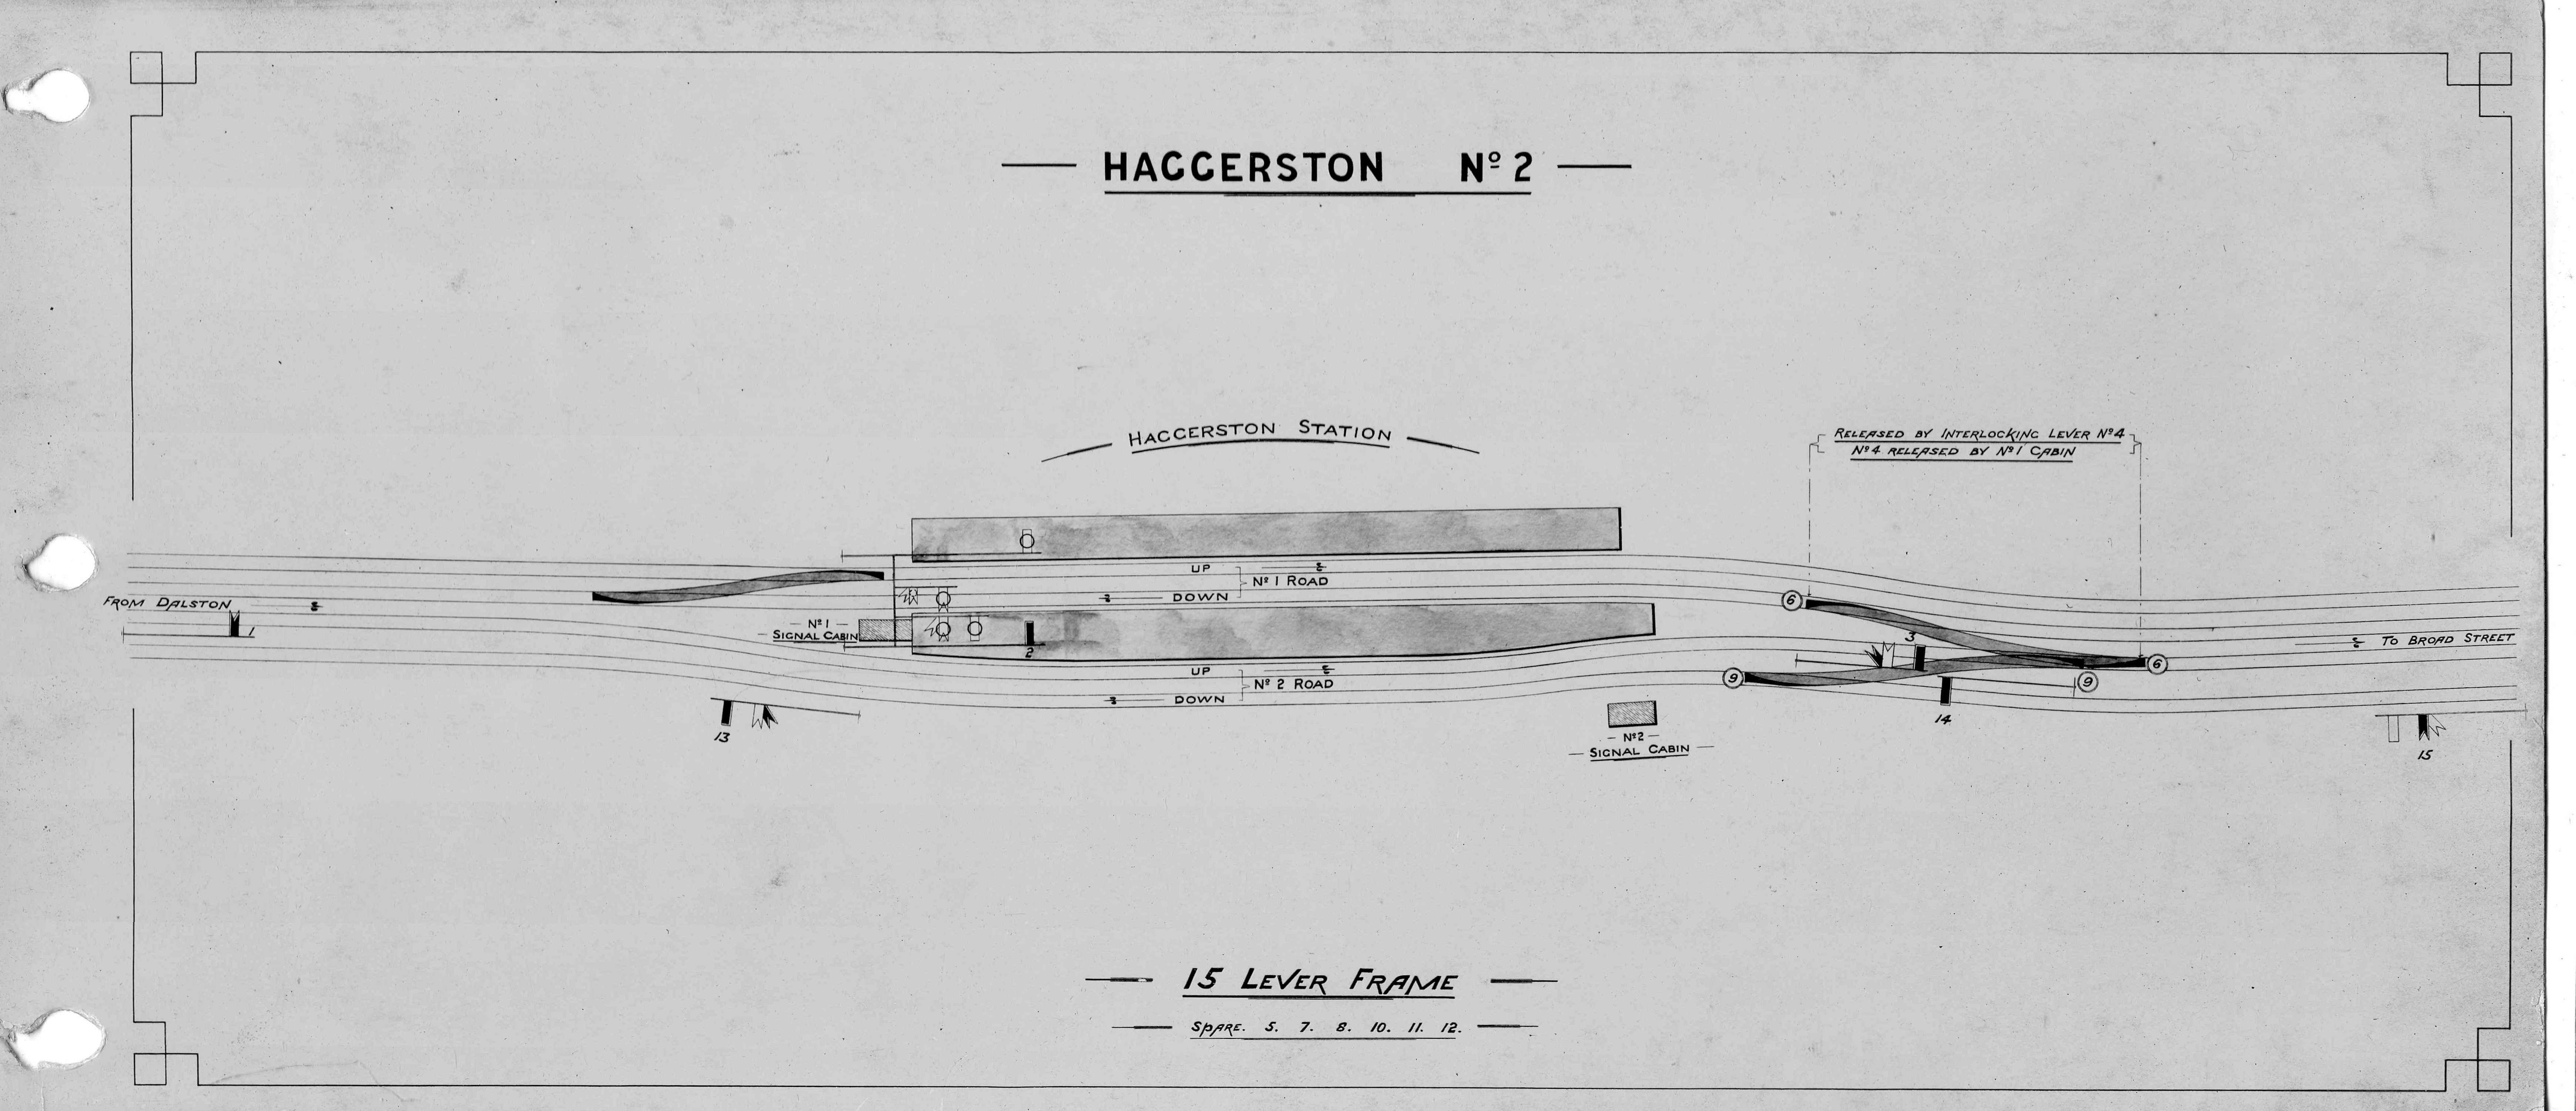
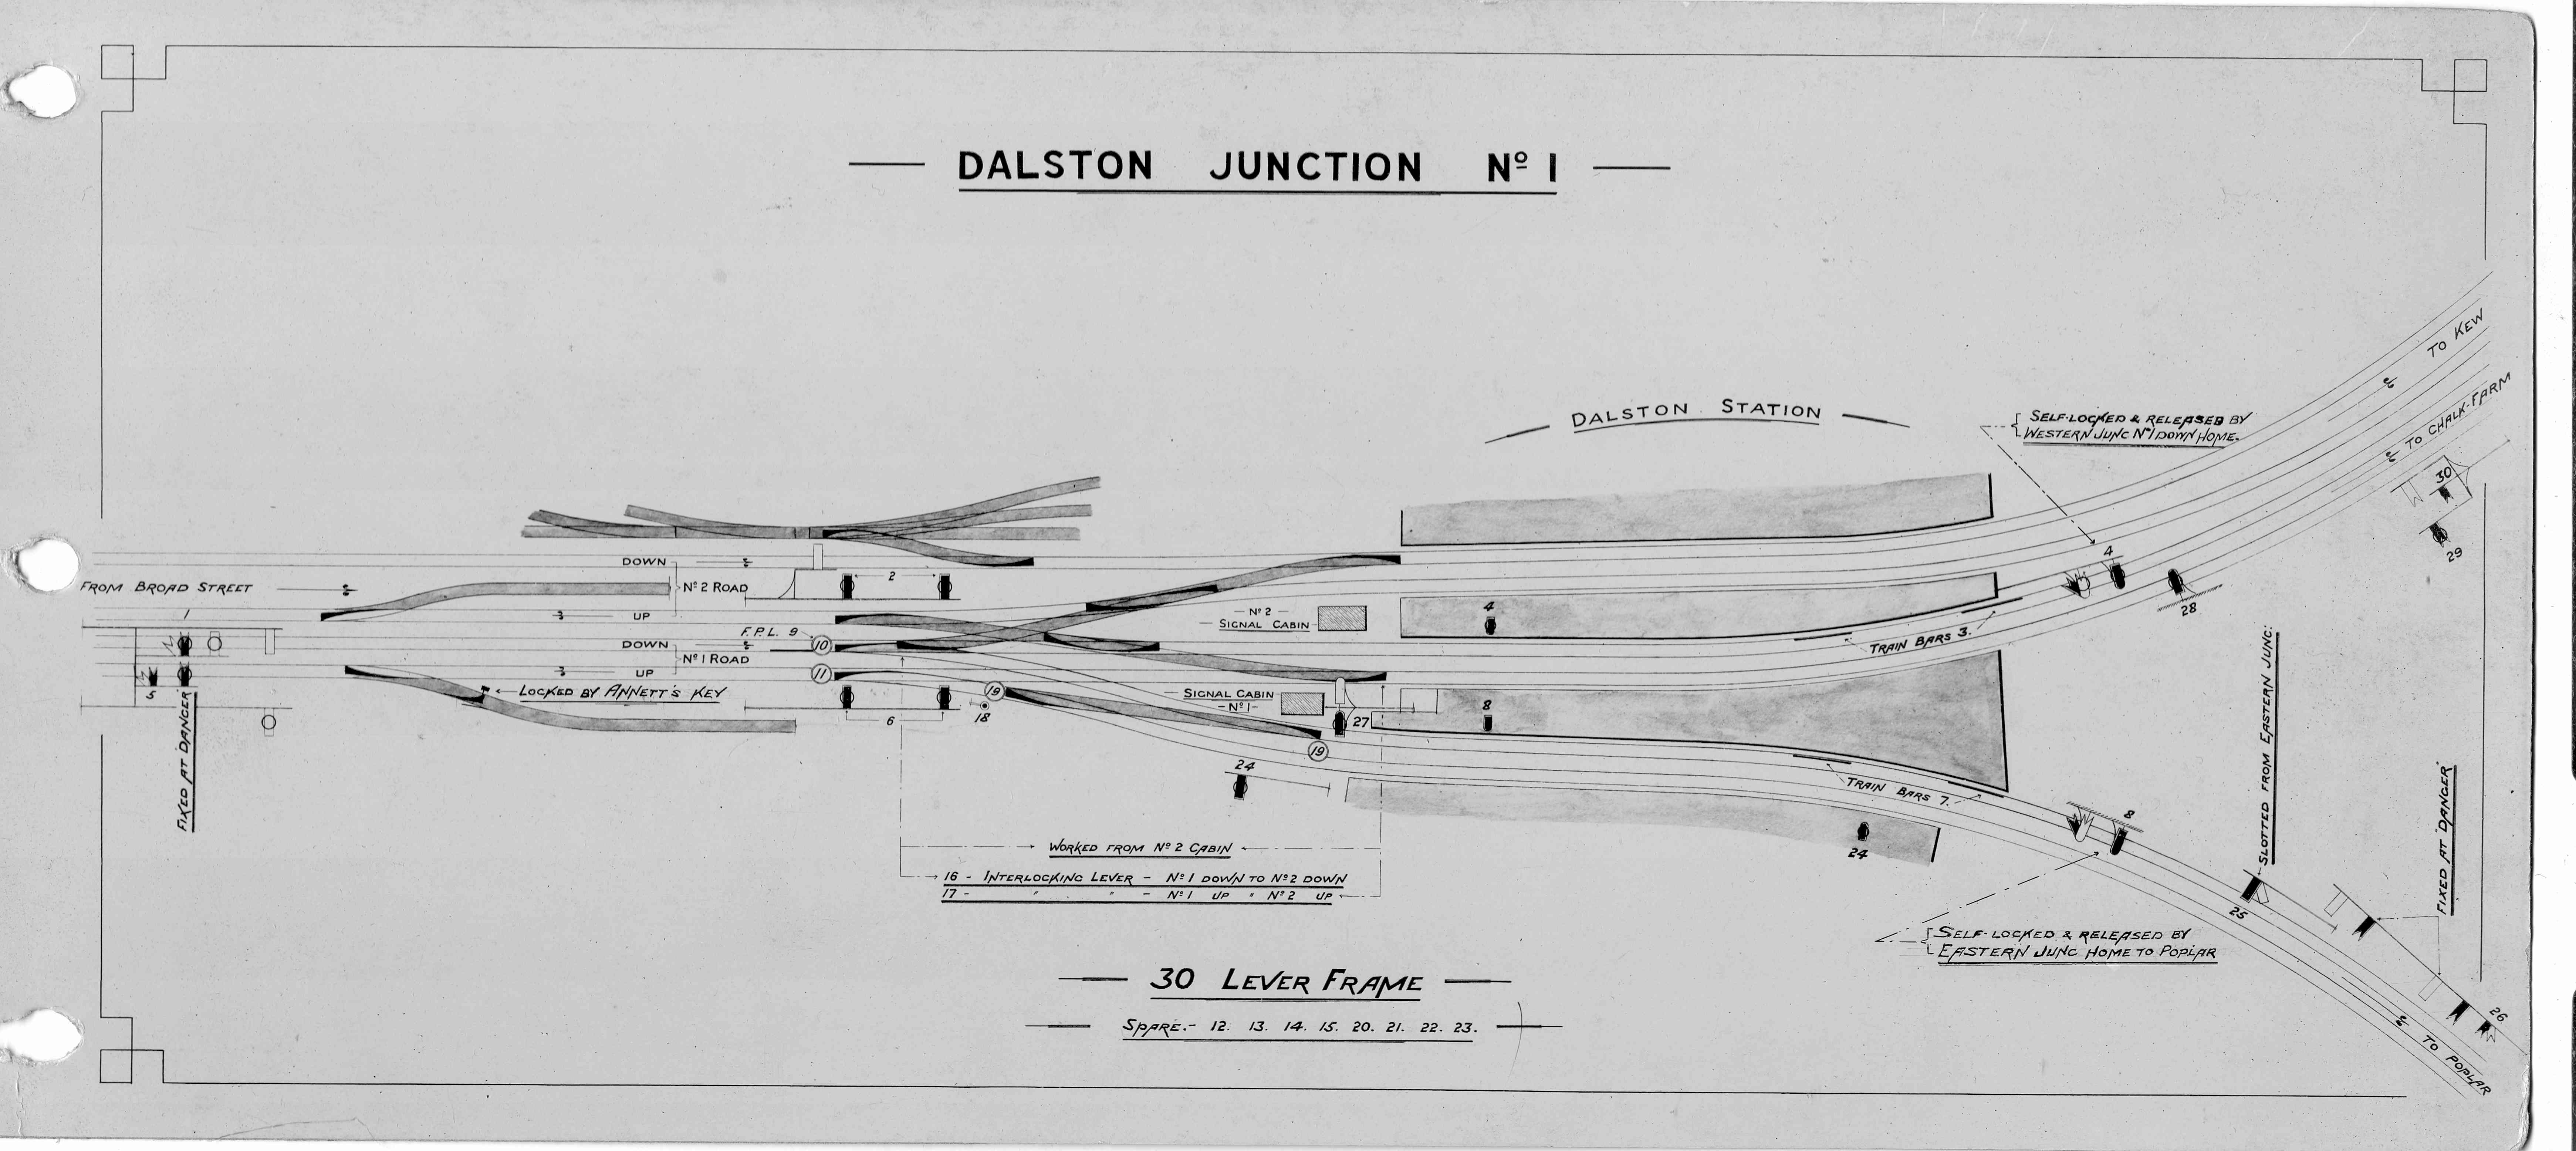
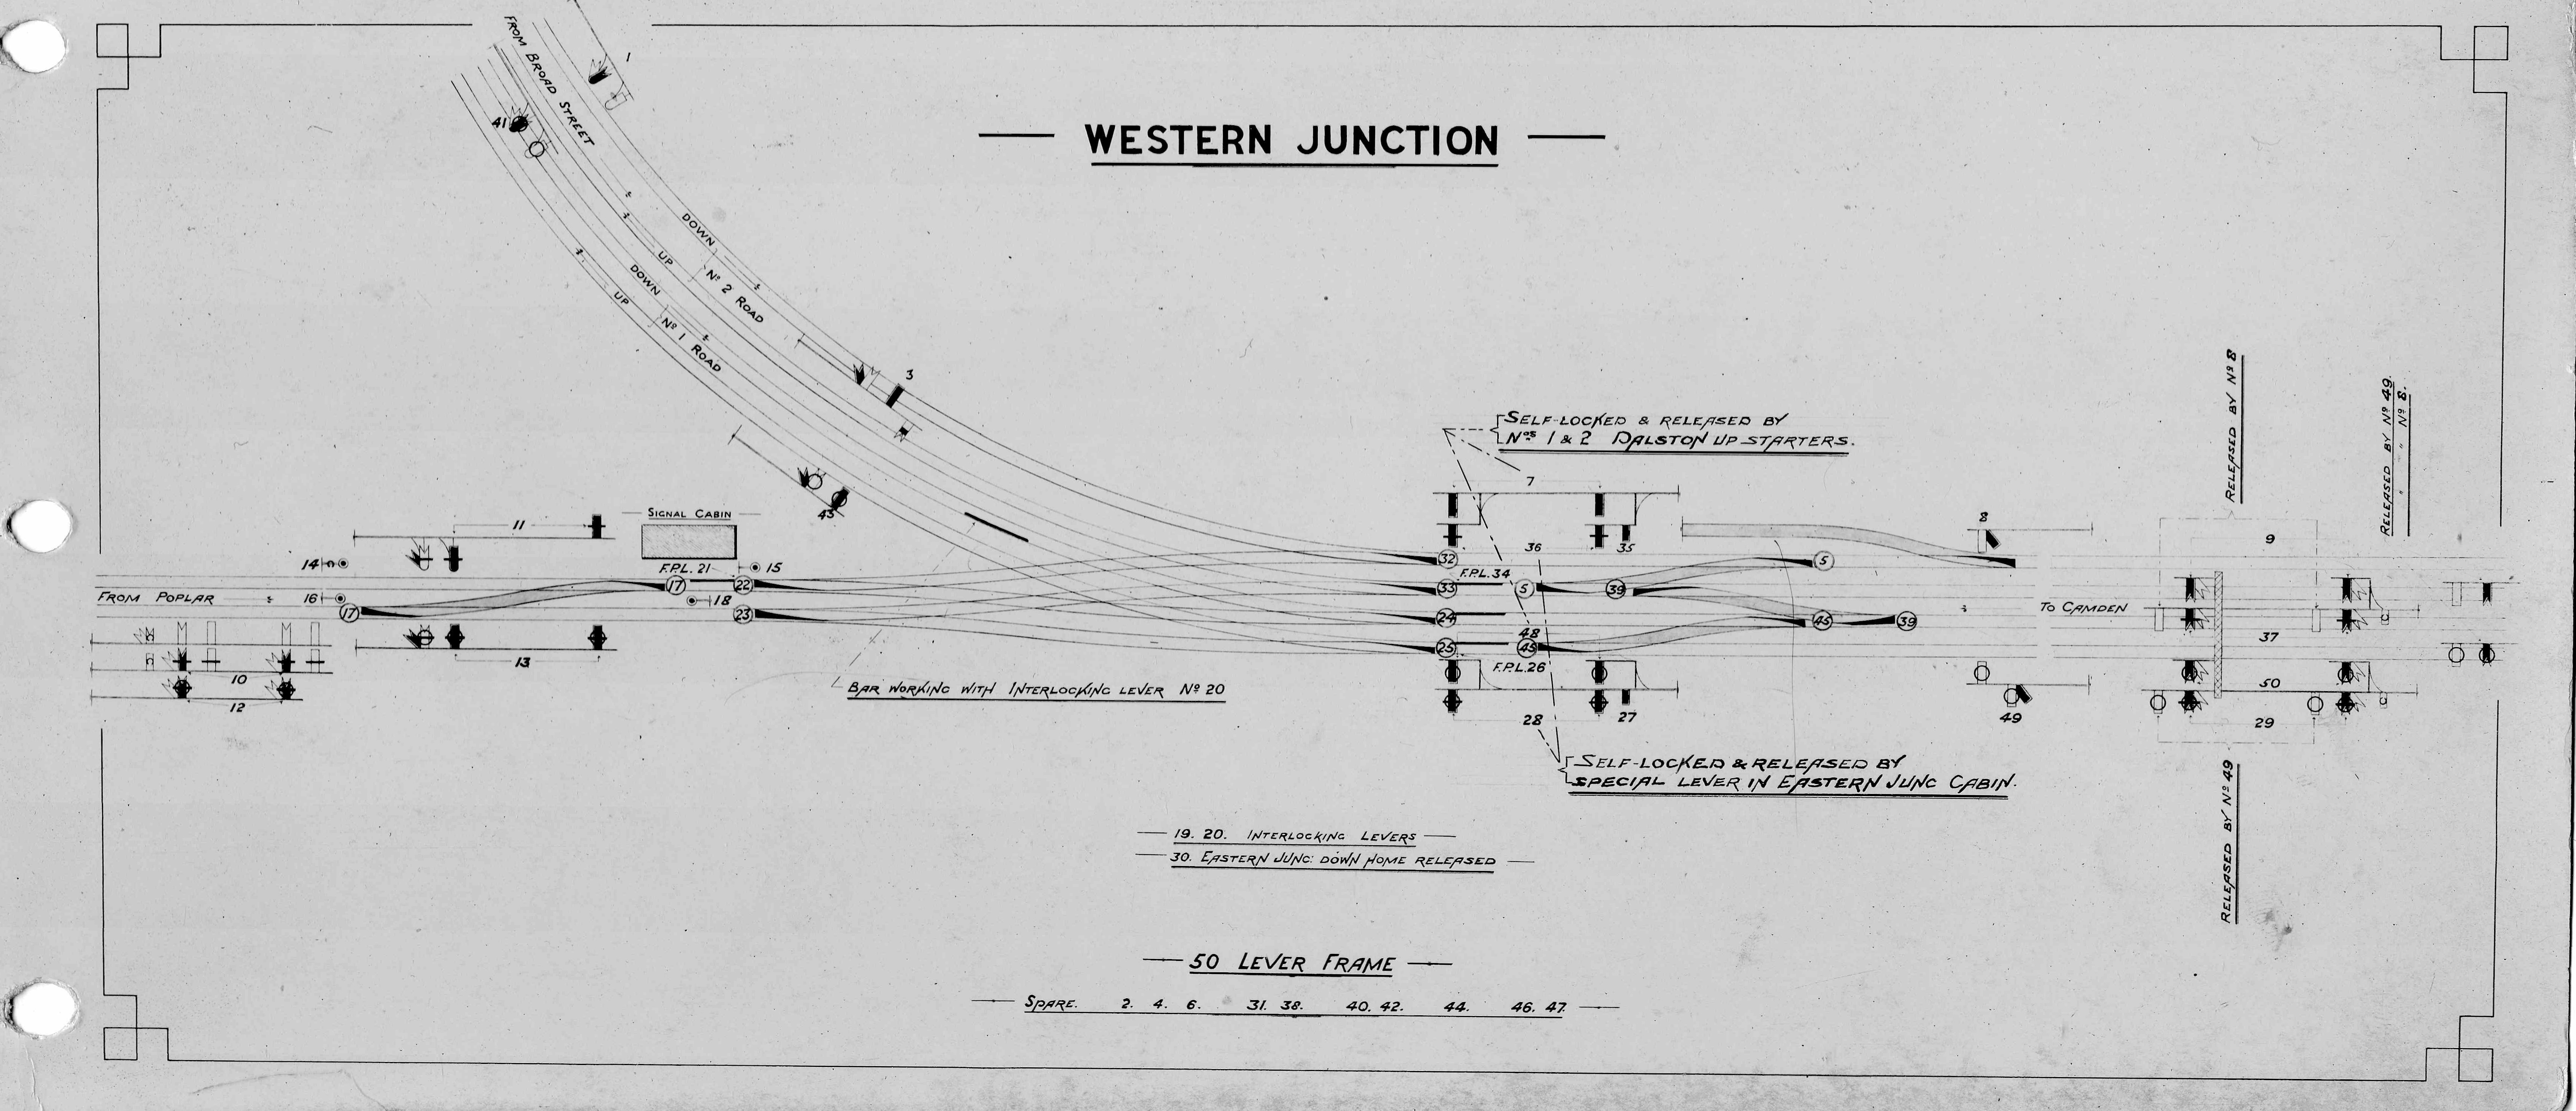
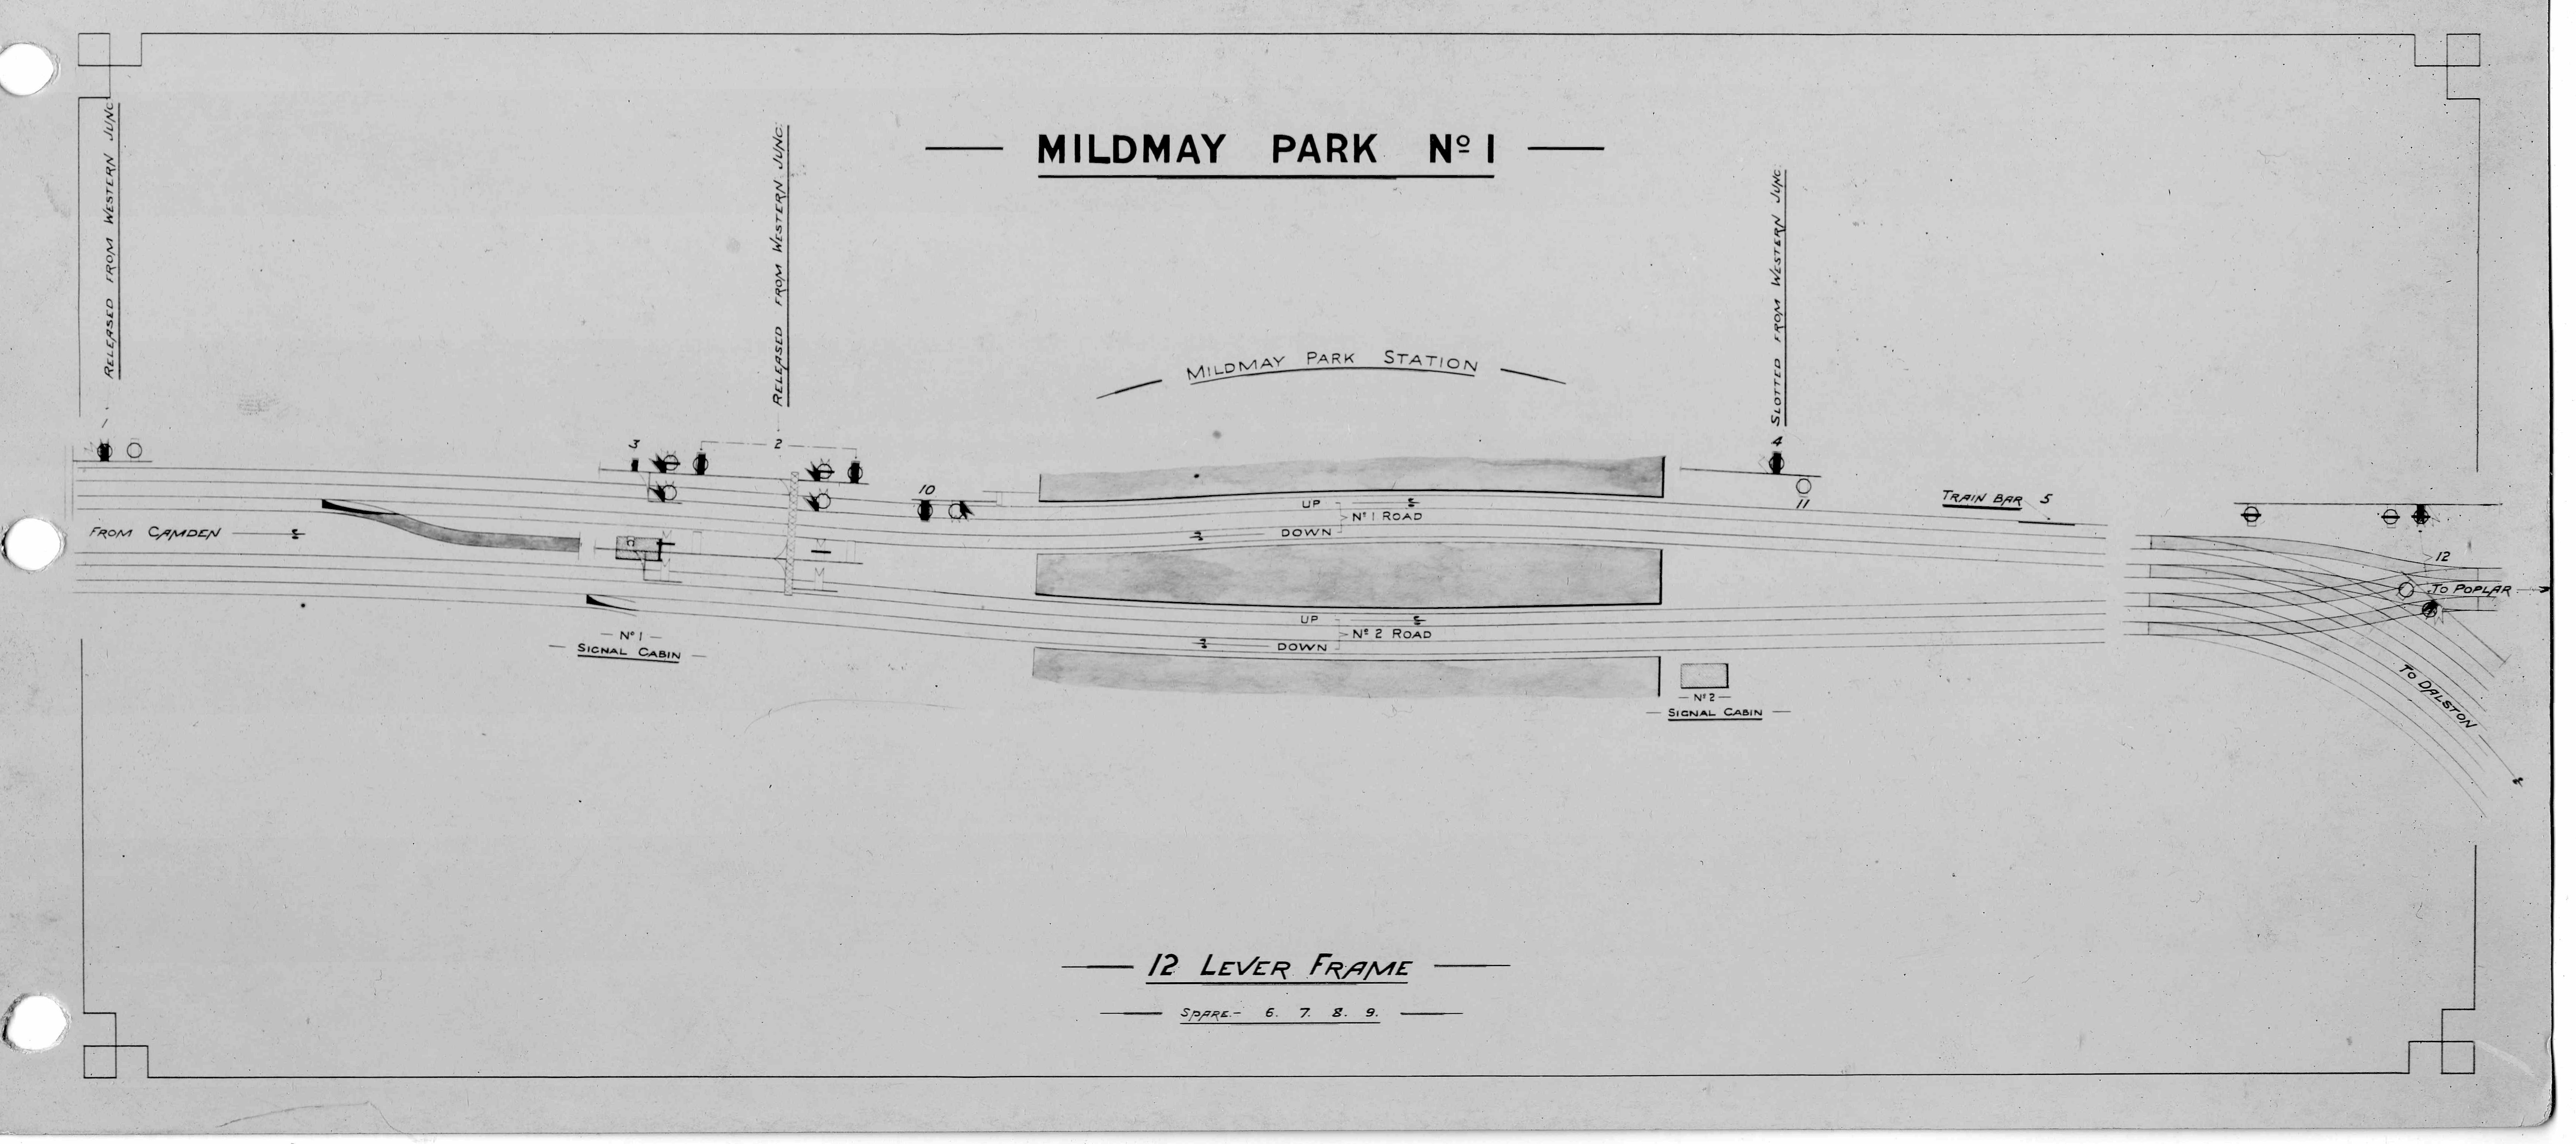
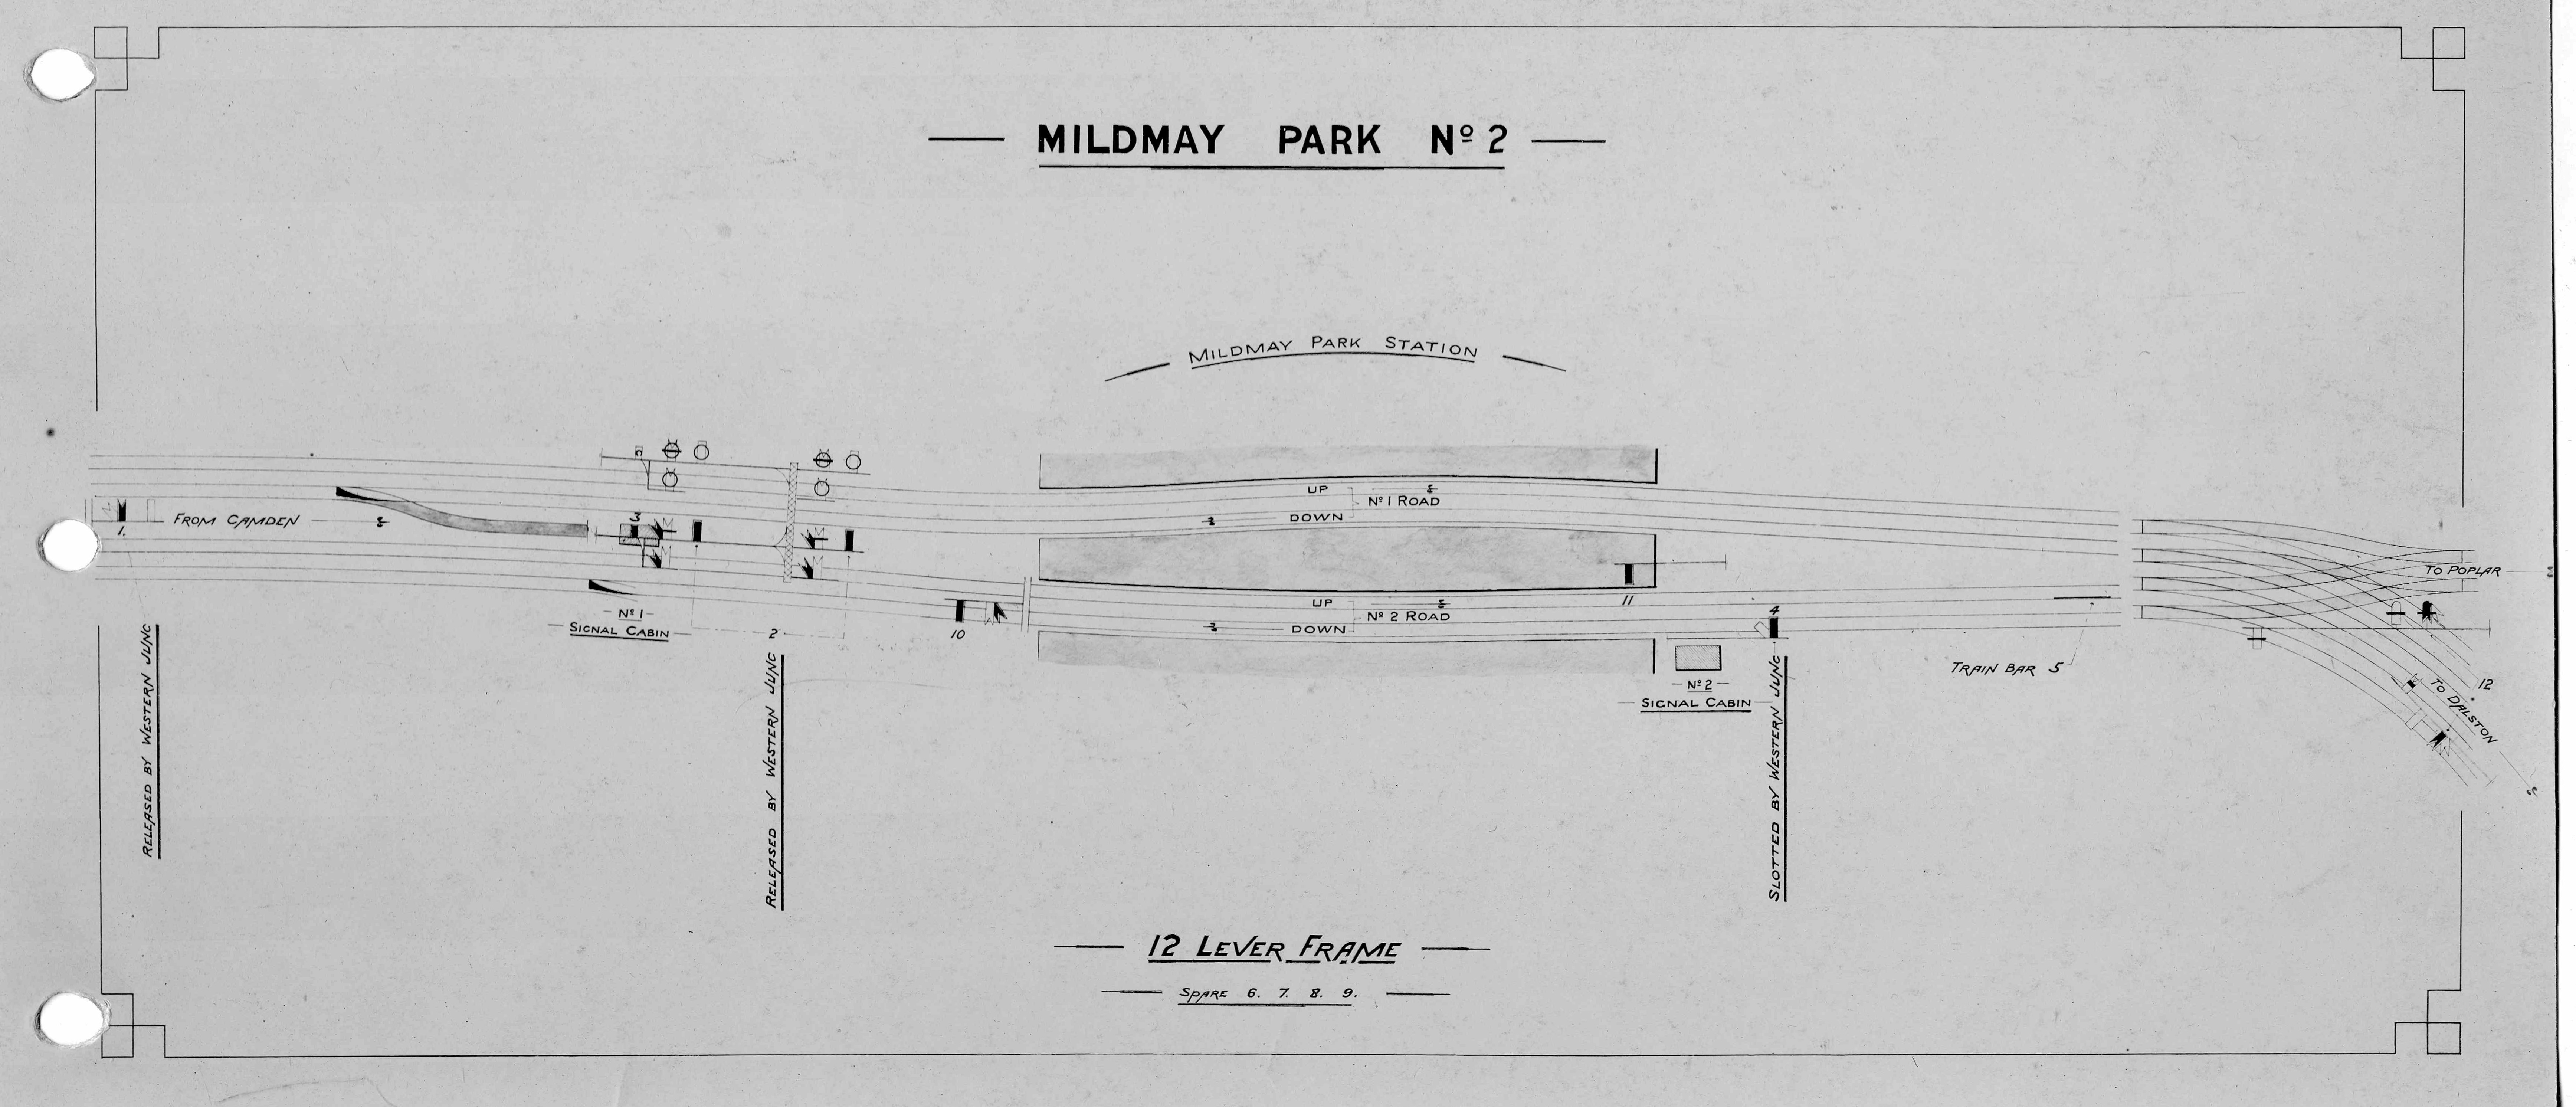
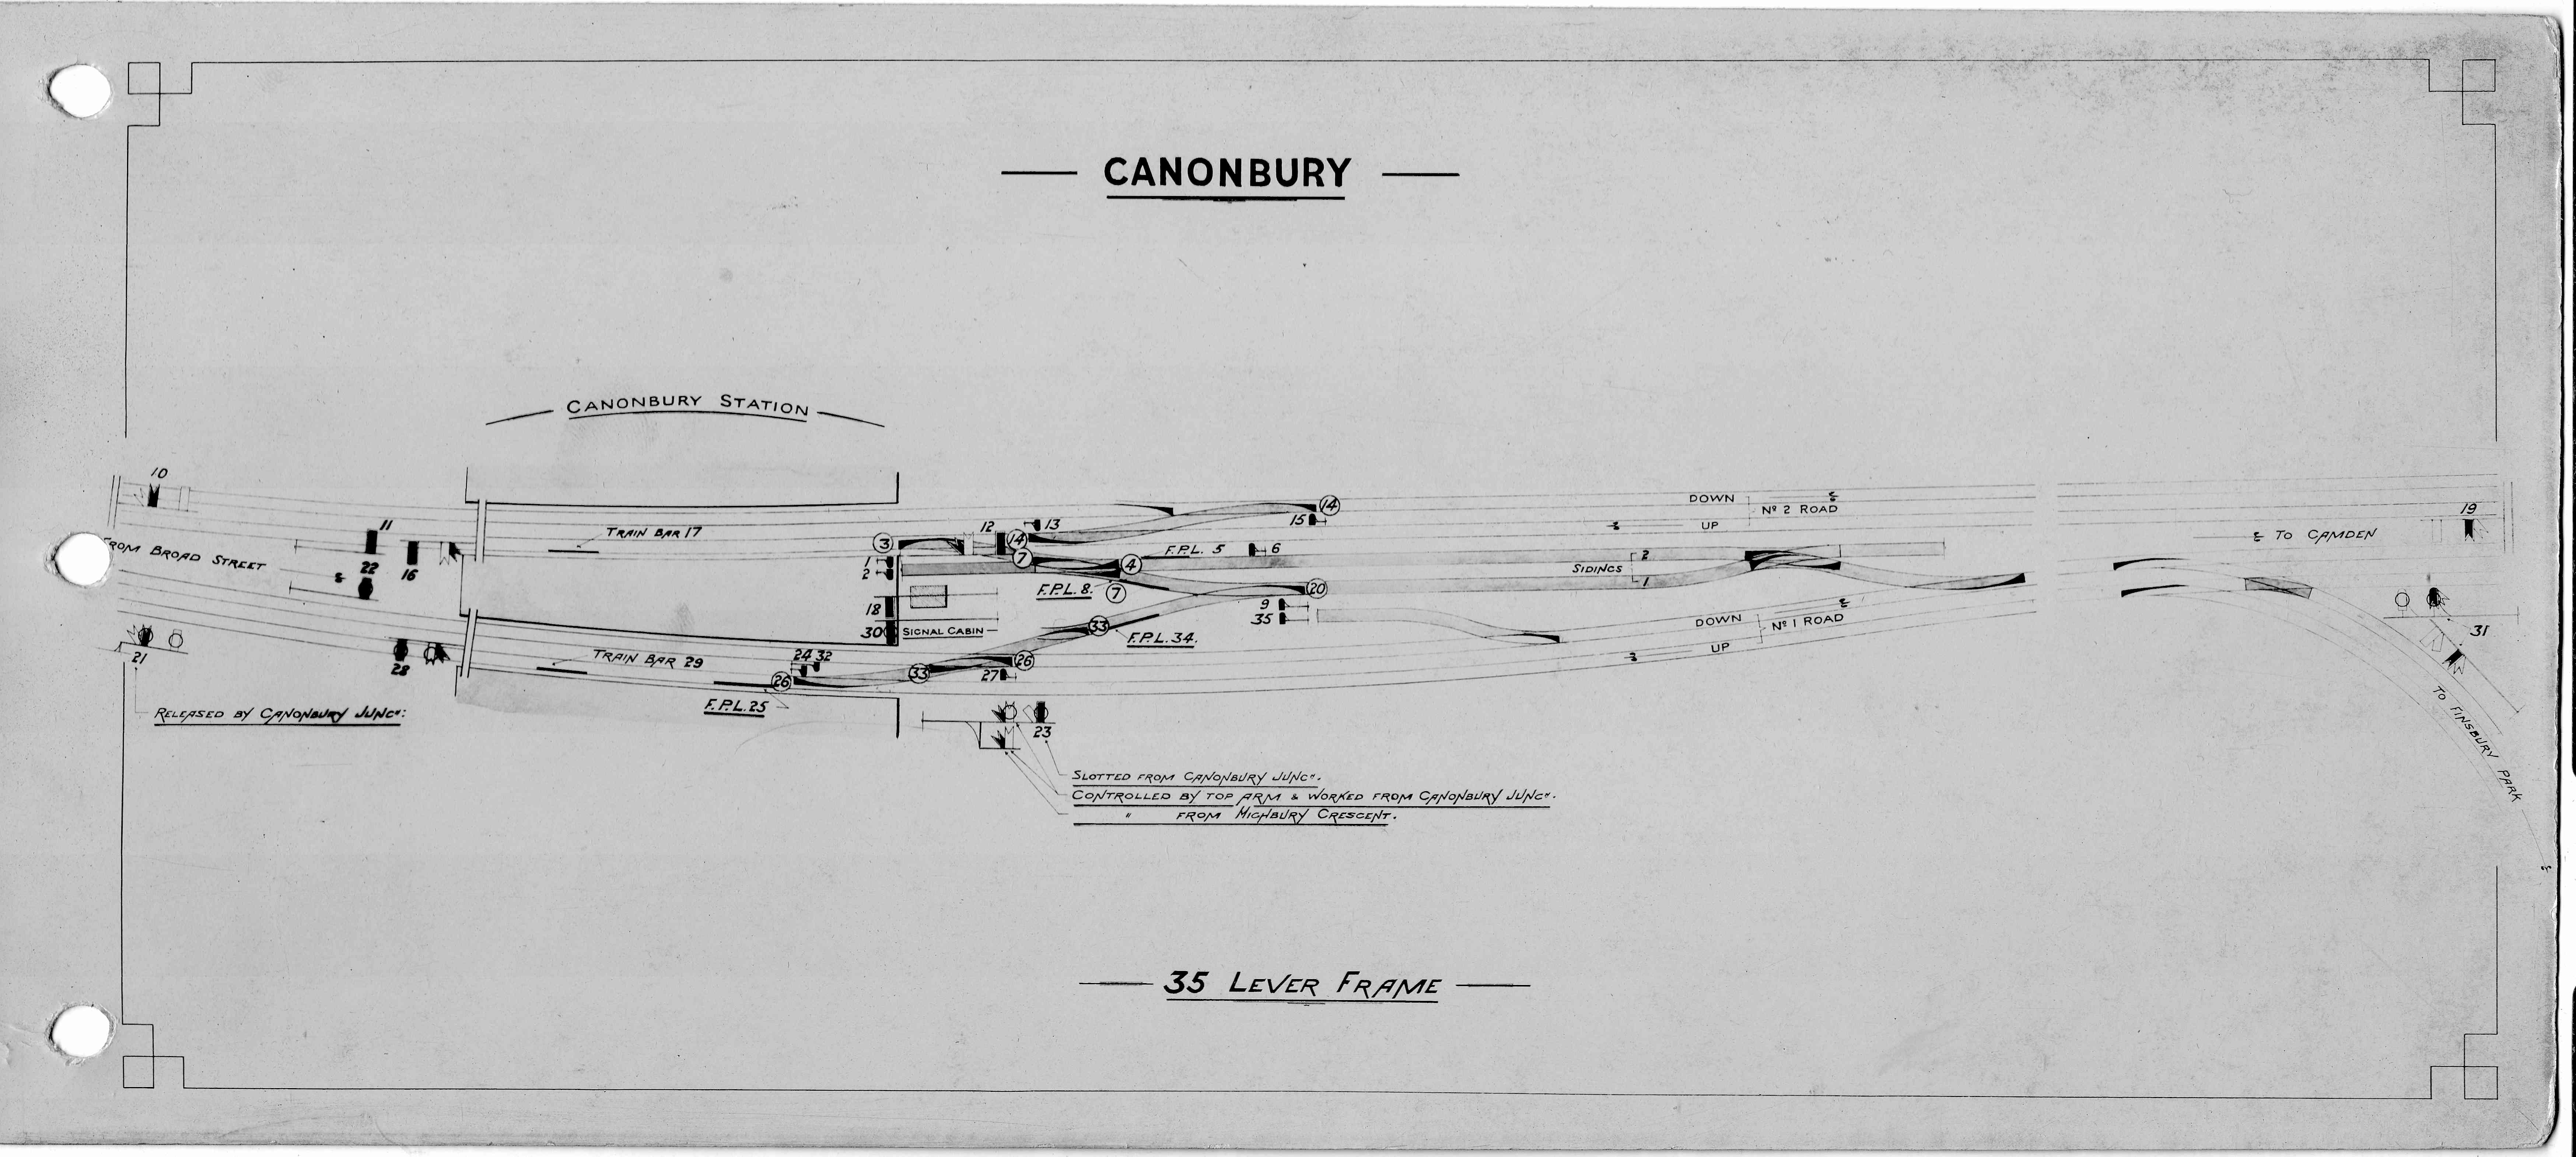
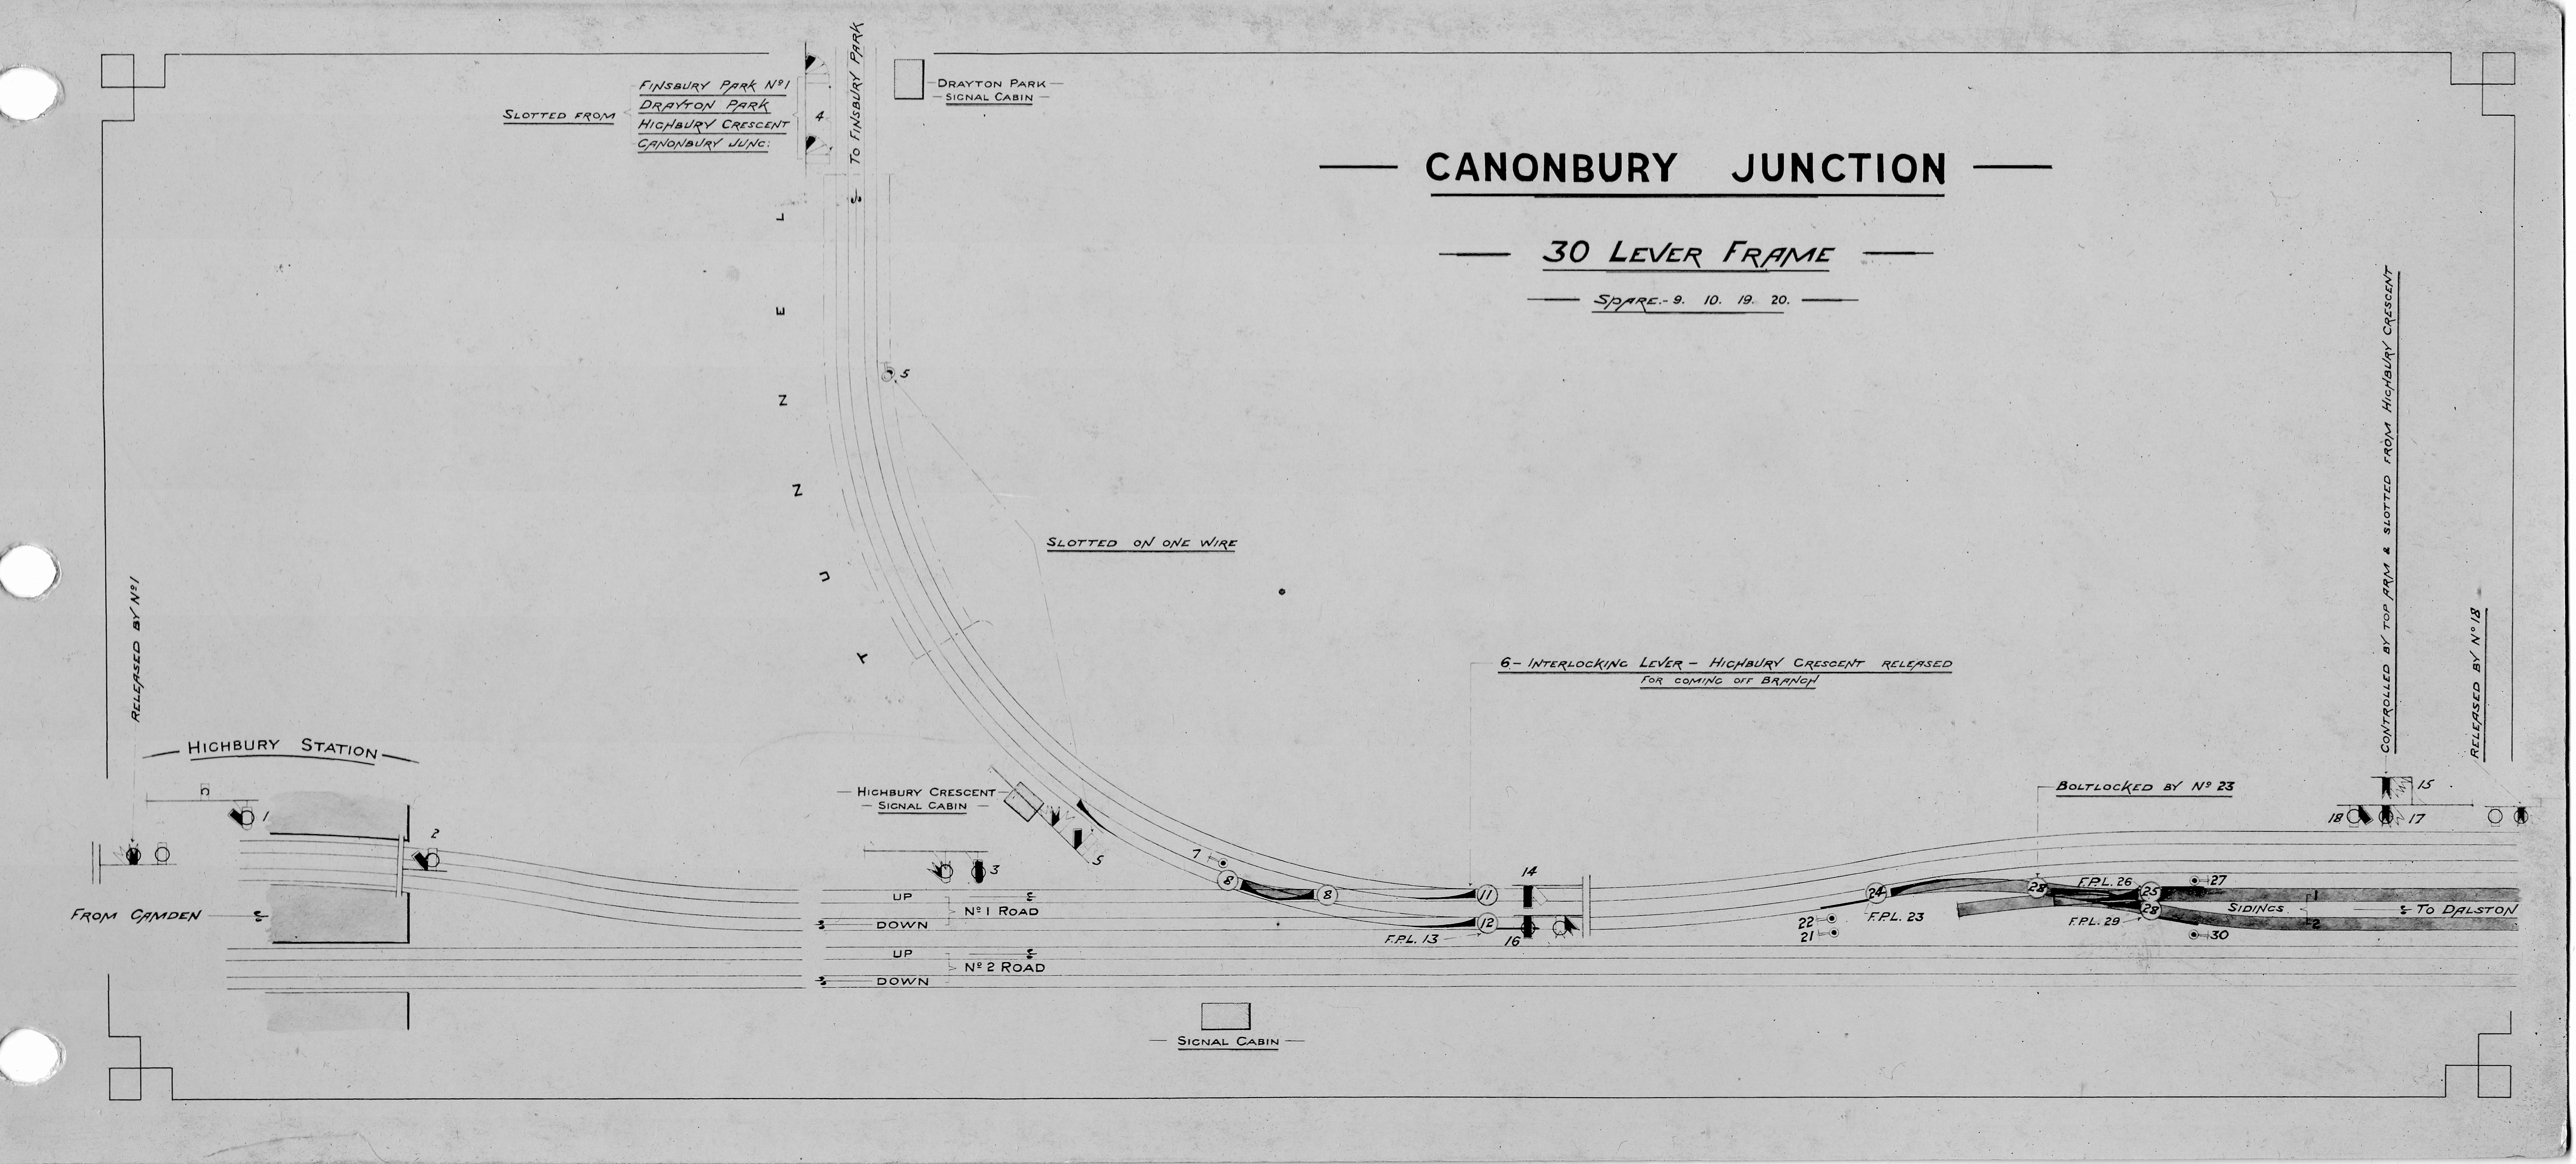
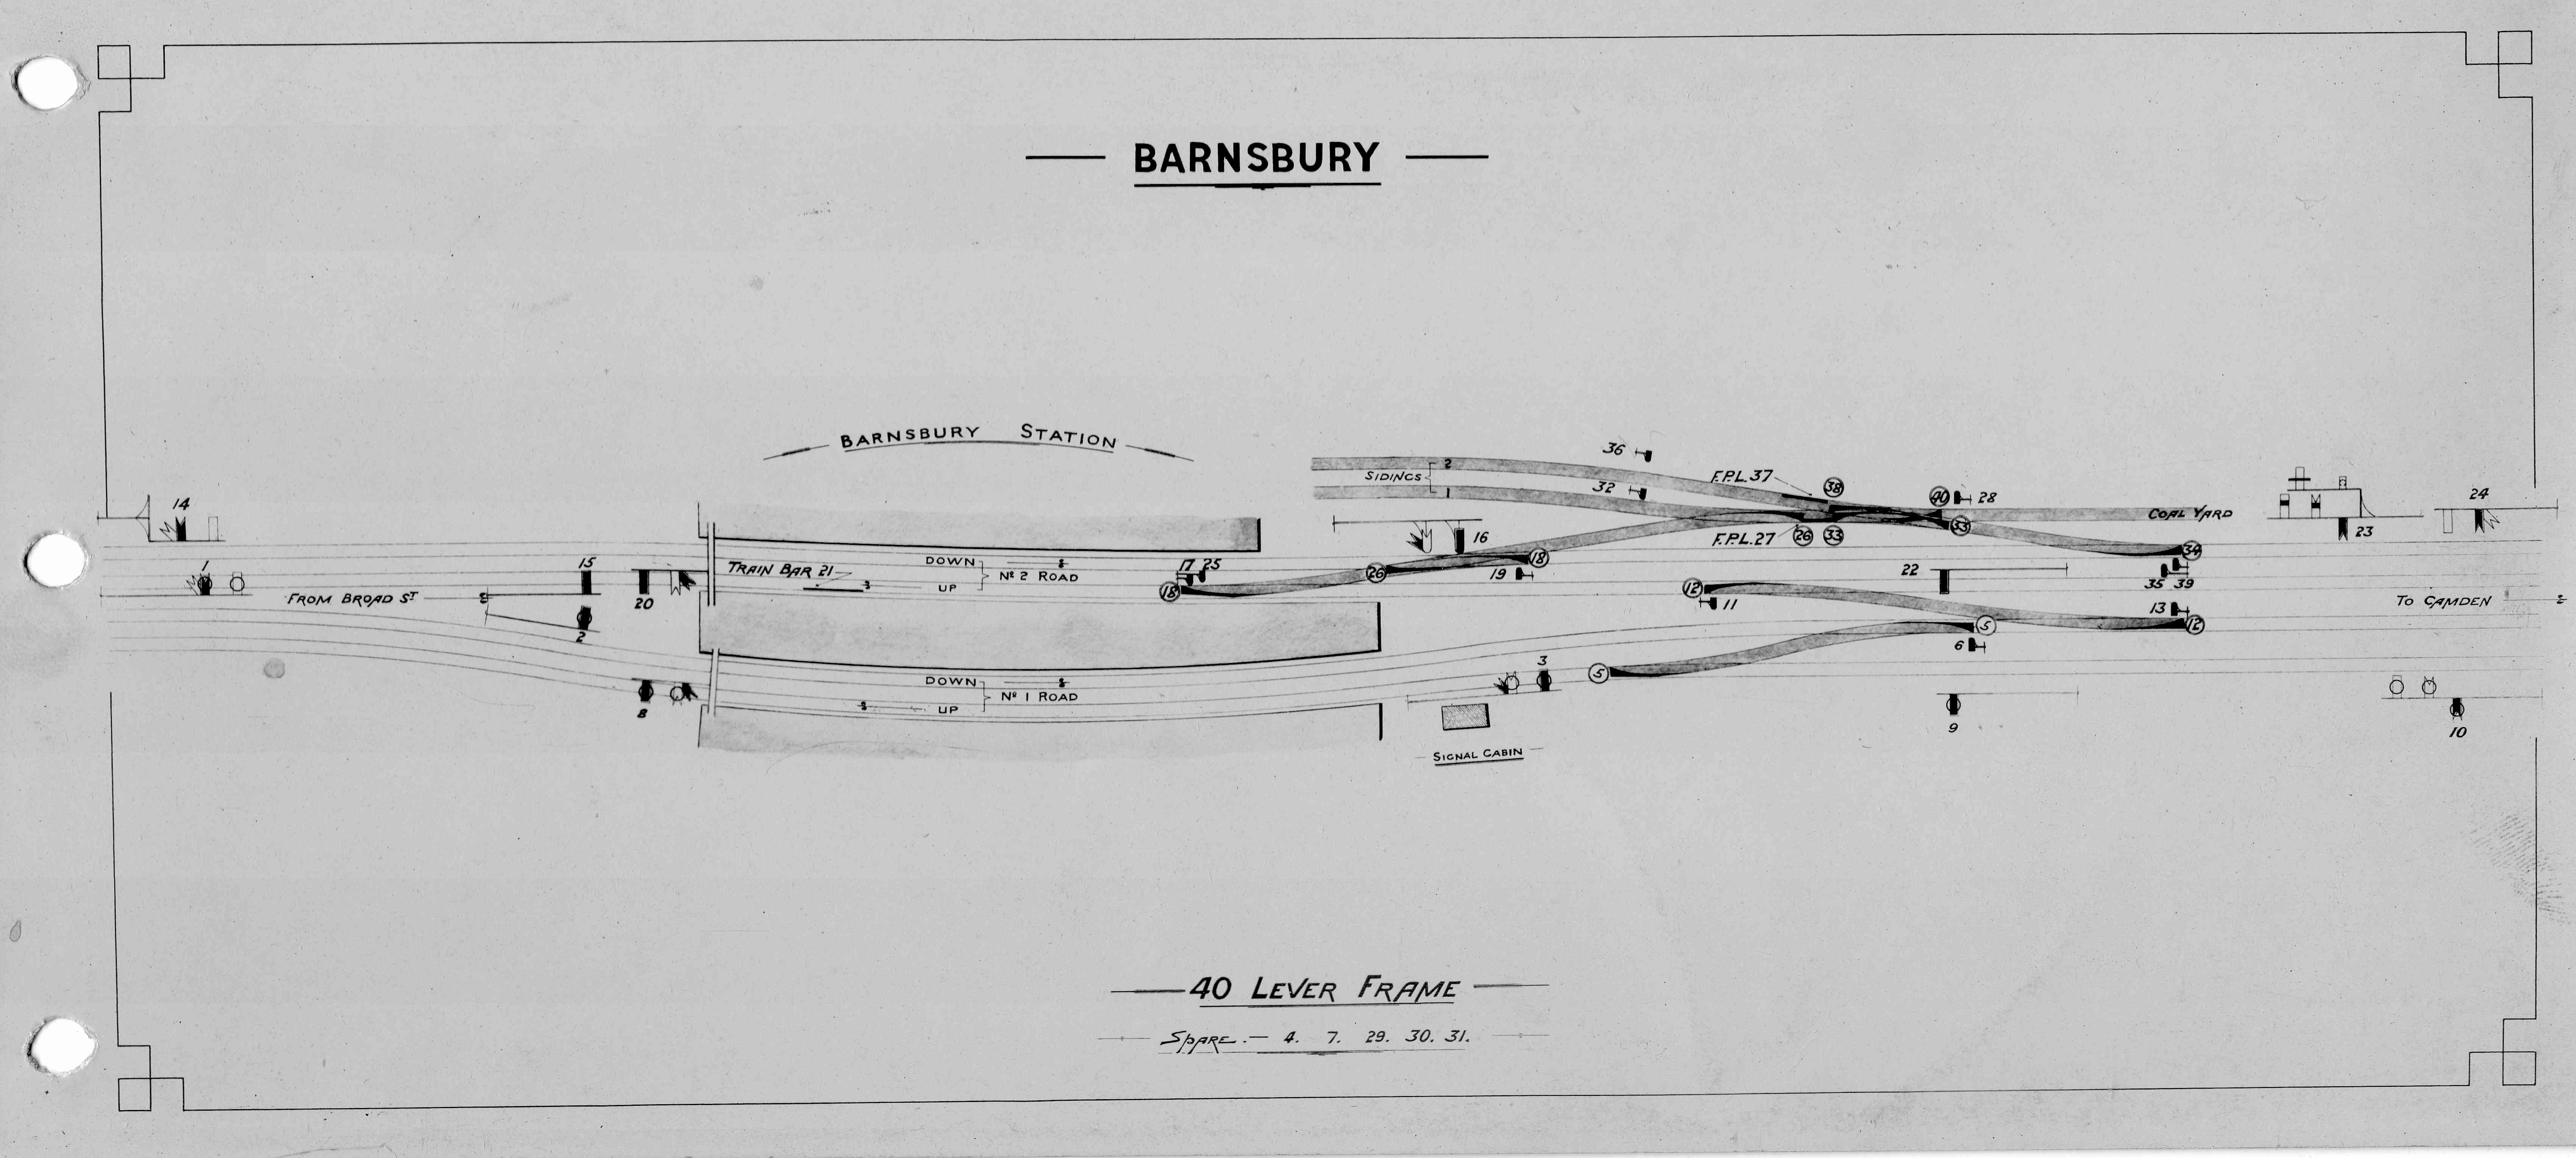
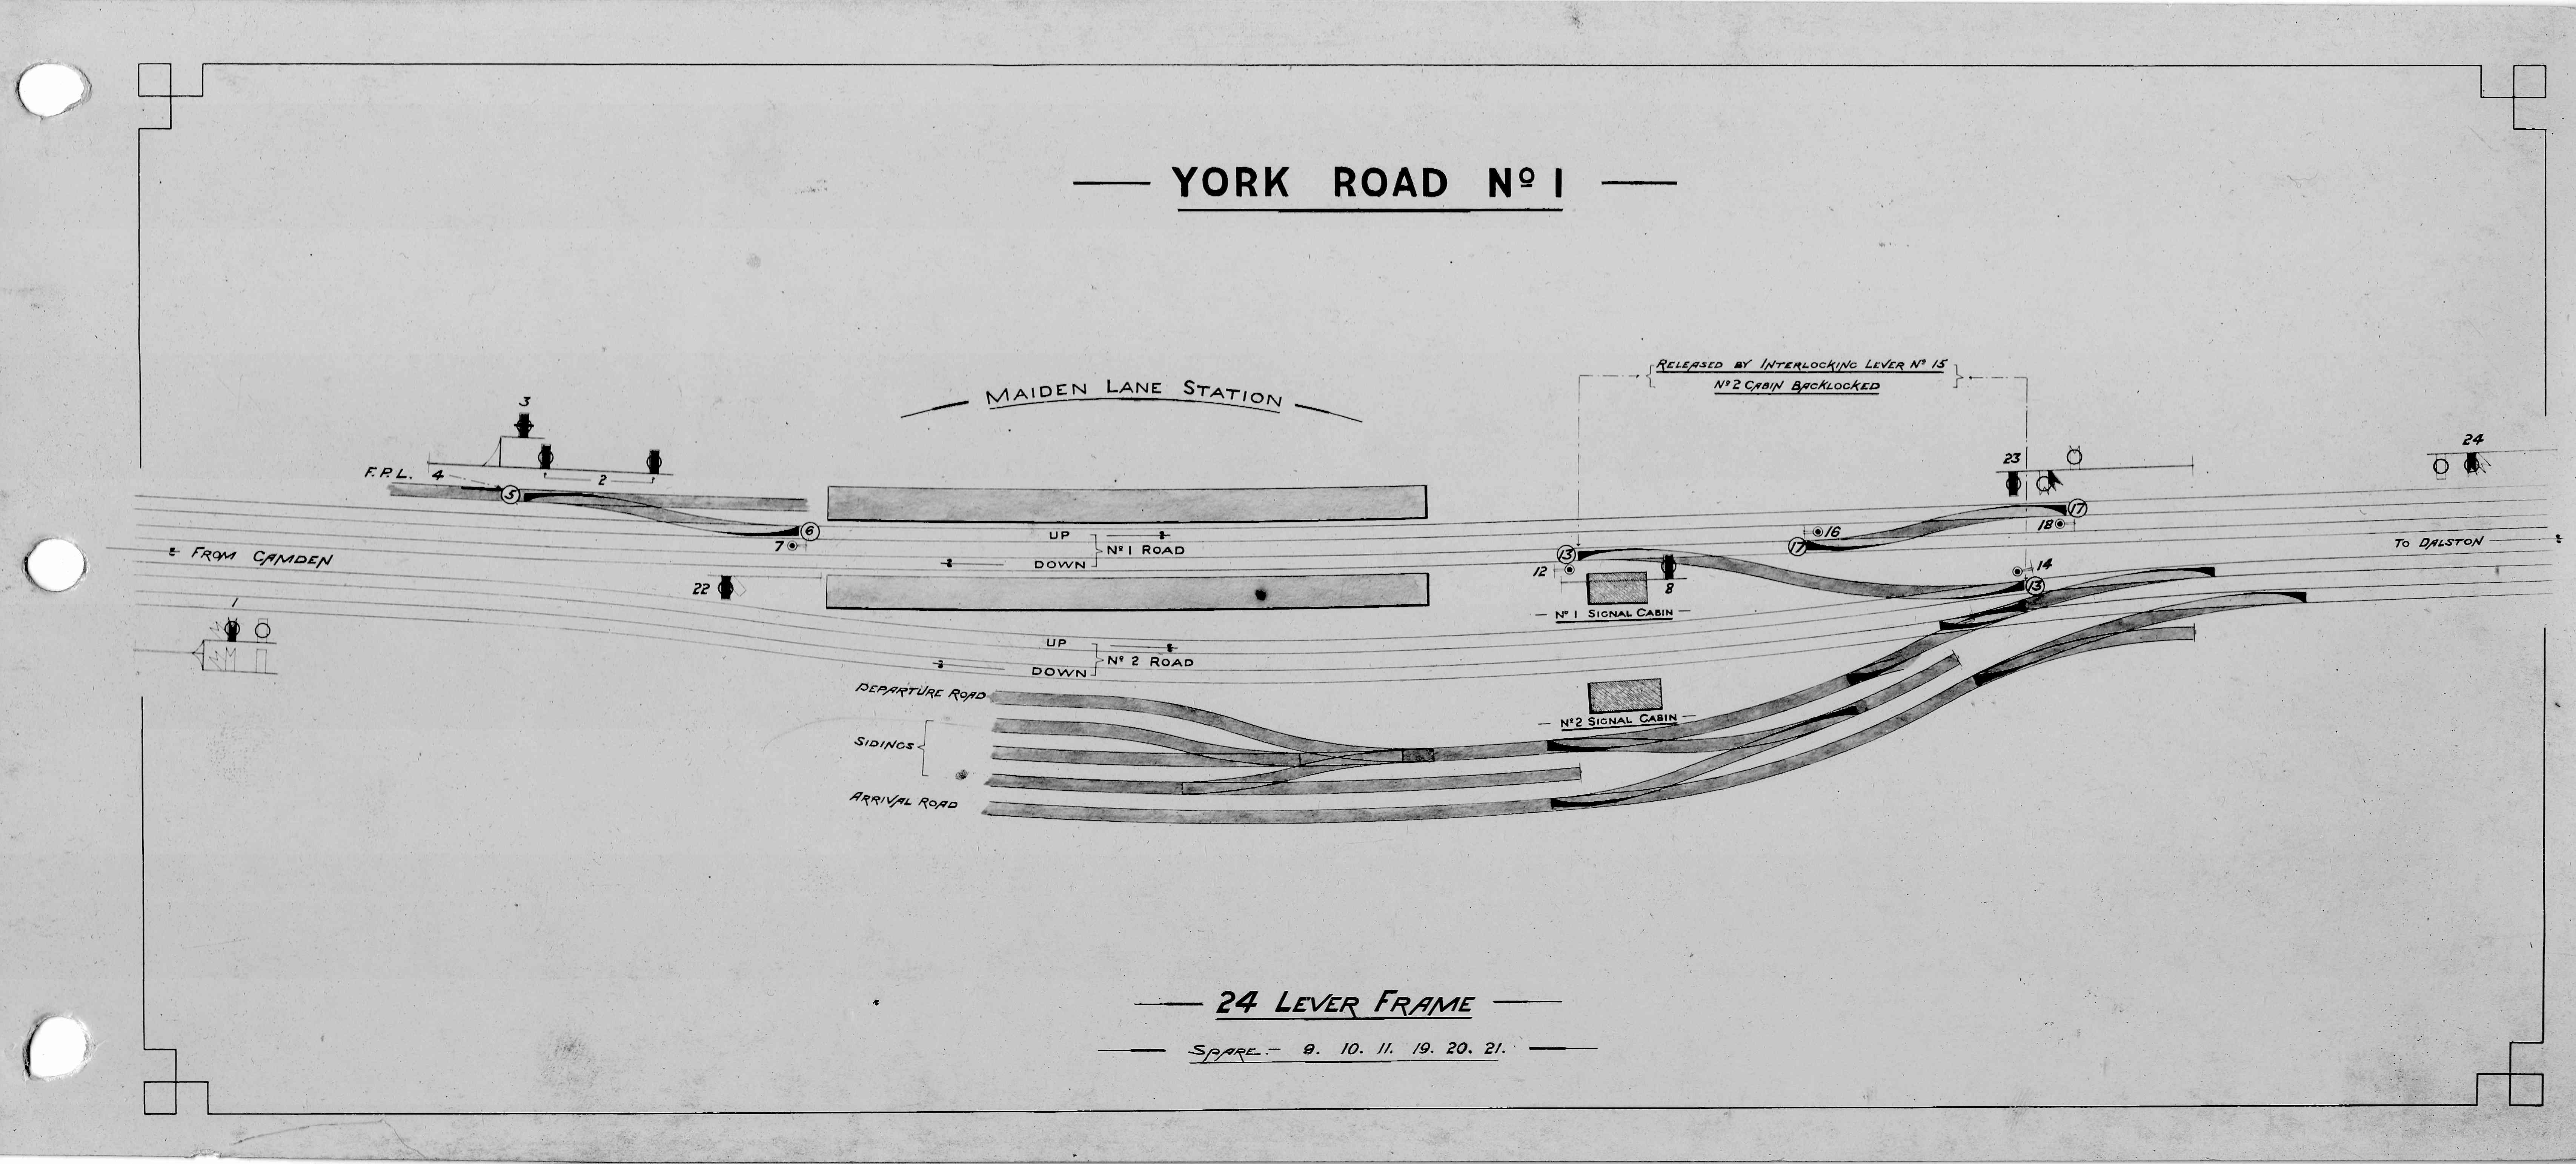
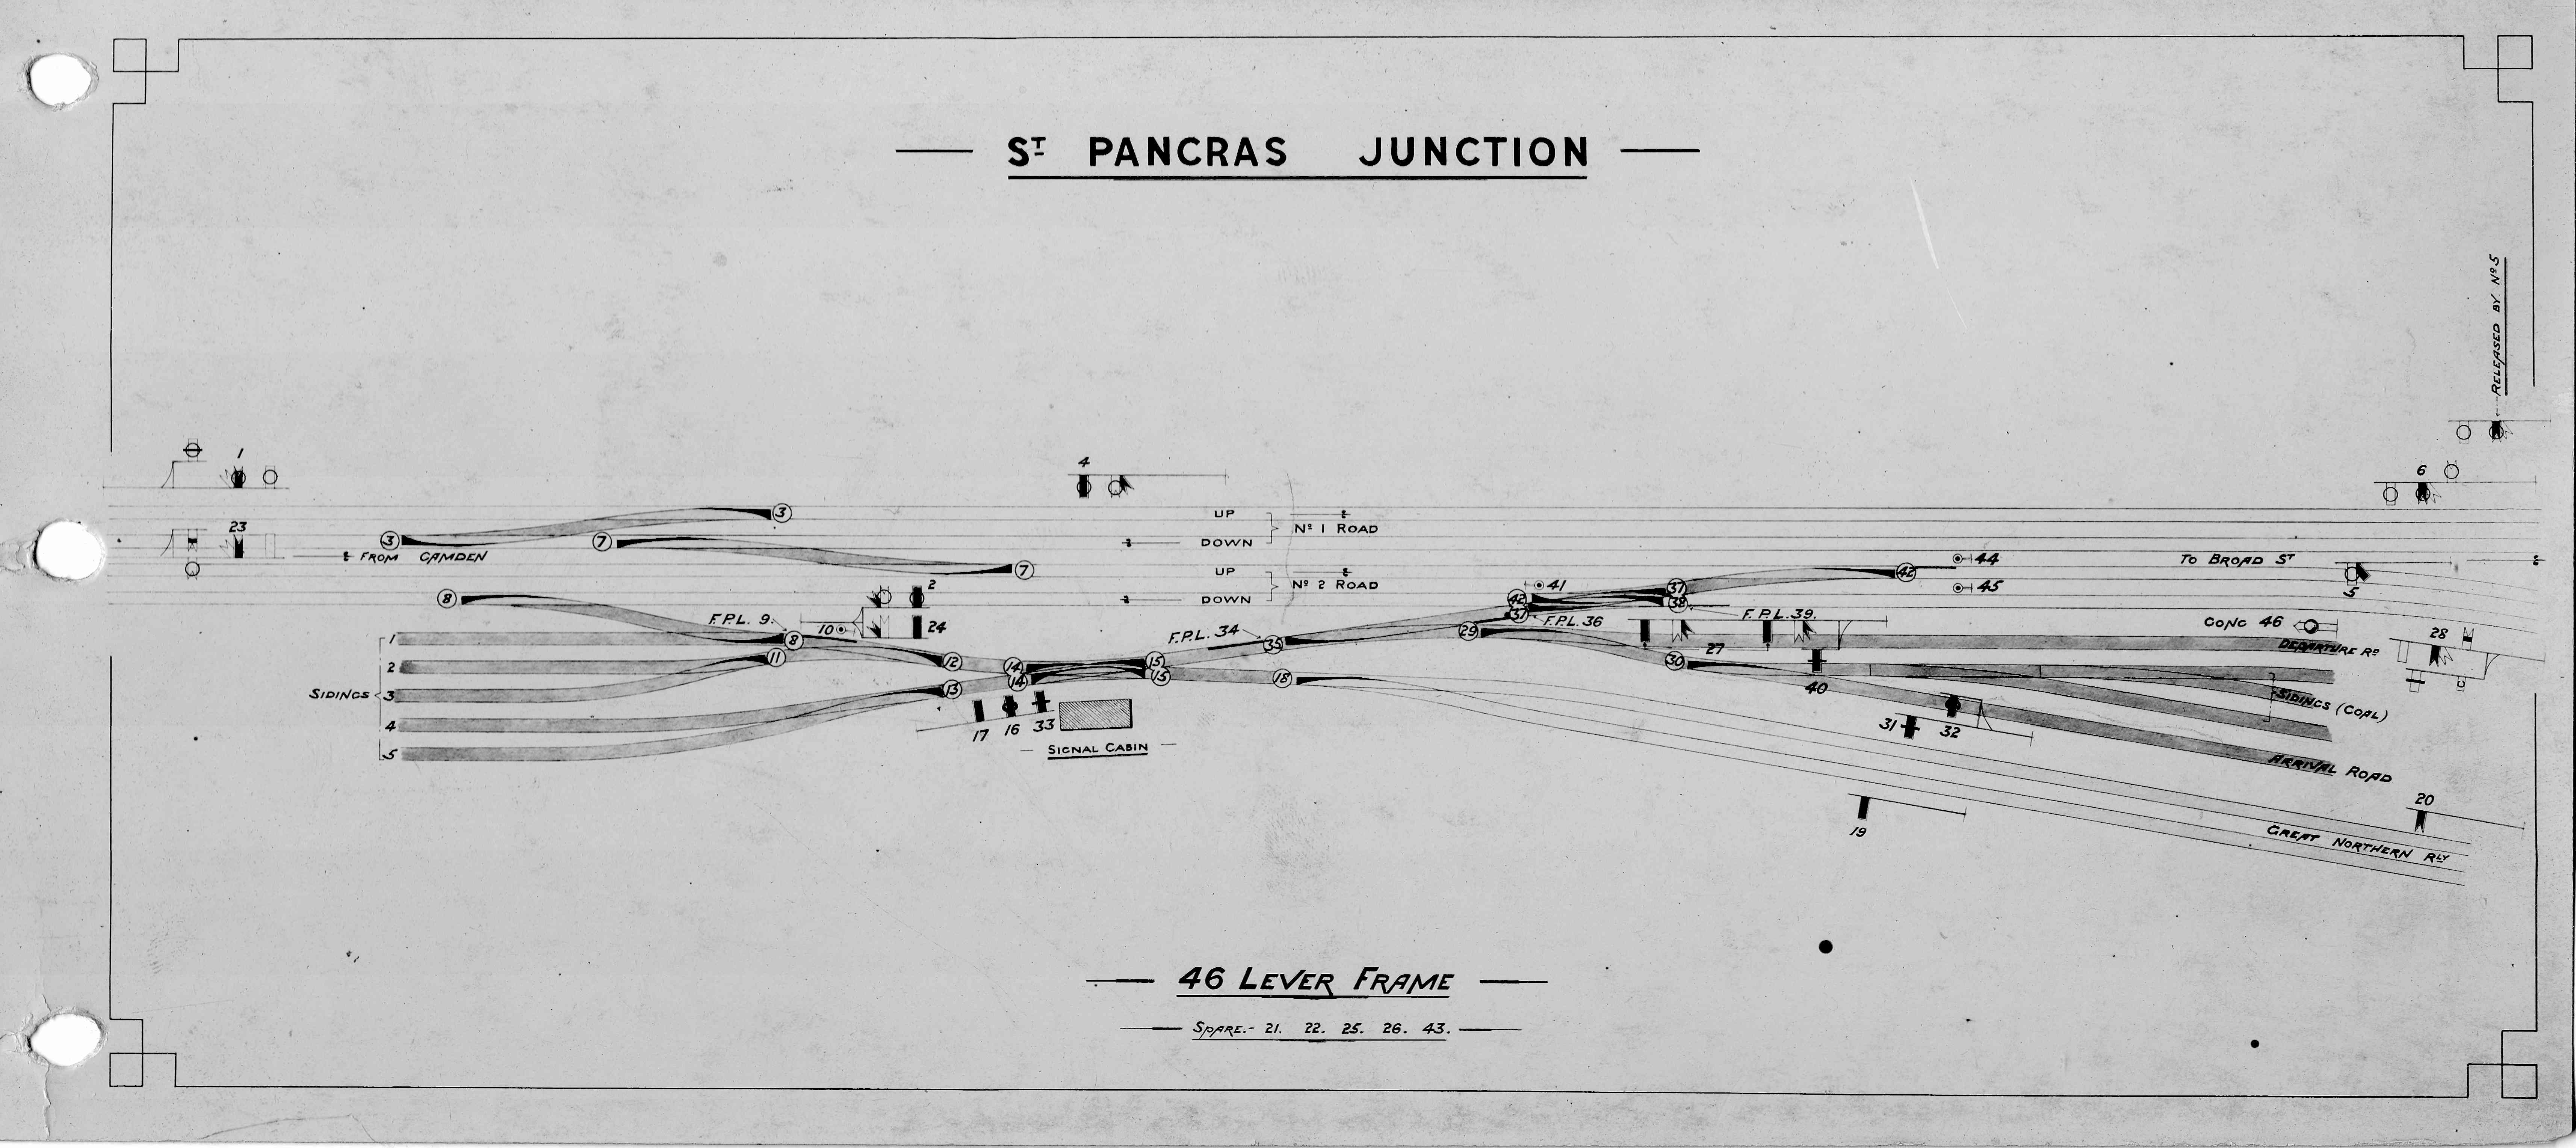
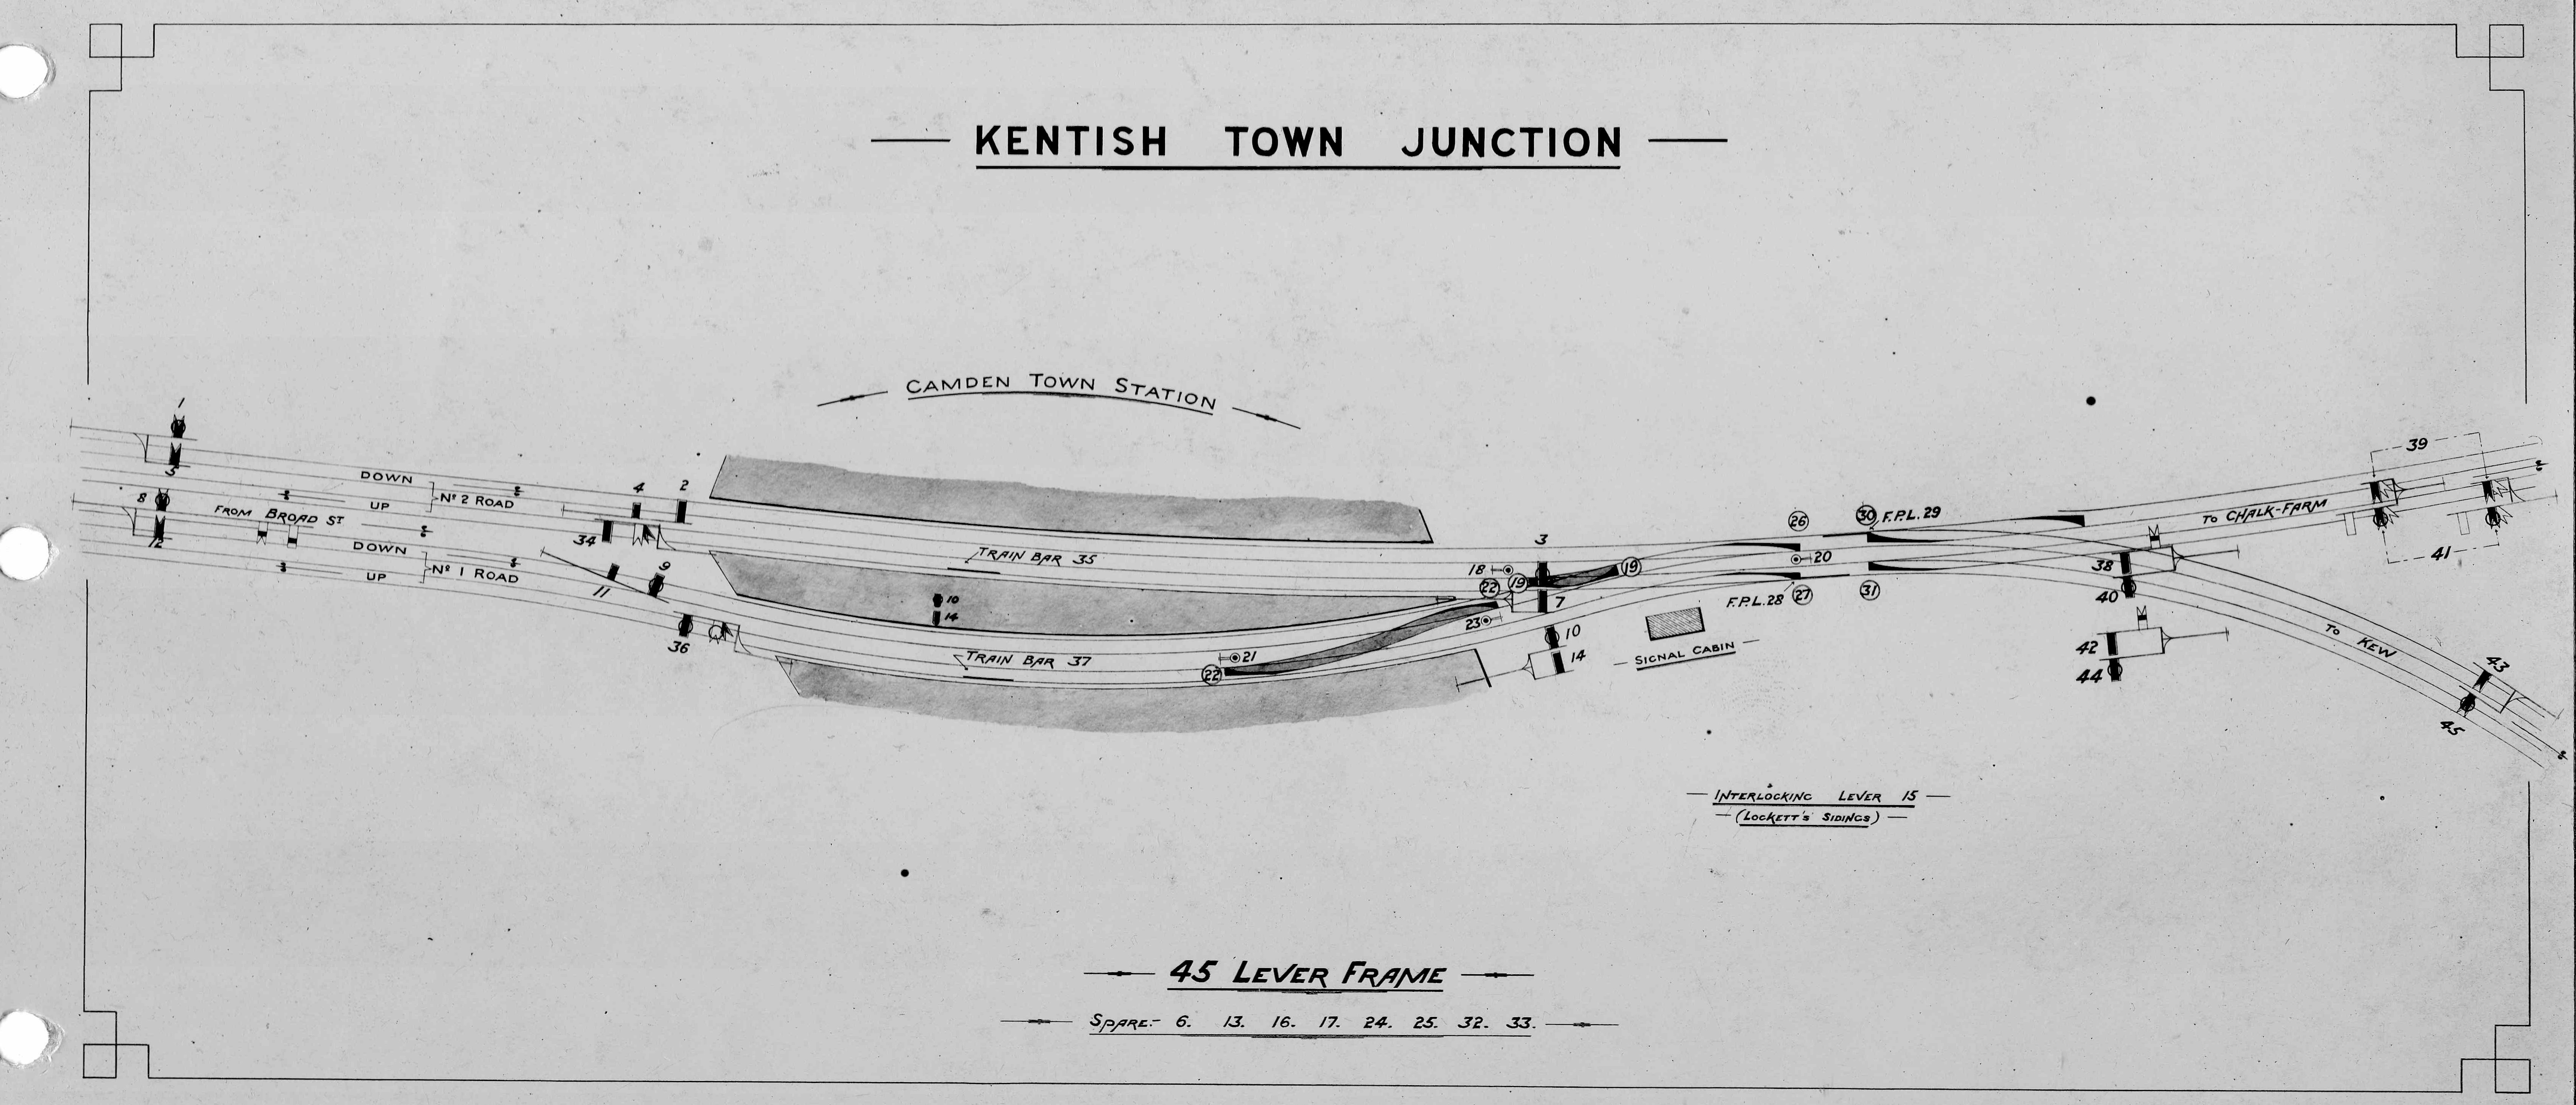
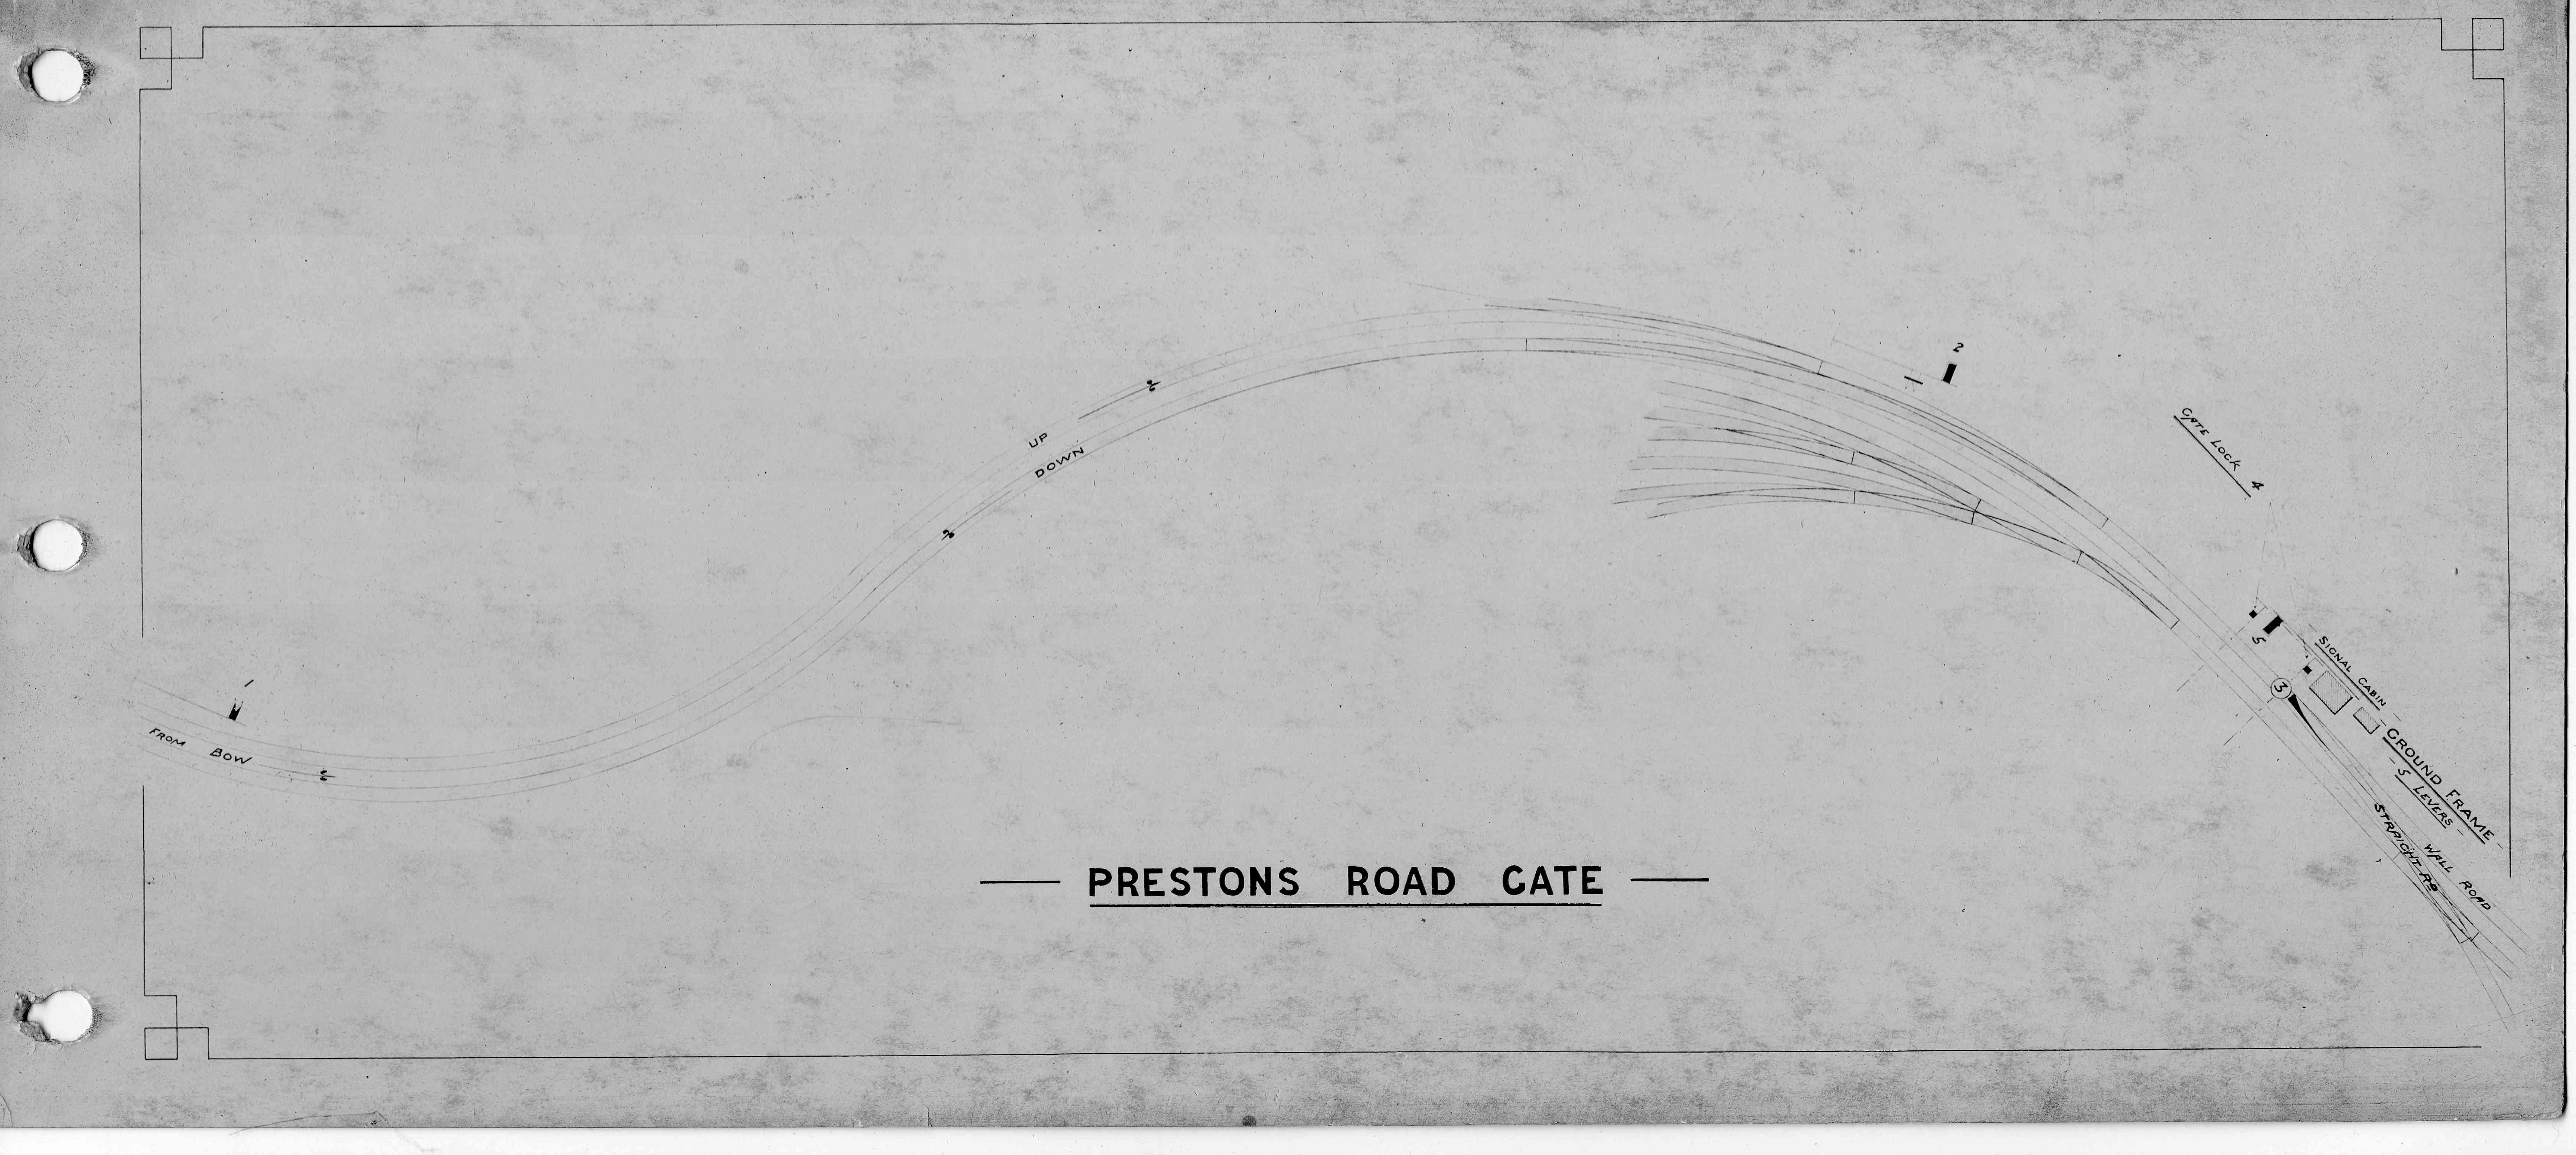
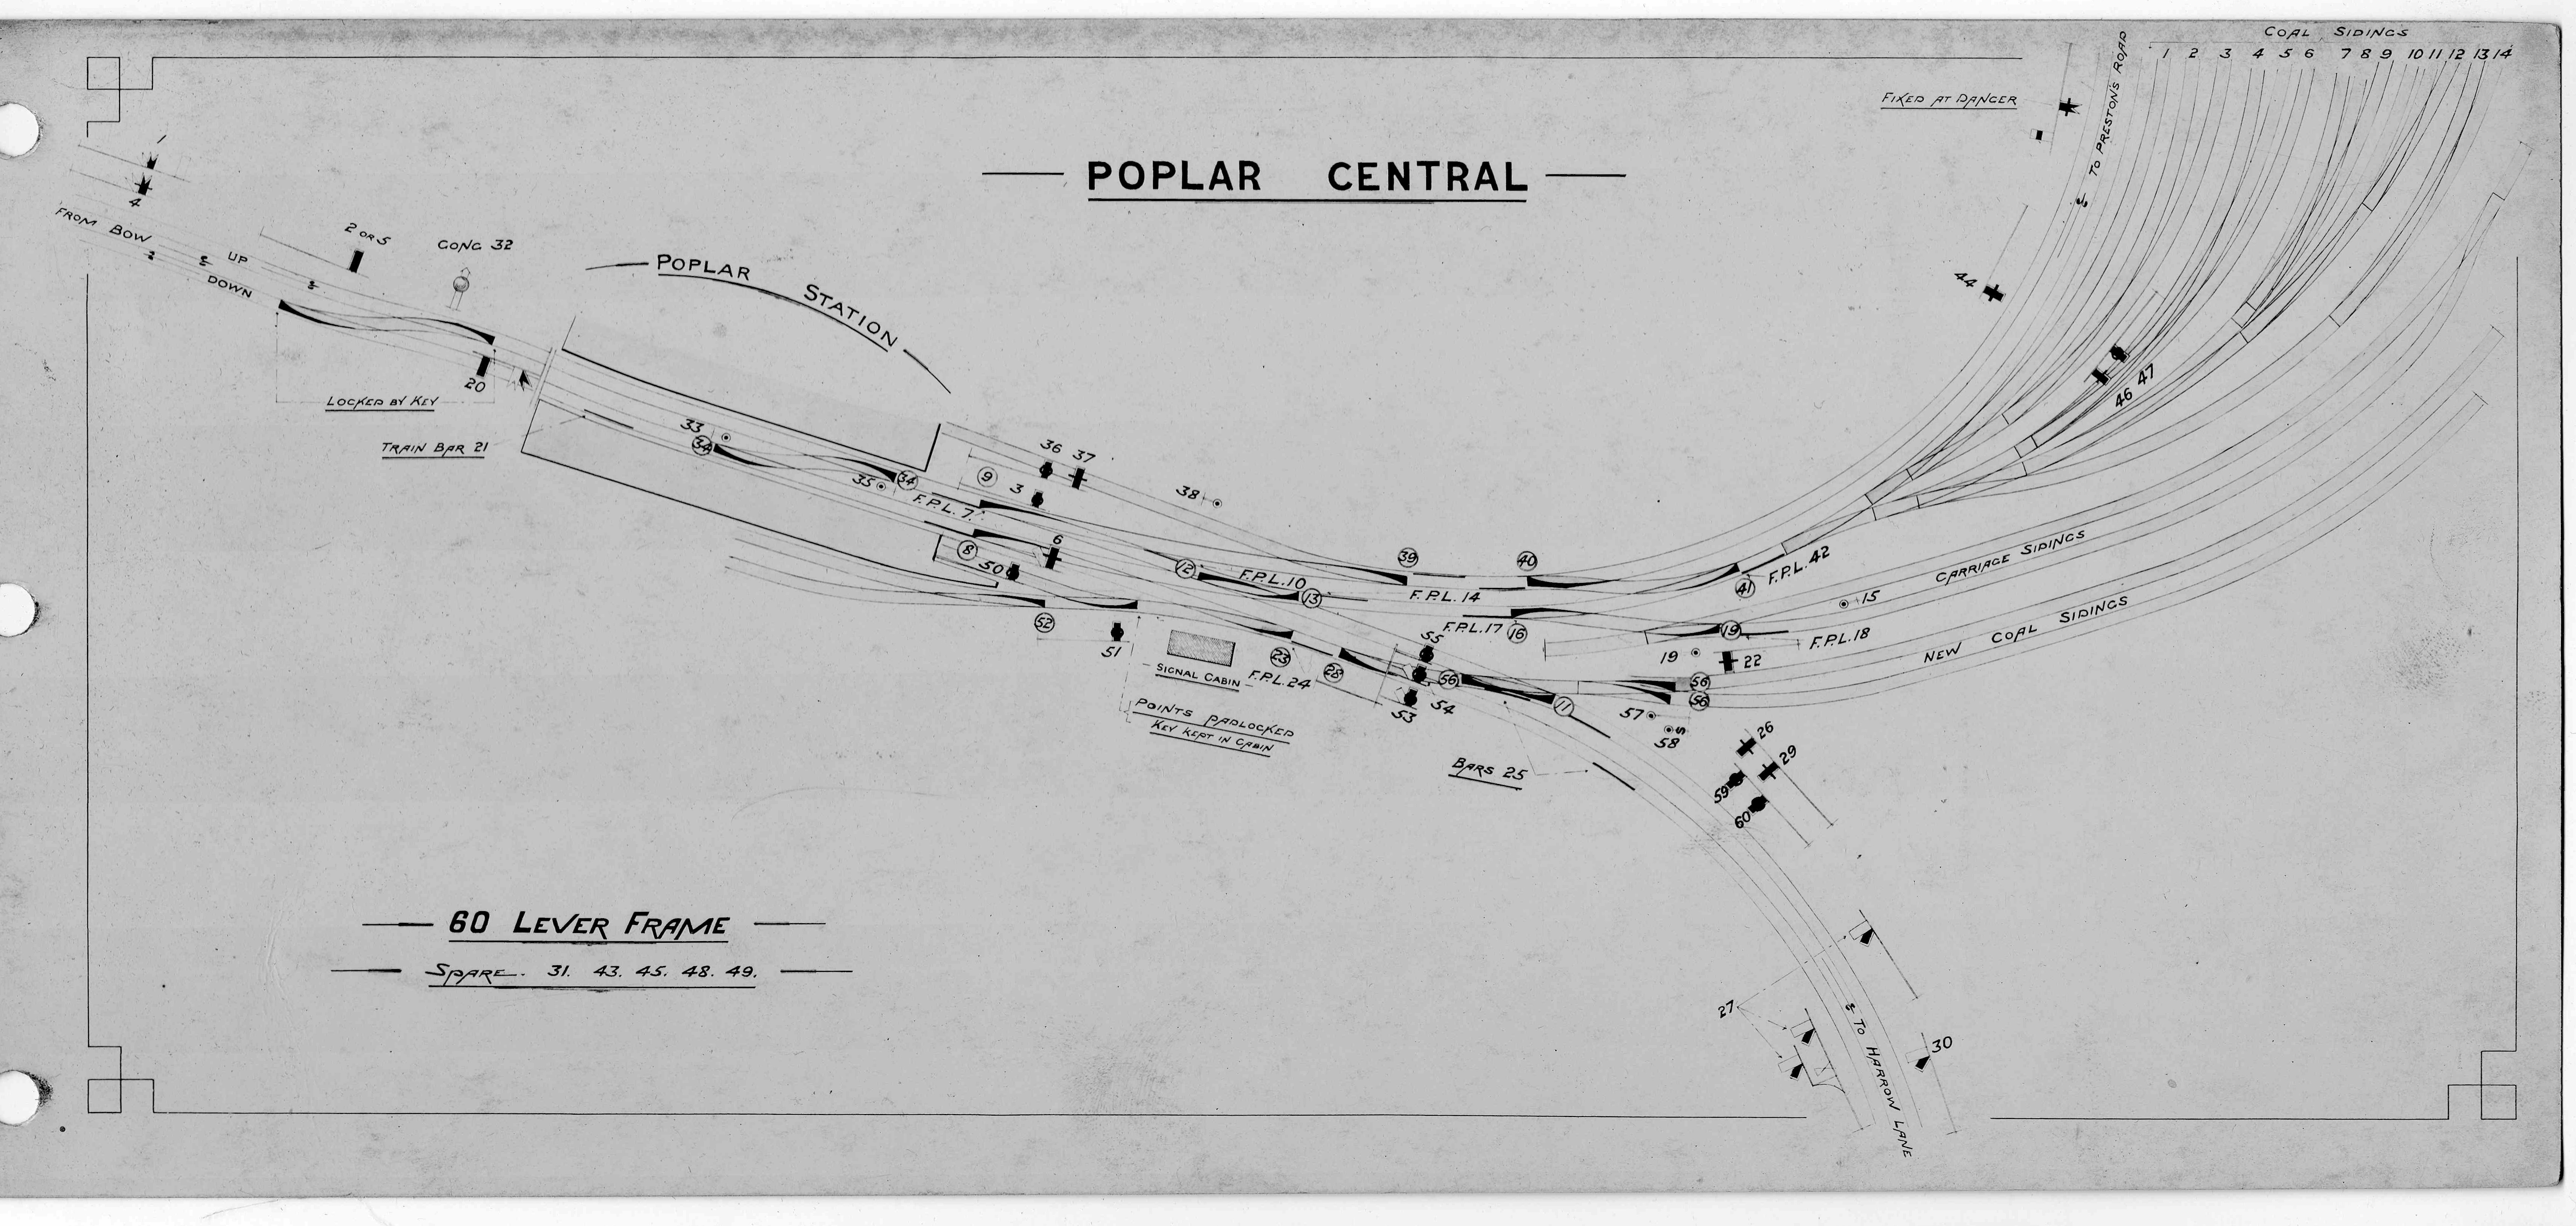
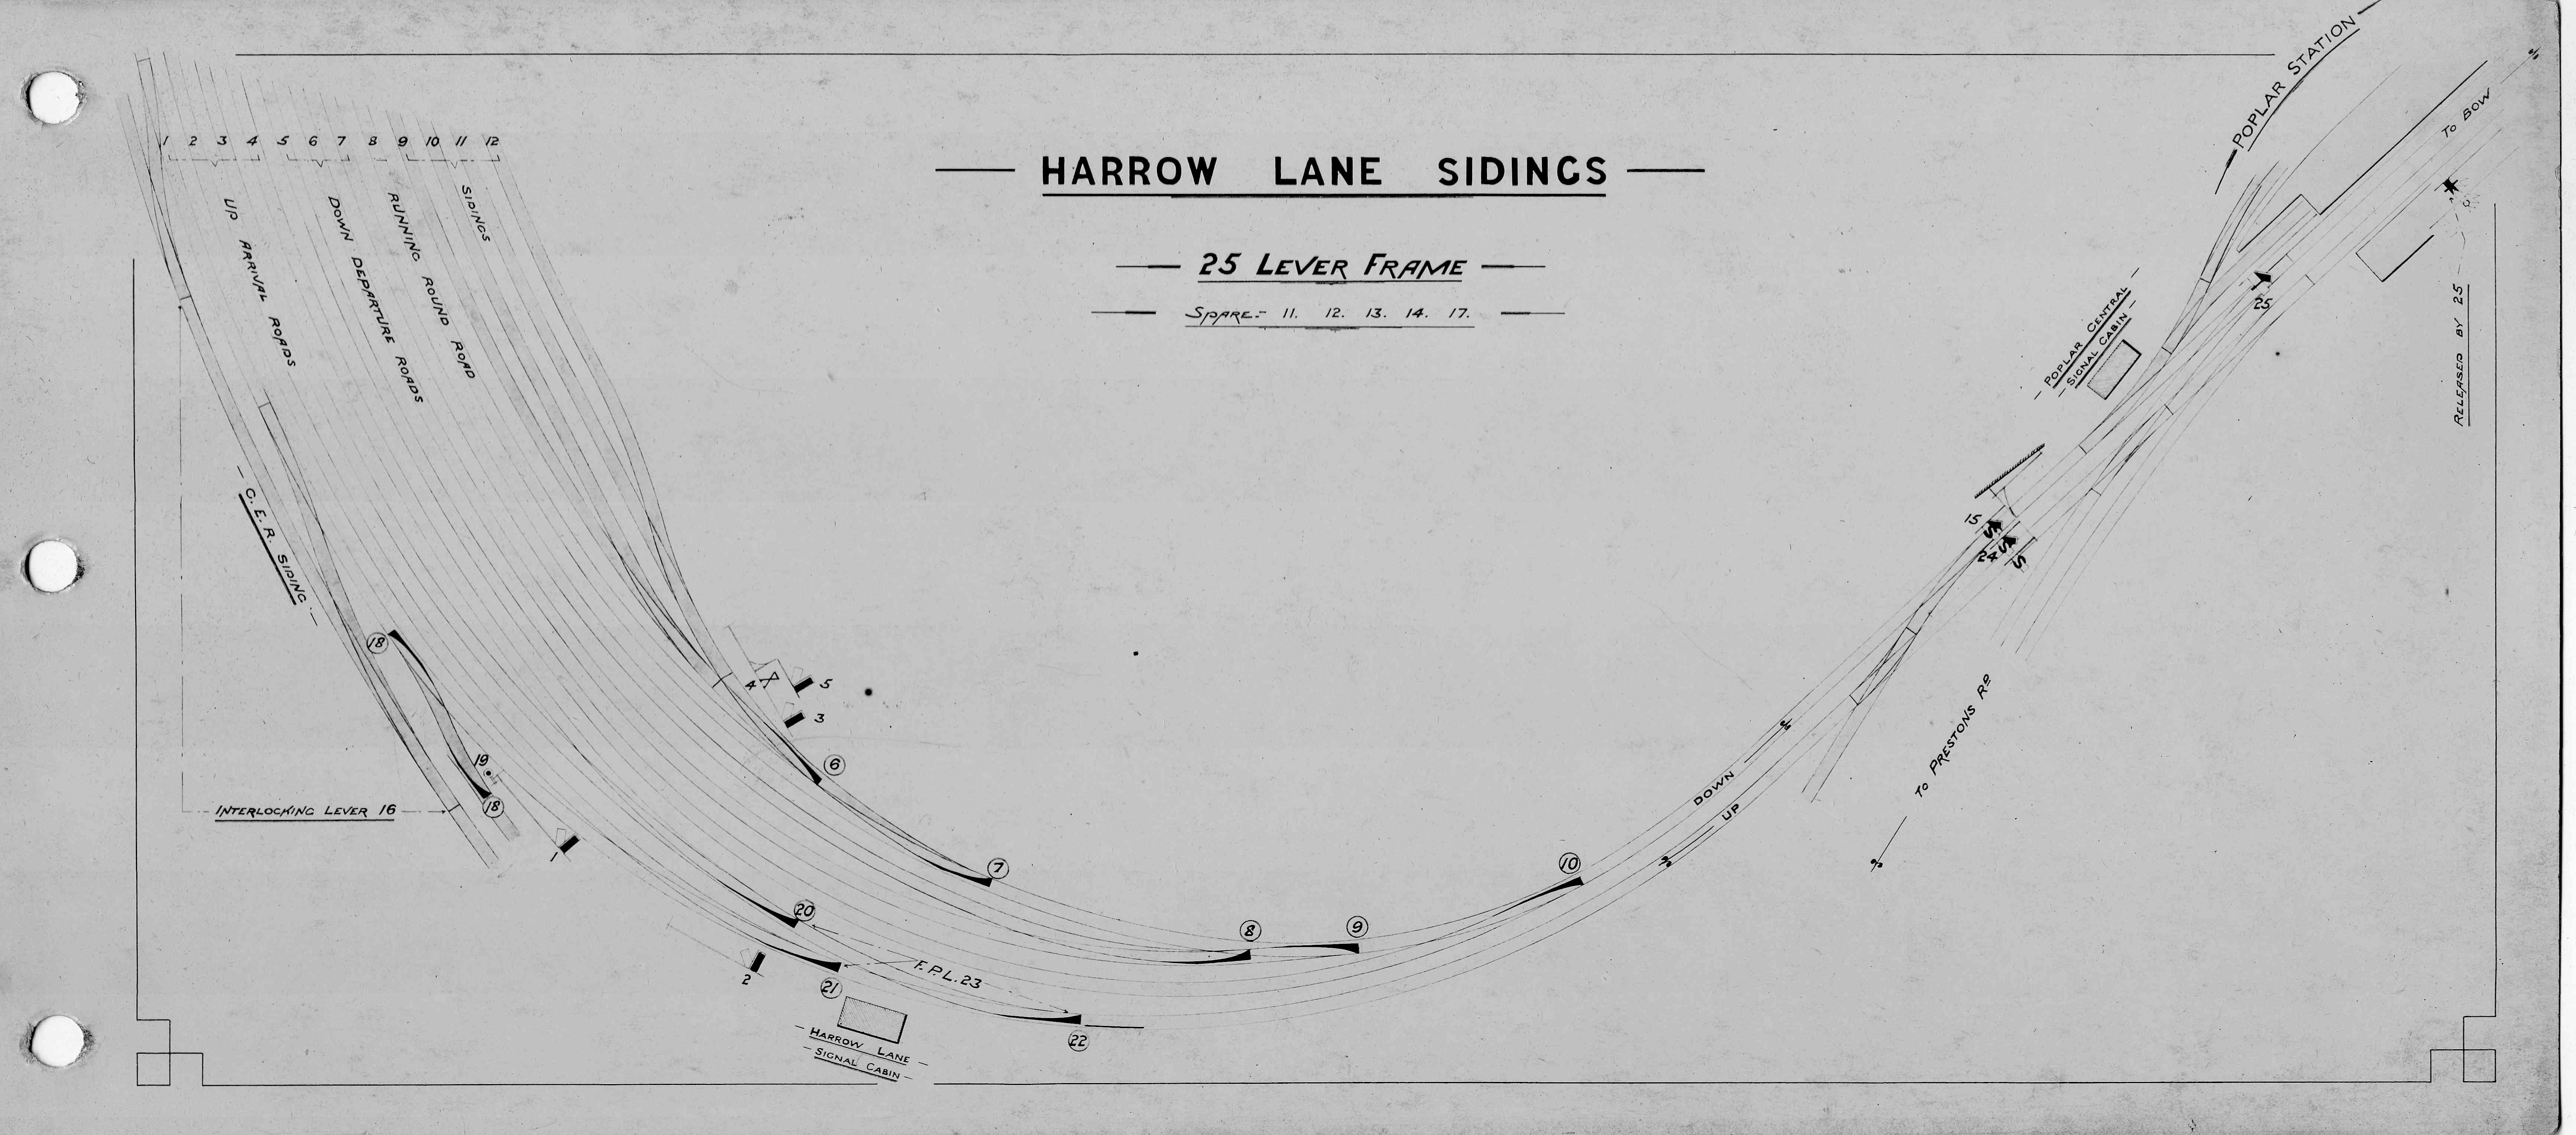
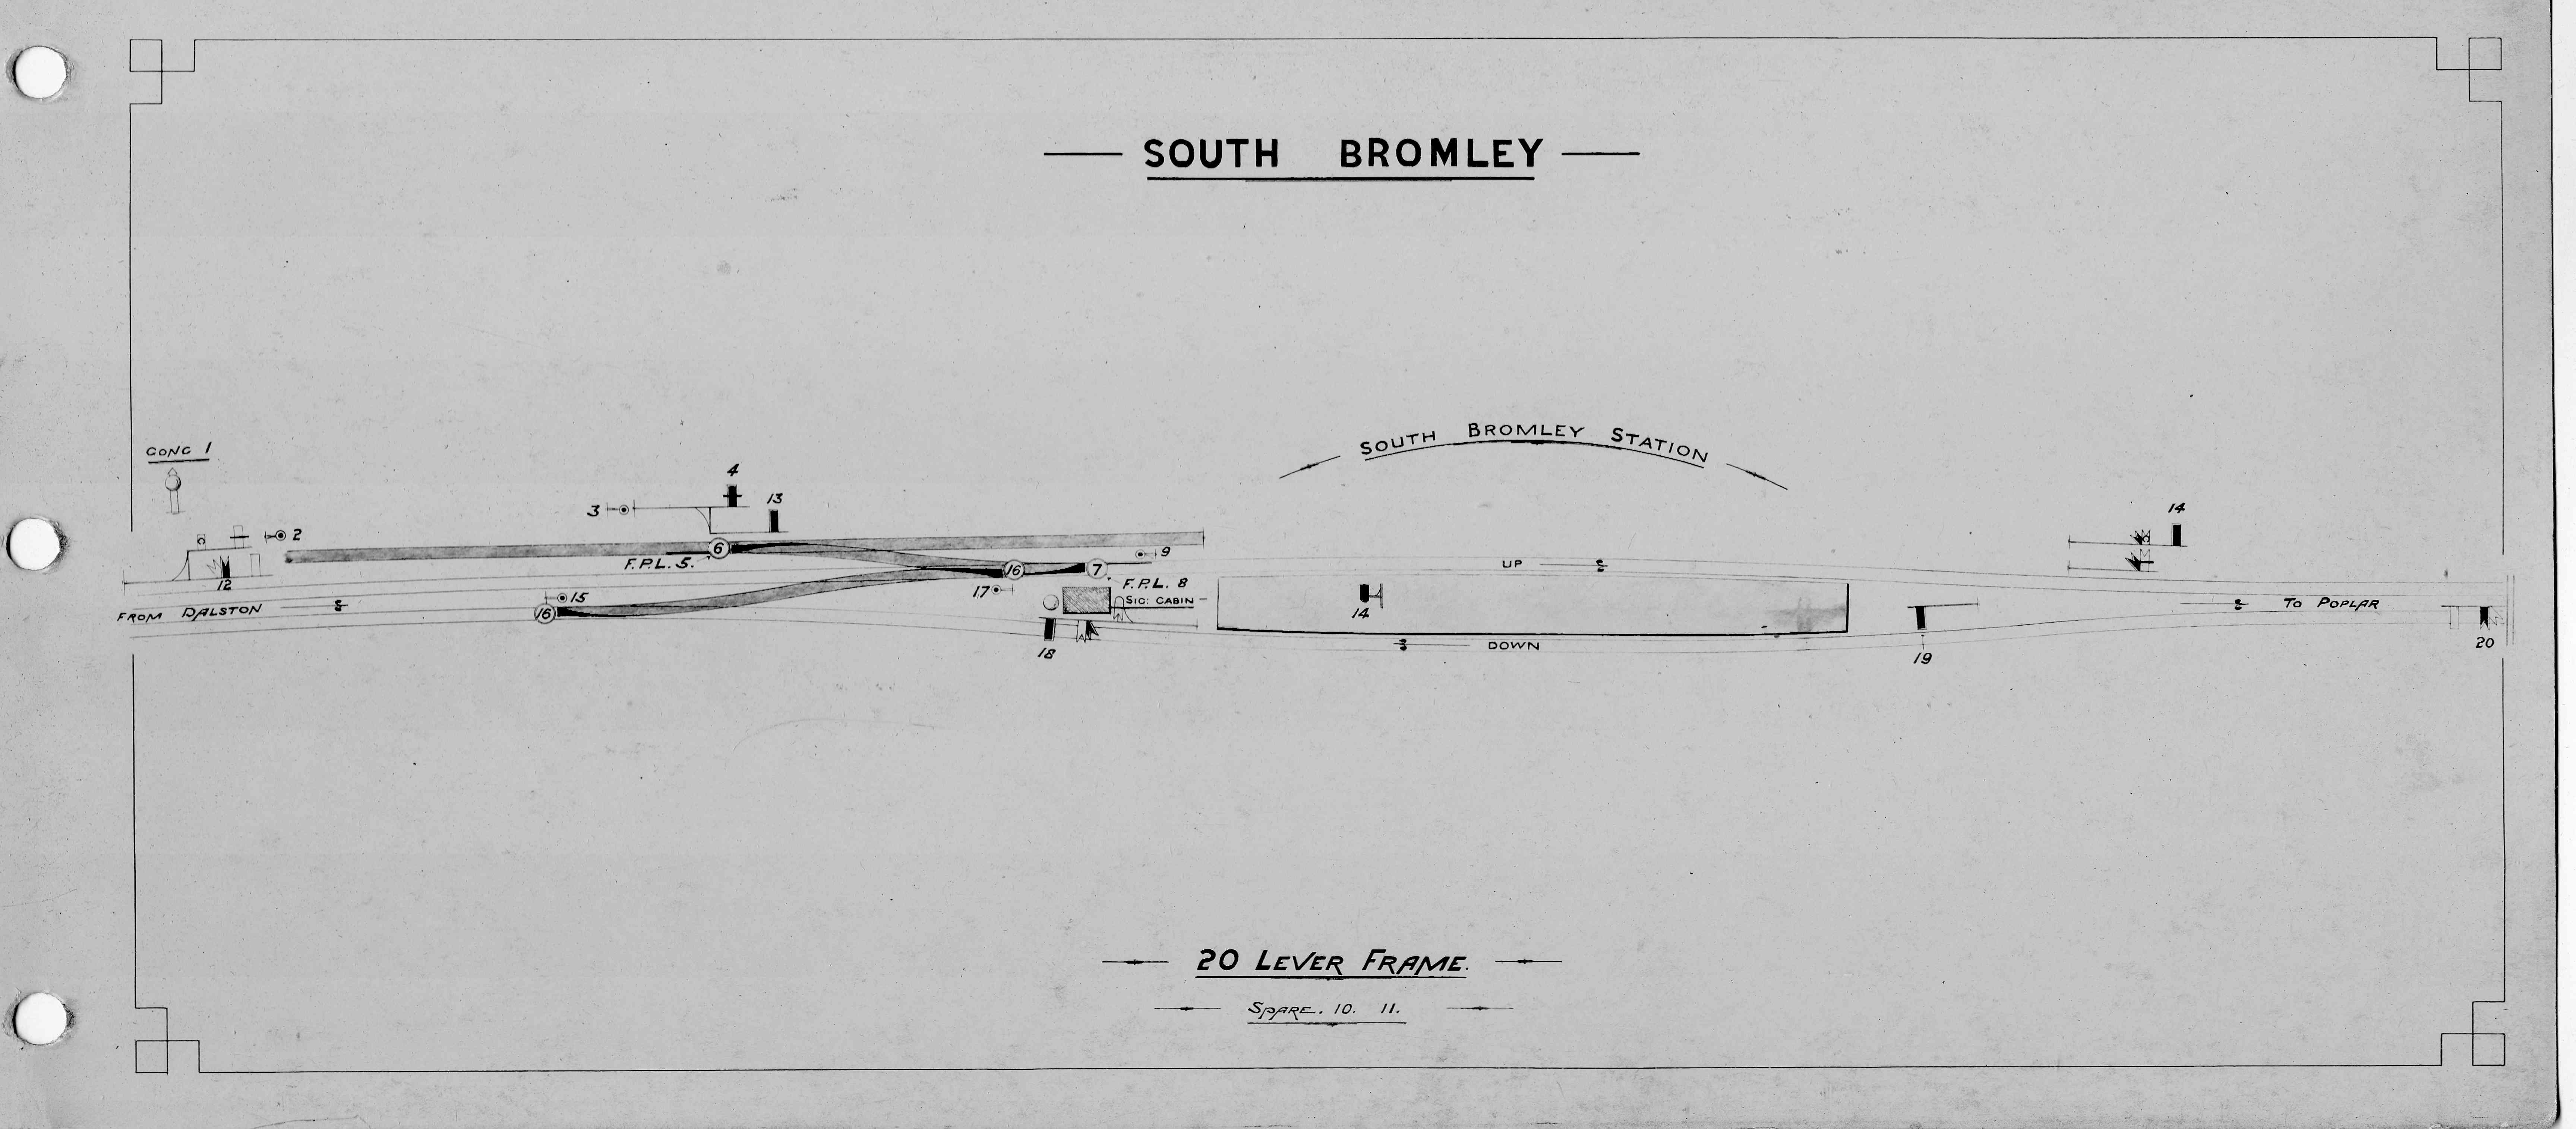
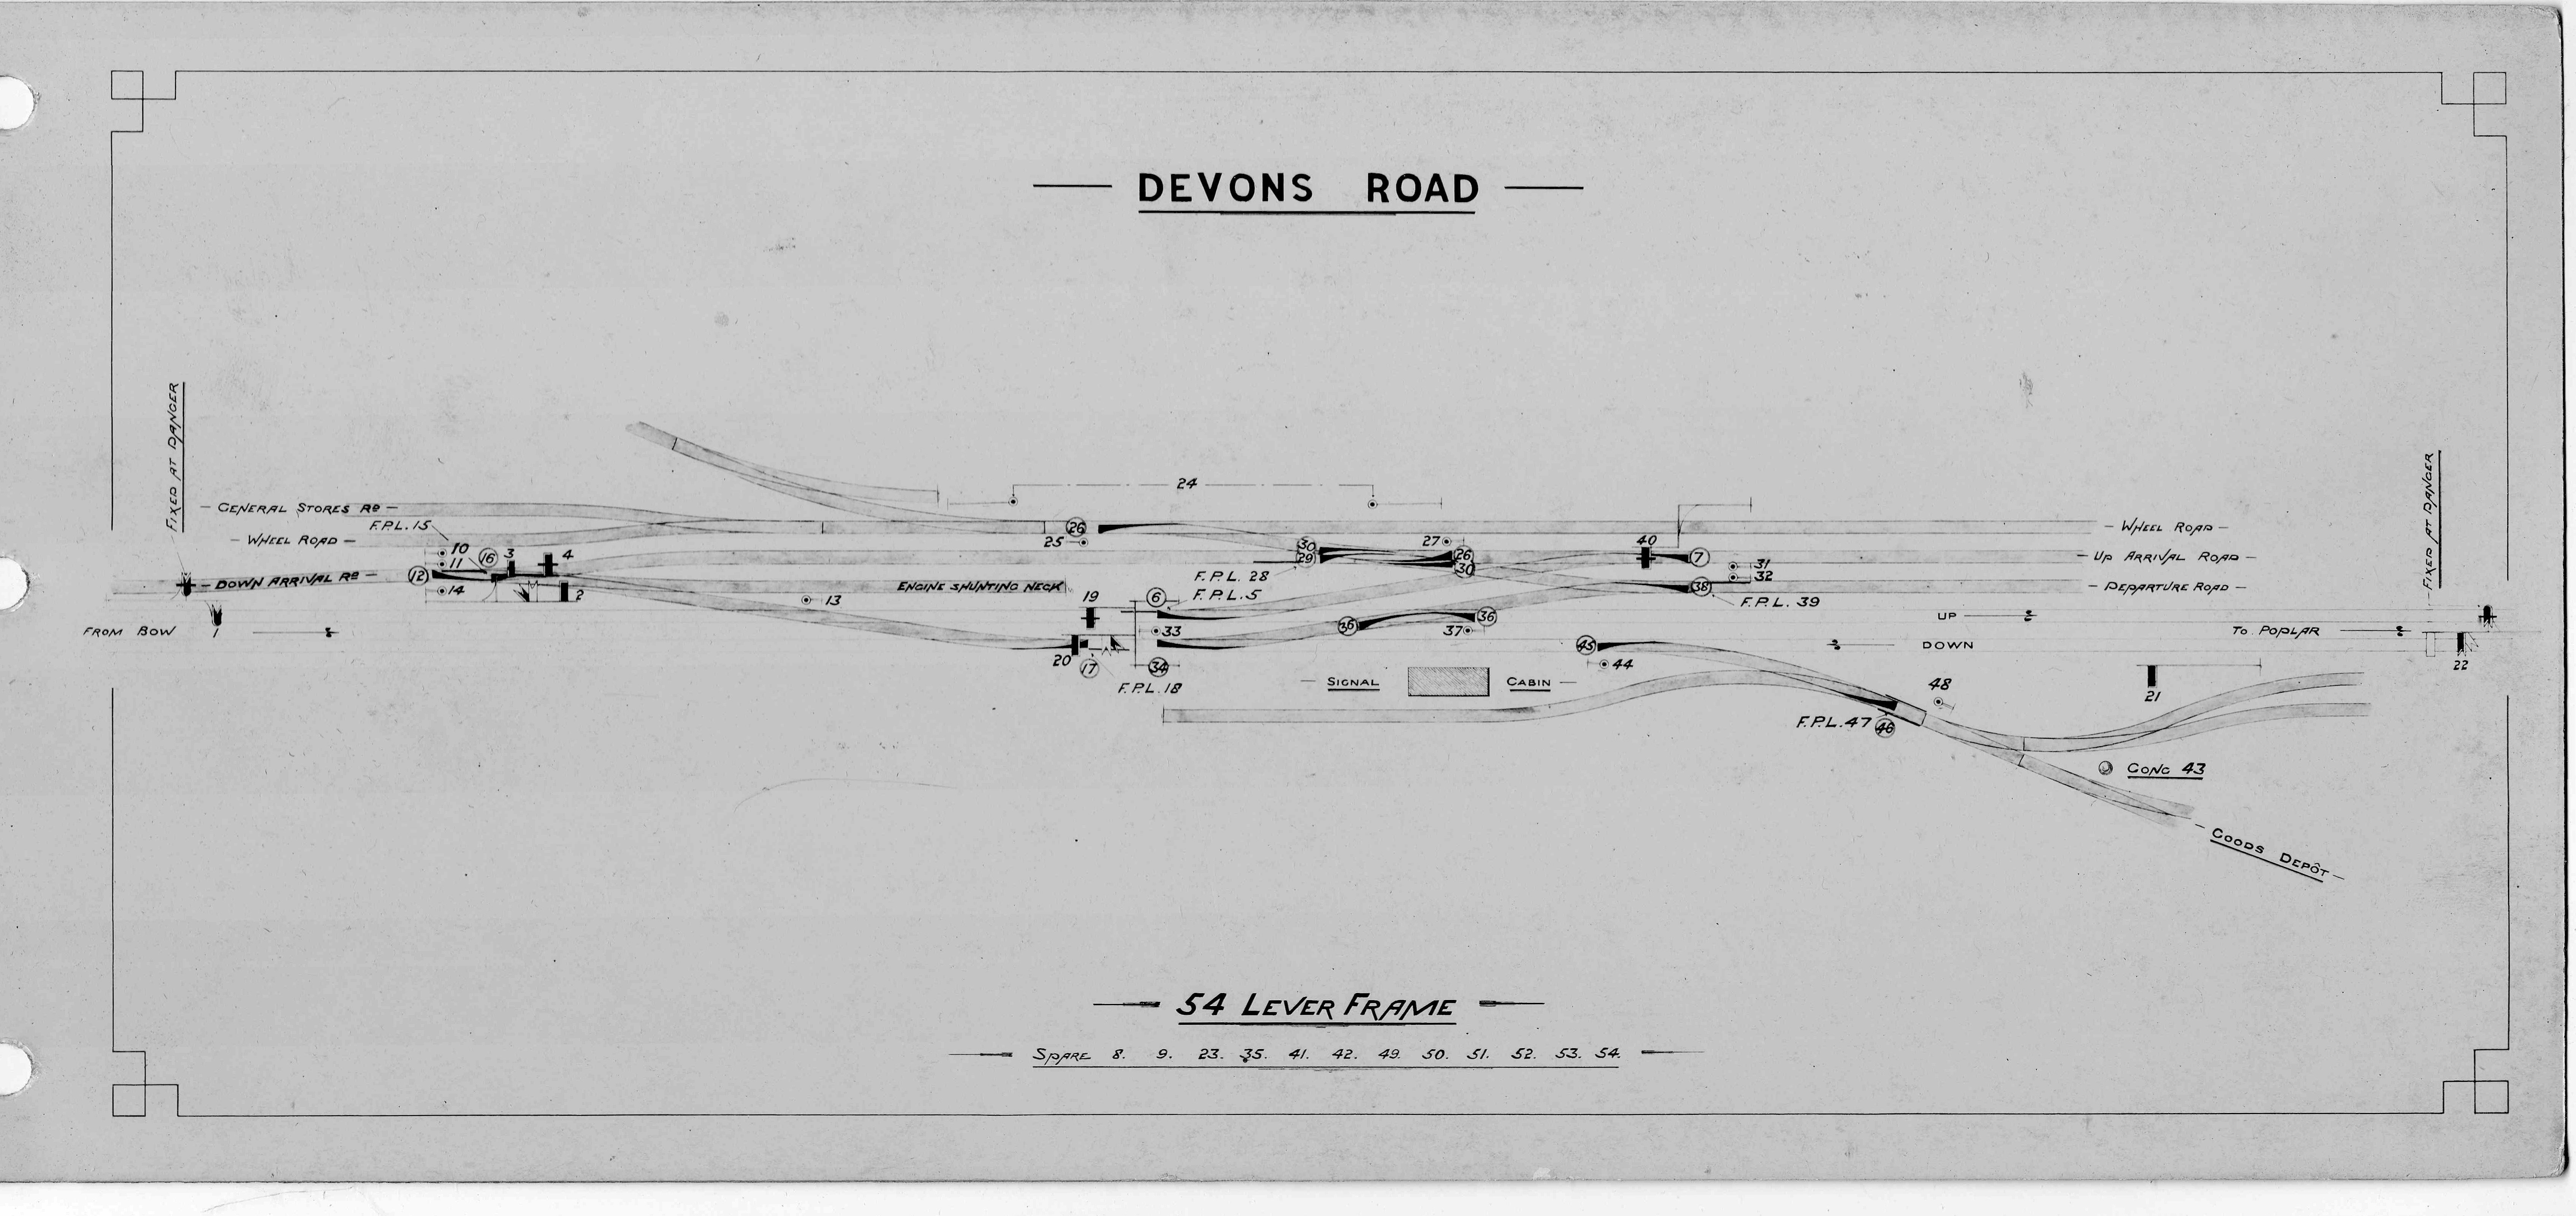
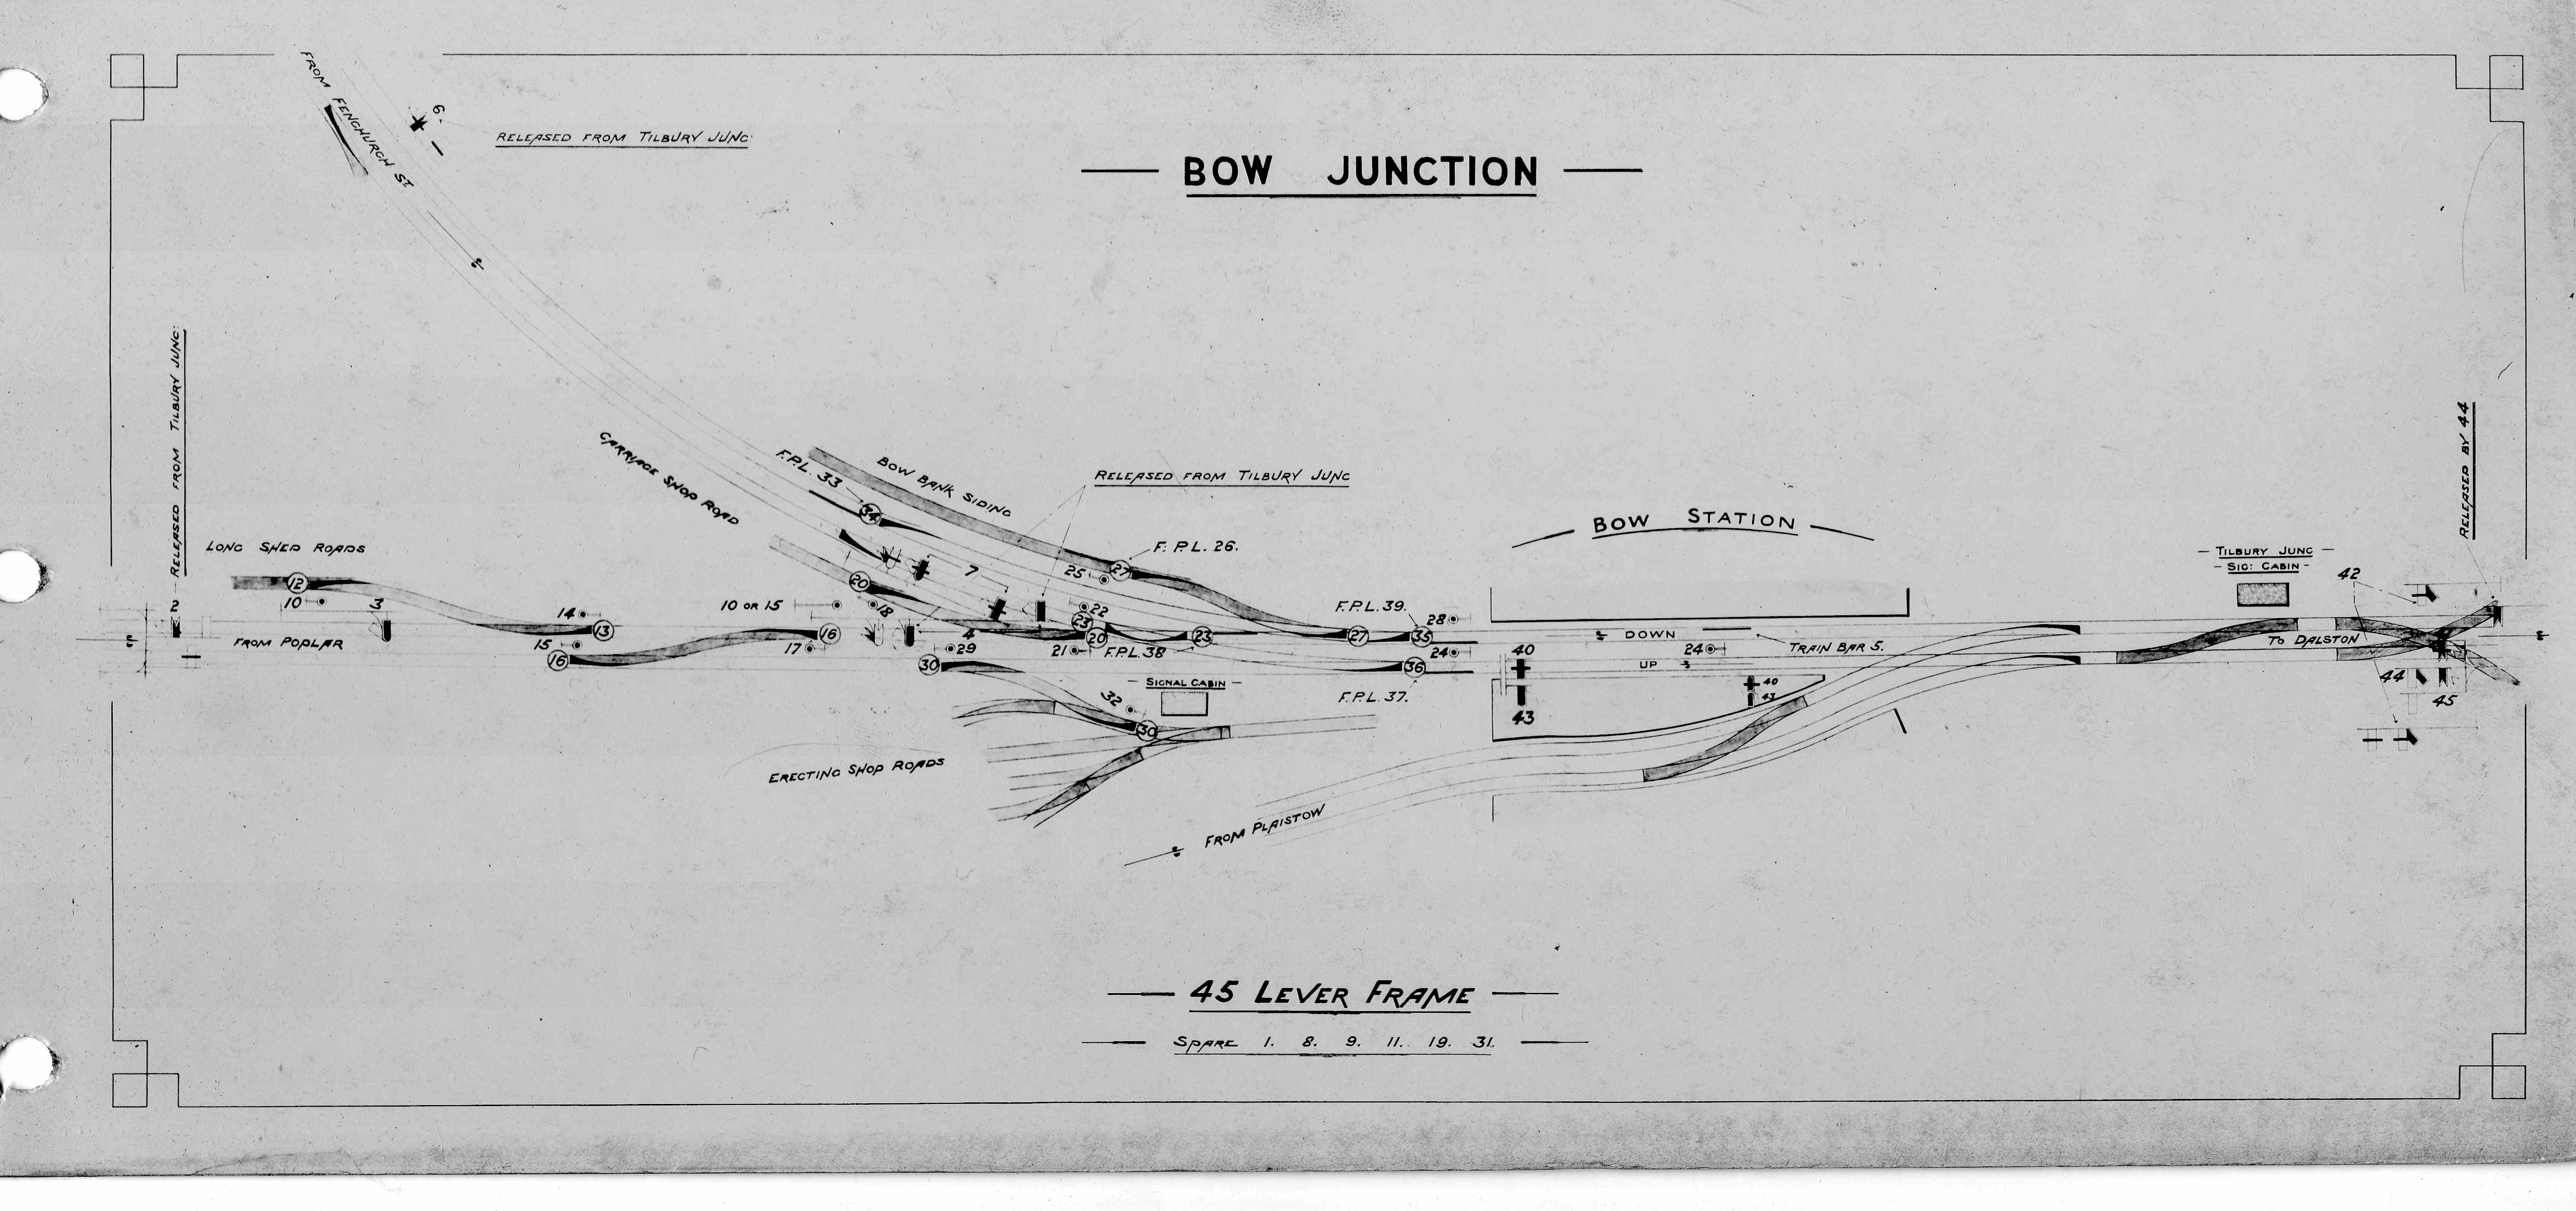
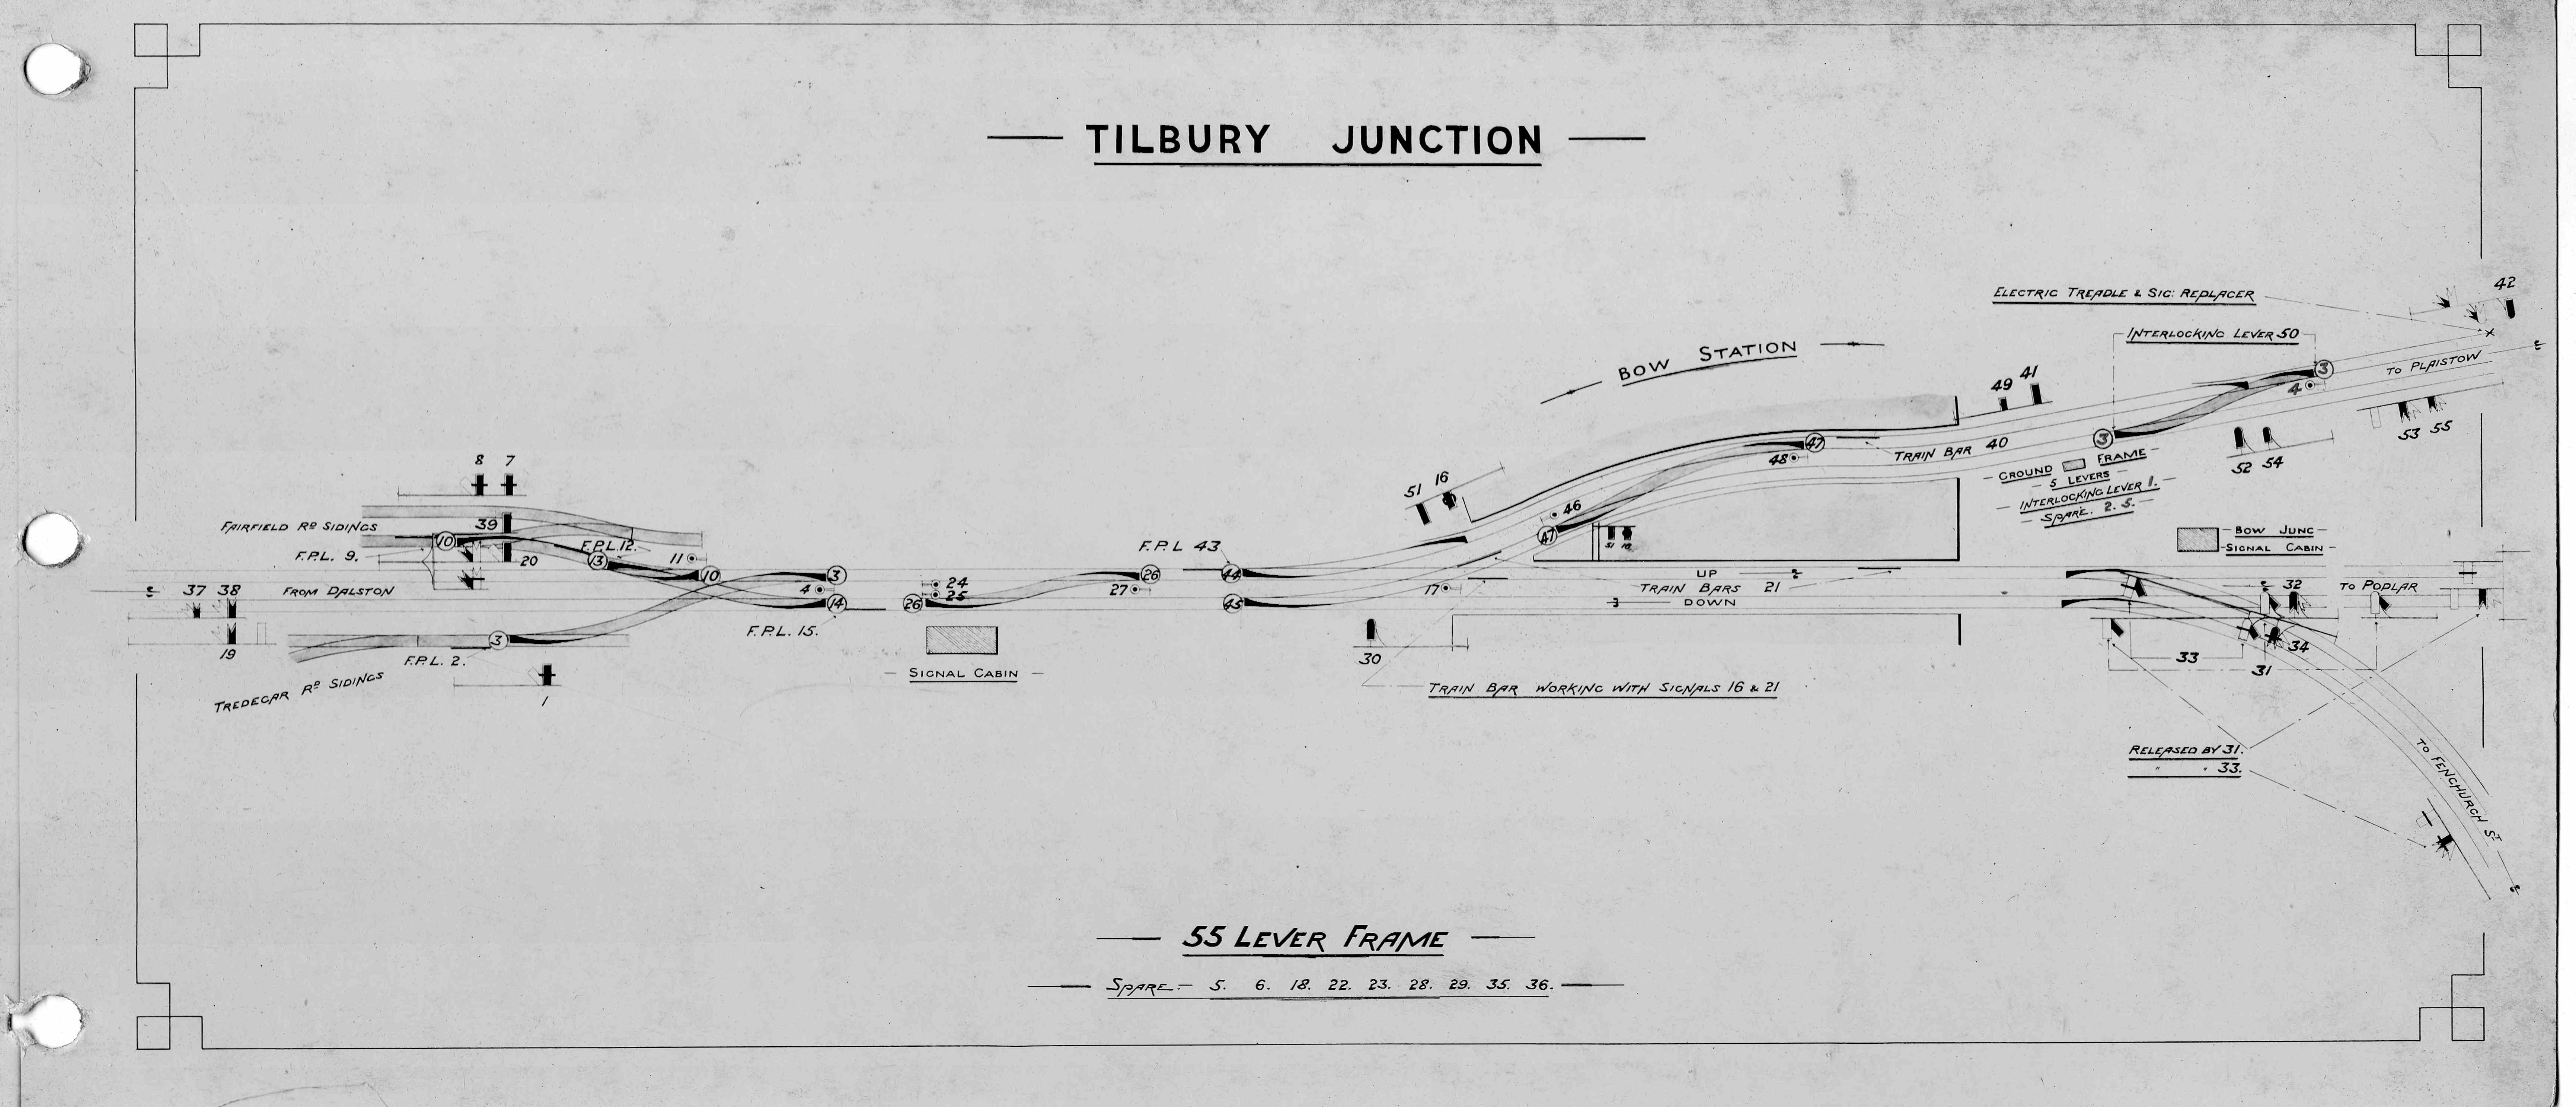
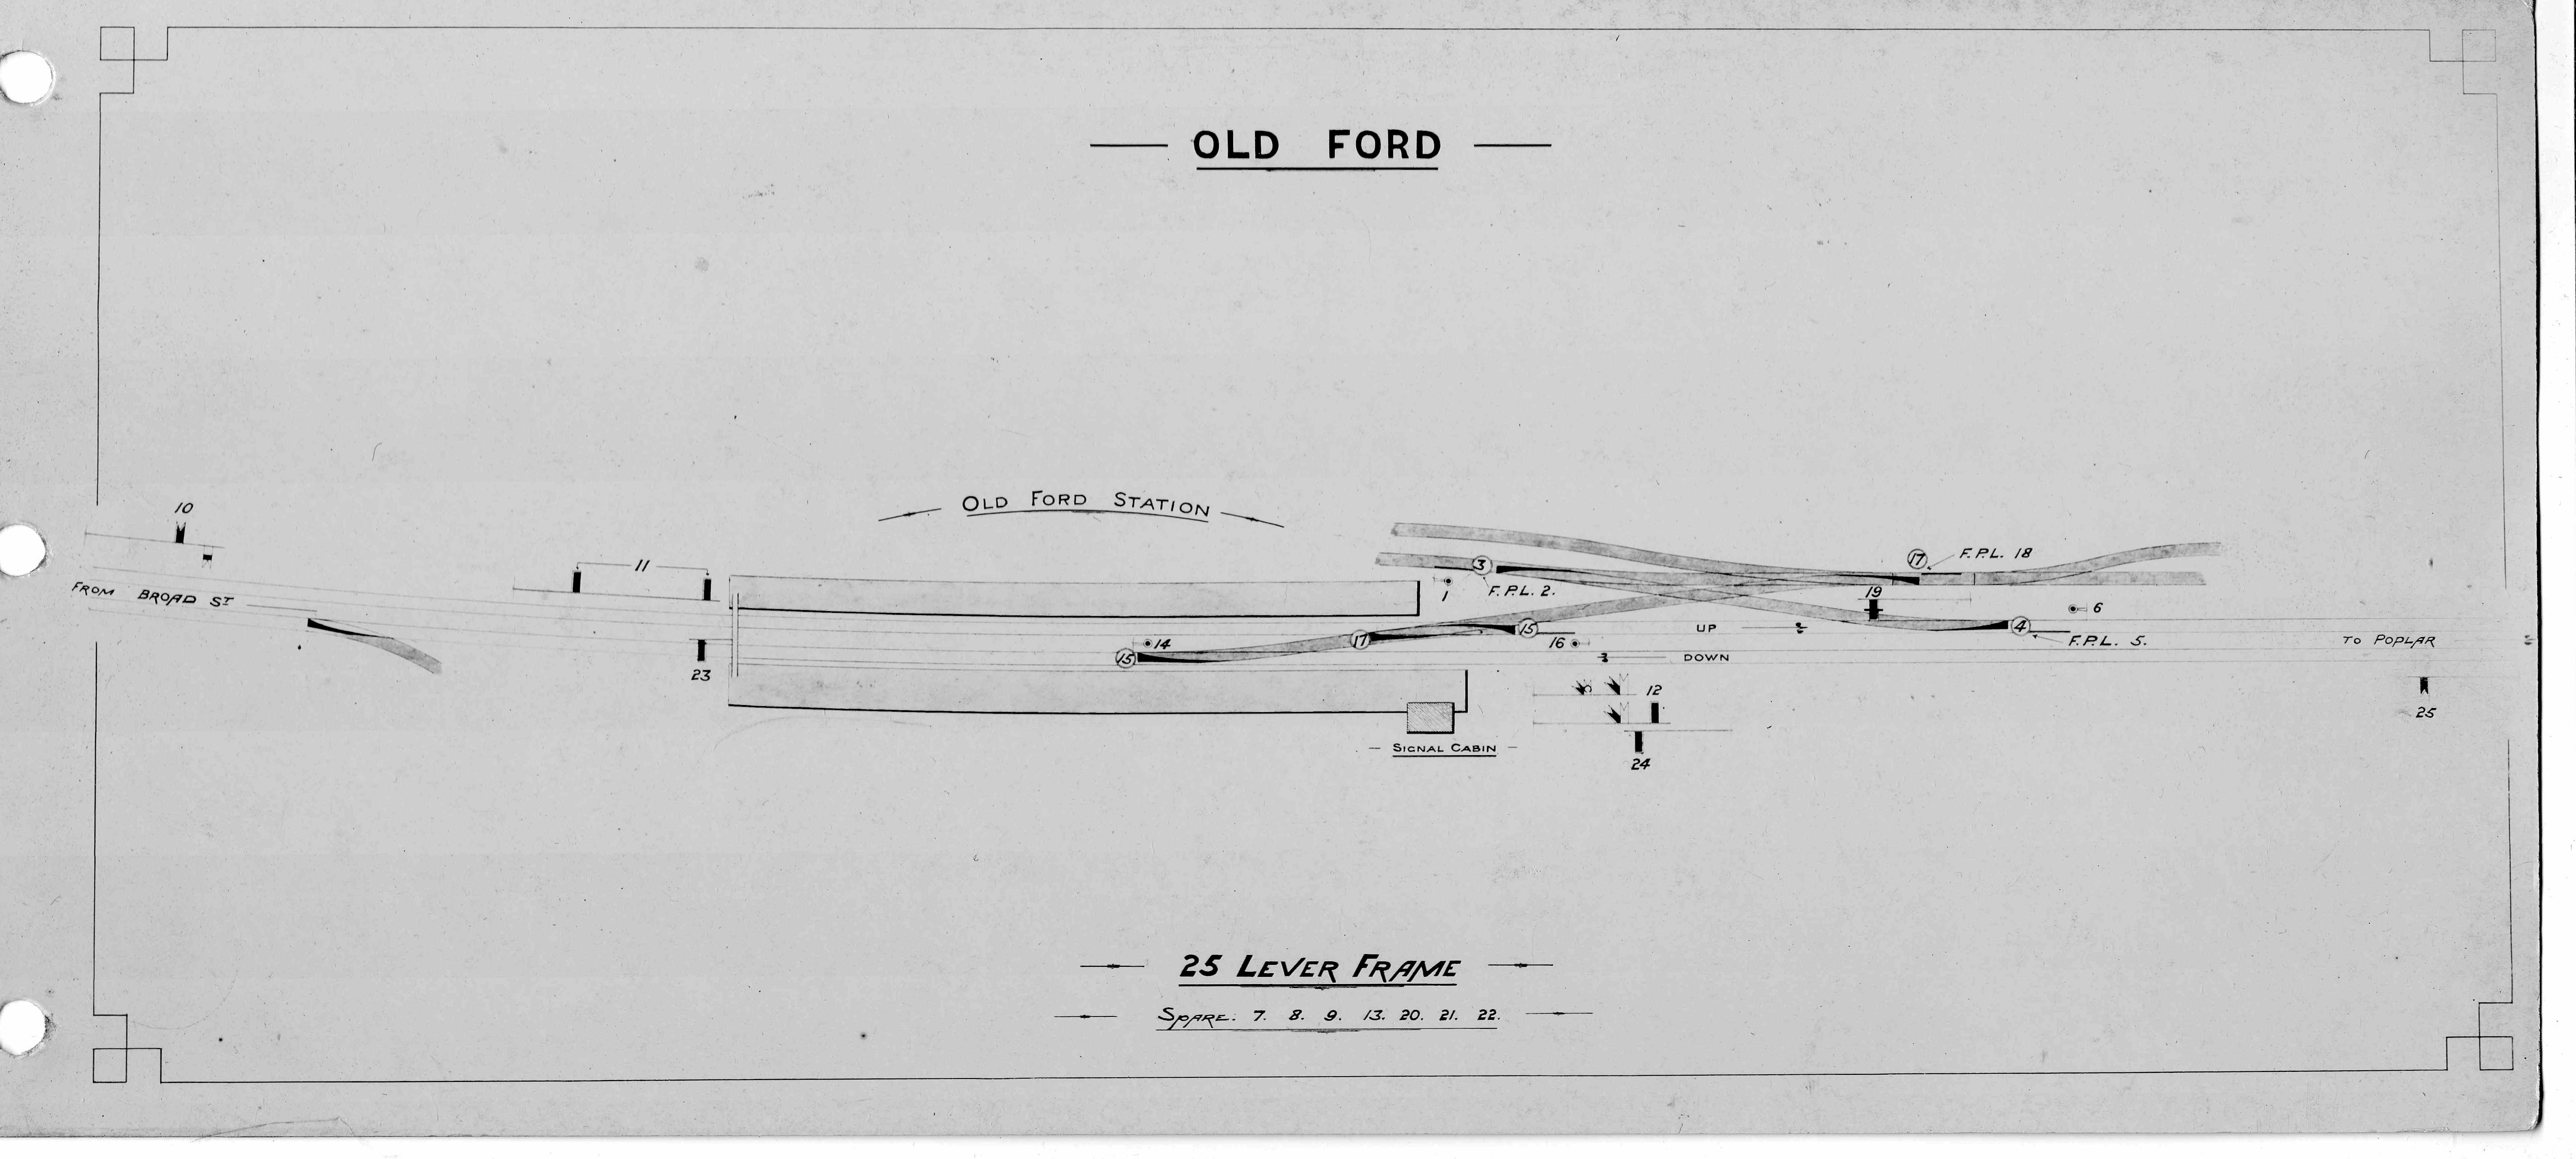
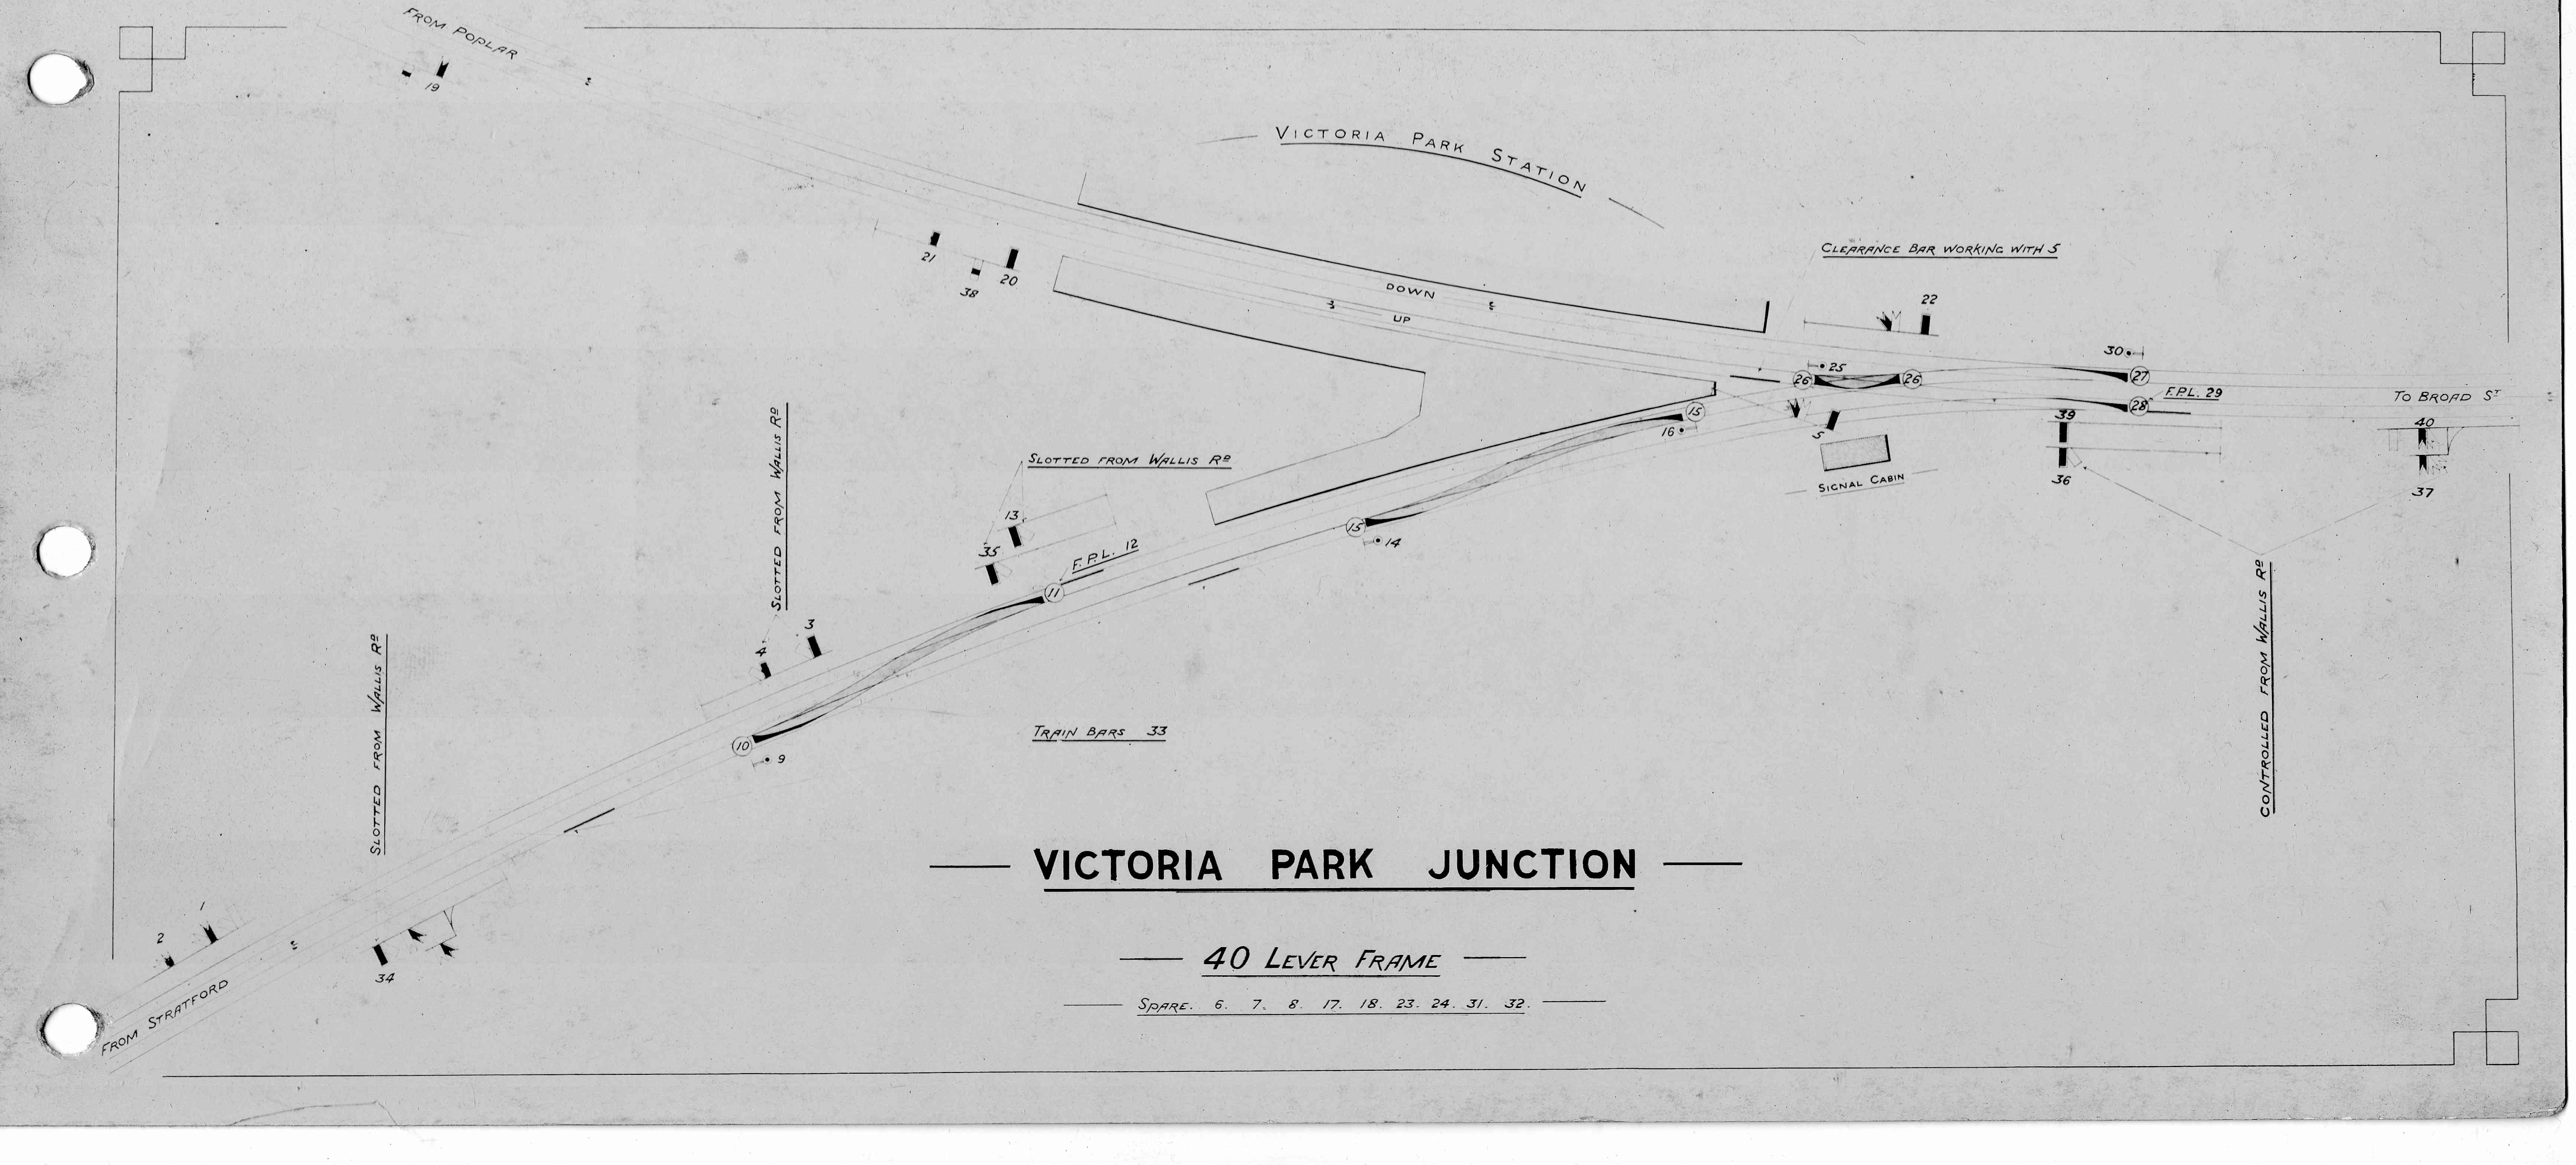
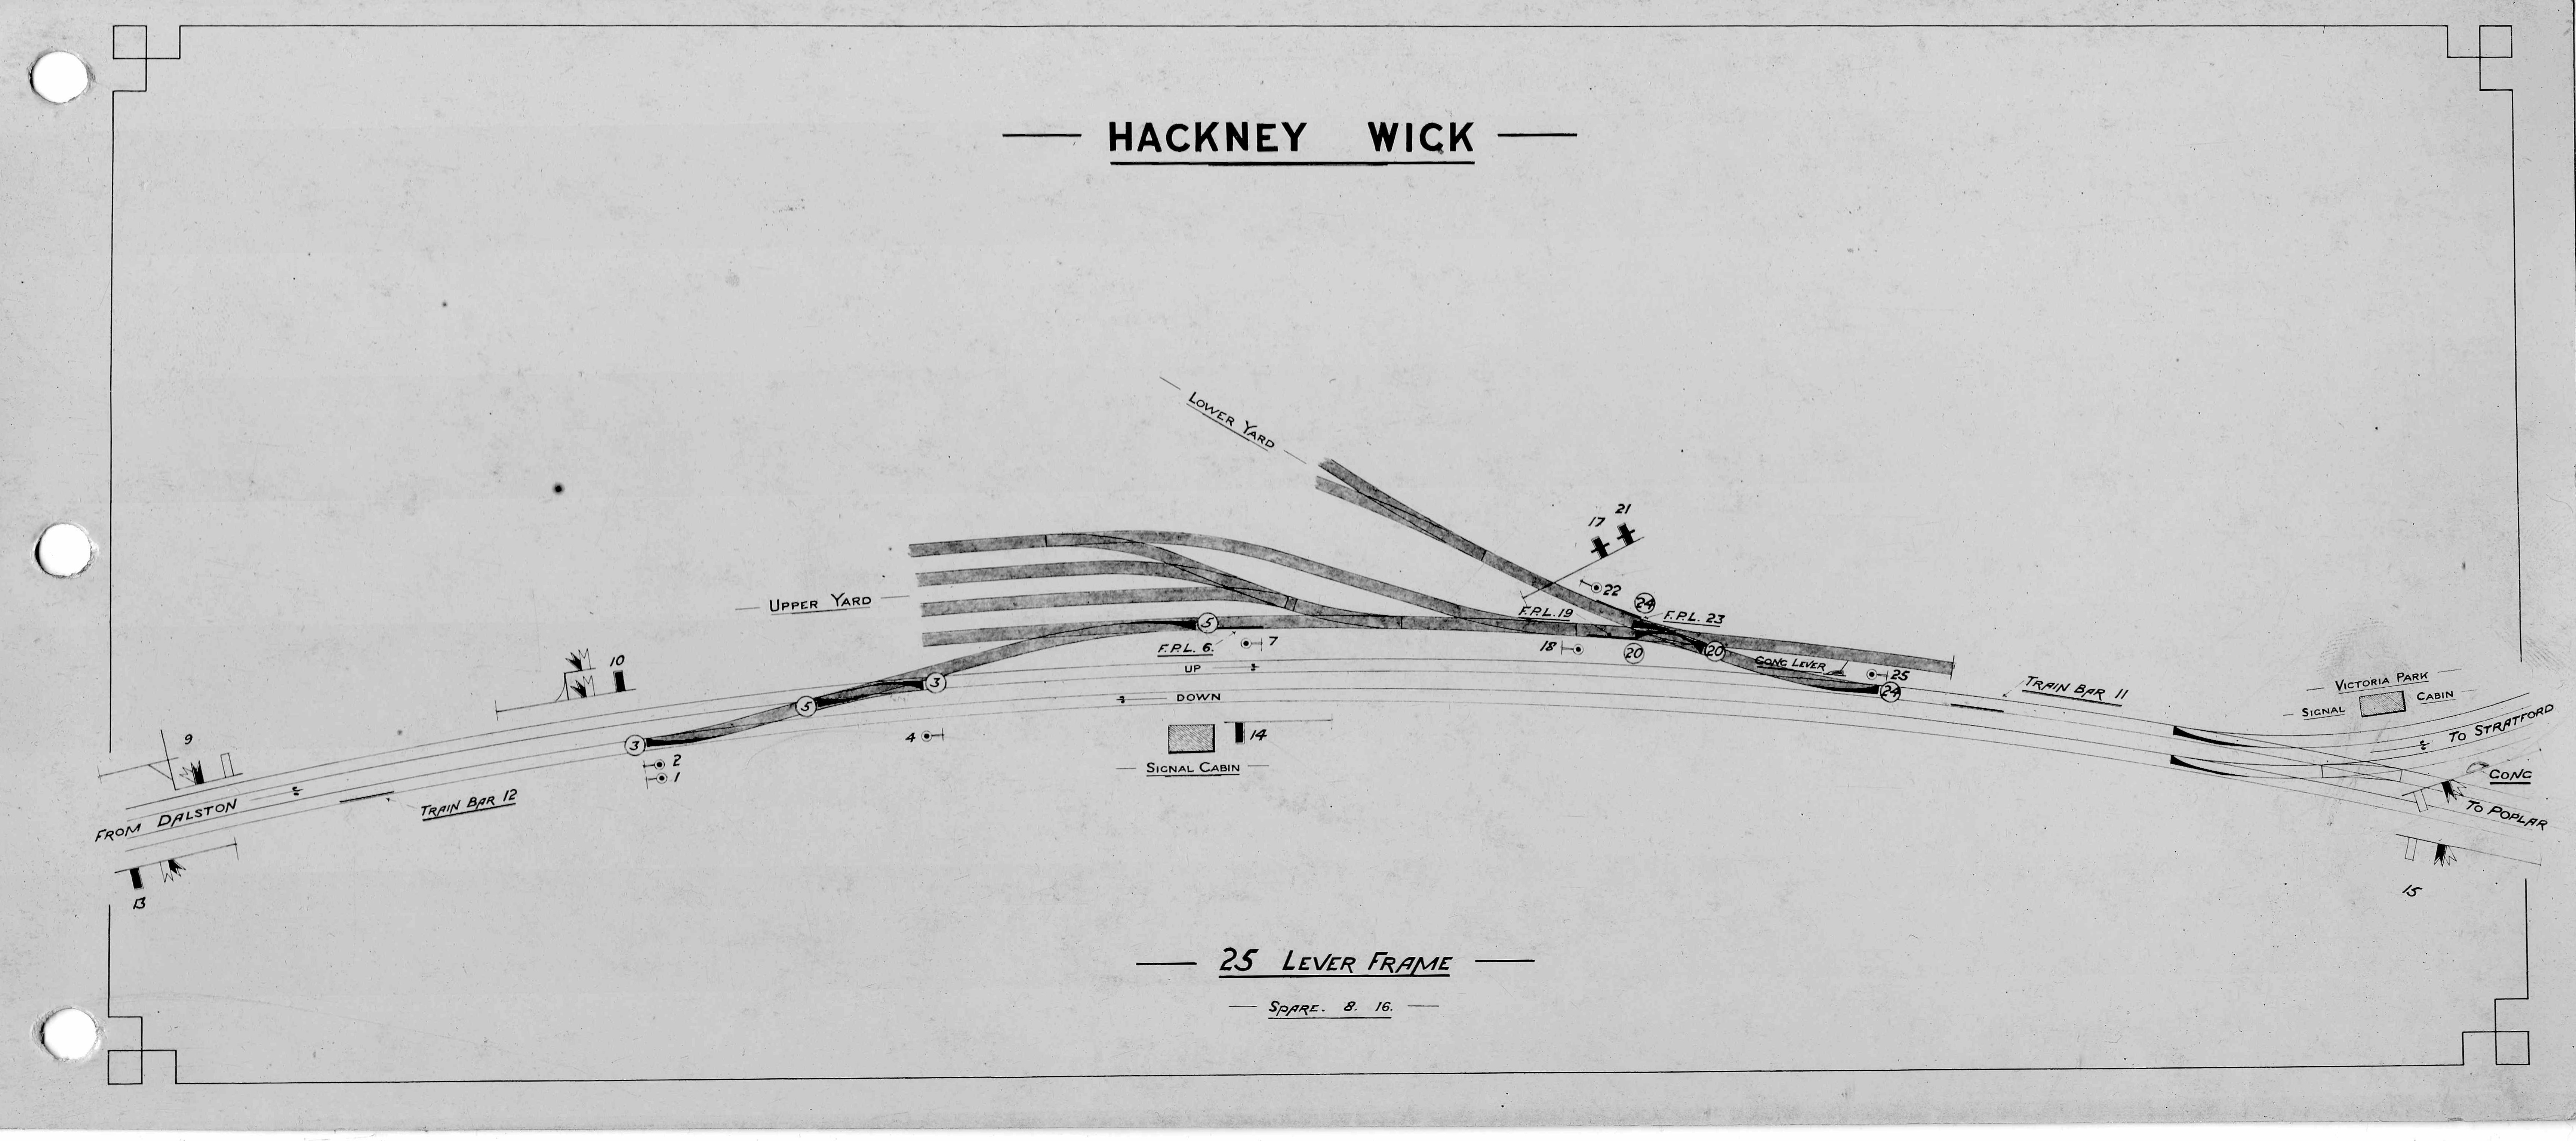
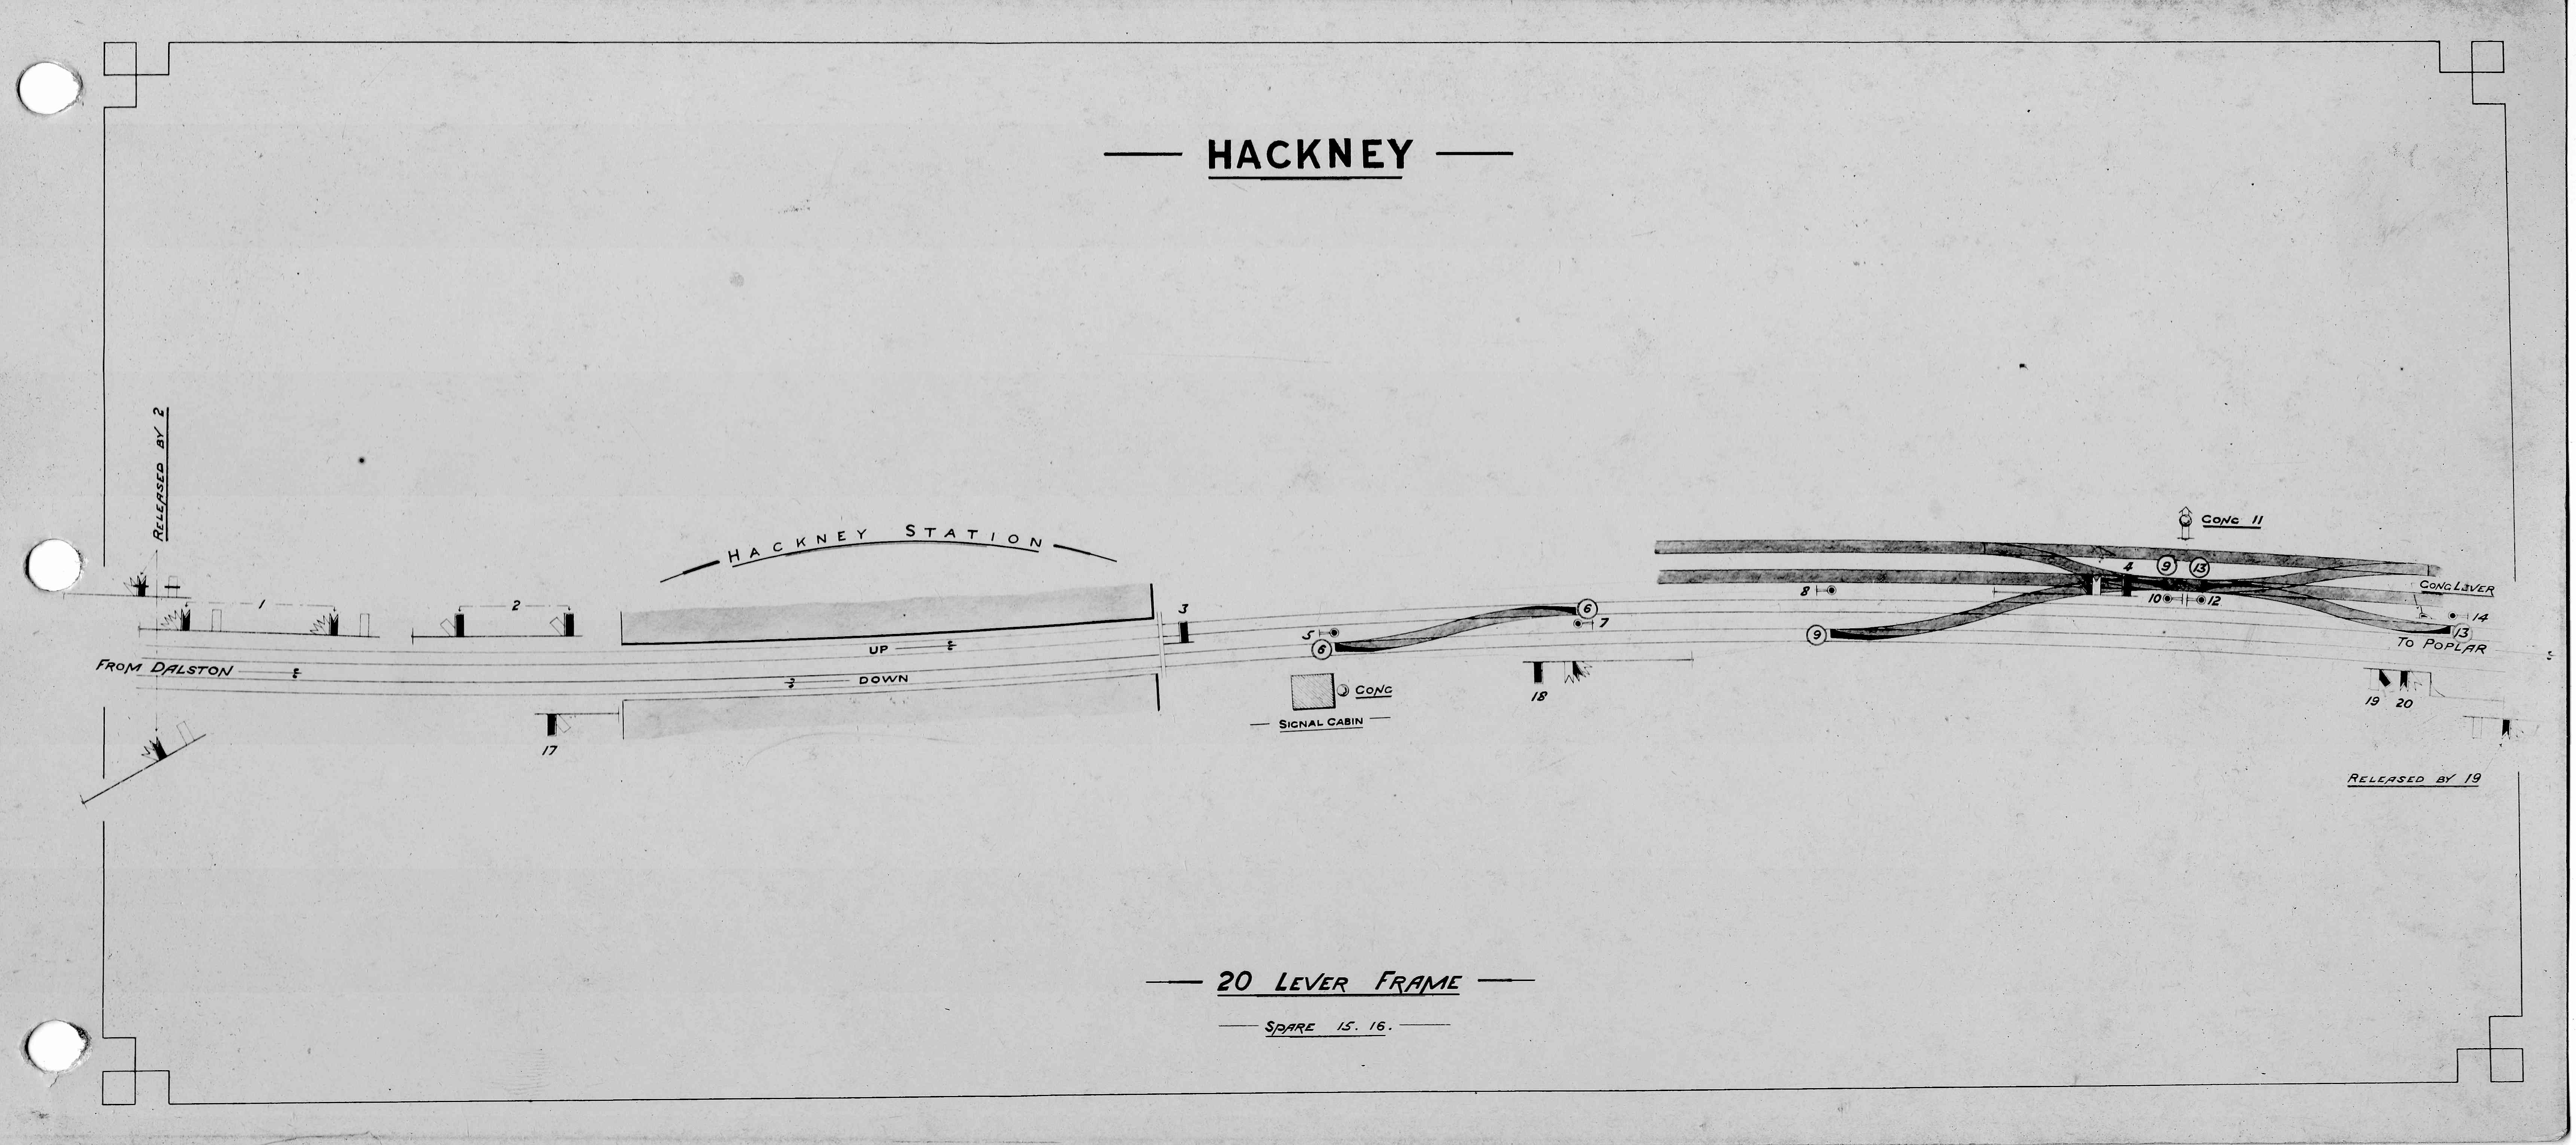
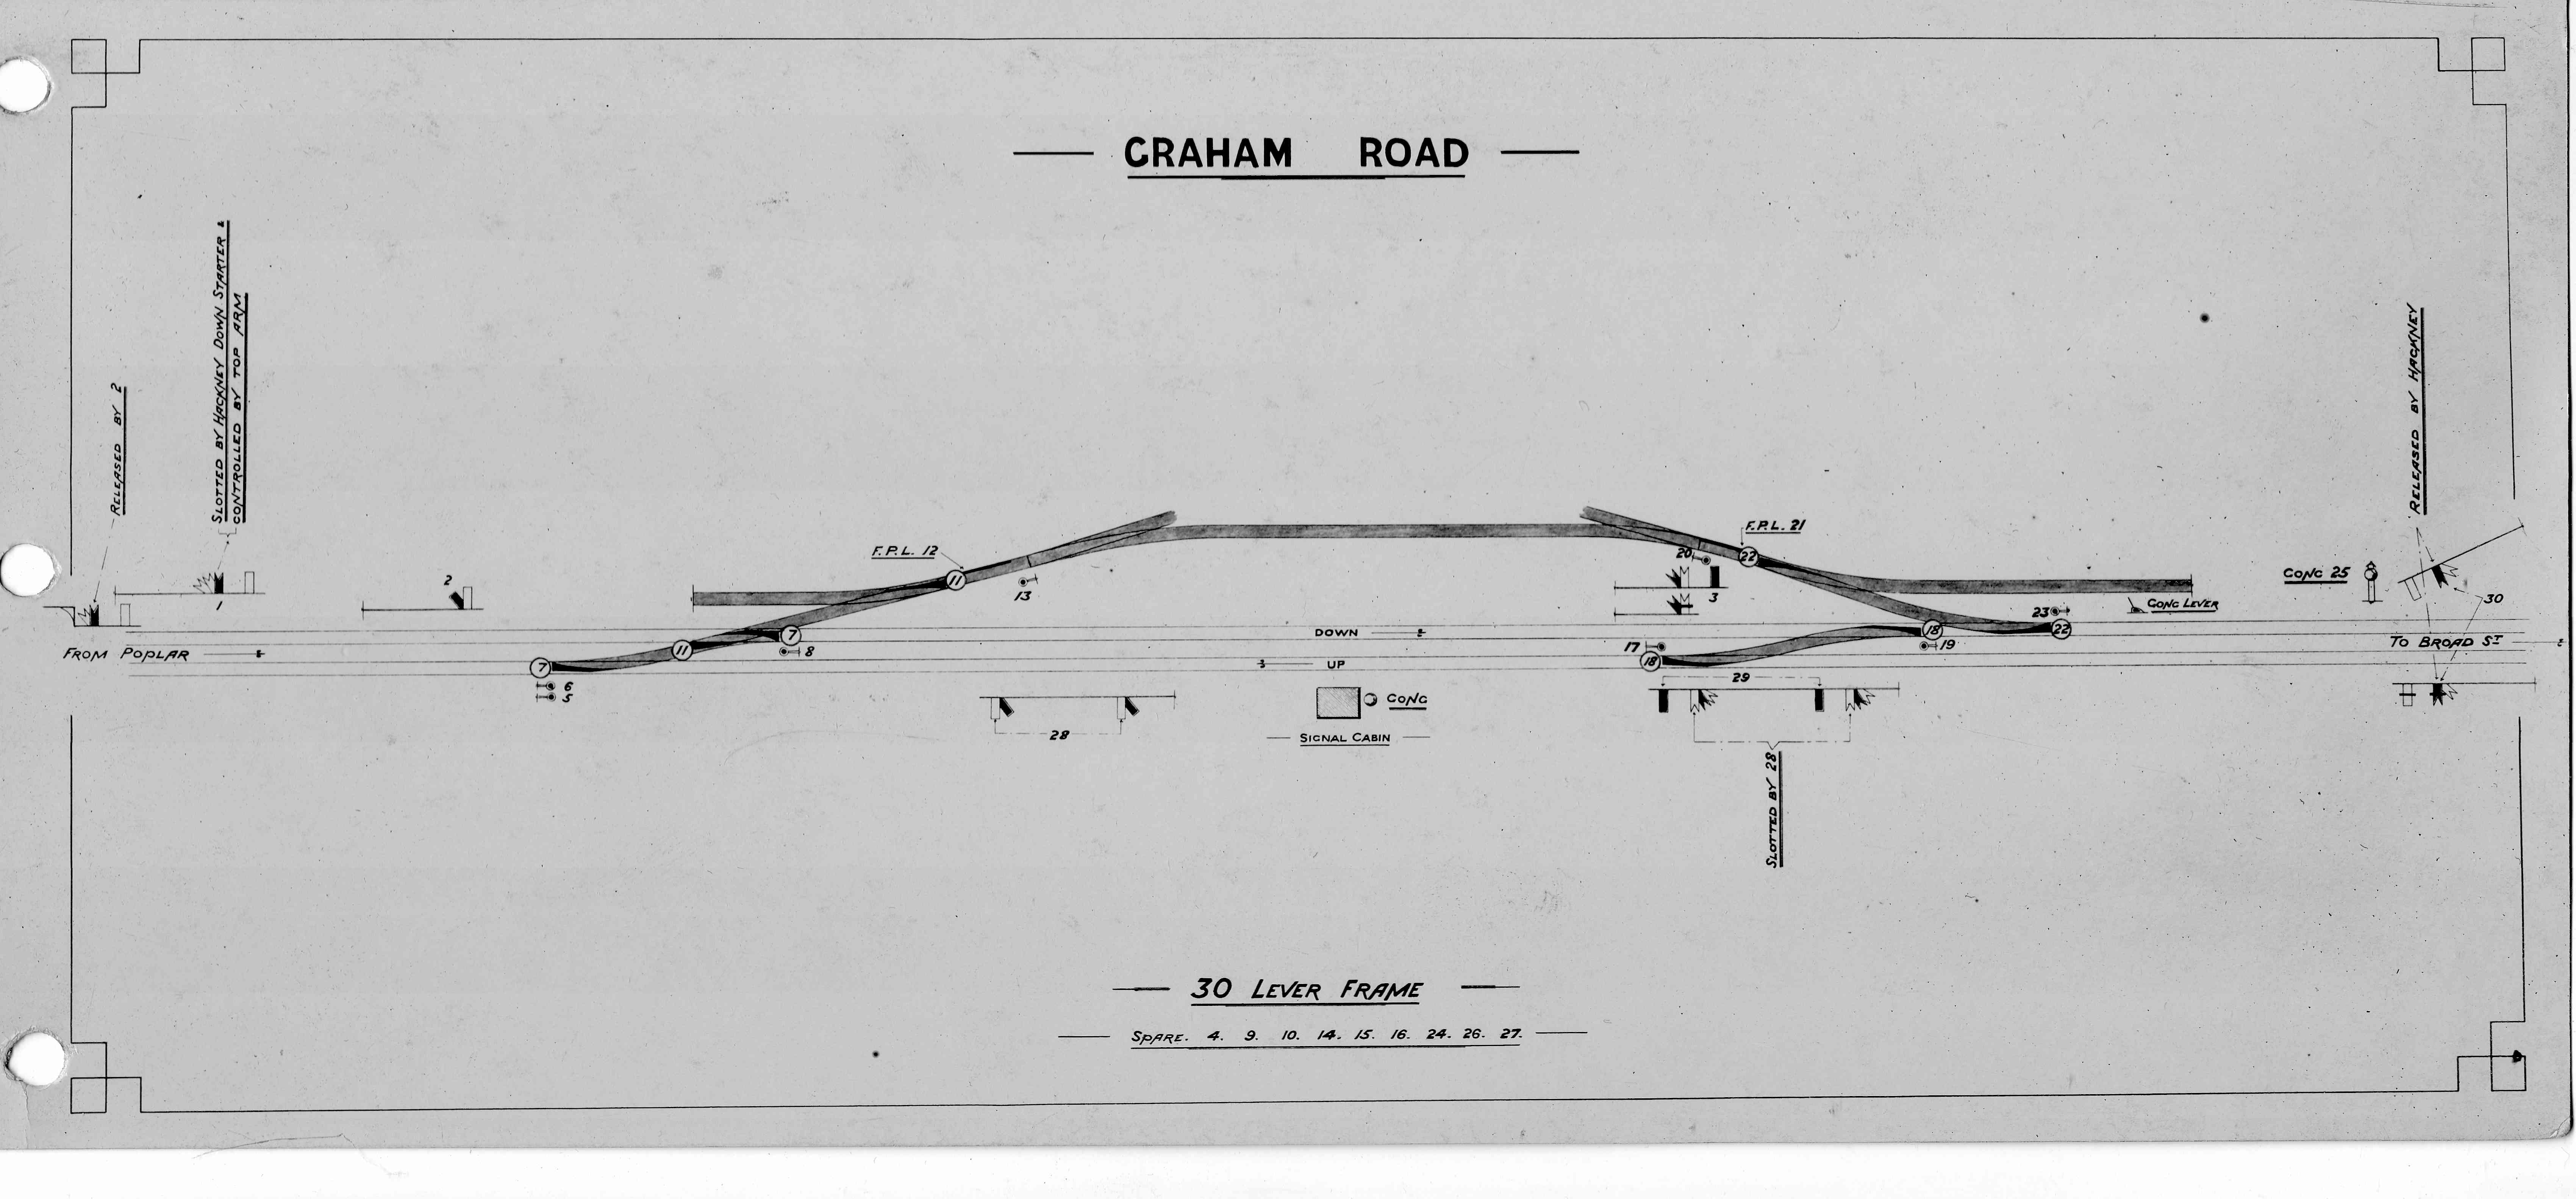
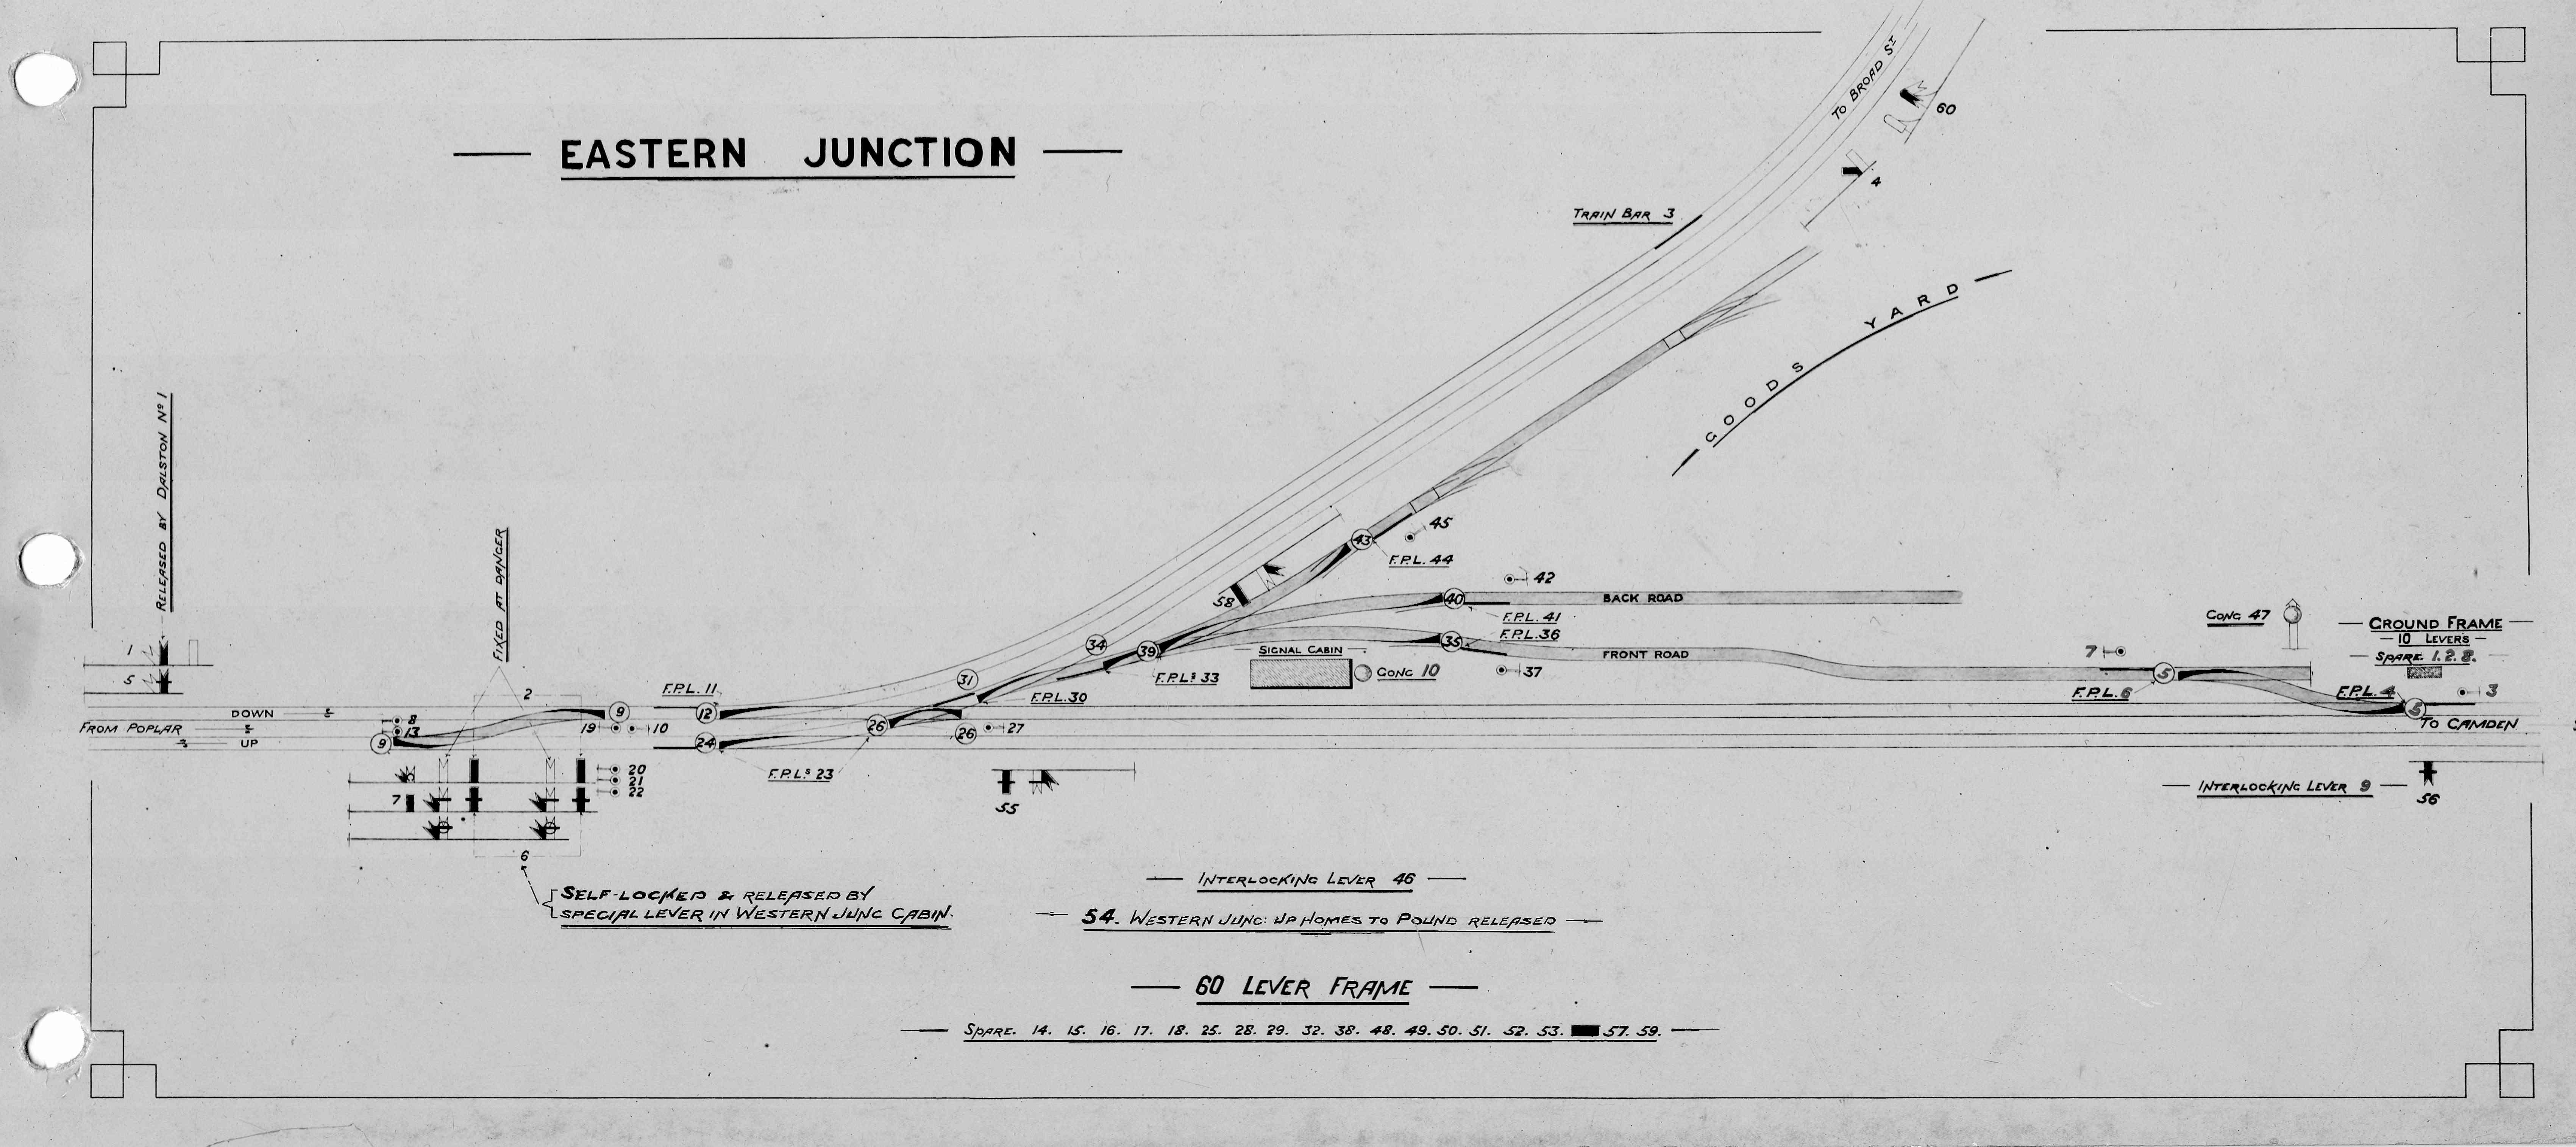
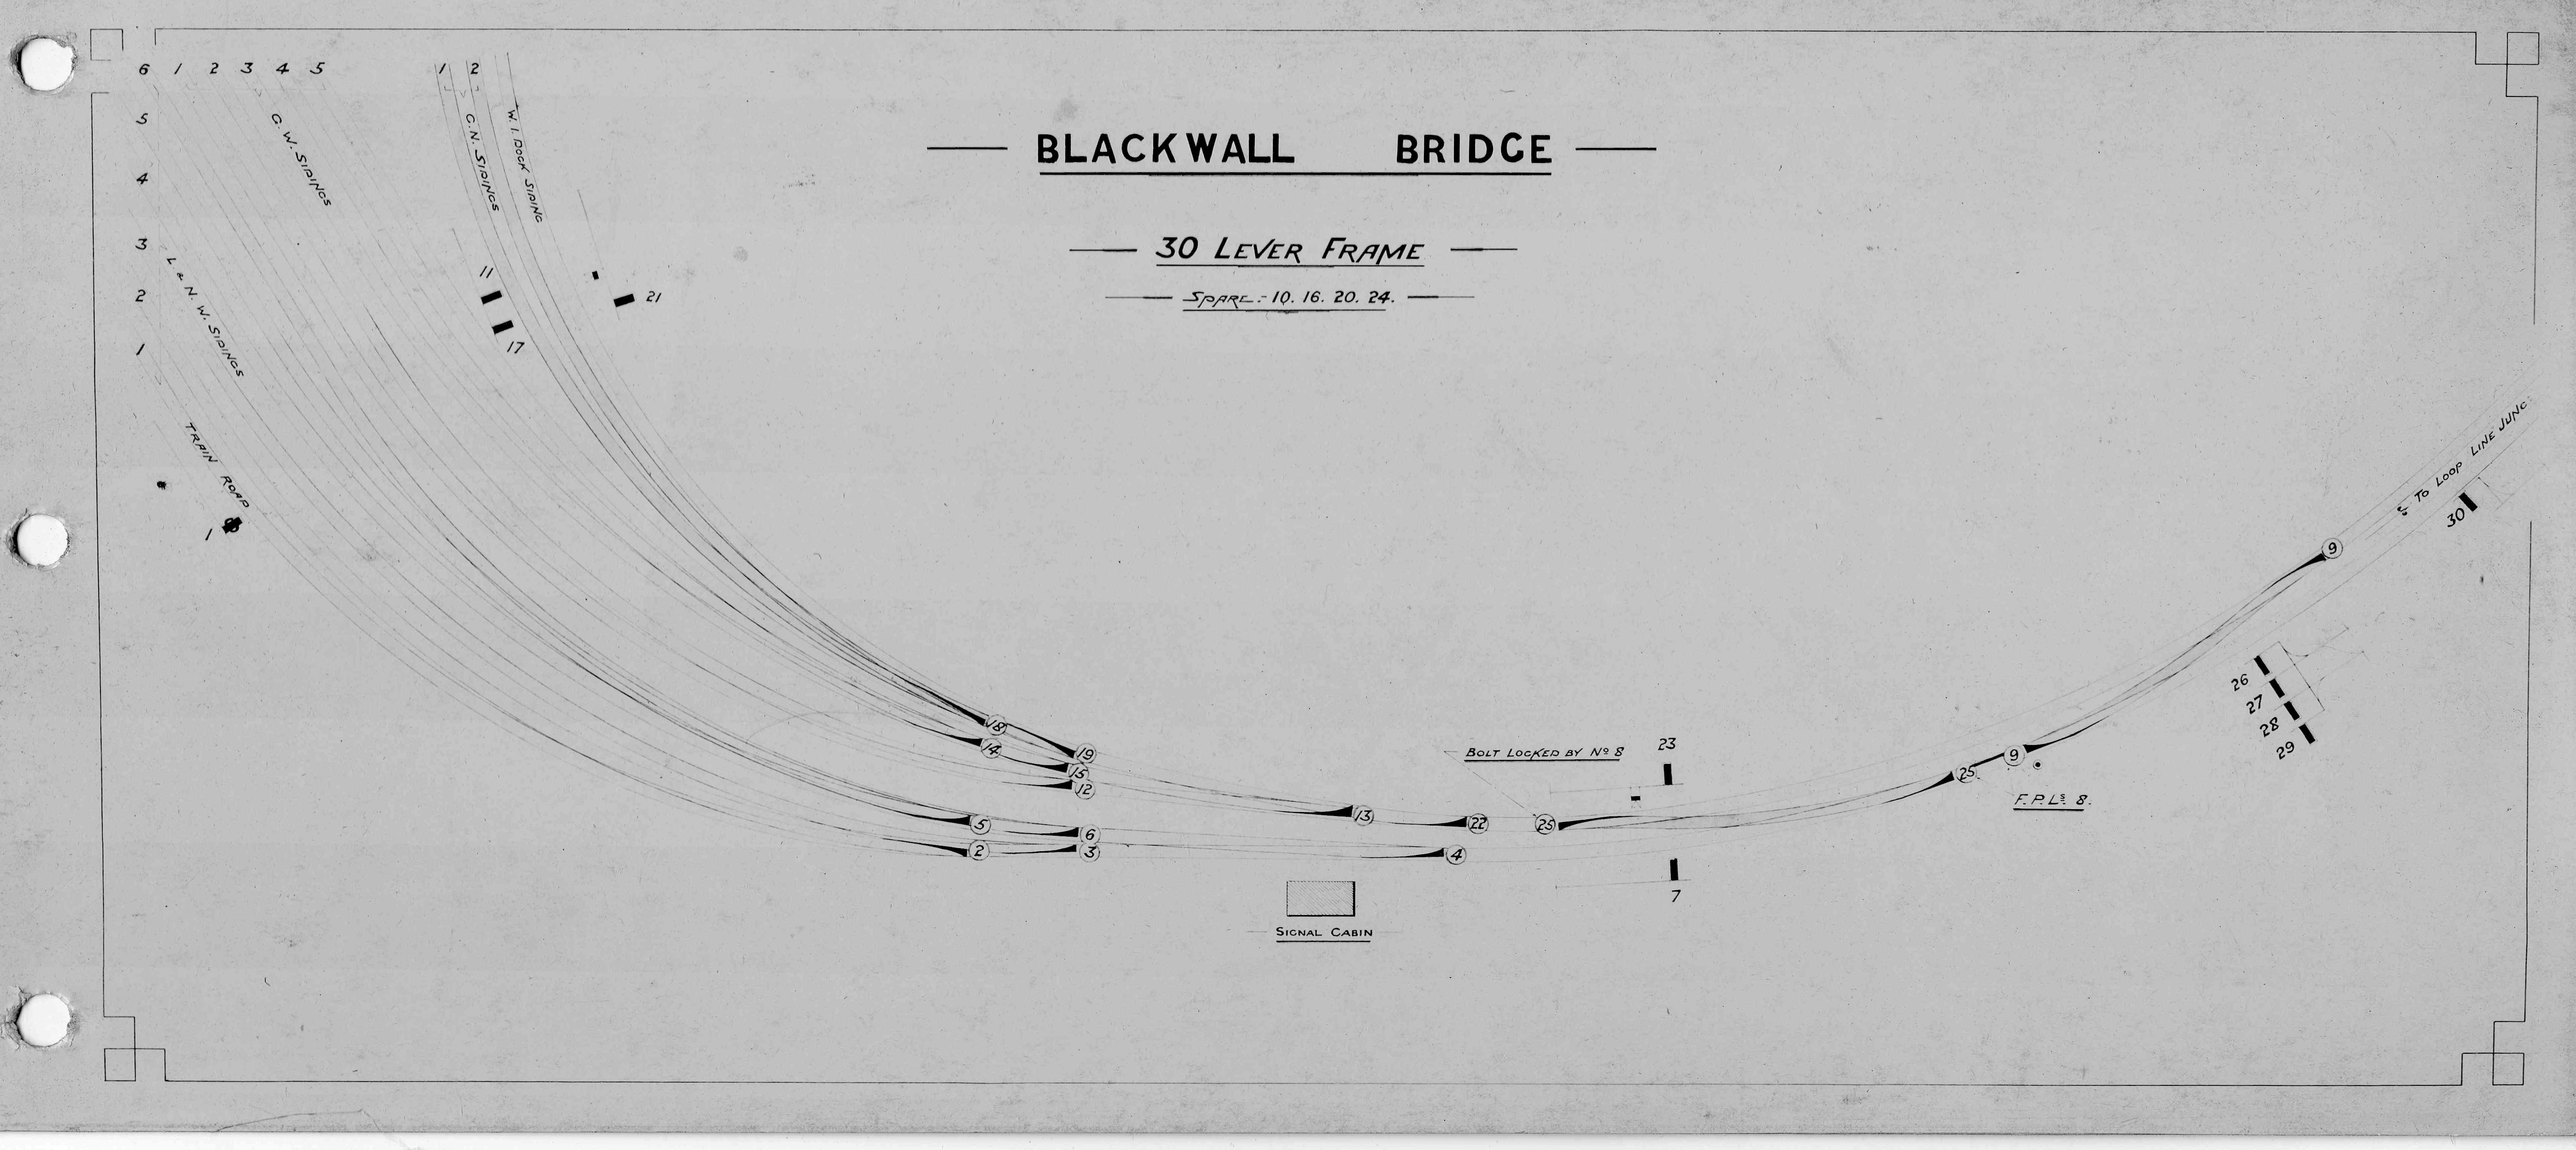
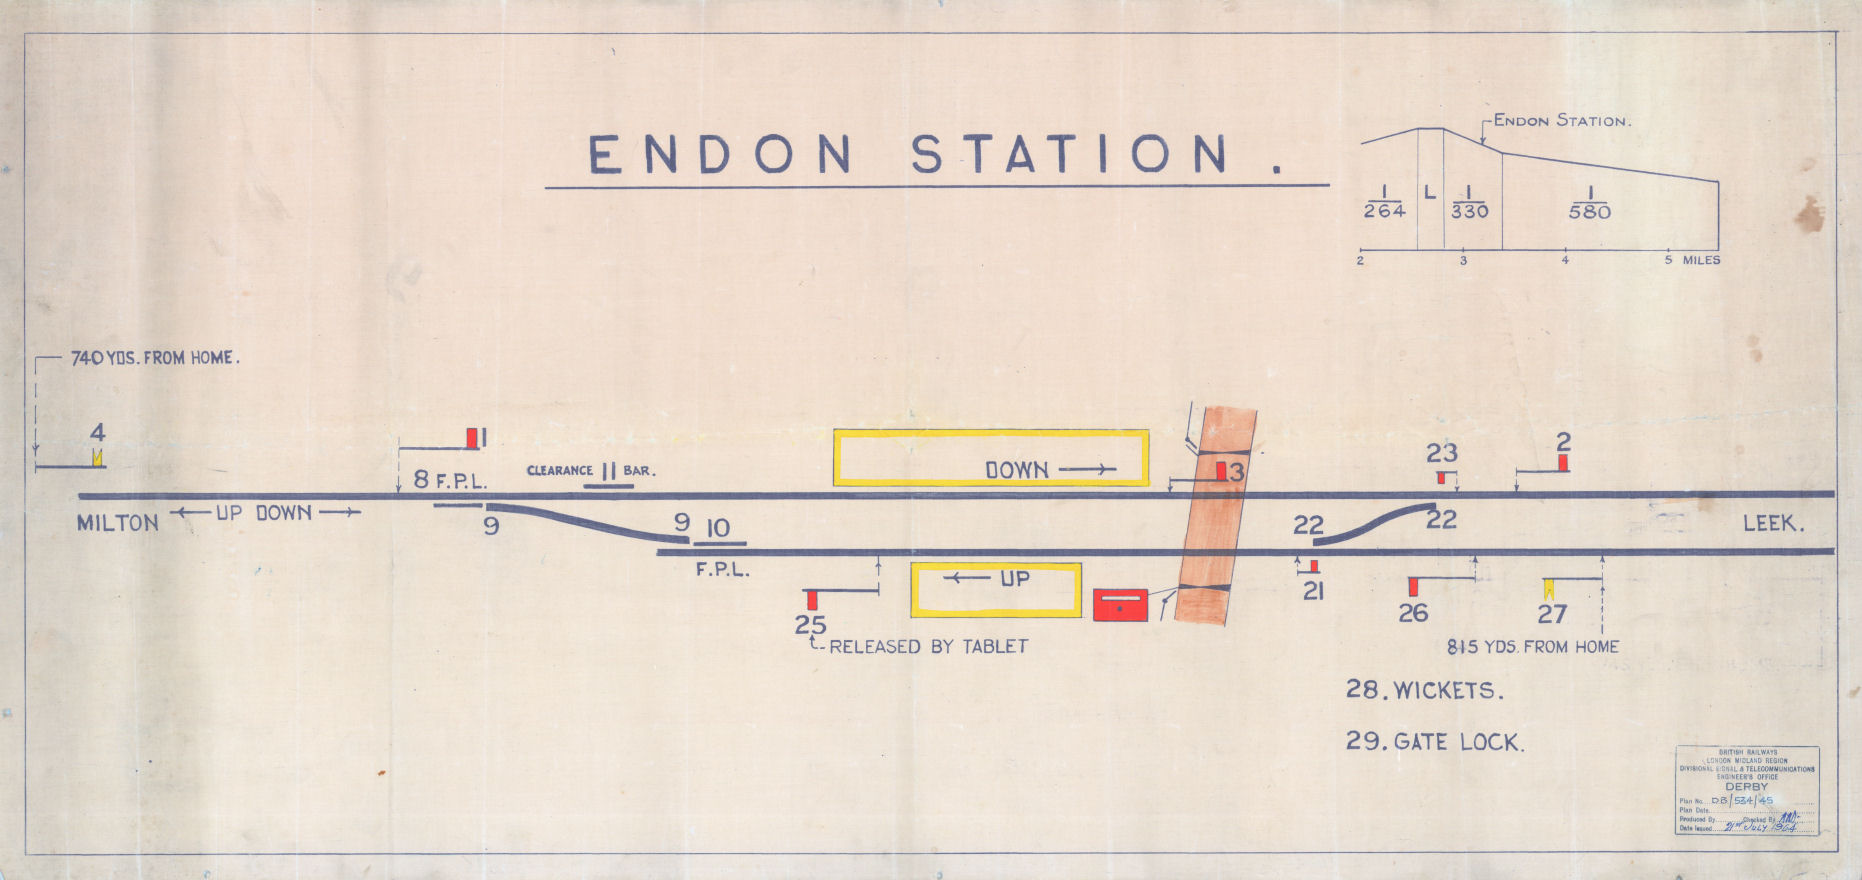
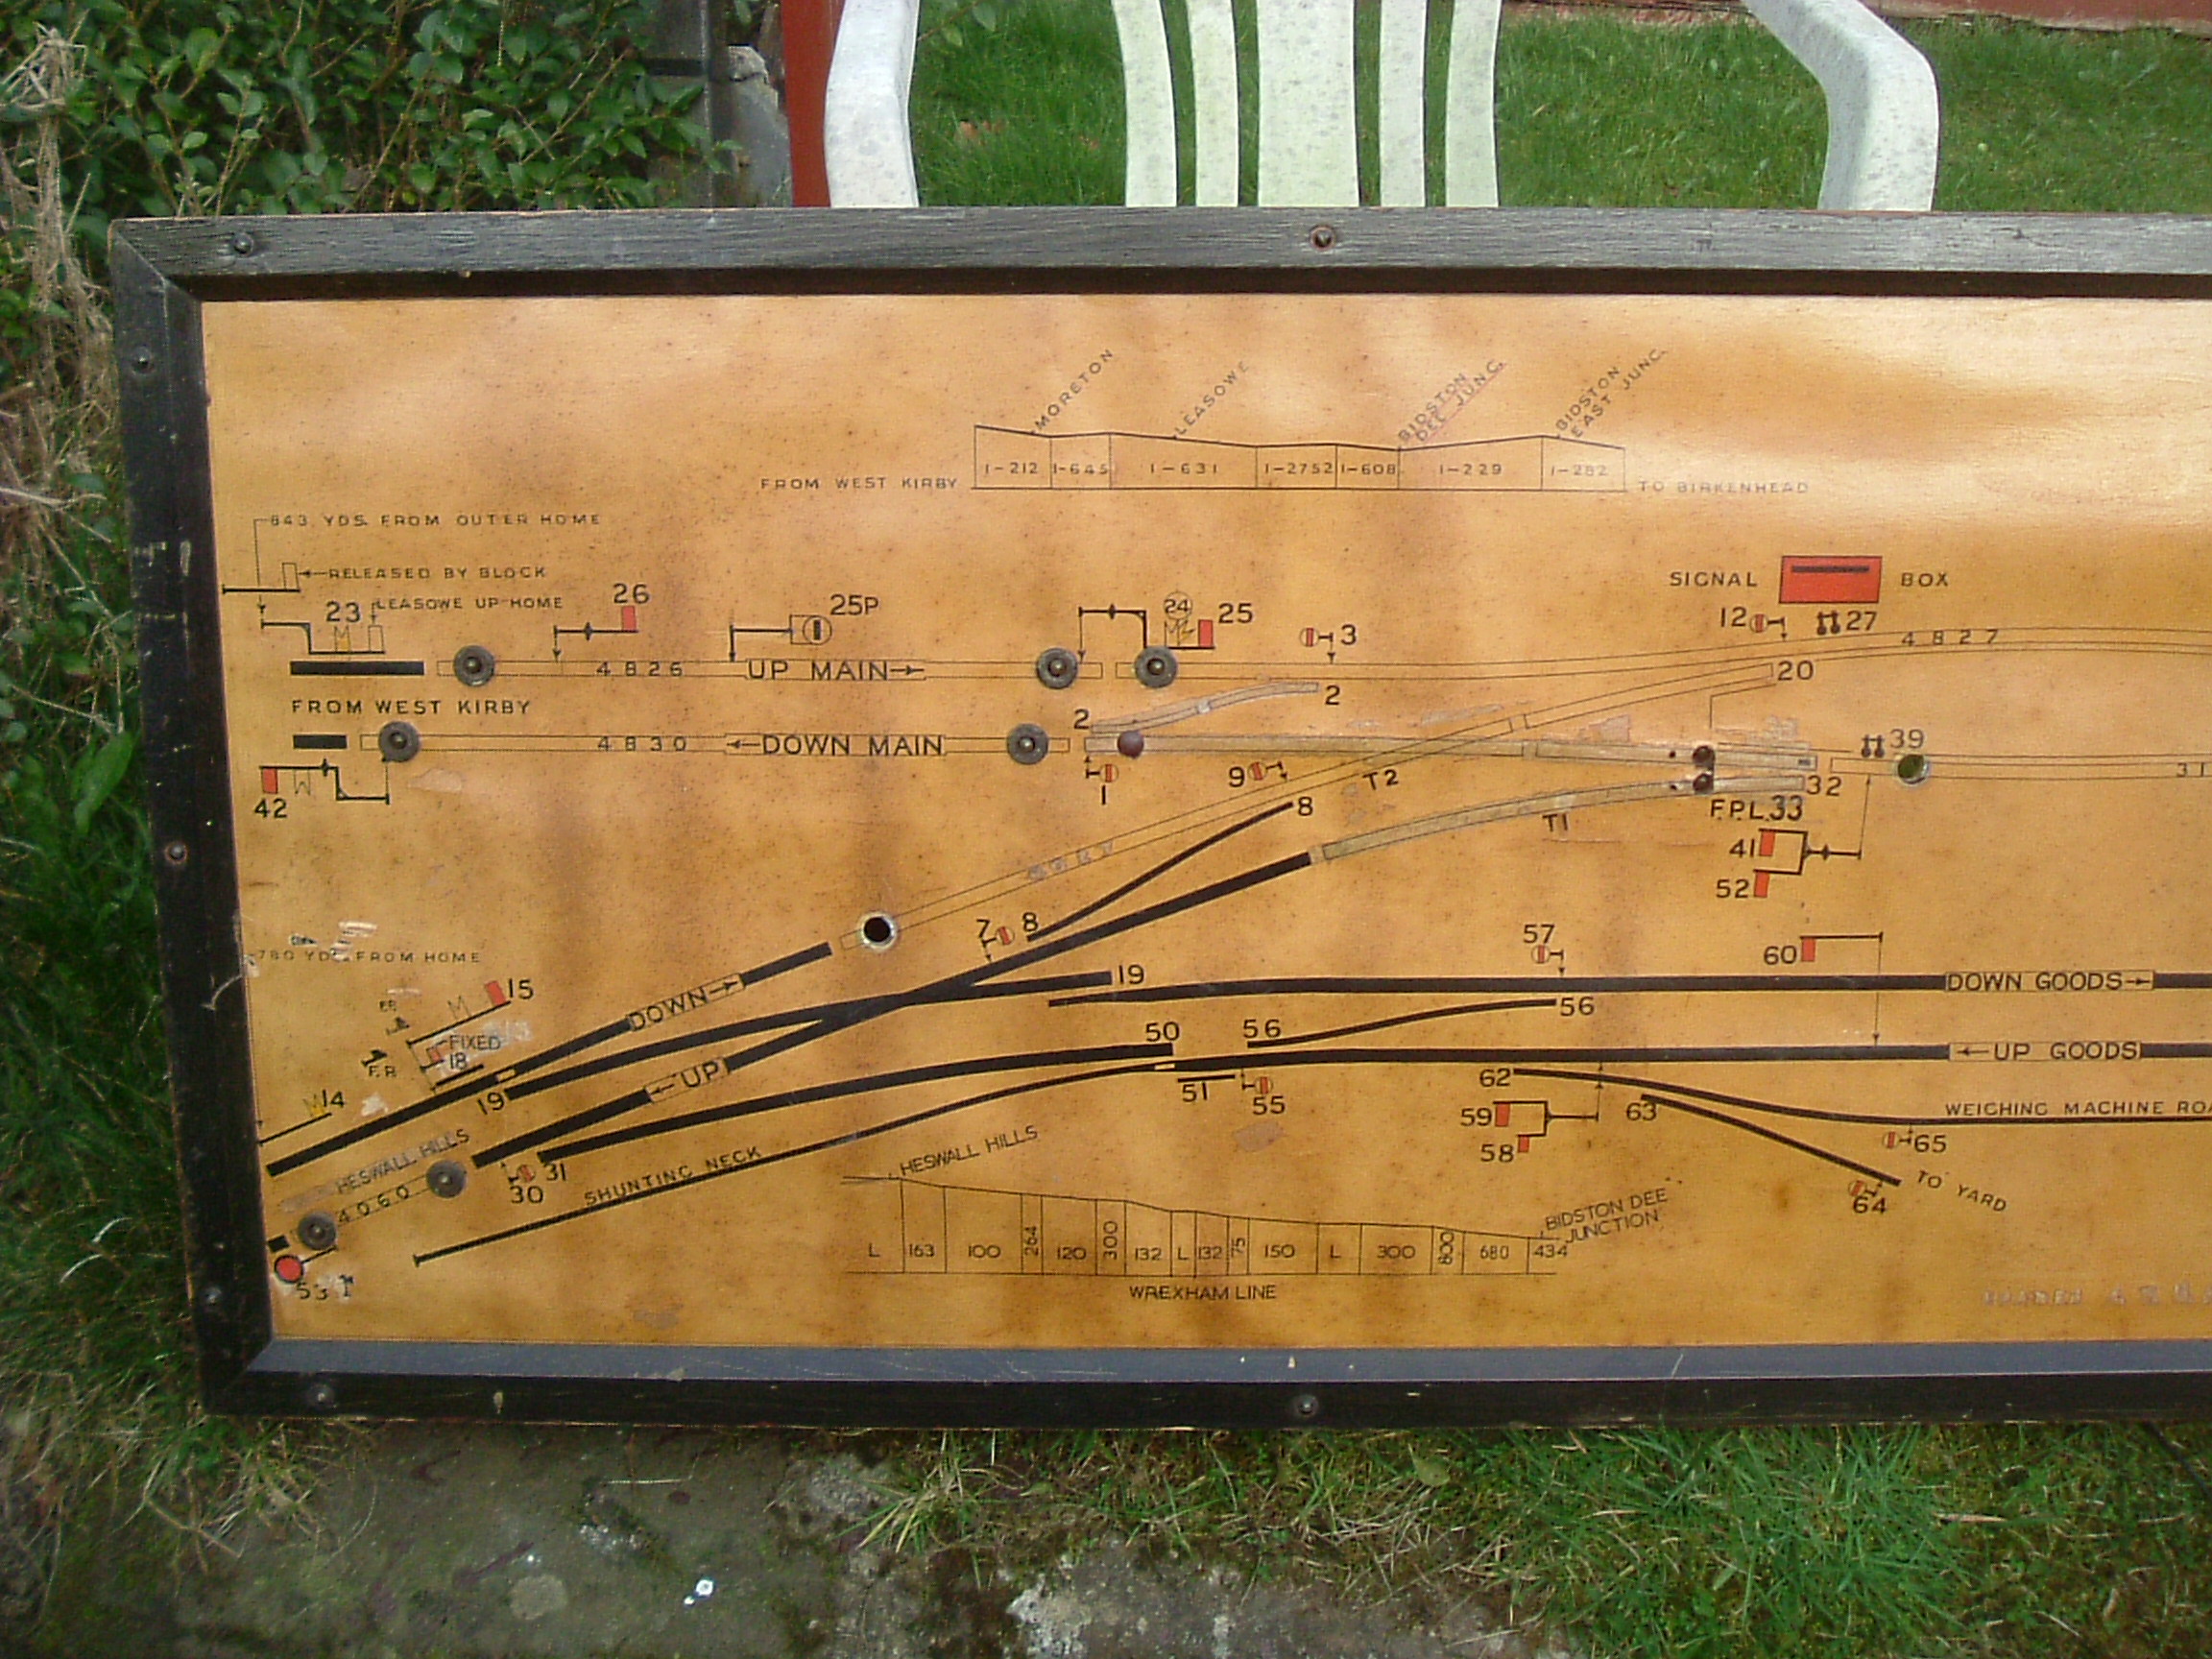
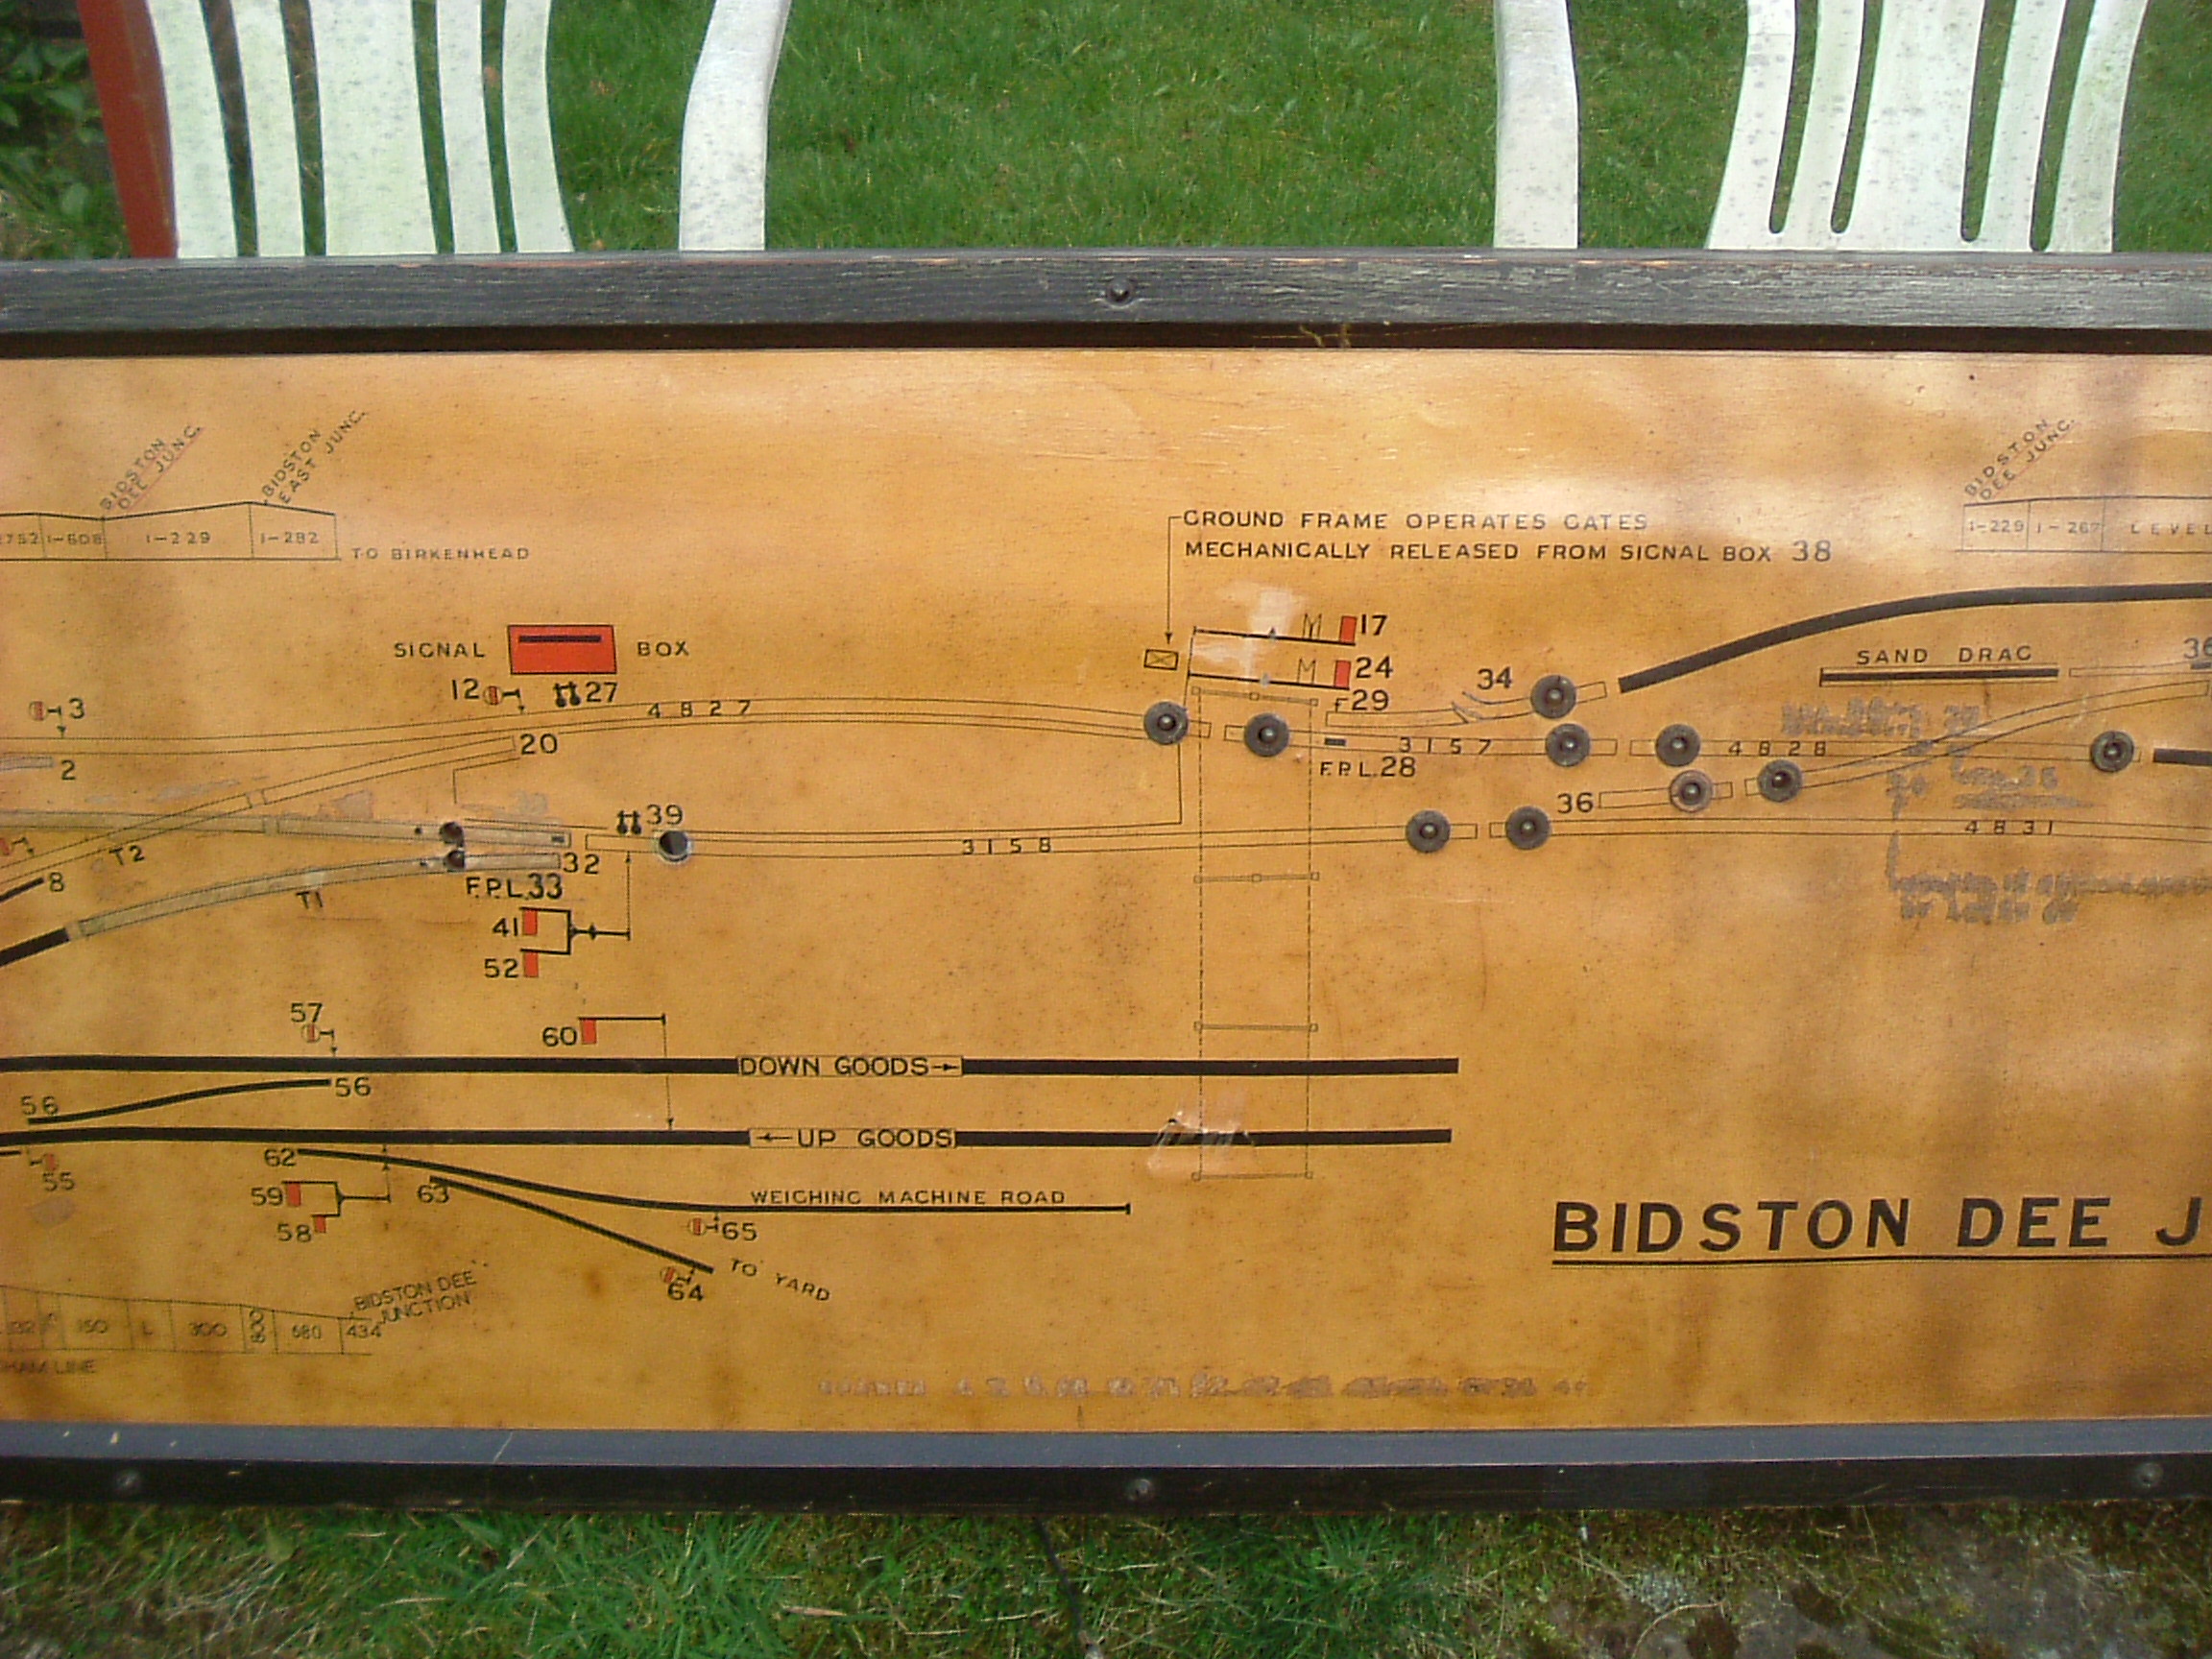
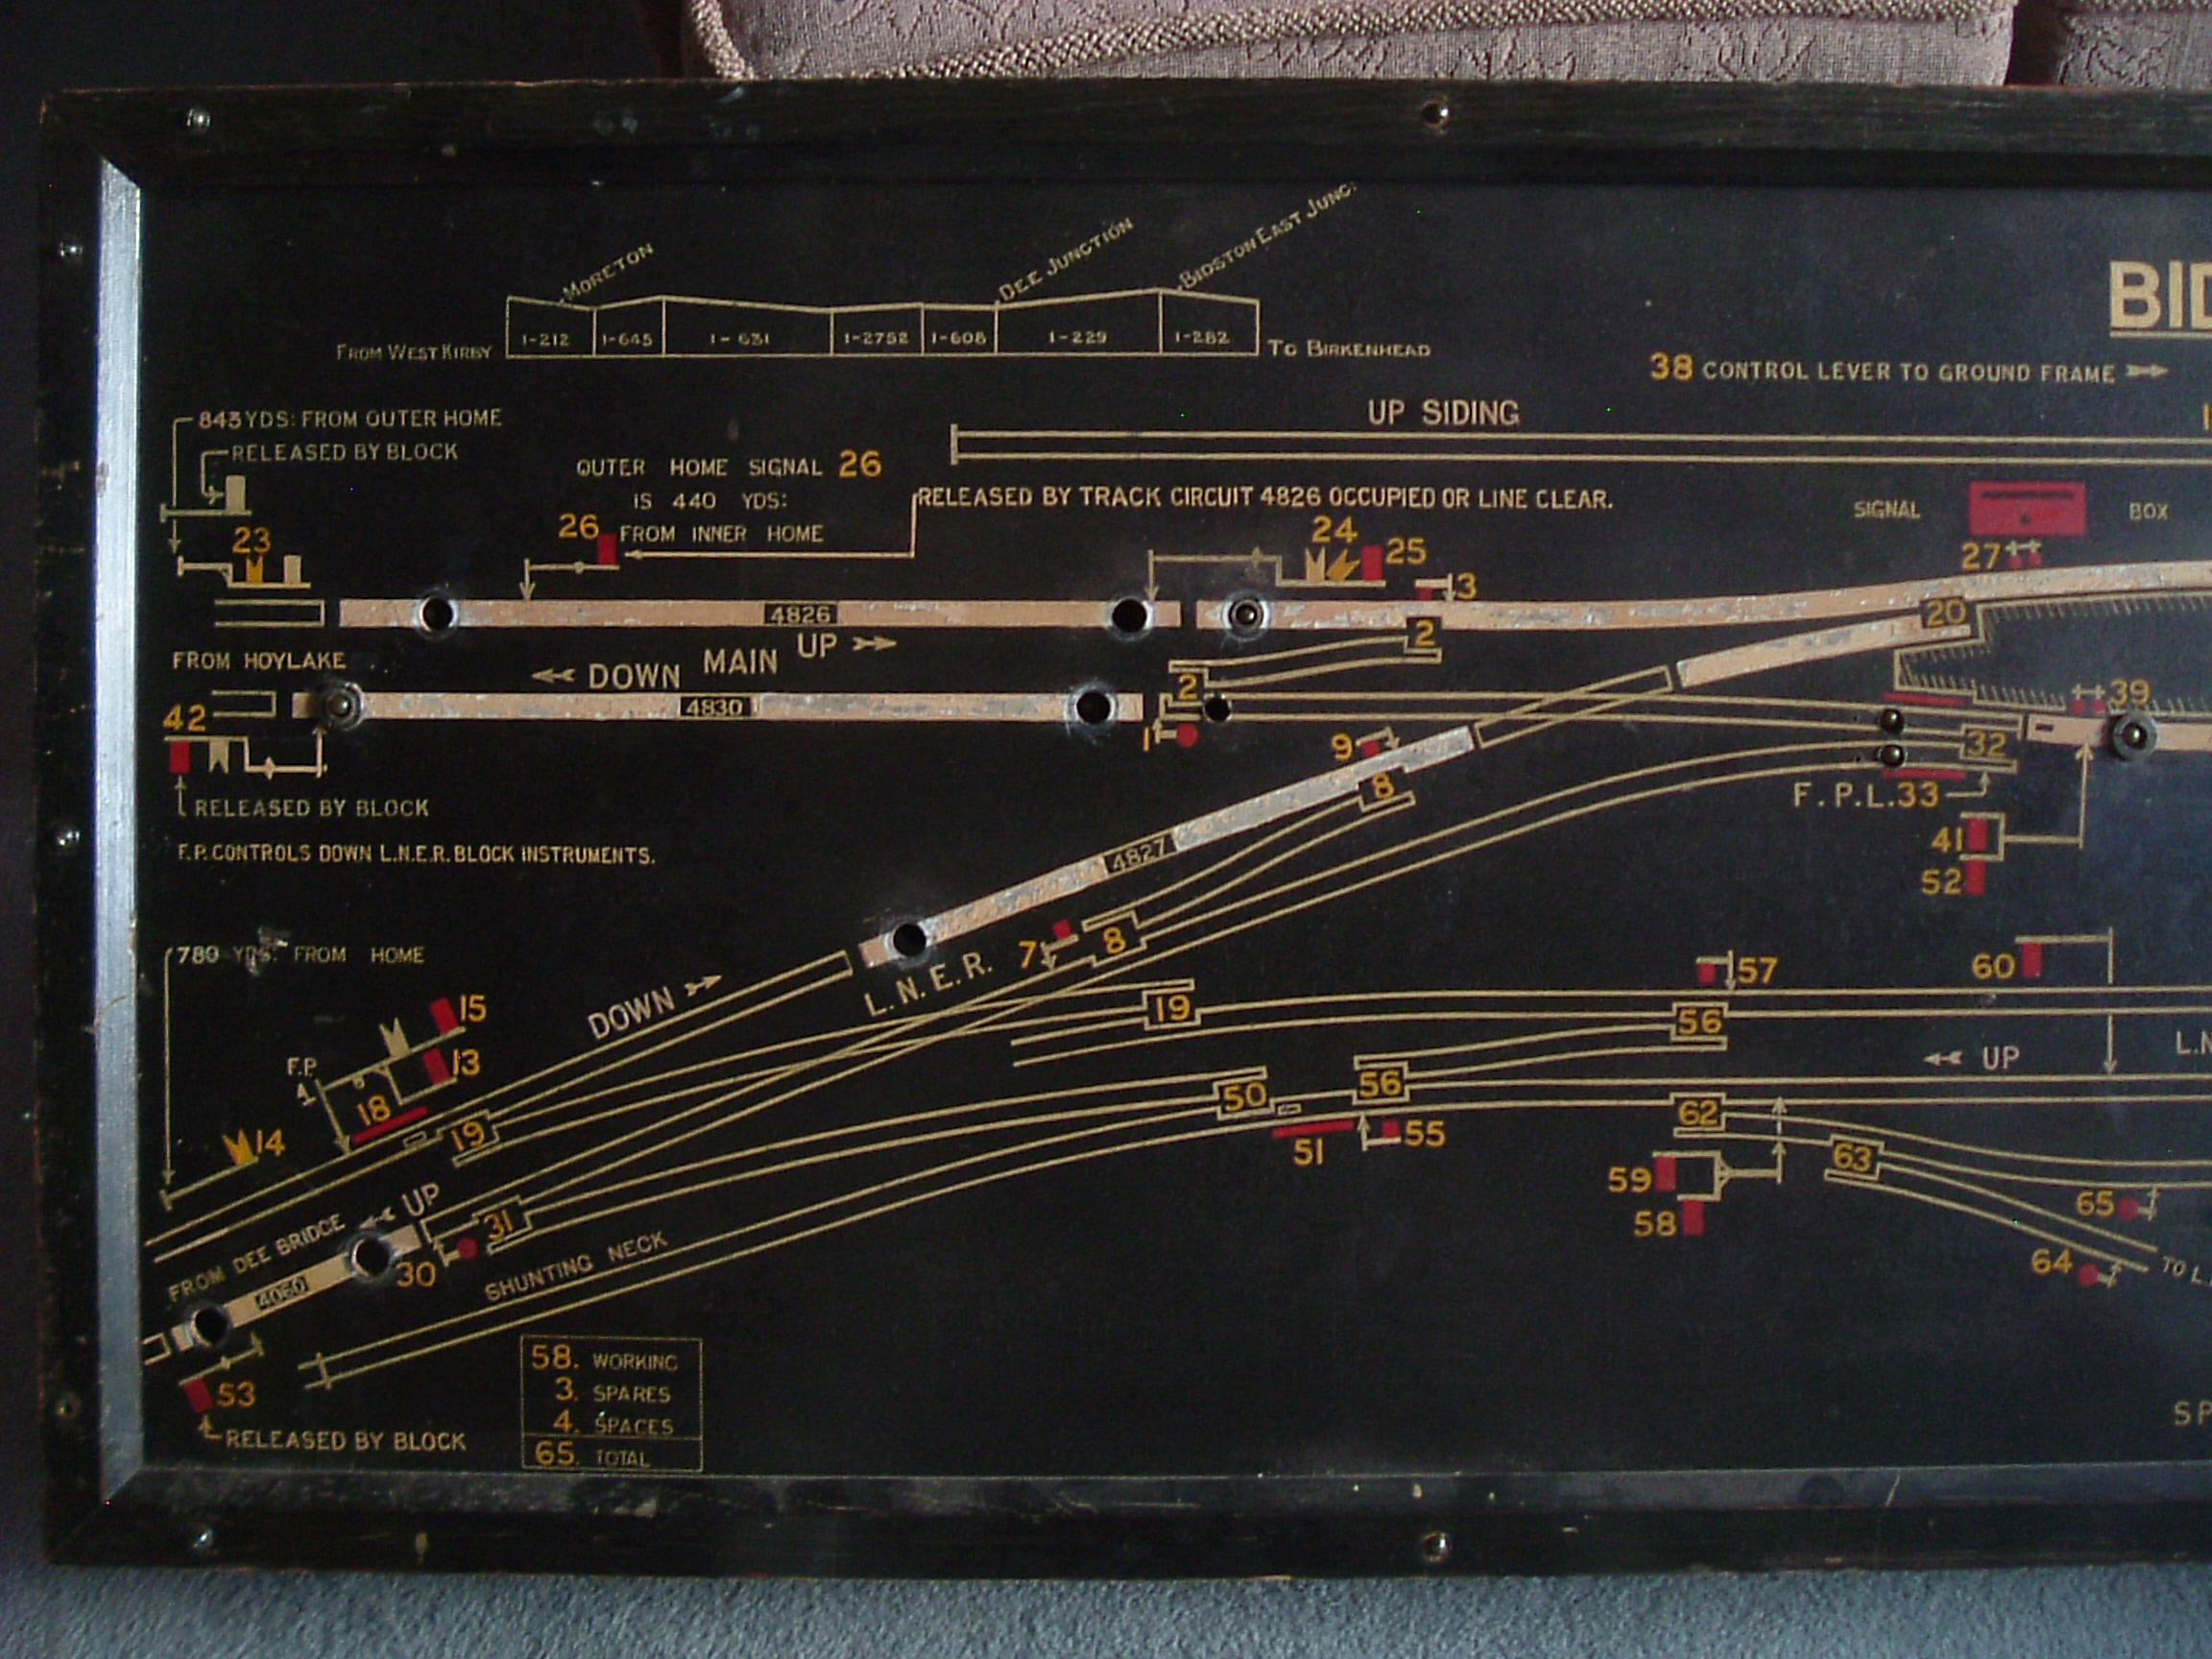
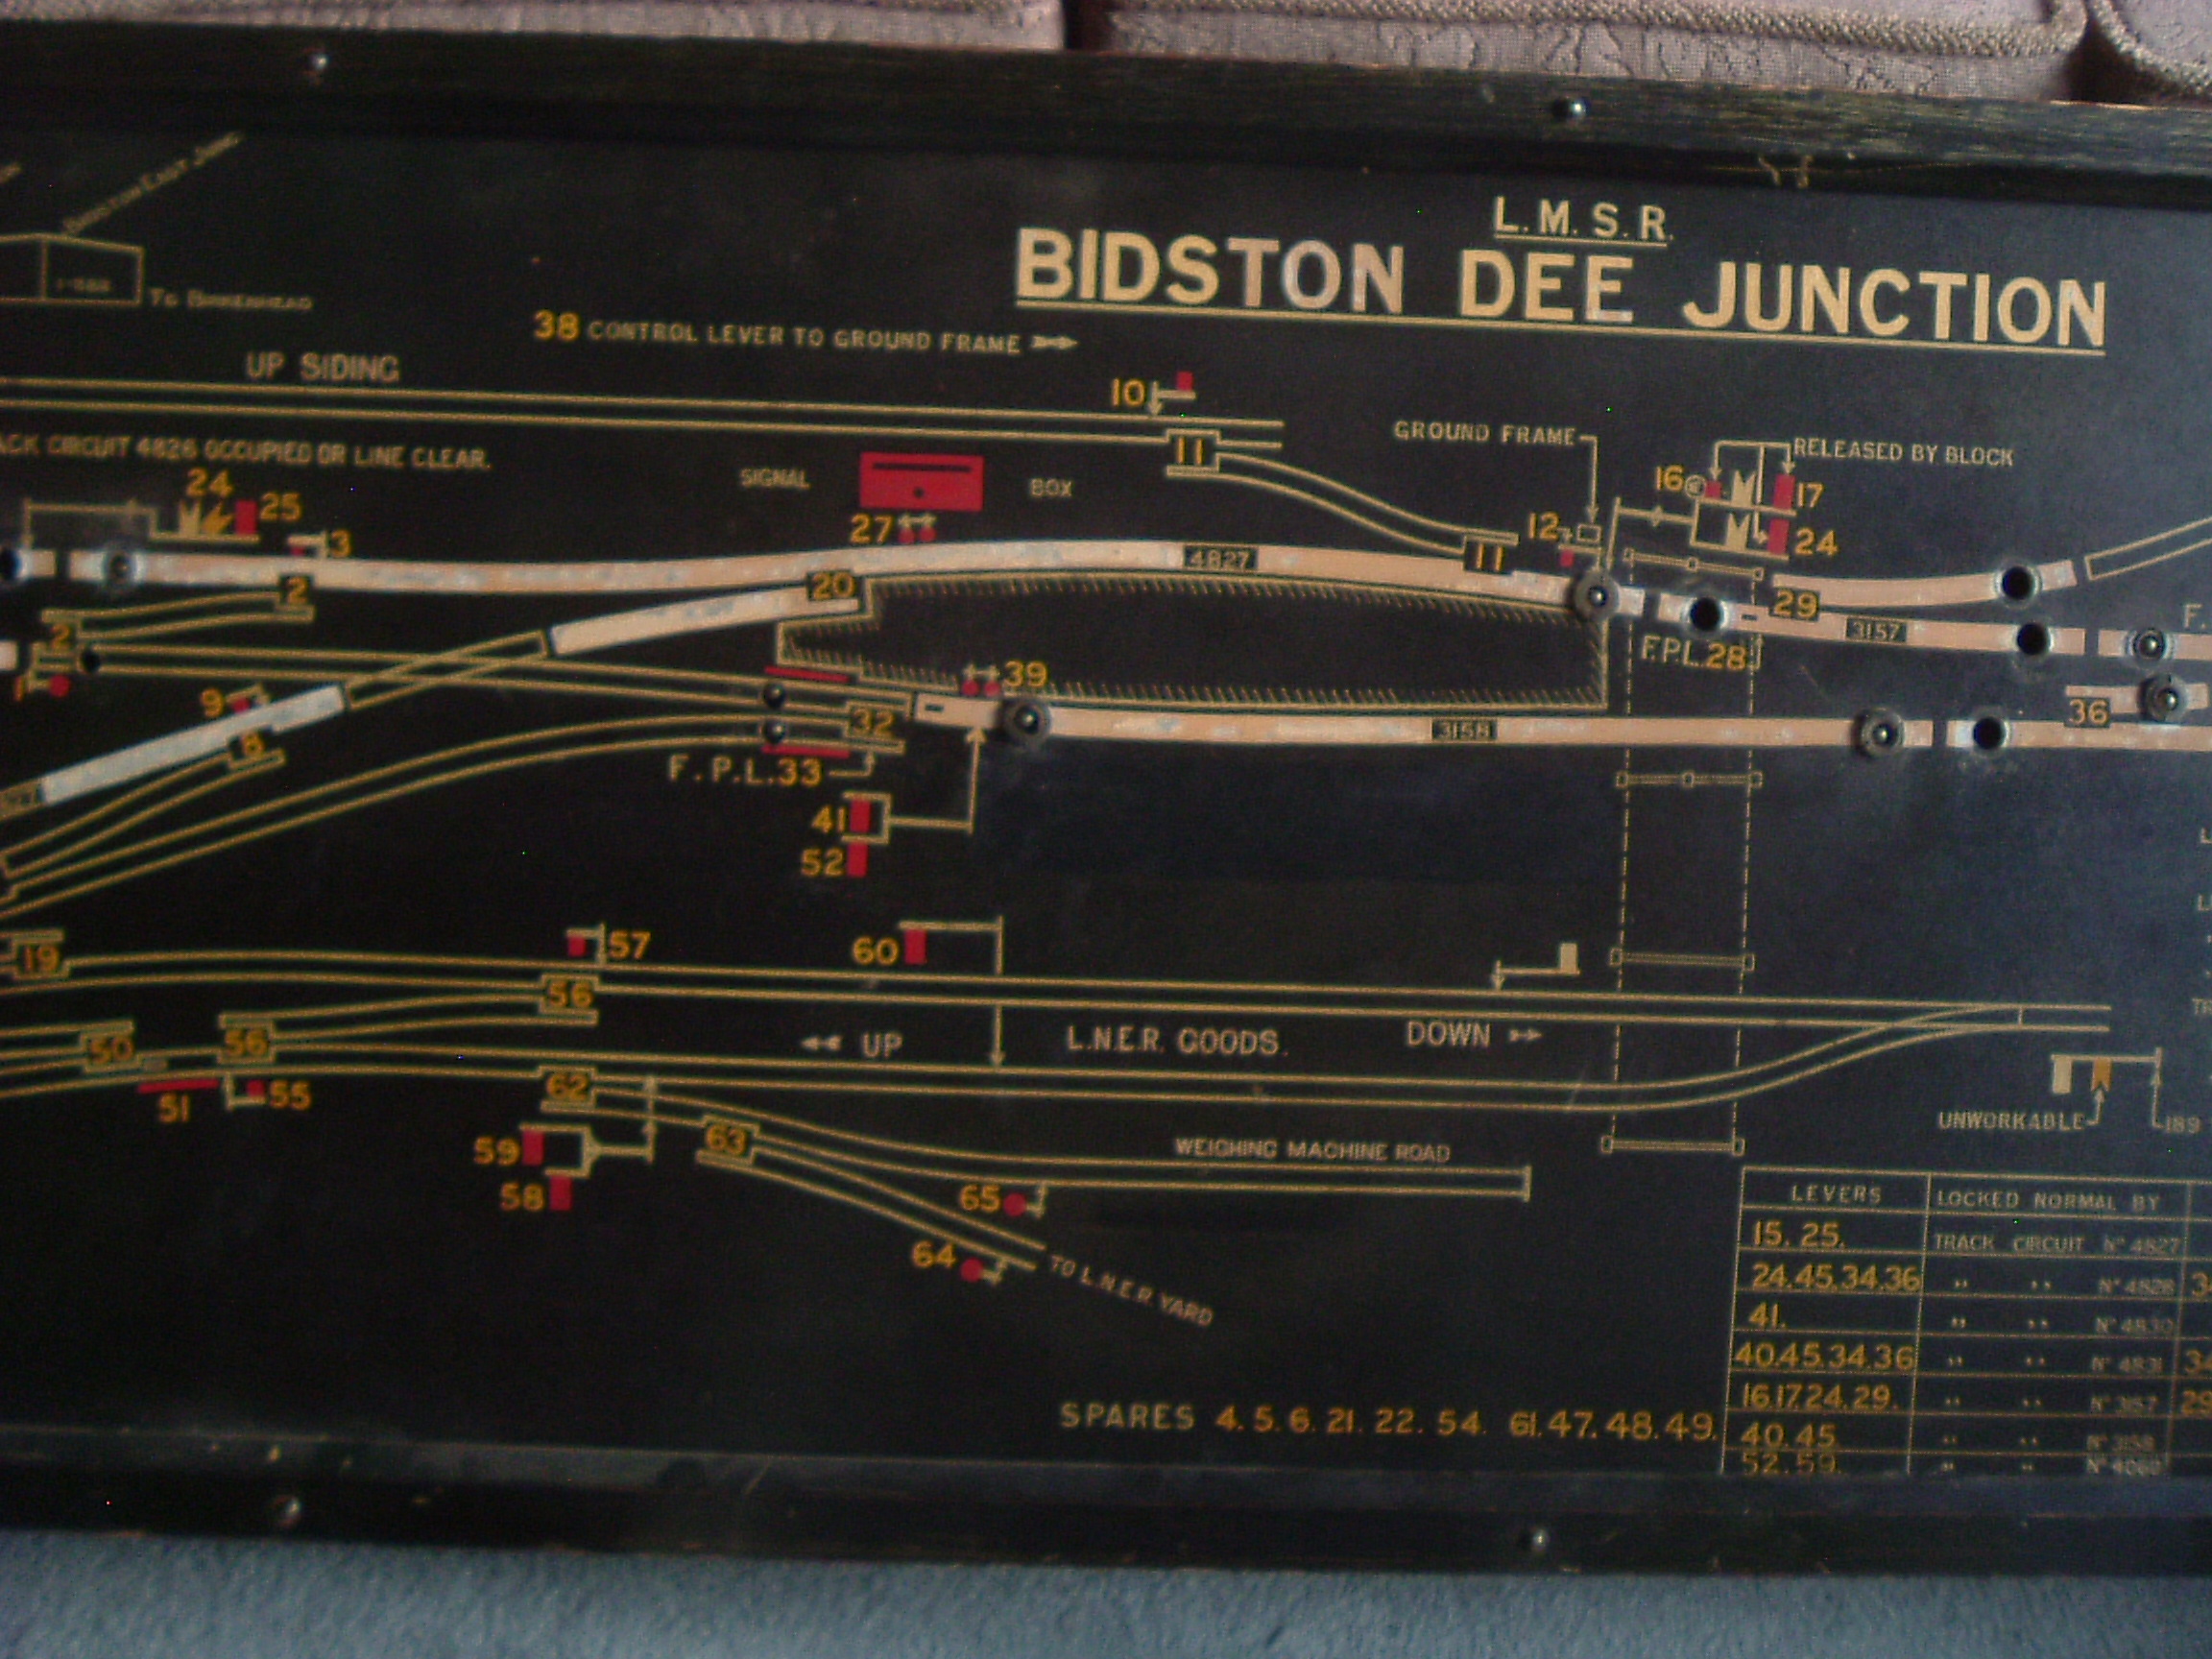
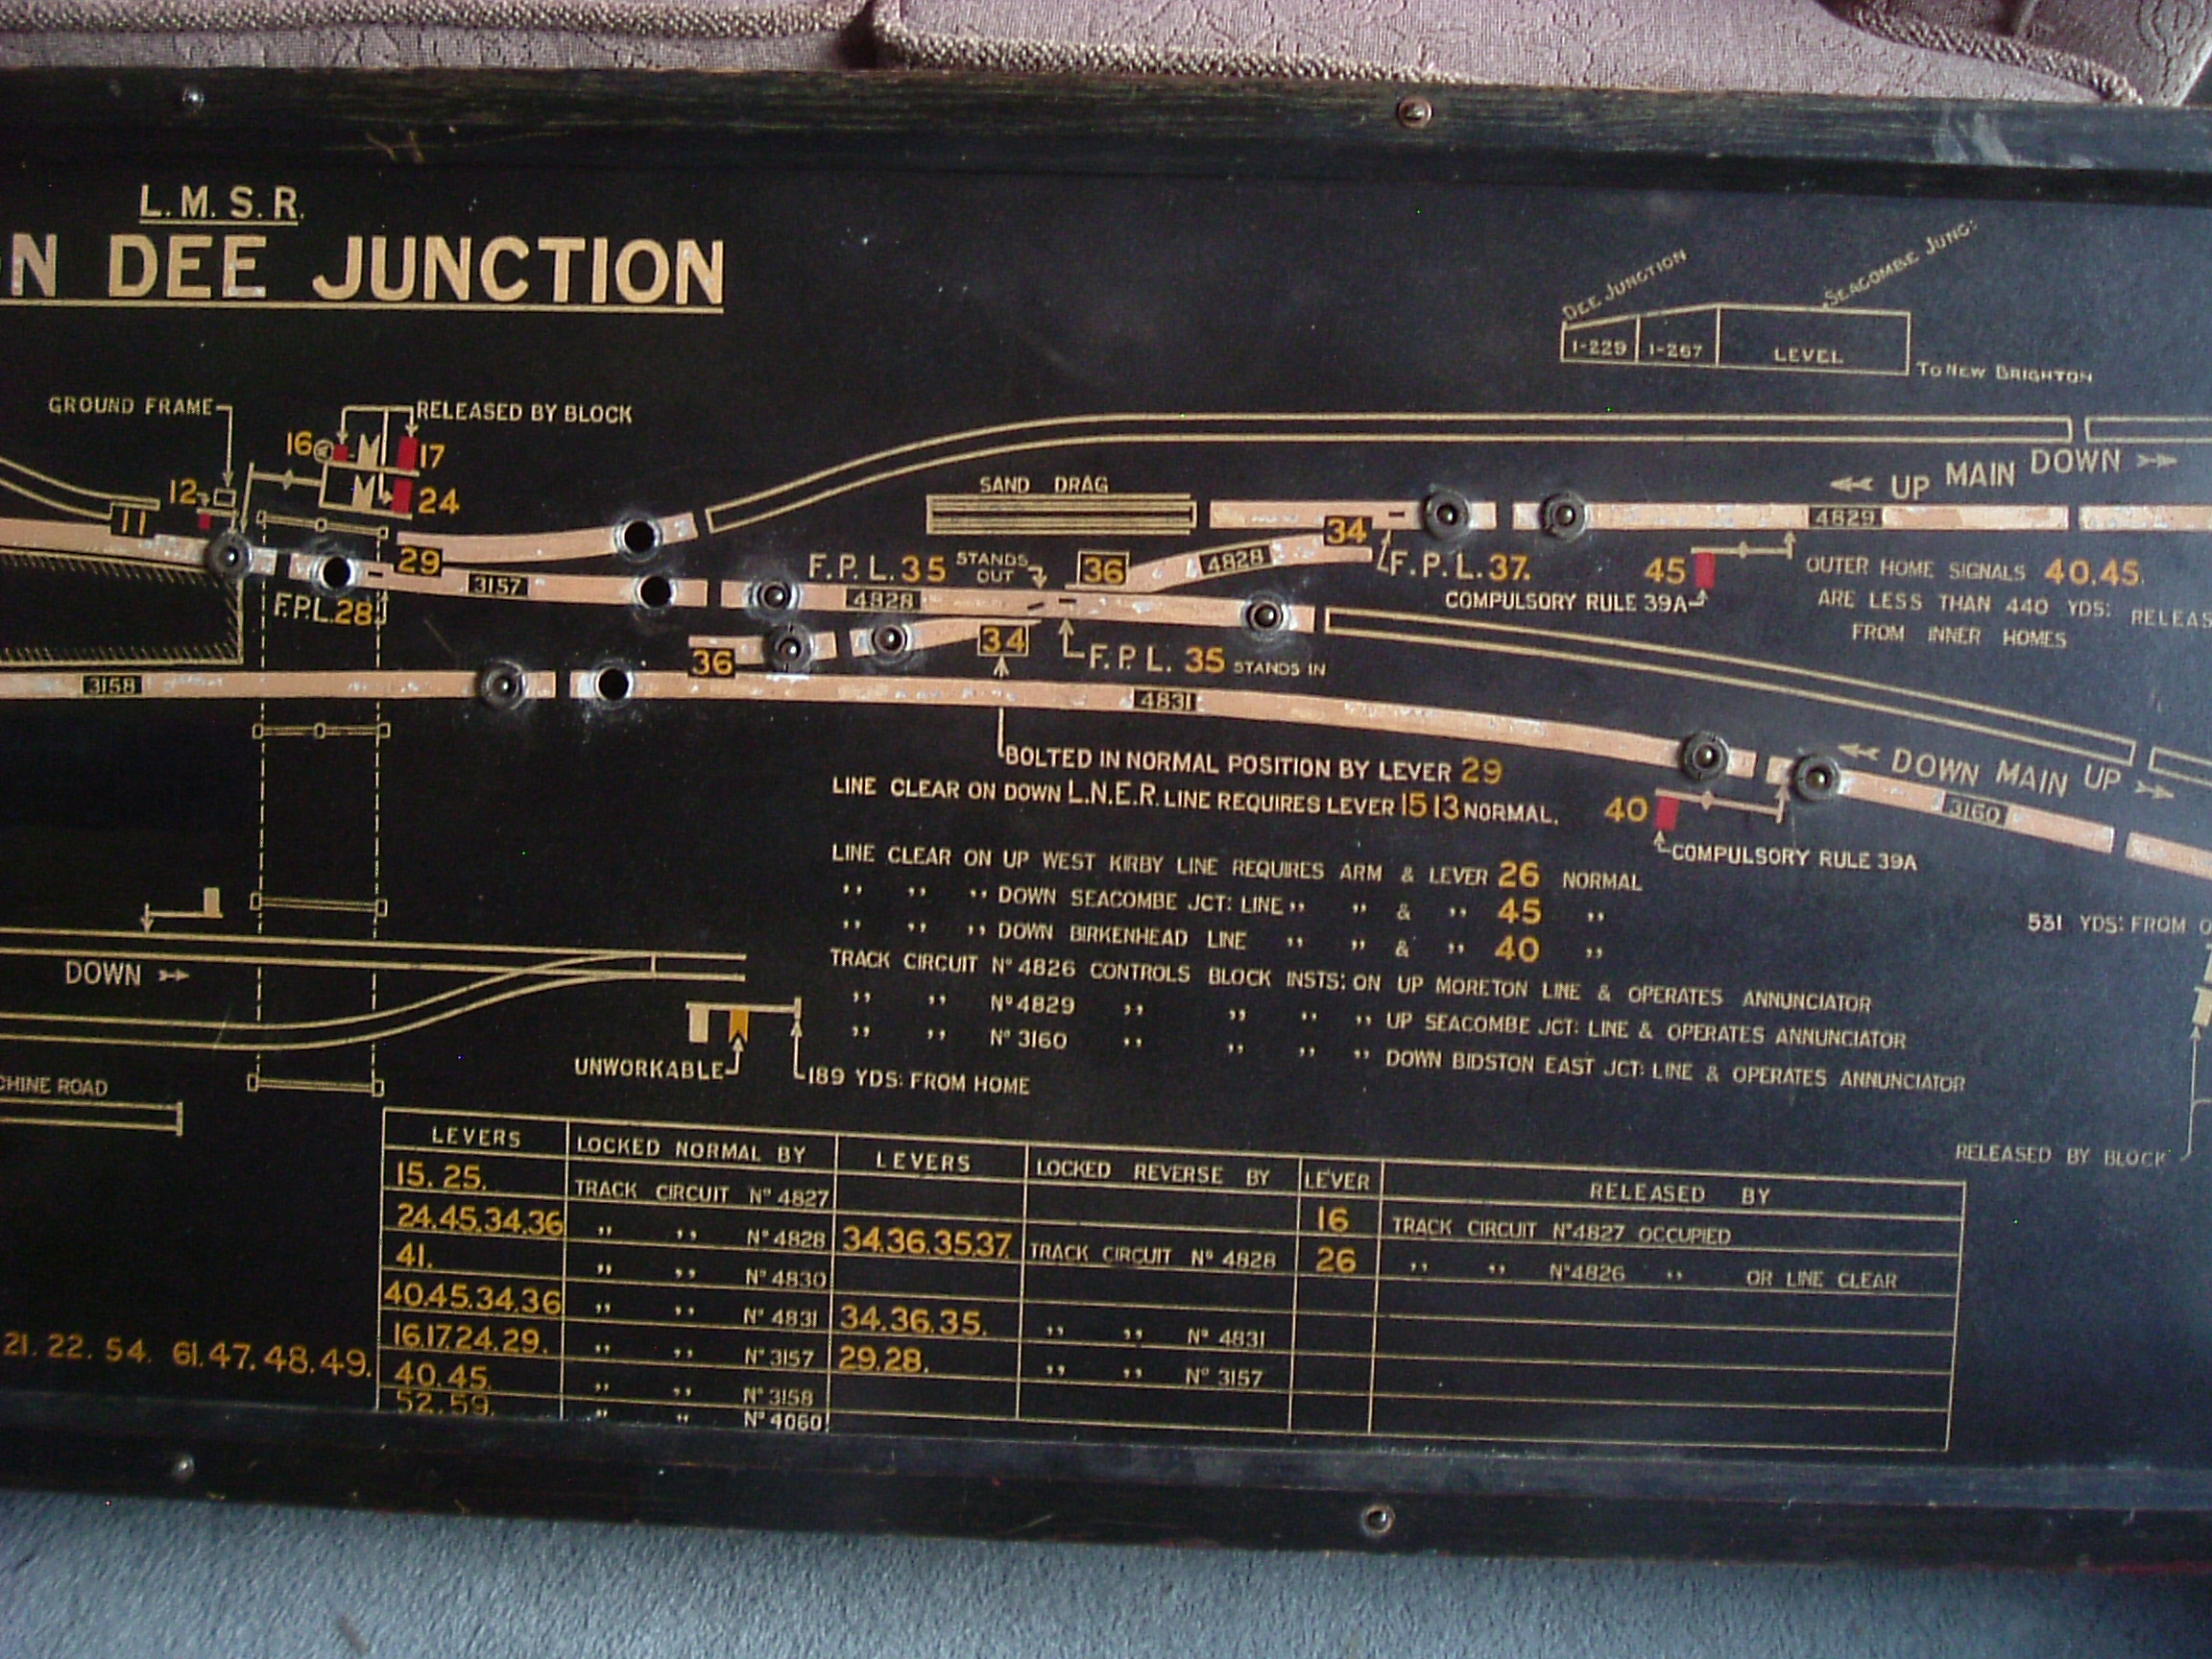
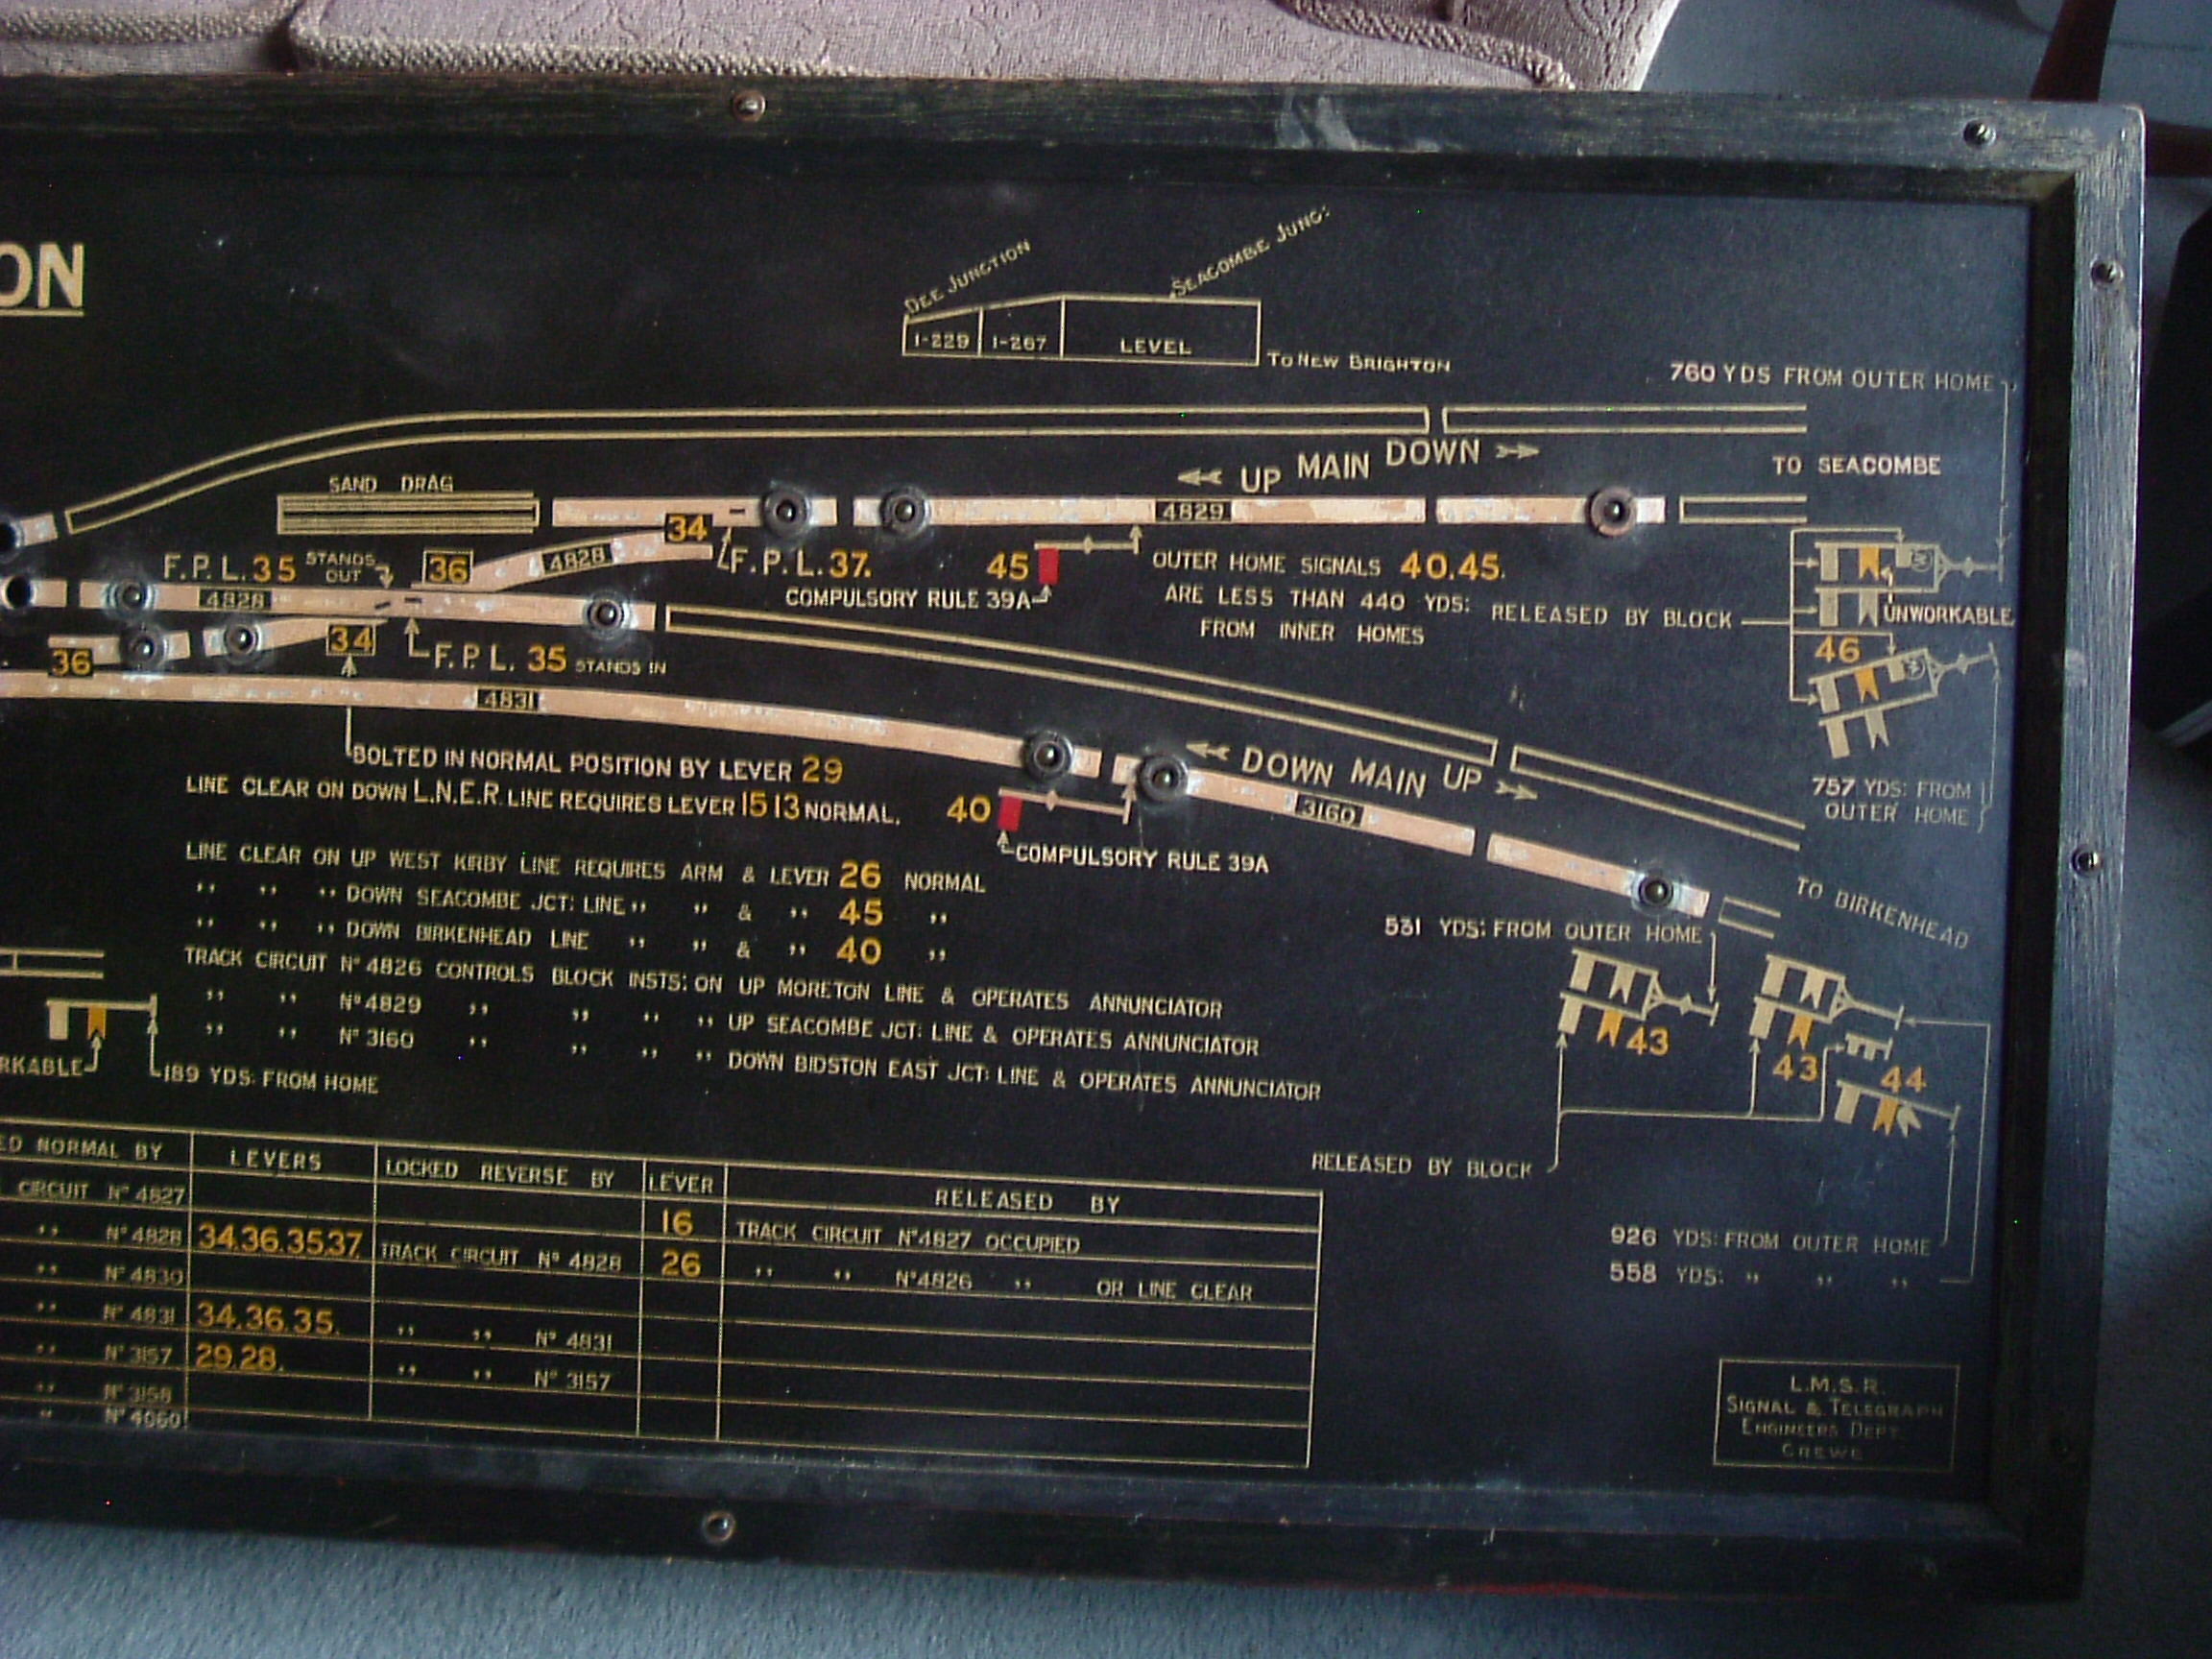
The diagrams presented here are a mixture of actual box diagrams or office copies of box diagrams (denoted SBD) and working sketches (denoted WS). They are arranged by company which provided the railway line, not the diagram - most of the diagrams are in fact from the British Railways era. Some of these diagrams are in my own collection; others have been loaned or scanned by other people. Andy Rush has very kindly allowed me to display here diagrams from the Industrialogical Associates Collection. These diagrams were scanned, and in some cases, coloured by him. Harry Gardner, a former BR signalman, has kindly allowed me to display here some of his hand drawn copies of signal box diagrams. Thanks are due to Simon Foster for help in scanning some of my own diagrams, and providing scanned copies of others. Additions to this page will be made from time to time, as circumstances - and my scanning inclinations! - permit. If you find these diagrams of interest, you may also wish to visit Brian Begg-Robertson's Sectional Appendix site.Cheshire Lines Committee Bewsey SBD, probably 1930's, 718 kb Brinnington Junction SBD, 1168 kb. The diagram includes the line to Reddish Junction, but was obviously in use after this connection was closed, as someone has tried to delete it. Diagram courtesy Simon Foster. Brookfold SBD, 1970, 988 kb Brunswick NX panel, photographed at the NRM. left, centre, right, oblique (260 to 320 kb each). Carrington Sidings SBD, dated 18 September 1966, 62 kb, courtesy Simon Foster. Hale (SBD, 1974) 266 kb Glazebrook East Junction (SBD, 1926) 1165 kb, higher quality version 5674 kB Mobberley, copy drawn by Harry Gardner Skelton Junction SBD, 141 kb, courtesy Simon Foster. Trafford park Junction SBD, 1969, diagram courtesy of Simon Foster, 612 kb. Woodley Junction - see Great Central and Midland Joint Railway (below). Dearne Valley Railway Black Carr Sidings East LMSR SBD (amended by BR), 645 kB, courtesy Industrialogical Associates Collection. Cromford and High Peak Railway Parsley Hay SBD, no date, diagram courtesy of Simon Foster, 327 kb. Great Central Railway Adwick Crossing SBD, 220 kB, courtesy Industrialogical Associates Collection. Aldam Junction SBD, the final layout before closure - diagram is dated 1982. The Worsborough Branch, and also Wombwell Main Junction, had closed the previous year. 380 kb. Also Aldam Junction SBD whilst 4-track, 542 kB, courtesy Industrialogical Associates Collection. Ashton Junction (Guide Bridge) SBD 1960, 853 kB. Barnby Dun SBD, 169 kB, courtesy Industrialogical Associates Collection. Barnsley Junction SBD, no date, after goods lines to Willey Bridge were truncated, but before connection between branch and main lines was removed, 1139 kB, courtesy Industrialogical Associates Collection. Brancliffe East Junction SBD, 9-11-1942, 483 kB, courtesy Industrialogical Associates Collection. Note the approach lit distant signal. Brocklesby Junction SBD, 625 kB, courtesy Industrialogical Associates Collection. Brookhouse Colliery SBD, 1942, 433 kB, courtesy Industrialogical Associates Collection. Bullhouse Colliery SBD, 543 kB, courtesy Industrialogical Associates Collection. Chapeltown GCR diagram, dated 1-5-1916. Diagram made available by Alan Whitehouse. 1002 kb Cortonwood Colliery SBD, 125 kB, courtesy Industrialogical Associates Collection. Courthouse Junction SBD, 123 kB, courtesy Industrialogical Associates Collection. Darfield Main SBD, no date, but probably 1960s, courtesy of G Nicholson, 507 kb Darnall West SBD, 173 kB, courtesy Industrialogical Associates Collection. Denaby Crossing SBD, 24-10-1959, 581 kB, courtesy Industrialogical Associates Collection. later diagram, about 1980? Dodworth: several diagrams are available for Dodworth. Dodworth (GCR/LNER) SBD 350 kb. First diagram from current box SBD 271 kb. Slightly later diagram SBD 362 kb, courtesy Alan Whitehouse. Finally, single line to Courthouse Junction SBD 176 kb, courtesy Industrialogical Associates Collection. Dunford West (SBD, 381 kb) Shows arrangements for single line working in Woodhead tunnel, but does not show station yard, despite being dated March 1954 (compare with 'Woodhead - The Electric Railway' by E M Johnson, page 92). The edges of the holes in my diagram show evidence of having being 'chewed' - suggesting it was affixed over the original diagram shown in Johnson's book. Here is the Dunford West block shelf layout diagram (831 kb, courtesy of Simon Foster). The photograph referred to above shows that the actual block shelf did not exactly match the diagram; although both main line blocks were Tyer 'black boxes', the goods line block to Dunford East was a standard GCR non-pegger, and the goods line block bell was of LNWR, not GCR, origin. Elsecar Junction. No date, but probably the diagram prepared for the signalling alterations made about 1950, in connection with electrification. Shown in two sections: Elsecar Junction left (718 kb) and Elsecar Junction right (782 kb). This diagram was made available through the courtesy of G Nicholson. It is drawn in a slightly different style to later diagrams - note the route indicators on the colour light signals, where the each of the five white lights is shown! Subsequently, more track circuits were added and the line to the west reduced from four track to two track. The final layout controlled from the power frame is shown on this layout plan (836 kB) - note the footnotes at the bottom which show the dates when various changes were made. Finally (for the time being!), here is the block shelf layout diagram (311 kB). These last two diagrams are from the book of wiring diagrams for Elsecar Junction - the diagrams all bear 1950 dates, with the exceptions of a a few more recent ones. I hope to add more information about Elsecar Junction in due course. Elsham SBD, 1/2/1967, 434 kB, courtesy Industrialogical Associates Collection. Frodingham Yard No 1 SBD, no date, 602 kB, courtesy Bob Dennis. Frodingham Yard No 2 SBD, no date, 481 kB, courtesy Bob Dennis. Glasshouse Crossing Final layout, 1961. Also Glasshouse Crossing with sidings SBD 132 kB, courtesy Industrialogical Associates Collection. Glossop WS, 1966, 1.15 Mb; Glossop WS, 1969, 1.02 Mb; Glossop branch electrification diagram 4.93 MB. Gorton Junction SBD, 1973 (185 kb). This diagram was prepared when Gorton Junction SB took control of Fairfield Junction, but was later amended upon the closure of Priory Junction. Here is a version with the amendments less prominent (193 kb). Goxhill SBD, no date, 159 kB, courtesy Industrialogical Associates Collection. Grange Lane Final layout, as gate box, but some of the previous layout can just be made out on this plan. WS, 1983 kb. Also Grange Lane SBD, double track, 153 kB, courtesy Industrialogical Associates Collection. Greasborough Road SBD, no date, 658 kB, courtesy Industrialogical Associates Collection. Great Coates Sidings No 1 (LNER?) SBD 421 kB, courtesy Industrialogical Associates Collection. Gunhouse Junction SBD, no date, 138 kB, courtesy Industrialogical Associates Collection. Hexthorpe Junction SBD, 12-4-1960, 783 kB, courtesy Industrialogical Associates Collection. Jumble Lane SBD, 20-6-68, amended 27-2-70, 623 kB enhanced contrast1113 kB Holton le Moor SBD, no date, 147 kB, courtesy Industrialogical Associates Collection. Hyde Junction SBD (761 kb). Hyde Road Junction SBD, 1984 (412 kb) Ickles (SBD 1984) 596 kb. Kendall Green Crossing SBD, 1924. Diagram made available by Alan Whitehouse. 435 kb Levenshulme South SBD, 1960, but with later amendements (105 kb). Maltby Colliery South (SBD, original rather faded, contrast enhanced, prior to closure of Maltby Colliery North) 463 kb. Mansfield Concentration Sidings - Rufford Junction panel (relay room diagram, circa 1981) 224 kb Marsh Junction SBD, no date, (but prior to Pasture Street PSB) 532 kb Mexborough No 2 LNER SBD, diagram kindly supplied by Peter Churchman, 840 kb Mitchells Main (WS, 1960's) 275 kb Mottram No 1 and Mottram No 2 - an LNER plan prepared to show the alterations required to the main line for the new Mottram yard, dated 1935. Also shows Broadbottom station and the connections for the Waterside branch. This diagram is split into two portions owing to its size - each section is about 2.4 Mb. Newbegin LNER diagram, made available by Alan Whitehouse, 663 kb Nunnery Junction - see Sheffield Victoria No 4. Old Oaks Junction (WS, 475 kb). Late diagram, with line to Oakwell Junction truncated. Scunthorpe and Frodingham SBD, no date, 631 kB, courtesy Bob Dennis. Stairfoot Junction No 2 WS, 1946, 628 kB. Sheffield Victoria No 1 diagram, 494 kB. Sheffield Victoria No 3 diagram, kindly provided by Richard Pike, 301 kb. Upon electrification, Sheffield No 3 acquired a control panel to operate the colour light signals - here is the control panel, courtesy of Greg Nicholson (1261 kB). Here is a contrast enhanced version, made in an attempt to read the text which has been rubbed out (1923 kB) Sheffield Victoria No 4 diagram for Nunnery Junction. Nunnery Junction was formed in the 1960's when a new connection was made between the ex-GCR and ex-MR routes in Sheffield; it was controlled by a switch panel in Sheffield No 4 box. This diagram is marked (on the back) 'diagram for switch panel', but oddly lacks any track circuit indications. Otherwise, it is drawn in typical BR(ER) style of the period. Here is a photograph (271 kB) of the interior of Sheffield No 4, courtesy of Michael Kaye. It was taken in 1985, just before closure; you can see the frame is out of use, and the only trackwork still controlled from No 4 is the Sheffield (Midland) to Woodburn Junction link at Nunnery Junction. A higher quality version can be found here here (827 kB). Thorne South SBD, no date, 468 kB, courtesy Bob Dennis. Thurlstone Crossing WS, 1961, 454 kb. Valehouse SBD, February 1953, 99 kb. Wadsley Bridge SBD, 777 kb, dated 4 December 1952. Wentworth Junction (SBD, 271 kb, no date, but a BR diagram). This is a very faded office copy which has been coloured in; a contrast-stretched version can be seen here (432 kb). Diagram made available by Alan Whitehouse. West Silkstone Junction signal box diagram, as removed at closure in 1981, no date, but probably dates from 1973 when the down loop was removed, 323 kb; also working sketch and locking, base diagram 1965 but shows later alterations and removal of down loop, 1016 kb. Wharncliffe Colliery LNER diagram, made available by Alan Whitehouse. 572 kb Willey Bridge Junction Wombwell Main Junction. BR diagram, very large, shows line to Stairfoot, kindly made available by G Nicholson. left (363 kb), centre (436 kb) right (422 kb). Woodhead (SBD, 1954, 404 kb) Also available is the Woodhead block shelf layout diagram (2277 kb). For both Woodhead and Dunford West, photographic evidence survives showing that the main line block instruments were of the Tyer 'black box' variety. But I've never seen a photograph of the Woodhead goods line block; was it really an LNWR permissive as shown on this drawing? Both diagrams courtesy of Simon Foster. Woodhouse East Junction SBD, 633 kb. Worsborough Bridge Crossing (WS, base diagram 1941, but amended to 1961) 721 kb. Worsboro Bridge Crossing signal box diagram, courtesy of Alan Whitehouse, 439 kb. Worsborough Dale Crossing WS, 1948, 896 kB. Worsborough Dale Crossing SBD Wrexham Exchange (SBD, mid 1970's, after singling of line to Wrexham Central) 515 kb. Great Central and Great Northern Joint Line Applehurst Junction SBD, no date, 382 kB, courtesy Industrialogical Associates Collection. Great Central and Hull and Barnsley Joint Lines Bullcroft Junction SBD, no date, 135 kB, courtesy Industrialogical Associates Collection. Doncaster Junction SBD, no date, 146 kB, courtesy Industrialogical Associates Collection. Great Central and Midland Joint Railway Belle Vue Station no date, but possibly final layout (SBD, 1.55 Mb). New Mills Junction LMSR base diagram(?), amended to 1963 (SBD, 379 kb). Woodley Junction SBD, no date, but an LNER diagram,403 kb. Here is the 1966 BR diagram for the same location, after the abolition of Apethorne Junction SB. Great Eastern Railway Acle SBD, no date, 117 kB, courtesy Industrialogical Associates Collection. Brandon SBD, no date, 158 kB, courtesy Industrialogical Associates Collection. Harwich SBD, no date, 340 kB, courtesy Industrialogical Associates Collection. There is no date on this diagram, but Peter Dobson kindly emailed me with the following comment: 'With the single line bi-directional nature of the 'bottom' track it most likely dates from after the electrification of the ex GER main line etc from Colchester on to Norwich. It is always possible that it dates from a bit earlier but is definitely post steam age.' Hertford East SBD, dated 17 Sep 1959 (but possibly with amendments), 1075 kB, enhanced contrast version 1583 kB. Hethersett SBD, no date, 137 kB, courtesy Industrialogical Associates Collection. Ipswich Goods Junction SBD, no date, 474 kB, courtesy Richard Pike. Ipswich Station SBD, no date, 223 kB, courtesy Industrialogical Associates Collection. Ely Station North SBD, 23-1-1968, 608 kB, courtesy Industrialogical Associates Collection. Great Northern Railway Ardsley Station SBD, probably late 1960's (1446 kb). I like this diagram - I was brought up in Morley, and it is the only diagram I have from within the old Borough of Morley! It's probably the last diagram before closure: The sidings and Ardsley North have gone, as has the junction with the Bradford line. Although this line still survives on the diagram, it has been redrawn as a siding. By this time, the connection with the main Leeds-Wakefield line was via the sidings at Lofthouse North. Notice the automatic signals between Ardsley and Leeds: these are labelled D (on the down line) or U (up line), with the mileage. I presume signal 27 is drawn incorrectly, and really is capable of displaying a stop aspect. Bentley Crossing SBD, no date, 422 kB, courtesy Industrialogical Associates Collection. Doncaster 'C' SBD, no date, 949 kB, courtesy Industrialogical Associates Collection. East Holmes SBD, no date, shows swing bridge, 121 kB, courtesy Industrialogical Associates Collection. Finsbury Park No 3 SBD, no date, 891 kB, courtesy Industrialogical Associates Collection. Firsby Station SBD, no date, 676 kB, courtesy Industrialogical Associates Collection. The Great Northern Railway once had an extensive system of lines in the West Riding, of which only the direct route between Doncaster - Wakefield - Leeds - Bradford now survives. A good guide to closed lines in this area can be found at the Lost Railways of West Yorkshire website. Just east of Bradford at Laisterdyke lay a complex set of junctions, the connections with the main Leeds-Bradford line being controlled by Laisterdyke East and West: Hammerton Street SBD, 1953, 821 kB, Hammerton Street SBD, 1970, 653 kB, Laisterdyke West SBD, 1960's (1209 kb). To the west (right) the diagram shows eight tracks: four (main lines, down goods and a siding) run to Hammerton Street. The 1960 Sectional Appendix shows that the siding was originally the up goods, and ran as far as Laisterdyke East. Another pair of lines run towards Halifax, on a line which avoided Bradford; the next block post in this direction was Hall Lane. There are also connections to Planetrees Goods Yard. To the east (left) lay Laisterdyke East, where trains ran straight on towards Leeds, or turned south for a variety of routes: Leeds via Pudsey Greenside; Wakefield via Morley Top, or Wakefield via Dewsbury and Osset. The gradient profile is impressive, with the summit between East and West signal boxes at Laisterdyke. Laisterdyke East SBD, about 1970 (476 kb). This seems to be a later diagram than Laisterdyke West (above): the sidings at the bottom of the diagram are all that remain of the line to Dudley Hill. The main line to Leeds is shown with modern track circuit block signalling, but in fact the 1960 Sectional Appendix shows that 'Automatic and Semi-Automatic Signals' existed between Laisterdyke East and Stanningley by that date. 'Railway Memories - No 4 - Bradford' compiled by Alan Whitaker and Brian Myland includes a photograph of the signal at Duckett's Crossing, which was of GNR somersault pattern with an automatic replacement mechanism. I had some fun 'dating' this diagram: a photograph by M A King dated 20 Sept 1969 shows the Dudley Hill line still connected to the main line; but Laisterdyke East had closed by October 1972 as it does not appear in the North Eastern Region Sectional Appendix of that date. Laisterdyke East SBD, 1953 (785 kb) Hucknall Town SBD, 20 July 1966 (984 kb) Lofthouse North SBD, dated 14 May 1969, possibly final layout before closure (318 kb) Sleaford West SBD, no date (372 kb) Welwyn North SBD, no date (590 kb) Great Northern and Great Eastern Joint Line Gainsborough Lea Road SBD, diagram kindly supplied by Peter Churchman, 77 kb Pyewipe Junction SBD, no date, 460 kB, Sleaford North SBD, no date, 483 kB, Sleaford South SBD, no date, 393 kB, Hull and Barnsley Railway Brierley Junction SBD, no date, 473 kb. Lancashire Derbyshire and East Coast Railway Clifton on Trent SBD, no date, 574 kB, courtesy Industrialogical Associates Collection. High Marnham SBD, no date, 171 kB, courtesy Industrialogical Associates Collection. Langwith Colliery Junction SBD, 1954, 367 kb. Ollerton Colliery final SBD, diagram kindly supplied by Peter Churchman, 150 kb Lancashire and Yorkshire Railway Barnsley Exchange Junction - two diagrams, no dates, but probably 1950's and 1960's: earlier diagram (545 kB) - shows single platform and engine shed. The engine shed was demolished to make way for a second platform in 1960 - as shown in this later diagram (faded office copy, contrast stretched, 697 kB). Birkdale, copy drawn by Harry Gardner (255 kb) Bradford Exchange SBD, BR diagram, no date, 876 kb. The old Bradford Exchange Station consisted of two, unconnected halves (one LYR, the other GNR), controlled by one signal box. This is the LYR half. Connection between the LYR and GNR lines was provided at Mill Lane Junction, the next block post to the south. The diagram also shows the gradient profile from Milner Royd (the junction with the LYR main line near Sowerby Bridge) to Bradford - notice the steep drop into Exchange. A DMU ran out of control here in 1964, with fatal consequences. Brierfield, copy drawn by Harry Gardner, about 1985, from the diagram in the box (292 kb) Brindle Heath Junction, copy drawn by Harry Gardner Bullfield West, copy drawn by Harry Gardner from an S+T print (306 kb). Bullfield West became a fringe box to the short lived Bolton panel in 1985, and closed in 1990. Burnley Central, copy drawn by Harry Gardner in 1985 from the actual box diagram (279 kb) Chaffers Sidings, copy drawn by Harry Gardner, circa 1985, from the diagram installed in 1971, in conjunction with the singling of the line to Colne (276 kb) Church East SBD, 1973, diagram courtesy of Simon Foster, 376 kb. This layout shows Church East as a fringe box to Preston power box, so it would have been short lived. Here is a contrast enhanced version, to make the text more legible (697 kB). Copy Pit, BR diagram, no date, but shows Up Loop to Portsmouth (745 kb) Crabtree Crossing SBD, diagram kindly supplied by Peter Churchman, 39 kb Freshfield SBD, no date, but shows station sidings, 305 kb. Hensall Station SBD, LMSR diagram (517 kB). This diagram corresponds to the replacement frame installed Sunday-Monday 3-4 October 1937, and removed in the mid 1960's (information provided by Tony Graham). The diagram was badly torn when I received it and was in need of some digital restoration... I subsequently received an email from M Shaw, who has restored the diagram and - as you can see here - done an excellent job (997 kB). Low Moor No 4 SBD, 1957, 358 kb. Mill Lane Junction, 1960, also Mill Lane Junction (Interchange Station) mid-1970's. Oldham SBD, diagram kindly supplied by Peter Churchman, 63 kb Philips Park No 1 SBD, diagram kindly supplied by Peter Churchman, 76 kb Philips Park No 2 SBD, diagram kindly supplied by Peter Churchman, 48 kb Shaw SBD, 1980, diagram kindly supplied by Peter Churchman, 29 kb Waterloo Station, copy drawn by Harry Gardner Liverpool Overhead Railway Dingle Station SBD, marked Railway Signal Company, Fazakerley, Liverpool, 14/8/29. 367 kb. London and North Western Railway Canning Street North SBD (270kb), marked on back 'removed from Canning Street box by S+T staff 8-8-79'. Number 10 points were removed about this date, the line from Number 9 points having become a private siding. Some time later a board marked 'Stop and Await Instructions' was provided on this siding, 60 feet in rear of the fouling point (information from Tony Graham). Some more information about Canning Street can be found here. Chester No 4 SBD, diagram kindly supplied by Peter Churchman, 143 kb Church Stretton SBD, diagram kindly supplied by Peter Churchman, 44 kb Cock Lane LMSR SBD, dated 1936, courtesy Simon Foster, 248 kB. Denton Junction SBD, no date, diagram courtesy of Simon Foster, 402 kb. Dewsbury No 1 SBD, dated 10 February 1965, final layout (?), signals down line only, 328 kb. Dewsbury No 2 SBD, not signed or dated, marked 'Rough Drawing', final layout (?), TCB on upline to Healey Mills, 981 kb. Hazel Grove SBD, dated 1976, diagram redrawn by, and courtesy of, Simon Foster, 403 kb. Latchford (SBD, original faded, contrast enhanced, final layout). Although the final layout was rather minimal, the gradient profile is of interest: the railway through Latchford was re-routed in the 1893 in connection with the opening of the Manchester Ship Canal - note the 1 in 135 gradients on either side of the bridge over the canal. 234 kb Mollington (SBD, no date). Mollington was a wartime box on the Chester-Birkenhead line, with IB sections in both directions. 308 kb Manchester South Junction and Altrincham Railway Oxford Road (SBD, 1931) 2552 kb Midland Railway Barnsley Goods Yard LMSR diagram, courtesy of Alan Whitehouse, 445 kb Cudworth Station South MR diagram, dated 12 May 1900 (702 kb) Blackwell WR diagram, dated May 1957 (1.12 Mb), version with better contrast (1.18 MB) Darfield Station SBD Dearne Junction SBD when fringe box to Sheffield Dore and Totley Station Junction SBD, 22-1-1952, 769 kB, courtesy Industrialogical Associates Collection. Great Rocks Junction SBD, 1970, courtesy Simon Foster (765 kb) Hope SBD, 1963, 221 kb Middlestown Junction SBD, 1967, 286 kb. Probably the final diagram before closure - it is marked 1967 and the box closed in 1968. There was originally a line to Dewsbury Goods, which carried 'straight on' between the up and down main lines (in this diagram), and the down main passed underneath this. The lines at the left hand end of the diagram originally went to Thornhill Midland Juncion, but here are controlled by the then new power box at Healey Mills. Sheffield South No 1 Swinton Junction, (final?) SBD, no date, 399 kB Trent PSB - not a Midland box, but certainly Midland Railway territory! These images are made from a diagram of the panel when new. I have split it into six sections. These are large files - each between 3 and 4 Mb: Trent part 1 - fringe to Chesterfield, Avenue Sidings, Clay Cross Trent part 2 - Erewash Valley line, Blackwell East Junction Trent part 3 - fringe from Netherfield, Nottingham Station; fringe from Lincoln Street; Radford Junction; Erewash Valley line including Pye Bridge Junction Trent part 4 - Trowell, Radford, Mansfield and Lenton Junctions; Stanton Gate, Stapleford and Sandiacre, Trent part 5 - Stapleford and Sandiacre, Toton, Trent Junctions Trent part 6 - Trent Junctions, fringes to Derby and Loughborough Swinton Junction, (final?) SBD, no date, 399 kB Toton East Junction, SBD, rather faded, no date, but prior to Trent PSB, 768 kB Treeton South SBD North London Railway The following diagrams are copied from an offical North London Railway document entitled 'NLR Signalling Diagrams'. It is stamped 'North London Railway Superintendent 25 Sep 1907', and also bears the name 'H E Short'. The document comprises a bound collection of photographic prints - each about 11x5 inches - which appear to be copies of the actual box diagrams, and covers the whole system. Broad Street No1 4773 kB Broad Street No2 2658 kB Skinner Street 2762 kB New Inn Yard 2017 kB Shoreditch No2 2623 kB Shoreditch No1 1713 kB Dunloe Street 667 kB Haggerston No 2 2213 kB Haggerston No 1 1845 kB Dalston Junction No2 650 kB Dalston Junction No1 758 kB Western Junction 2345 kB Mildmay Park No1 1958 kB Mildmay Park No2 2224 kB Canonbury 811 kB Canonbury Junction 3052 kB Highbury 2402 kB Barnsbury 658 kB York Road No 2 857 kB York Road No 1 783 kB St Pancras Junction 809 kB Maiden Lane Junction 2466 kB Kentish Town Junction (Camden Road Junction) 2161 kB Prestons Road Gate 857 kB Poplar Central 2806 kB Harrow Lane Sidings 738 kB South Bromley 621 kB Devons Road 2150 kB Bow Junction 2744 kB Tilbury Junction 2349 kB Old Ford 1969 kB Victoria Park Junction 708 kB Hackney Wick 2247 kB Homerton 2253 kB Hackney 697 kB Graham Road 644 kB Eastern Junction 748 kB Hampstead Road Junction 2098 kB Blackwall Bridge 2255 kB Goods and Cattle Sidings 762 kB Loop Line Junction 767 kB North Staffordshire Railway Endon Station SBD, courtesy Simon Foster, 185 kB. Oldham, Ashton under Lyne and Guide Bridge Railway Ashton Moss South, copy drawn by Harry Gardner. Ashton Moss South, SBD negative, dated 1969 but with later pencil amendments (1.0 Mb). Note that Harry's drawing includes additional track circuits at the junction. Tottenham and Hampstead Railway Harringay Park Junction SBD, no date, 398 kB, courtesy Industrialogical Associates Collection. Wirral Railway Bidston Dee Junction A few years ago I bought the original illuminated diagram from this (LMS) box. Here is the diagram as I obtained it: image 1, image 2, image 3, image 4. This turned out to be a later overlay, on top of an earlier LMS 'white on black' style diagram. Here is the earlier diagram: image 1, image 2, image 3, image 4. Files about 1MB each.
|
|